| Author | Message | ||
Buuueller |
For those of you who are interested in a different look for your ride, a chopped tail will make your bike different and in my opinion, give it a more aggressive look.  After removing the plastic tail piece, make a template out of paper so you can draw your cut line. This may take a few trys.  After cutting your desired line, mark that line onto painters tape below the template. This tape will make the line more visible and it will help protect the plastic from the saw.  Take the template and flip it over to mark the other side.  You should have a perfectly symetrical cut line.  I used a jigsaw with a medium blade that worked great. Just do a practice cut to get the speed down. Going too slow will melt the plastic back together. After cutting you can place it on the bike to mark the cuts needed to shorten the sub-frame.   You now need to trim the tail light holder because it will be too narrow to fit. Not to mention that you want it to set in further so its not sticking out too far. I trimmed it so that the plastic only covered the back of the tail light and enough on top to mount it to the sub-frame. Then I flipped it backwards to get it so set in. Im waiting for frame paint to dry but Ill upload finished photos soon. | ||
Buellkat |
How about a photo of the finished DIY tail on the BUELL BLAST? Where did you mount the license plate?? | ||
Mmelvis |
http://www.badweatherbikers.com/buell/messages/201 64/89848.html Half way down the page Posting by Gren chopped tail I think if you search more you can find one done by others | ||
Buellkat |
Thanks Mmelvis. It was more of a jab at the pic not being a blast to start the thread LOL. But then step by step was on a blast, which is great. | ||
Buuueller |
Well, mines not quite that drastic. Sorry Im just now getting the pics on, I was just excited to get the other pics on here. And who cares what bike "shes" leaning on? heh  Notice the removed flyscreen    Mounts are just L brackets cut to fit. The top part is only about an inch long and bolted to the top of the seat sub-frame.  Someone pointed out the light aiming too high, so I just bent the brackets down a bit (not shown).  With the LED light:  (Message edited by Buuueller on September 05, 2007) | ||
Buuueller |
Reminds me of an old Truckster:   | ||
Swampy |
Looks good! | ||
Swampy |
OH Yeah, What Bike? | ||
Twisty_mcwrister |
ok the chop is very simple. tools used: masking tape hack saw die grinder sharpy 80 grit sandpaper and the random tools to remove the tail light assembly and plastic tail section 1.remove seat, tail, and light assembly 2.remove red lens from tail light 3.with tail set into place hold lens against the subframe and up against the tail 4.trace lens on underside of tail 5.drill a few holes through the tail on the line, i did 5, at the ends and 3 along the middle 6.now apply masking tape and use the hole's as guide 7.trace the holes with the sharpy then give it a nice taper at the ends( the "sides" of the tail) 8.cut along the line with a hack saw 9.smooth with a die grinder 10.finish with 80 grit sand paper 11. now you will notice that the black light mount is way to long 12.cut the mount so that the vertical part of the light mount is up snug against the sub frame 13.drill new holes in the plastic mount through the existing holes in the sub frame 14.re-assemble everything i just happen to make the taper on the tail end right where the black tail light mount is. it looks really clean and most people don't notice its not stock, but notice that something looks different. | ||
Ezblast |
Great Job - here are some picks showing what can be done - the Yellow bike does a great job of showing the modification.   EZ | ||
Twisty_mcwrister |
side by side, kinda   | ||
Berkshire |
Tail Trim & R1 Tail Light Install I've always liked the look of twin round tail lights on a bike, and especially the slash cut ones. I started looking at some auctions, and picked up a unit from an '01 R1. It uses the same type bulb as the stock tail light, but with two bulbs it has double the power.  I also planned to do a quick & easy tidy up job on the bulky tail bracket, and a little trimming on the rear plastic to make it sleeker, like the ones shown above. After removing the bracket and holding the R1 tail light up where I thought it should go, I figured out the rear subframe would need to be trimmed in order to mount the tail light as high up and as far forward as I wanted it to be.  Since part of the light would be above the plate at the back of the subframe and part would be below, I made a two-piece mounting bracket. Two of the rectangular holes in the subframe were in just the right places to give clearance for the twin bulb sockets, which stick out past the back side of the unit and end up being right where all the pieces came together.  The "factory-tough" way to do it would have been to make a single mounting plate out of steel and weld it to the two subframe tubes and plate, but aluminum and pop-rivets are way easier!     ...so much for the "quick & easy" plan! (Message edited by berkshire on July 07, 2008) | ||
Berkshire |
I had a hard time finding the kind of aluminum I wanted. Extruded shapes (round & flat bar, round & square tube, continuous angle, etc.) were abundant, but I wanted a sheet about 1/16" thick (.063"). Flashing is 10 to 14" wide and many feet long, but it's less than 1/100" thick! There is diamond plate, but it's all wrong, and hella expensive too. The closest thing I found was at ACE, sheets of .025" thickness in various sizes and reasonably priced - maybe good for some things, but too thin to make brackets out of. After looking for a mailbox, trashcan, or other manufactured item that I could buy and cut up, I came across some kick plates - these are the protective/decorative metal plates you sometimes see attached across the bottom of a door. Really nice ones are brass or stainless steel, but most are aluminum. Lowes sells the "National" brand, which are .032" thick and $22 for the 8" width. Home Depot had the "Schlage" brand in 8" width for $15, and the thickness was .040" So... my brackets are made from a Schlage kick plate! LOL A mail-order metal place would have had exactly what I wanted at the same or better price, but that would take a week and I was ready to rock! Also, the .040" thickness is coming close to the limit of what is easy to work with at home with no special tools - something around .050" might have been optimal, but .060 probably would have been hard to bend. I made pattern pieces out of flashing (easy to bend, cut w/ tin snips or shop scissors) before making the real ones with thicker metal, which I cut with a light-duty band saw. For radiused inside corners I drilled a hole first. Even using patterns, a lot of test-fitting and adjustment was still needed - most of which was done with a 1" belt sander. To bend the thicker metal, I used a 4" wide masonry chisel and a 4 pound hammer - lay the metal on a soft piece of wood, put the chisel edge on the bend line, and SMACK it with the hammer, softly at first until you get a crease, then harder. Once you get a slight bend going, you can lay a board across at the bend, kneel on the board to hold it down tight, and pull up on the exposed part to bend it to the required angle. For a more rounded bend, use a piece of round bar in place of the chisel. A rubber mallet is good for hammering wavy metal flat. | ||
Berkshire |
As shown above, it wasn't quite as sturdy as I wanted it to be, and also there wasn't anything to mount the license plate to, so I made a mounting plate for the tail light that had a license plate mount at the bottom, and then another plate to reinforce the license plate mount and also to cover the back of the tail light and the area that was exposed in the gap between the bottom of the under-seat storage compartment and the top of the license plate bracket.     | ||
Jd110033 |
thats some great work Berkshire. Thanks for all the details. Giving me some good ideas. | ||
Berkshire |
I figured I didn't need 1/3 of the light just shining up out the top of the tail light and lighting up the underside of the tail plastic, so I blocked off that part with yellow Fusion paint - hopefully the light will reflect back down and shine out the back! To maximize the "double-barrel" style of the light, I also painted the part in the middle, so it won't just look like a big oval light from far back.   The tail cut is a simple arc, etched with a compass-type apparatus (two picks and a piece of wire) then cut with a band saw and smoothed on a belt sander. It's not much shorter than stock, but the R1 tail light is long, and I wanted it to be somewhat shrouded by the tail plastic - lurking underneath instead of sticking out.   | ||
Berkshire |
I still need the new fasteners to get it all ready to put on the bike, but I did a quick mock-up to see how it all fit together.      | ||
Twisty_mcwrister |
thats really sexy. i'm jealous and now you've got me thinking. | ||
Reuel |
Sharp! If you want LEDs, let me know.  | ||
Swampy |
Nice Work! I always see my self doing stuff like that, but then I think about Homer Simpson, and Bart saying "Yep, He's done!" That really looks nice. | ||
Gearheaderiko |
Nice work all! I really like the idea of having 2 light bulbs in the rear. Also nice to see some well thought out tail mods rather than hack and chop and let the wheel hammer against the license plate (not that I'm against the MadMax look). I really like the "it looks stock, but.." approach. | ||
Twisty_mcwrister |
i'm glad i'm not alone | ||
Berkshire |
Still figuring out the details... after looking at that last pic a while, I think I'm going to trim down the lower corners of the rear panel to reduce that big flat area of rear-facing aluminum as much as I can. Still haven't decided what to do for turn signals - leaning toward something like Naustin's flush-mounts. Any recommendations for a model that's sleek, cheap, and BRIGHT? I thought of getting a full LED tail light unit w/ integrated turns, but I like the look of the red lens. The smoked LED unit looks badass, but ain't cheap! Got a 24x36" sheet of .025" aluminum today (ACE, $15) to make an undertail panel - might as well do that too while I've got it apart... this was supposed to just be a bracket trim & tail light swap - funny how these things snowball! LOL | ||
Buuueller |
Little LED tip: If you have a truck stop nearby some of them carry different LED lights for dressing up diesel trucks in several shapes and sizes that you dont normally see at bike shops or auto parts stores. It may be worth a look, you might find something unique that no one else has. | ||
Fast1075 |
VERY NICE fab work!!!! that gets the Fast seal of approval!!!!! | ||
Reuel |
Since you have two lights there, you could have one side blink when you hit the blinker switch. | ||
Berkshire |
That would be like lights on a trailer - they use 1157 bulbs and the 21W filament is used as a brake light AND a turn signal. Cars used to be like that too. That would be pretty cool! Stock Blast turns are only 10W - I wonder if splicing the wires would burn out the switch or if a different flasher would be needed? Wait - I don't think that would work anyway! Either the brake lights would blink, or the turns wouldn't... It would take some fancy wiring - maybe diodes or...? Anyways, as-is, the light is much brighter than stock! I feel a little safer now. I did a little trimming after taking the above pics, then put it on the bike and mounted the stock turns on the cargo tabs. The rear plastic is raised up from the subframe at the rear mount points, so it doesn't push down on the turn stalks. That's not why I raised it, but for now it's an added benefit. I had planned on making an undertail panel and adding micro or flush turns, and painting it all yellow - BUT - I was tired of having the bike apart, and there was a group ride the next morning, so I just put it together to get back on the road. Now it's been almost 600 miles and I don't feel like messing with it, and the frakking back tire is almost bald again, and I'm thinking about handlebars and horsepower and sprockets and rearsets, so who knows when it will get finished.... "Yep, He's done!" | ||
Reuel |
I can do it with 2 relays.  If your brake is on, the brake light on the turning side would go off when the turn signal goes on. If your brake is off, the same light would go on with the turn signal. If your brake is on, the brake light on the turning side would go off when the turn signal goes on. If your brake is off, the same light would go on with the turn signal. | ||
Thumpe |
Here's my chop job i took 3" off the tail, frame and the seat.  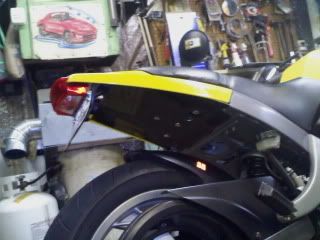 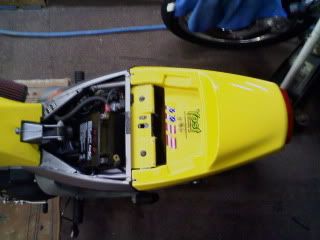 | ||
Silentdale |
I am looking to do something different to the rear of my Blast. I was looking for some type of a rear tire fender type thing, kinda to make it into more of a cruiser looking bike. I was wondering if anyone had any pictures or links to pictures of examples of something like that. This is my 3rd summer riding the blast, but am very new to body customizing. Any input would be greatly appreciated! |