| Author | Message | ||
Robi |
Halfway through. Few things I learned for myself. 1. Run fuel to nearly empty before taking the tank off. It's not too heavy, but will reduce the likelihood of #2 immediately below. 2. When resting the tank against something, don't let the bottom slide out. You'll break the plastic fuel valve. I will be fixing that next. Few things to share. 1. See above. 2. How to get to the damn bottom of the main bolt: I ended up using the male 3/8 hex socket + universal + ratchet = not as much of a pain in the *ss. When trying to use an extension, there wasn't enough room for the ratchet w/in the frame. QUESTIONS: 1. How can I torque the main bolt to spec? Do I need to find a smaller torque wrench? Or do I do it by feel? 2. EZ - visually I can see the metal within the old mount, which I assume goes through the whole thing and serves as a spacer. Is this correct? Can I assume the new mount has the same thing, just not visible? 3. Does anyone remove the horn when doing this? 4. EZ - the grounding cable. You said make sure it is clean and correct. Is there a right and a wrong end? Or are you referring to the correct "face" of the end? Below are some photos comparing the two isolators. When I got the old one off, I was surprised how different they look. The old one seems to have more surface area at the top for the big washer to rest against. I called HD to make sure which end was the top. They said the side with the paint is the top. EZ, this is exactly what you told me. I called rather than logged in because the phone was handy and my hands were greasy. Sorry for doubting you. I'm not going to doubt you about the mount, but in my own humble opinion, visually, I can't help but think the old mount "looks" bigger/heftier than the new one. Bottom view:  Top view: 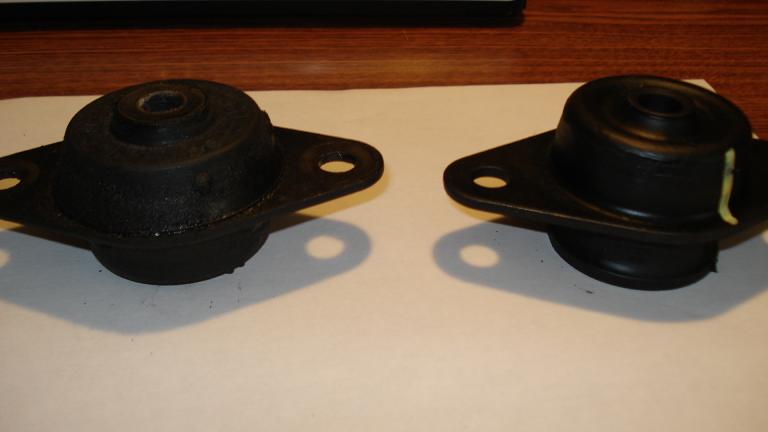 | ||
Robi |
Forgot another question. Regarding the two outboard isolator bolts. The left side has a lock washer and the companion reinforcing plate is grooved where it meets the washer. The right side had neither the lock washer nor the grooves on the bottom of the reinforcing plate. See page 54 of the parts manual. # 6 traces up to be the left side outboard isolator. The diagram shows the locking washer (#15) and the reinforcing plate. #5 traces up to be the right side outboard isolator. However, the diagram does not show the the locking washer, reinforcing plate, or the nut. I assumed the mirror of the left side was to be inferred on the right. But when I took it apart, the right does not have the locking washer nor the grooves. Are the grooves part of the fabrication process of the reinforcing plate? Or were they worn in there by the locking washer? I got two locking washers. Should I install one on the right side as well? | ||
Ezblast |
Torque that center bolt by 3/8 hex, universal, short extension,torque wrench with adapters as needed - you'll be turning that wratchet 1 click at a time - so manually tighten it to two and a half threads showing through the top of the nut - a few clicks later the torque wrench will clack and your good - lol - pic a near lower middle torque value from the range in the manual, pre-run each nut down to at least 5 threads showing on the other side, then back off - they should be tight. The washers and bolts should mirror each other in sequence - bolt length differs - make sure the all contact points are clean and solid, especially on the ground side - you can fry stuff otherwise - why I recommend new parts or like new. Your old mount is a complete failure not only tearing at the rubber, but it is collapsed and separated from the rubber as well looking like a separate piece. PG 54 of the parts manual shows no inner spacer - lol - both on the cable - and except for the grounding strap - they should mirror each other in hardware. Your missing parts because this is not the first isolator replacement and someone did a sloppy job and lost parts or did order enough. EZ | ||
Robi |
Thanks EZ The grounding strap: my dumb a'' forgot how I took it apart. From the parts diagram it looks like it goes between the washer and the frame as it goes up to the spacer and reinforcing plate. Is this correct? What function does this serve? I tightened it with it not touching anything, but it seems like it could be pushed against something, especially when putting the thank back on. I ended up getting some crows feet and another torque wrench from harbor freight. I'm not sure if I need to make adjustments in the torque setting when using the crows feet. For the main isolator bolt it clicked at 30, 40, but nothing higher. I stopped, any more just seemed too much to me. Does use of the crows foot (at right angle) throw off the toque adjustment? I failed to torque from the bottom because I didn't get to this message on time. At the top of the thread there is a NOTE and a TIP. The note finishes by torquing from the top. The tip never mentions torquing from the top. I'm hoping I'm good to go. Must be the cold weather. I ended up cracking the venturi (spelling?) when I was installing the air filter. I'll be fixing that too. And another thing. I don't know if it's a faulty jack, or if I set it wrong. It's my neighbors low clearance hydraulic jack. Well, the motor moved. I did get everything back together, but I hope I didn't f' anything up. I'll be honest. I don't have a lot of faith in the execution of my repair. But I do feel I did my best considering the hotch pot of tools and it was my first time. Unless my methods above make you think I f'd it up, I'm going to put the bike back together and ride it when I can. Hopefully it's all good. BTW: if anyone has Harbor Freight by them, they have allen wrench sets at $1. The standard goes up to 3/8. The sale is supposed to last until 12/7/08. However, after reading EZ's post, I shouldn't have been using an allen wrench in the first place. | ||
Reuel |
Got a new Harbor Freight coming in just up the road. That ground strap has to be electrically connected. The washer goes between the bolt head and the ground strap. If the motor moved, you have to replace it.  Really, there's no adjustment to be made of everything you did, so you're fine. I moved my motor up and down a few times when I did mine. Really, there's no adjustment to be made of everything you did, so you're fine. I moved my motor up and down a few times when I did mine. Which part is the venturi on the air box? If it's the part on the outside between the air and the filter, you can cut that whole thing off, and make the hole bigger, too. If you doing foot-pounds, and you put a crow's foot on, and add one inch to the total length, you're now doing pounds at 13 inches instead of 12. Set the torque for the low number in your range. If your crow's foot is at a right angle, your torque change is pretty much negligible. From what you're describing, you did much better than the average dealer mechanic. Pat yourself on the back, but keep in mind that you should check all your bolts every 100 miles for about 500 miles, and if something decides to come loose, you'll catch it. If someone else does it for you, check all bolts he touched with a torque wrench set to the appropriate torque, then do above. | ||
Robi |
Thanks. I will do that. Washer between bolt head and ground strap. That's where I put it. Still wondering what it does, connecting to the frame and the do not remove part. Does it discharge static build up from movement? Venturi ring. #16, p. 22-23 of the parts book. Which part were you talking about? | ||
Reuel |
Oh that thing. Nevermind the venturi thing. The ground strap is your ground connection from the engine to the rest of the bike. If it doesn't make a good connection, your spark does not have a complete circuit, so your spark may not exist. | ||
Ezblast |
Concur! - if the bike starts - the ground strap is good, if not redo - till she starts - I set torque wrench to minimum - and will approach it from the top when I feel the bottom isn't working - I always make sure that 2 1/2 threads minimum sticks out the top. EZ | ||
Robi |
Question. If the strap is dirty, will the bike just not start? Or could it also be difficult to start? I've ridden 4 times this winter. Each time I have trouble starting it, but it eventually starts and runs fine. Is this from the cold weather, or is it from the strap? | ||
Gearheaderiko |
The strap can be as dirty as it wants, the only thing thats important are the connections to the frame and engine. They should be tight and clean. If its the original battery, then its a little old and probably due for a change. If you ride the bike every day, you may not notice the battery's weakness. But come wintertime with very little riding and long sits between rides, the battery discharges and coupled with the fact that the starter/battery has to work harder the colder it gets, it makes for hard starting. | ||
Robi |
Thanks. | ||
Reuel |
If you expect to ride it in temperatures below 50, use 10W40 synthetic oil, and it'll start more easily. | ||
Fast1075 |
Saturday I set about doing some routine maintenance on the Blast...install the new "superboot", fluid changes, new clutch cable....when I removed the tank, I found the front isolator collapsed...second stock Blast isolator failure...about 2400 miles on it... So...it's off to the Buell shop...this time I got the "Big Twin" isolator...like Robi did in the above post...the way it is made it is impossible for it to fail like the stocker....but the shock was...it is made in CHINA!!! A freakin' Harley part..made in CHINA!!! and it was 68 dollars!!! Now I have a "isorater" on my bike... | ||
Ezblast |
I've found them for as low as 20 bucks on the net - yes it is a HD part, so if you shop around you can find a good price on it. EZ | ||
Reuel |
Stamped on the tag of my rain suit: "Genuine Harley Davidson Motorclothes ... Made in China." | ||
Scooterdabueller |
my name is scooterdabueller my motor bolts broke ????? what are the part numbers i need ????? for everything i need washers spacers and bolts. does the assembaly come in a package ??? | ||
Gearheaderiko |
Welcome Scooter! Current part # is AA0718.1CXZ (bolt). pt #BA0714.3Z (washer). You'll have to read through the archives for more info and get a repair manual to follow the torque/assembly sequence (which is important). {Unless somebody with more time would like to type/print it up here} | ||
Robi |
Scooter, Check out EZ's Yahoo page or provide your email address. | ||
Ezblast |
calling now to verify new part #L1501.T is indeed the new part number for the front Isolator. EZ (Message edited by ezblast on August 07, 2009) | ||
Swampy |
EZ, why don't you put that info at the top of this page permanently? | ||
Ezblast |
I did. Its a kit now - I just ordered one from Chi.HD - will post a pick when it arrives - this last one lasted about 5000 miles - nothing to brag about - hoping the kit is better. I must admit the tuber one was solid with 4000 on it on my toy, and I have one of those I'll use if the kit looks too wierd - and fails on me - who knows - lets see whats in the kit! EZ | ||
Ezblast |
 Looks and feels the same as the one prior that I put in Vader, however,I suspect the spacers to be a different height, Instructions are pretty much same as the manual though. EZ | ||
Ezblast |
The spacers are about 1/8" inch shorter - took the same amount of time and cussing to do the job, but the test tide was more than worth it - all the heavy vibration is gone and the bike seems back to normal - lol - now to see how long this puppy lasts! EZ | ||
Ezblast |
I'm a rook so take it easy on me. I would like to know how to adjust the tie bars on my 03 blast. I have looked through the Service manual and can't find anything referencing any set points. Thank you. Good question - any one with an answer? EZ | ||
Gearheaderiko |
You dont! They are set to a specified length and should be adjusted to that length. I have the measurement at home and I dont believe I ever posted it on Badweb (might have). There isnt any adjustment although if you feel something is bent, someone who specializes in frame straightening could probably get it true. The average person is not going to get it right and if it needs adjusting the bent/worn parts should be replaced. I'll be home Monday. | ||
Gearheaderiko |
"Overall length could be 5 7/8" and they both should match." From one of my earlier posts. I dont know if could s/b should (typo) or I just didnt double check  . But if one is still at the stock length, match the other one up and while I cant check until monday, I'll bet its 5 7/8" overall length! . But if one is still at the stock length, match the other one up and while I cant check until monday, I'll bet its 5 7/8" overall length! | ||
Ezblast |
Thank you - a gent on another forum was/is putting together a basket case type Blast, and needed to know. EZ | ||
Gearheaderiko |
Happy to help  tell them where we are! tell them where we are! | ||
Tnthumper |
hey guys I have a problem I need help with. On the inside of the frame above the horn are 2 flat metal spacers held in with nuts and bolts. Somehow I have had the left side nut and washer come off. Does anyone have the specs for this nut and washer? any help is appreciated. Also what is easiest way to get the bolt back up thru the holes? Thanks, John PS: I am finally back home from Iraq and wanting to get back riding. | ||
Crackhead |
I think the washer is custom fit for the space, a grade 8 lock nut will work though. |