| Author | Message | ||
R38007 |
I am pretty sure you have to pull the engine for this one,right? Anyways I have a bit of oil that works its way out from the cylinder base(not much but I dont like drips!) and it looks like the guy before me used some RTV or something to make a gasket. Pretty new to ripping a bike apart but so far I have fixed the front iso,rockerbox leak and a few other odds and ends. I do have a friend that has done lots of work on bikes that will let me use/give me a hand so is there any gotcha I need to watch out for and since I am going to rip it out is there anything else I should check on?? Gears,oil pump and so on.. Bike has a little over 19k and the guy before me really rode it hard(I have only put on 120 on it...I know im slacking) and really dont know what he did for maint...I plan to have something new by summer but I would not mind getting this bike in tip top shape,I really do like it! | ||
Ezblast |
No - just need to drop the front isolator and side bolts a bit, then re-torque to spec. when done. EZ | ||
R38007 |
Wow really! I was under the impression that to clear the cylinder base studs I would have to pull the engine...not that I dont want to pull it or anything :P Just to make sure I asked correctly this is the gasket P/N in question 16774-88D. Thats the one that I need to replace. | ||
Renamed |
EZ, have you ever done this? You don't need to touch the isolator bolts. You just unbolt the mount from the head. It's a lot simpler. | ||
Swampy |
You will need a rocker cover gasket set, a head gasket, exhaust gasket and pushrod tube gaskets. You will also need piston wrist pin clips. The only part you cannot get from a HD or Old Skool HD shop is the lower pushrod tube gasket. All the top end gasket parts are interchangable with HD parts if you don't tell them what it is for, otherwise they will not have them....LOL | ||
Ezblast |
Yes - I was thinking about the top end,you are correct though - putting a good jack under the motor will support it, and those bolts - once pulled are not reusable and will need to be replaced, also be careful removing them, the have built in breaks in the thread built to prevent vibration, etc - there are like 9 special bolts on a Blast that you can not replace with hardware bolts or "upgrade" - those head bolts are one of the groups of special bolts. Get new pins and retainers for the piston as well, leaving piston in the cyl.; or hone cyl. and get new rings (and a hi comp piston). EZ | ||
R38007 |
Cool guys that sound good,I was thinking of getting a new piston and all that since I am going to be in there. That or if I can track down just an engine(out of a wrecker or something),I can do all my work on that and when this one goes swap for a nice built from the ground up one  Something to do on a nice rainy day  | ||
Milt |
A BadWeb wise man once advised me never to do any work on my Blast unless 1) it makes the bike faster 2) it keeps the bike running My take is that this is doubly true if you're not going to keep it. Unless you just like wrenching... which is fun, too. | ||
Ezblast |
Especially if you have 1 or more other bikes running! ez | ||
R38007 |
Well I do like wrenching but I do plan on having another bike around when I start to tear this one down. So if the sun comes out here in Or I wont miss out! Ha! And if I end up selling it I am sure I can make back my $800 from what I paid for it :P | ||
R38007 |
Hi, Its me again and I need some input. Now when I am done riding there is about enough oil that weeps out to cover the face of a quarter. Now I have been working on this more then riding it and I am getting tired of that. Is there anyway I can put some high temp RVT or anything around the outside of the cyl. head just to hold it back? Or do I need to replace this now? Plan is to have a new bike in the summer and work on this guy after I get some new wheels. thanks for the input! | ||
Ezblast |
Try a few ounces of Marvel Mystery oil - see if you can rehydrate the gasket - it sometimes works, and the rtv trick has been known to work on a temporary basis. EZ | ||
R38007 |
Thanks for the tips! I may try the mystery oil and see what happens...As long as the slight oil weep does not cause any major problems I think I am going hold off ripping it down until I have a second bike. I could always duct tape it...hahah :P | ||
Swampy |
Also look at the crankcase ventilation hose. Make sure it is not plugged, or kinked. Warm the bike slow, don't go pounding on it, revving it up until it reaches operating temperature. Take your time with it. The aluminum cylinder with the iron liner warms up at a different rate then the engine case and the differences in metal expansion is what causes the gaskets to shear causing the leakes. It only takes a couple of hours to replace the base gaskets and seconds to tear them. | ||
R38007 |
Will do, never thought to check the vent hose. Thanks for the tip! | ||
Fahren |
Another superb option for gaskets besides the updated HD gaskets is to go with Cometic. Great product, but the HD updated kit is perfectly fine - whatever is easiest for you to get a hold of. | ||
Truthnexile |
Hi guys, I had my ride cut short the other day by a sudden and severe compression loss. So, here is where I am at today- cylinder is off and I need to get everything cleaned and reassembled. I haven't had to dig this deep into the top end before and I have just a few questions. 1. Does the pushrod cover need to come off for any reason? 2. Does the head gasket go on with the stamped side up or down? 3. Any tips on cleaning all the gunk and residue from these parts? Not making any quick progress scraping the old base gasket off with a plastic putty knife. I'm guessing I need to soak it in a solvent to loosen it. 4. Any advice on reassembly that the service manual doesn't list? It seems all pretty straightforward from the looks of it. That's what I am hoping anyway. 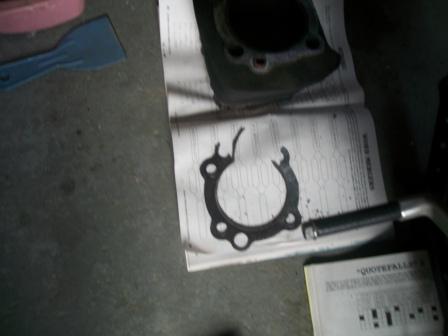 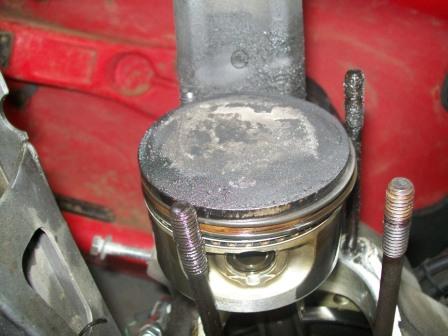 | ||
Fahren |
Time and patience with the gasket surface gunk: gasket remover (Permatech or other); goo-gone, and gently scraping with plastic putty knife as you are doing. Nothing hard, and absolutely not with anything abrasive like a scotchbrite pad. They have abrasives in them that you don't want to have dusting into your engine - so don't even think about that, even if you think you will do a really good cleanup job after. (Message edited by fahren on March 16, 2012) | ||
Milt |
Make sure you re-install the front pushrod in the front cylinder. They are different lengths. | ||
Reepicheep |
Bamboo kabob sticks are useful to let you go to town and get gunk off without much fear of ever actually hurting any aluminum surface. Solvent, lots of kabobs, and patience... | ||
Fahren |
Mmmm...Kabobs! Those work even better when you also apply fluid from a long-neck 12 oz. bottle! | ||
Swampy |
The front exhaust push rod is longer. Follow the directions for the headgasket retorque. Looks like you have alot of blow-by with the way the piston looks. It is alot easier to slide the cylinder back down on the piston with the pushrod cover out of the way, and it is gauranteed to leak if you don't remove it and replace the upper O rings and lower gasket. Take your time, otherwise you will get really good at it.... Good luck | ||
Gearheaderiko |
Posted on Friday, October 22, 2010 - 11:48 pm: Torque the head in the following sequence: Start at 15 ftlbs and torque in 5 lb increments until you hit 40ft lbs. Then go over 40 ft lbs at least 3 times (or until the bolts no longer move). The repair manual says to do it a little different, but this way is more consistent. You can start out the same way as in the manual by torquing down, then loosening and finishing up as previously directed. If using a different gasket then stock, definitely skip the torque then loosen instructions. If you are using an early style gasket (which most are) dont forget the dowel O rings. Dont forget the pushrod cover before you put the head on! (it happens). Make sure the pushrods go in the correct location (they are different lengths). Thoroughly clean the cylinder in soap and water before assembly. Its very unlikely the machine shop cleaned it up. If its going to sit around overnight (or longer) until assembly, spray it with WD40 (or equivalent) or it will rust and makes sure its lubed before start-up. Before installing the piston pin circlips stuff some rags into the case so if you drop the clip it wont fall into the case (dont forget to pull the rags back out). The Crackhead and Gearhead debate: I found it easier to put the piston in the cylinder while on the workbench, rather than fuss with it on the engine. It also allows you to keep the gaskets clean while assembly. Crackhead prefers the repair manual way of doing it with the piston already on the connecting rod (which is just about the only way if using used pistons). Your choice. But whichever method you use dont force or hammer* the piston into the bore. It should slide fairly easily if you are doing it right (and you'll know when you are because it wont fight you). Be sure its well oiled. Hope that helps. If its too much information, just be sure to use the above torque sequence and disregard the rest! *Light taps with a plastic or non metal hammer is acceptable. | ||
Gearheaderiko |
In addition to the above repost (which was for newly machined cylinder): Its perfectly fine to use a metal scraper on the case. In fact a razor blade on a window scraper works well (wear safety glasses). Just DONT GOUGE the gasket surfaces. Brakeleen works well on gasket removal leaving it clean for a new gasket and sealer. I'd still be working on my first engine if I was using a plastic scraper LOL!!!(sorry!!!) You didnt replace the rings? Again: Stuff a rag in that case hole before you lose parts or tools down there and dont forget to remove it just before installing the cylinder. | ||
Truthnexile |
Thanks. I used #16789-04 on the base and the #16770-84F on the head. I cleaned as directed, used wire wheel to clean carbon from around valve seats, pre-oiled cylinder and piston before assembly- went well, no problems. That was the longest I ever spent removing a gasket. With a plastic scraper I might has well have been digging ditches with a spoon, lol. I torqued head bolts as directed, new o-rings on pushrod cover before the head. So, how do I install the rocker cover and pushrods correctly? Do I need to let pressure off lifters somehow? What is the proper sequence for reinstalling the isolator and engine mounts. I'm stumped at the moment with it. Gonna need a new throttle cable and probably another rockercover gasket as well, again, Hah. | ||
Gearheaderiko |
The manual has the proper torque and installation sequence . Turn the engine to TDC-valves closed. Then proceed per the manual. You might collapse the lifters a little when torquing the rockers down, but you shouldnt be opening the valves too. Depending on which mount bolts you loosened, installation should be straightforward. If you loosened the wrong nuts and bolts, install per the manual. You didnt un-adjust the engine tiebars, right? Swampy says longer pushrod in front. If you dont have a repair manual, I'm sorry I dont have the time rewrite it here. The hardest part is already done. | ||
Truthnexile |
I took Swampy's advice and took my time with this job. Few days of heavy rains and I was in no real hurry anyhow. Nice day today, in the 80s. Cleaned all the carbon buildup from the parts. <table><tr><td><img></td></tr><tr><td>From Buell Blast Repairs</td></tr></table> I filled with some fresh Mobil 1 in the crankcase, static timing, new plug and all, set idle mixture screw at about 2 1/2-2 3/4 out, new intake boot, adjusted primary, and went for a good ride. Hell, it's running better than it has ever, and I'm not leaking oil- that's a first since I got it. It's a whole lot more fun to ride with good compression. Much obliged for the support on this endeavor, wasn't too bad at all. | ||
Buellistic |
Does anyone ever think about pulling the wrist pin as not to disturb the rings leaving the piston in the cylinder, OR IS THAT TOO OLD SCHOOL ??? |