| Author | Message | ||
Retribution |
Could anyone treat me to a tutorial on the installation? Part #100BU07B/T. Bike is a '06 XB9SX. Kit just came in - with a few caveats. Looking for step-by-step tips on the job. No HD/Buell shop nearby... For instance, do I need a bike stand or can I do it with a couple helping hands and a jack? Which are the needed tools? Thanks a lot! | ||
Jpxb9 |
I hope it'll help you !!   | ||
Jpxb9 |
For my own, I pushed the bike a little on the stand and put a big piece of wood under front engine mount, then I removed the screw and put the new one. I did it alone, it's not so hard to do ! So you can make it with a jack under the muffler and a couple a hands to keep the bike stable. Good job !! | ||
Gentleman_jon |
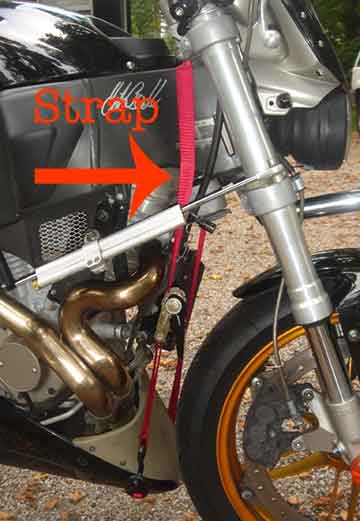 You could just use a tie down strap as shown above, to hold the engine in place when you remove the front isolator bolt. The bike is just left on the kickstand or a rear wheel stand if you have one. | ||
Retribution |
Great tips, thanks! Quick ones: - If I strap up the engine and leave the bike on the sidestand, will the bolt be properly aligned (without stressing the filling sideways) and come out/in easily? - Can't get myself a torquimeter, so could someone "describe" as possible the tightening force to be applied to each bolt? For once I realize there should be no hulking on the bolts of either clamps... The isolator however is supposed to be tightened a lot harder according to the specs, but the Buell service manual warns about being careful not crossthreading it... Sorry for the squidness. | ||
Gentleman_jon |
Good questions. Looking at the photo again, it looks like the bike is on the rear stand. I usually use that when I am working on the bike. As far as the torque is concerned, I really can't figure out how to describe it. I do recommend using some anti-seize or blue Loctite on the threads of the big bolt, because it threads into the aluminum frame, and if unprotected, the bolt and the frame can corrode, making the bolt difficult to remove, and damaging the threads. | ||
Retribution |
Good call. I'm planning on using a light/medium strength loctite on the isolator. Wouldn't it be dangerous using anti-seize on that? Or is it actually a good idea? Gonna do this tonight! | ||
Jpxb9 |
If you tighten with the right key ( the key you used to loose ), without an extension piece and if you do not over tighten, the torque is good. | ||
Retribution |
Ok. But I think I'll need an extension piece for loosing the bolt in the first place.. won't I? Or is it not so tight from the factory? | ||
Old_man |
It was no problem to loosen, if you make sure you have the weight of the engine held up. -- If you don't it will not turn. | ||
Retribution |
Great. And that's enough info now. Thanks a lot to you all, feeling ready for the job here!  | ||
Al_lighton |
"I do recommend using some anti-seize or blue Loctite on the threads of the big bolt, because it threads into the aluminum frame, and if unprotected, the bolt and the frame can corrode, making the bolt difficult to remove, and damaging the threads." A couple corrections here: 1) There is a threaded insert in the frame that should be red loctited into the frame. That is the only part that threads into the aluminum frame. The big bolt threads engage that threaded insert. 2) DO NOT USE LOCTITE on the big bolt, only neverseize. Use LOTS of it,to. Not just on the threads, smear it on the whole bolt so that it doesn't freeze to either the isolator or the threaded insert. Al (Message edited by al_lighton on April 28, 2007) | ||
Gentleman_jon |
Thanks Al, I did not know that there was a threaded insert there. Would you happen to know if there are there any other inserts on the Buell frame, like on the upper shock bolt or anything else? | ||
Retribution |
Dude... I wish I read that before! I even called a couple mechanics, both told me they'd rather use loctite than ant-seize. And so I did.  The manual does say there should be loctite when installing the insert but doesn't say anything about the big bolt! What now? I'm afraid to unscrew it (to replace loctite with anti-seize) and damage the insert in the process... | ||
Retribution |
Job done. Ok so I freaked up after reading Al_lighton's post and hasted to the bike to remove the big isolator bolt before loctite had fully cured. And it came out like a breeze. I was fortunate to have used a mild lock.. the insert "feels" ok (can't see it). Bolt actually came out with very little glue on the threads. Cleaned it up and put a film of copper anti-seize on the whole bolt as advised... thing resembled a shiny dog turd.  Bolt back in, no problems. Except I got REALLY pissed because I managed to loose the 3/8" allen wrench, and since I was sort of racing against the clock on the loctite curing process I went about kicking things away.. and that's how I found the damn wrench tucked under the car's tire... Since my allen wrench was a short one I did need leverage, provided with an 8" iron pipe. And following Jpxb9's tip, I wouldn't use leverage when tightening the bolt if I hadn't needed it for the removal. So I wrenched it back in pretty solid with the assisting pipe, then felt bad about it and loosened it a bit, based on the fact that the bolt is pretty secure once you don't support the engine. Since we're at it, could anyone explain what the isolator bolt does? Even though the name says it all I don't fully grasp the concept on the internals... I figure it screws on the insert's inner thread, but is the threadless and narrower 1" bolt tip surrounded by a big rubber ring up there or is it loose inside the frame? Another one: the folder that came with the LSL says you should remove the rubber ring from the provided bolt if the one on your bike didn't have a rubber ring... I wonder if XB12's have it and XB9's don't, and why... Mine didn't have one so I removed it, even though there's room there and it doesn't seem to matter when you look at it after installation - UNLESS of course the bolt moves up and down during riding; I'd like to know that too. Perhaps someone else would as well. I'm glad you guys took the time to answer; as you can tell from the loctite issue I have no trustful mechanic nearby. So thanks again. (Message edited by retribution on April 30, 2007) |