| Author | Message | ||
Lakes |
hi Kevin , looks like you had you heart set of a total Rebuild. so good luck with it. I'm like Ratbuell a firm believer in riding it as it is to find out how it runs & rides. | ||
Buellmanmike |
Nice work so far.I just got my X1 going again. I've had since it had about 9miles on the clock, it's been awesome. When I got it in Oct.98 I wanted an S1W preferably Nuke blue, and Molten orange. They were gone and the 99's were coming. They probably could have found me a 98 but no doubt they would rather sell me the brand new bike than a leftover, so they probably didn't try hard to find me a 98. One thing you might want to upgrade is the front rotor to a later style X1 rotor, mine was the old style and it wore out quick, so I got the newer one. Owning my X1 I have been aquiring spare parts to hopefully put together the bike I wanted with the upgrades. My shock went back so I ended up with 4 of them. I have a spare set of PM wheels so it's easier to swap tires. I also picked up a spare swingarm and mounting block, so I could polish it more completely than I did the pone on the bike. IIRC slight modification was required to fit the late swingarm to the S1/M2 frames...There was a write up in Battletwin about exactly where it just needs a little clearance work with a die grinder...I just need a frame with a title for my build, I'll get the rest eventually, I'll never sell my X1, way too much fun. The Baker shift drum is my most recent upgrade, and one of the best so far !!! | ||
S1owner |
Heres an X1 frame and title get the build going!!! http://www.badweatherbikers.com/buell/messages/21/ 728536.html?1388272120 | ||
Puls4521 |
haha ken that was the first thought that ran through my head. Definitely tempting, but I'm not sure my wallet can handle another build right now! But never say never! | ||
Puls4521 |
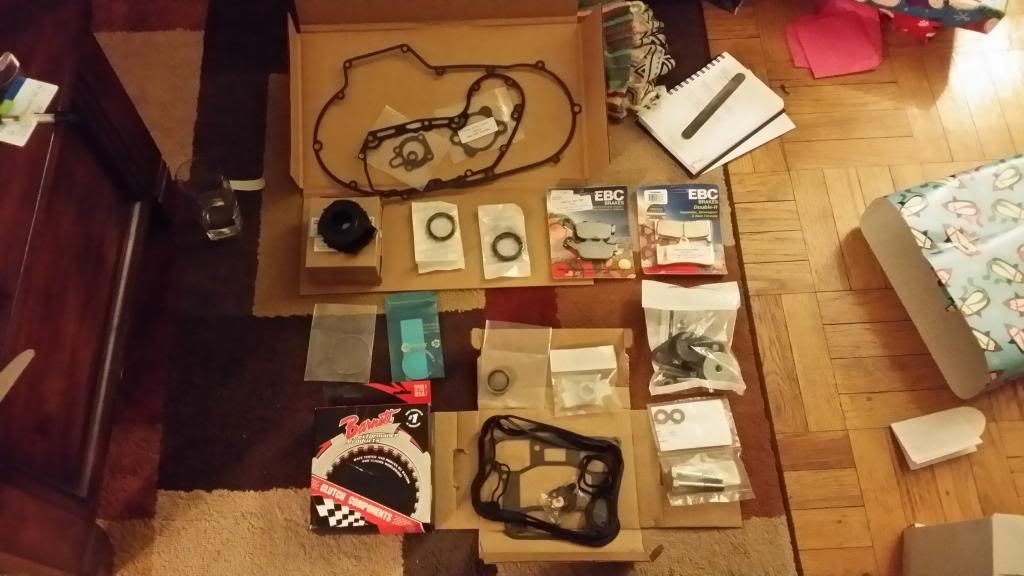
Just thought I would update a little. I got all the ordered parts in and have started putting them to use. The list includes: Flywheel output shaft seal, oil pump gasket, cam cover gasket, primary cover gasket, starter gasket, shift shaft seal, rocker box kit, Front and rear isolator kits, front motor mount bolt kit, Barnett 9 plate carbon fiber clutch kit (and retaining rings), oil pump drive gear, and brake pads! I may need to pick up a few odds and ends, but I dont want to buy anything else until I get all the parts possible from the donor x1, which I should be stripping down in about a week from monday!  Notice in the picture the nail file and Christmas wrapping paper? Some of these parts were gifts from an awesome girlfriend. Thanks again everyone! | ||
Jolly |
I had a girlfriend that was like that, totally got the bike thing and bought me all kinds of parts...it earned her an upgrade to "wife" status! before you put the new bolts in you should seriously consider upgrading the front engine mount to the billet one sold by American Sport Bike. since your going to do the oil pump drive gear and the rocker boxes, since you are already there, you might explore the thought of changing out the push rod tube assemblies to the collapsible ones sold by zippers, they are like the ones on big twins and have a spring in the middle that pushes up and down to push both ends into seats to provide a better seal yet still allow the push rod tubes to grow in length as the motor heats up and grows vertically. I have done it on two of my bikes and they are a fantastic upgrade IMHO.... shoot me a PM if you want some good photos. | ||
Puls4521 |
Jolly, its definitely rare to find a girl that not only understands the obsession we have with our bikes, but is also willing to throw money at it to support it hah! As far as the motor mount and push rod covers go, I think those would both be absolutely killer upgrades, however I'm pretty certain at this time I just cant afford it. I'm in my senior year of college and tuition definitely puts a damper on extra fun money haha. Thats why this build is taking me all of fall and winter, I want to keep the cost reasonable but make sure I dont cut any corners. This bike will certainly be a continuous project, each off season I plan to tackle more projects on it. A full time job after graduation will hopefully facilitate that! As for right now, I cant wait to get her back on the road! Thanks for the advice! Every little bit of advice is greatly appreciated! | ||
Puls4521 |
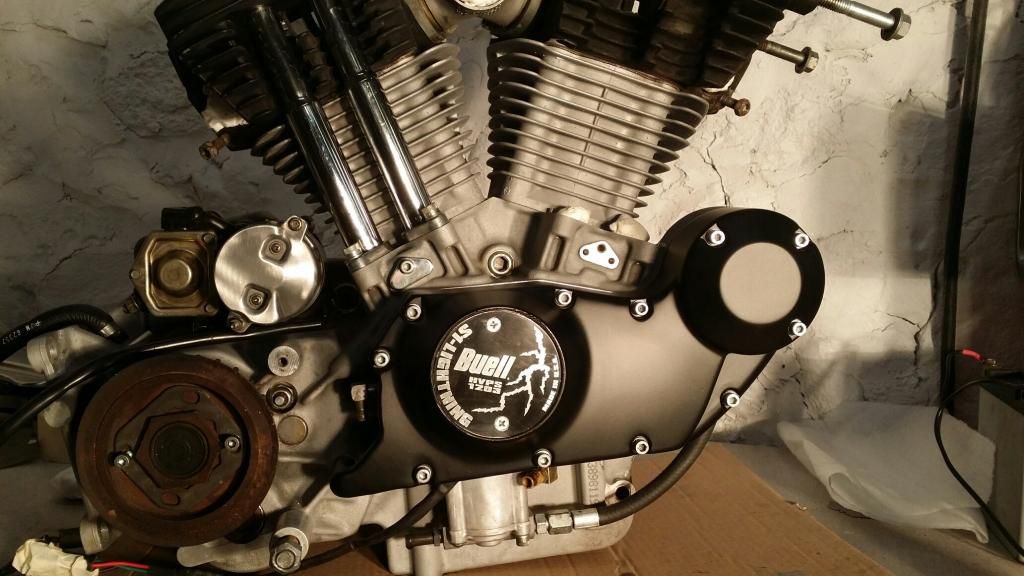
Ok, I got a little progress update to report. Over the last couple weekends I finished up undercutting and polishing the cam cover and sent it and the primary cover out for powder coating (Hy-Tec Powder Coatings out of Waukesha Wi). While I waited I installed a Barnett 9 plate carbon fiber clutch kit, as well as the upgraded brass oil pump gear. I also got the crank case scrubbed down and looking nice. This last week the covers came back from the powder coater and look great! This weekend I got the cam cover back on and started putting the valve train back together. Here is the engine as it sits.  I have a question for everyone. Any tips on bleeding down the lifters? I've read a little on it from badweb but all the manual says is to tighten slowly in a cross pattern and don't turn the engine over until the pushrods can be turned with your fingers. So any more insight? Definitely want to make sure everything is down right. Thanks again everyone! Also on a side note I was able to stop by my old high school to for a couple hours and secure a complete X1 swingarm and mounting block off the parts bike they have, score! | ||
Lynrd |
Looks REALLY nice! That is pretty much it for bleed down on the lifters - gravity does the work for you. The only additional advice it: when you first start it - don't freak out when the lifters sound like a handful of gravel in an empty beer can. They are empty and need to pump back up, and that takes a few minutes. Just grit your teeth and wait for the sound to go away before blipping the throttle. | ||
Akbuell |
Plus 1 on what Lynrd said. When I first started my X-1 after an oil pump drive gear change, it made so much noise I immediately shut it down. Figured I must have gotten something wrong during reassembly. Couldn't stand the noise while waiting for them to pump up at idle, so did a sub 2k RPM cruise about the neighborhood. Raises the oil pressure a bit, and riding made the noise less of a concern. Got back, all was well. Hope this helps, Dave | ||
Woodnbow |
http://www.ebay.com/itm/Buell-Front-Engine-Mount-C NC-Machined-Billet-/331057615690?pt=UK_Motorcycle_ Parts&hash=item4d1492534a You might check this out.. It's less expensive than the stateside option. I used the one Al at americansportbike sells and it works exactly as advertised. When my stock mount failed at 20000 miles I was very lucky, cruising at 75 on the interstate with my wife on the back. We hit an expansion joint and it broke. The motor didn't drop all the way and only one of the studs snapped. I followed the advice of everyone on the board in removing the broken stud and it was a piece of cake, nerve wracking but a piece of cake when all was said and done... Great job on the cam cover by the way. That's the way the Motor Company should do it! (Message edited by woodnbow on January 27, 2014) | ||
Puls4521 |
Thanks for the thoughts! I was really happy with the way the cover turned out, thanks to everyone that suggested cutting it! Damn I was really hoping to avoid having to drop big money on the motor mount, but it seems like it is a serious concern, and the thought of cruising down the highway at 75 mph and the motor mount snapping is frightening to say the least! Just a thought, I am an engineering student and I have access to Pro-E/Creo, SolidWorks, 3D Printers, and a CNC mill, that mount looks pretty simple, I wonder if I couldnt model it up and make my own! Thoughts? | ||
Brother_in_buells |
Kevin ,looks good there! I have question about the new powdercoated cam cover. Did you drop it at the coaters place and he did the sand blasting ,cleaning and coating, or did you had a talk about keeping the cam bushings clean from all the blast grid? | ||
Puls4521 |
I had all the grinding and polishing done then dropped it off. I talked to him about the sandblasting, but I have done a lot of sandblasting myself in the past, and I know that know matter how hard you try, that grit always gets in places you don't want it. The coater did the taping, plugging, sandblasting and cleaning. When it came back it was really clean inside but I could still feel some grit on the inside. I asked about what I could use to clean it, and he suggested just a mild soap. When I got home I filled the tub with hot water and hand soap. Everything got washed for a long time with a toothbrush and Q-tips until I couldnt see or feel and grit. I paid particular attention to the bushing areas. All you can really do is just clean the hell out of it. I hope that helps you! | ||
Woodnbow |
"Just a thought, I am an engineering student and I have access to Pro-E/Creo, SolidWorks, 3D Printers, and a CNC mill, that mount looks pretty simple, I wonder if I couldnt model it up and make my own! Thoughts?" If you can get your hands on a chunk of suitable billet (I have no idea what that might be) I would think it'd be worth a shot... I have no idea what the failure rate is on the stock piece. I've heard and it makes sense, that wheelies can cause issues for it, also that riding two up can be a factor as well. Beyond that I just don't know, it scared the crap out of my when mine let go I know that. I also know it'll be the first modification I'll make to any tuber I purchase in the future and there will be more I guarantee it. This is one of the great motorcycles ever built IMO... | ||
Puls4521 |
I'm pretty certain that the billet is T6-6061 which should be really easy to get a chunk of. I would think with the center to center bolt dimensions off the old mount and some over building, it really shouldn't be tough to mill something out. Not to mention a hella lot cheaper. | ||
Jolly |
wow that powder coated cam cover looks fantastic! I've done two of mine and just had them painted to match the heads, but that slick smooth powder coating looks great. I had heard issues with the heat from the curing process causes the cam bushings to potentially drop out of the cover which is why I have stayed with painting mine...did you have any issues? I do recommend the front motor mount, you would hate to get that far and then re-install a weak part.... (Message edited by Jolly on January 27, 2014) | ||
Puls4521 |
Yea I was really impressed with how the covers turned out. I was on the fence whether to have the frame done or not, but with how those look, I cant not do it! I hadn't heard of the bushings dropping out, I guess it could happen, but cleaned the cover really well and I didnt notice anything along those lines. I'm pretty much set on doing something with the motor mount, like you said Jolly, I've come this far, no sense in putting a weak part back on... However I am already talking to my school about using my own Creo model and G-code on a CNC. Also I will probably 3D print out a model to make sure it fits before I run the part. I found a metal supplier that I can get a suitable chunk of 6061 billet for about $60! So I think there may be hope for making my own mount! I'll have more info on that soon. Thanks again everyone! I appreciate the comments and compliments! Also on a side note, I have been thinking a lot about paint schemes, I'm thinking I want to powder coat the frame the same matte black as the covers, and do the tank and body work matte metallic white. I know a guy that does vinyl wraps, and may elect to wrap the plastic. They claim 10 years of usage in the elements, and that would avoid stripping paint off a tank that doesnt have a bubbling issue... here is a picture of a wrapped R8 for reference  Any thoughts on that? | ||
Rocket_in_uk |
This isn't a criticism. Just a personal observation. For me the whole idea behind cutting the cam cover down is to save / shave weight. Exposing the guts of the pulley / oil pump / pipes gives it an appearance that's forgiven in racing as it's not regarded pretty enough for showroom. This is exactly why we love the crude 'go faster' look on our hot bikes. You're kind of going the other way by making it look pretty. A bit like putting tits on a bull. As you were peeps  Rocket in England | ||
Rocket_in_uk |
This isn't a criticism. Just a personal observation. For me the whole idea behind cutting the cam cover down is to save / shave weight. Exposing the guts of the pulley / oil pump / pipes gives it an appearance that's forgiven in racing as it's not regarded pretty enough for showroom. This is exactly why we love the crude 'go faster' look on our hot bikes. You're kind of going the other way by making it look pretty. A bit like putting tits on a bull. As you were peeps  Rocket in England | ||
Woodnbow |
You can sure say that again Rocket...  I think the reason I like the cut covers is in addition to weight savings, (honestly not that much but it helps) it has a raw mechanical look to it similar to the generator style shovels, panheads and knuckleheads... Harleys should look that way! | ||
Puls4521 |
Rocket, I understand where your coming from and how it may seem contradictory to cut the cover to achieve a more raw, unrefined look, then turn around and do everything possible to make it look polished and finished. However for me the stripped down bare bones sexyness can be polished and finished. I see no reason to not put my full attention into every detail. But to each there own! | ||
Blake |
Highlight that which is core to aesthetic appeal, the rest let remain less bold towards catching the eye. Meaning, avoid distraction from the core artistic form. | ||
Blake |
Black cylinders would re-establish the tall dominating "V" form that is so aesthetically appealing. | ||
Jayvee |
That is one ugly pulley | ||
Puls4521 |
Haha yes it is... not for long! | ||
Gusm2 |
Cutting down the cam cover allows better routing of the oil lines ie rather than under the engine | ||
Rocket_in_uk |
Ah yes. So good I said it twice  I was quite impressed with my tits on a bull thing but no one fell on the floor laughing. I guess it's an Americanism and quite common place for you lot. Did I hear it in the Bond movie with Sheriff JW Pepper (no relation)? I was quite impressed with my tits on a bull thing but no one fell on the floor laughing. I guess it's an Americanism and quite common place for you lot. Did I hear it in the Bond movie with Sheriff JW Pepper (no relation)? So, I'm so wanting to finally get my cam cover cut down this year. And I do love the look and agree with the mechanical look as on Harleys. Yours is no exception Puls. I think Blake nailed it though. You need those cylinders black. Especially with those pushrod tubes. Rocket in England | ||
Puls4521 |
Hmm... Definitely something to think about, anyone have suggestions for an engine enamel that will hold up and not look like crap after one season? | ||
Phelan |
Next time I tear one of these down, I'm gonna pull a RottenRalph and grind down the bottom two or three or four fins from the cylinders. The vast majority of heat is dissipated in the heads anyway and I love the look  . . |