| Author | Message | ||
Beardo |
Ok, have an S1 and I proceeded to start the swap of the steel swingarm for the a later aluminum one. I also got a set of solid mounts from another member. But before I get to ahead of myself, what is up with the disassembly process? It literally took me HOURS to get the old arm off. From the bolts mangling the rubber isolators, to trying to get them off, to getting those inner 'threaded studs' out, it was a nightmare! Yes, I have a FSM. I undid the links frame side. Yes I have the bike suspended by the frame from an I-beam in the basement. Yes, I have a transmission jack under the motor with a ratchet strap to keep it from falling off but not so tight that I couldn't reposition things as needed. The real kick in the ass were those inner pieces that rest next to the bearings. Did I go wrong somewhere? Is there a trick I didn't know about? My worry is now reinstalling everything. I've been wrenching on bikes for a long time and have never not wanted to get the bike back together ASAP. Quite the opposite. I e been told many times I need to slow down. Not this time. I need some wisdom from the more knowledgable badly. Also, since I have those solid mounts, do they completely take the place of the rubber isolators or do they work in conjunction with the rubber pieces? If they work with, then new isolators are in order cause the old ones are destroyed. And to pour salt in the wound, the last exhaust stud I went to take off snapped. Maybe that's a sign for new heads! Least that's how I could justify it... | ||
S1owner |
I preformed this same swap. It sounds to me like you had some lock tight issues! Like someone used red where not needed. The inner threaded stud does use red lock tight a little heat is needed to break that loose. I am not familiar with the solid pieces you have but I assume you do not reinstall the rubber. Also if the wrong lock tight was used on the isolators and the pin was sheared off it would explain your difficulty. I had no where near the issues you did took maybe an hour to disassemble. I think it was an issue created by someone before you! Something I learned was a little vaseline and a thin putty knife really helps when sliding the swing arm back in with the rubber isolators. You may not have that issue with the solids | ||
Jramsey |
or do they work in conjunction with the rubber pieces? Yep, the stiffeners I sent you go in the ISO to prevent up and down movement. The hole in the stiffener for the bolt is offset .160 the same as the Iso. Installing them in used Iso's can be a bear because the Iso's start to sag from mile one. The 1/4-20 threaded hole I put in them is for removal (use long 1/4"bolt as a handle)but can be used to wiggle them in position with a little patience. }} (Message edited by Jramsey on July 14, 2013) | ||
Beardo |
First, when I bought the bike, I was forewarned that it sat in a damp barn (literally) and there was corrosion to the eye, but honestly didn't encounter any resistance from any other fastener when working on other parts of the machine, so that really didn't occur to me until you mentioned red LOCTITE. So now that I know those solids go IN the isolators, I need new isolators. The ones that came out were destroyed. The last time I made a mess of a bike wrenching on it was when I was a teenager, decades ago! I really appreciate the replies and confirming my thoughts. So now the big question is, do I bother drilled the exhaust stud out or do I take the opportunity to upgrade?! | ||
S1owner |
Upgrade is always good as long as the pocket allows it!!!! American Sport Bike sells the ISO you would have wanted to put in new ones any way since they are a wear part always better to replace. I completely tore down my S1 and rebuilt it. I am not an expert but received a lot of support from this site. I took lots of pics as I went and learned tons so if I can help you out I will. | ||
Lynrd |
Well Beardo - you know how that goes.... "Well, since I'm changing the heads...well, might as well set them up for better cams - maybe just do the cams at the same time..." "And you know - while I already have the intake off - I always liked those Mikuni Carbs..." "If I'm changing carb anyway..." (insert next self justification here...) Not saying that's a bad thing. Just sayin... | ||
Beardo |
Haha, already have the Mikuni on it! I just had a fellow BWBer over to look at my S2 and we looked over the S1. He mentioned something about spreading the frame. Evidently, not something I knew about going in. I'm hoping reassembly goes a bit better than the disassembly did. | ||
Lynrd |
Yeah, there's a how-to linked from Don Casto's page. Not so much spreading the frame as compressing the isolators. http://www.doncasto.net/hoserisolator.html | ||
Beardo |
Very interesting. Thank you for the link. I will be using that trick. Hopefully the shop has the isolators in stock. | ||
01x1buell |
i would get the isolaters from American Sport Bike , i have a pair of the iso stiffeners from Jramsey and they work great , the bike feels tighter in the corners. (Message edited by 01x1buell on July 14, 2013) | ||
S1owner |
Nice link and links back to this sight! Thats what I used the vaseline and putty knife for once started they slip right in | ||
Beardo |
What's the difference if I get them from the shop where I used to work and American Sportbike? I'm asking sincerely. Do they sell a design of their own that's better? | ||
S1owner |
As long as they are the updated version it is your choice. | ||
Natexlh1000 |
The updated version has "ears" to help support the weight. The originals you took out (Assuming they are original!) won't have the ears hanging down. Here are some pictures stolen from ebay: OLD version 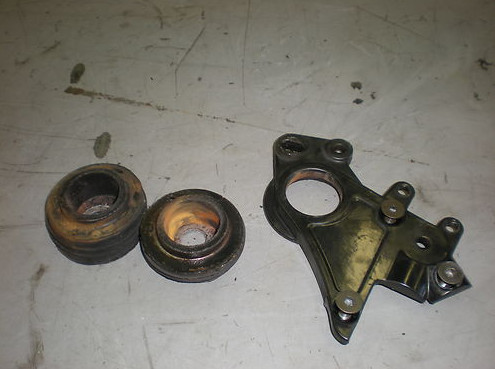 Newer version with "ears" 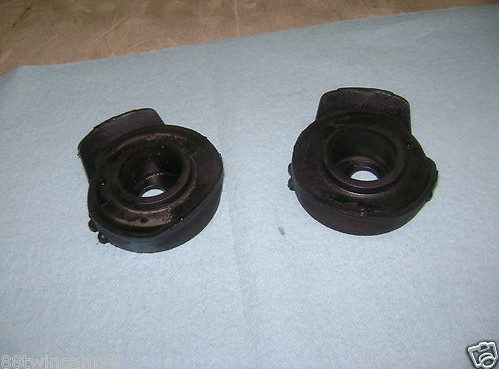 As others have said, don't be tempted to buy used rubber isolators. They age and wear out. Sometimes without even looking different! | ||
Beardo |
I don't know were me buying used Isolators came from, but it wasn't me. I used to work at an HD dealer and that is where I would get them from, IF that design was updated across the line. The original part number dates back to -86. So they were used on the FXR/FLT frames. Yes, what came out were the original Isolators. This is all probably a blessing in disguise, for I didn't realize those parts were considered wear items. Though it does make sense. | ||
Hootowl |
I've never seen a new style isolator fail. Anybody else? | ||
Lynrd |
The Frog - a 2000 S3T - has service records showing 2 separate failures of the rear isolators. Given the time period and the year model of the bike., both failures would have been with the new style isolators Both occurred on long tours (Service records in both cases are +500 miles from home) - and the bike was set up with an aftermarket luggage rack in addition to the deep bags. It also had a two up corbin seat with a passenger backrest. My guess is that the bike was overloaded for touring - which lead to failure. The aftermarket luggage rack in particular is going to put weight far back from where it should be. If it were the former owner (not a small guy) plus his old lady (From the condition of the seat - not a small girl) - plus the mandatory touring with the ol' lady saddlebag stuffing AND a tourpak...on a green bike. Of course they failed. I think the newer isolators would be just fine, so long as you don't want to tour with a fat chick and a bunch of saddlebag crap on a green motorcycle. but then...who does? | ||
Lynrd |
Oh - and Beardo - That type of Isolator actually goes back to the 1980 FLT . THe FLTs and FXRs all used pretty much the same system. We worked with them a lot at Gambler. We also made our own polyurethane system - which I do NOT recommend....it'll stiffen things up, but the bike will vibrate like a dog crapping peach pits. You may need to notch your belt guard to fit the newer isolators due to the location tab. I think a shiny new set from HD would be the best way to proceed. Stay away from green bikes and fat chicks. | ||
Beardo |
Mines a primary color, yellow, so I hope that there isn't a bleed in effect, but no fat chics here. That's why I like the thought of the stiffeners. I started out on Ironhead Sporty's. a bit of extra vibration isn't going to be a problem for me. I'll keep ya guys posted. | ||
Hootowl |
Hmm, maybe he'll chime in here. I'd sure like to know for sure. | ||
Beardo |
Question, does the front Isolator need disconnected for reassembly, as well? Here is why I ask, I cannot get the inner collars (I do not know the correct name for these, but remember they are number 2 and 6 in the FSM) to feed through the frame to get a clear shot through the block, to thread into the inner pivot collar. It's a tight enough fit just getting them to go through the frame, let alone through the block, to get to the swingarm pivot area. I already chased and cleaned all threads involved, as well as, lubed up everything for reassembly. From what I can make out, the Isolators themselves are the last parts to be installed, so figured I would get everything ready and installed, for the final installment. Tricks and tips are appreciated. Brian | ||
Hootowl |
Have you seen the scott free method? http://danielcstarr-pages.blogspot.com/2008/09/una uthorized-scott-free-technique-for.html | ||
S1owner |
Ok when I did mine I did the front Iso at the same time. I installed it loose then lowered the frame over the moter swing arm and mount with the rear isolators in the frame i put alittle vasine on the iso and used a thin putty knife in between the iso and pivot block to start then one simple push and it was in place. So the motor pivot block and swingarm were all mounted together then the frame went over it for install | ||
Fahren |
+1 Hootowl. DO NOT spread the frame. If you need to, you're doing it wrong. | ||
S1owner |
Nice link hoot I was going to do that but thought I would try it the way I did and it went easy. Now that being said could have been an anomoly as everything I do is ussually the oppisite! | ||
Beardo |
Thank you for the link. Hopefully this gets everything going in the right direction. Ken, I'm also going to go your route, as well. Disconnect (and while I'm at it, replace) the front Isolator. Why not now. | ||
Beardo |
Sure enough, the top front Isolator was split in two spots and looked to be for some time. I know those were another of the original mounts from the FLTs and evidently never lasted too long on HDs either cause I sold a bunch the time I was there. Anyhow, it made it much easier to refit all three for the pivot parts. I'm not looking forward to putting this bike. Back together. Quite literally have more than half the bike torn down. And have still yet to get to the shifter shaft. Fully admit I buggered that up before this whole venture started. | ||
Thylacine |
As a motorcycle technician for many years , I had to put in my $ .02. Green motorcycles should NEVER be taken seriously. Lime is fine though | ||
Steveford |
Don't give up, Beardo, the end result is worth it. I just came back from a ride on my S1 (with the later swing arm and isolators) and remember what a PITA it was to do. Last ride on that one for a bit as the tank is stripped and ready to ship to Texas. I'll see if I can't get to the bottom of this outgassing problem yet - the tank, not mine. | ||
Beardo |
I have never, and I mean EVER not put a bike back together in running condition after tearing one down. Just because I don't feel like doing it, doesn't mean it won't happen. I have all three Isolators on the way. In the meantime, I'm drilling out the exhaust stud that snapped off. Making good use of the down time. |