| Author | Message | ||
Torquehd |
Vacuum bagging the first piece now. This is my initial vacuuming project. I used vac bagging film and the tacky tape stuff from composite envisions. The thing is leaking like a sieve all around the edges. I tried the only thing i knew, rolling the edges tight over themselves and taping it shut. It helped a little but I can still hear air hissing around every inch of the perimeter. But, I am getting around 25 in/hg. I don't know if my pump is OK to run all night or not, it's a yellow jacket 7cfm pump. it's an American-made pump so i expect it to be decent quality.  Got the hissing tamed a little by more folding and massaging the edges. Pulling about 26 in hg, and the bleeder cloth is almost fully saturated. I'm just concerned that the pump is pulling more air from outside, than getting rid of the air bubbles. I need to build a vacuum chamber to pre-vac the resin before I apply it. (Message edited by torquehd on December 27, 2013) | ||
Torquehd |
Popped the top half out of the mold this morning. I'm not convinced that the surface quality is much better than not bagging it. A little better, maybe, but not much.  | ||
Ourdee |
It is getting there. | ||
Ezblast |
That has promise. EZ | ||
Oldog |
Hey Torque, have you considered using a short piece of Large dia, PVC pipe with a cap and flange? it wont be super cheap but you can vac your cans of resin ( a 5 gallon pail with a lid may work up to say 15" ) If you have a welder buddy Carbon steel pipe and fittings may be less, and you can mod it, as long as your "tank" works between vacuum and less than 15 psi most states wont see it as a "code vessel" if you start playing with air or steam pressure on your tank be careful as an over stressed tank is a BOMB | ||
Ducbsa |
There is a minimum volume in the Boiler Code that doesn't require inspection for over 15 psi. This seems to say it is .0425 m3 or 2593.5in�. http://www.gov.pe.ca/law/regulations/pdf/B&05G.pdf see page 2 Use at your own risk, but since we are talking vacuum, risk should be low. | ||
Oldog |
about 1.5 cuft, AR and some states have volume requirements.. again if you play with heat, pressure or steam, be ware you may be dealing with a BOMB, YMMV like I said you could try a 10$ plastic bucket with a lid first | ||
Torquehd |
I tried a paint can, my vac pump crushed it like a pop can. Next time I stop by the hardware store, I'm going to pick up a bag of cement and line a paintcan with cement. I also have a 1/4" steel cylinder that I turned into a crucible for my foundry. I'll eventually get it to a machine shop with a lathe, and have them put a lip on the top. And run a corresponding-sized ring around a piece of sheet steel, or just leave the sheet flat, and use an innertube as the gasket. I hadn't thought of the PVC. I just don't think I'll ever be free of voids and bubbles, unless I go with resin infusion. Huh. This slow-cure resin I use has a pot life of HOURS. I wonder if I could vacuum infuse it... | ||
Torquehd |
I put the top and bottom halves each in their respective molds. I trimmed a "window" out of the bottom mold to allow access to the inside, and joined the top/bottom with a few layers of carbon from the inside. The gap created by the parting line was up to 1/8" in some places. Not totally sure how that happened. I'll end up making new negative molds, once the final product is complete (for future production). I'll be able to vacuum bag the negative mold this time, which should produce perfect parting lines with no gaps or errors. There were a ton of tiny air bubbles trapped beneath the surface of the resin, I used a sandblaster to open the holes. Resurfacing with more resin, this is going to require more sanding, wet sanding, etc. Too bad I ordered a thin viscosity resin, the stuff loves to run off. Created a small degassing chamber, good for around 8 oz of resin. Pulling 30 inches of vacuum with no reaction on the glass.  | ||
Torquehd |
It's starting to look like a pillion. Sanding it today. Will need a lot of finish work.  Unfortunately, my resin job is just crap. There are pinholes trapped beneath the surface, and if I try to sand down deep enough to get them, I end up sanding into the carbon weave. This can be finished over, but it creates visual flat spots in the weave.  I hate to paint carbon, but better a decent paint job than a crappy carbon job. Have to buy a paint gun. Any recommendations for certain type or features? | ||
Torquehd |
A couple vids. Yes, it's ugly right now. The good news - after the lip cures tonight, I can start mocking up the portion of the subframe that extends up under the pillion/passenger seat. I have to admit, the thing I'm looking forward to perhaps more than anything is making my own taillight. I ordered a bunch of LED's from superbrightleds. I've been playing with them, I can't believe how bright these suckers are. I plan to make a reflector box out of carbon, and vacuum form a lens out of PETG. | ||
Sifo |
Here's some discussion on when I built my tail light and lens. Follow the discussion further and you get to see how H2owerker did his. http://www.badweatherbikers.com/buell/messages/327 77/441042.html?1236122813 If you are doing LEDs there's no need for an actual reflector box. You probably know that, but I wasn't sure from your description. I simply panted my circuit board white on the side you see. On paint equipment, a lot has to do with what you have for compressed air. A small compressor with a big gun doesn't work out well. All you really need for bike sized projects though is a touch up gun. I've got a small oil-less compressor that can pretty well keep up with my touch up gun. I still run it through a water trap to get rid of any condensation. A cheap gun from your big box store should be enough to get you going with occasional use. If you wind up trying to make money with them, you will wind up spending a good chunk of change for a more durable gun. | ||
Torquehd |
Thanks for the info Sifo. I bought some less bright and brighter LED's, according to their specs, but the difference when you fire them up is not as great as I expected. I'll have to play with your dual resistor idea for running/stop lamps. Where did you get your circuit board from? I'm considering just making a flat fiberglass board and drilling holes where I need them. IIRC, circuit boards are (or were) made of a type of fiberglass. Working on the portion of the subframe that goes under the pillion/passenger seat. This will all be extruded stock that will either be welded or fastened to the left and right subframe rails. I'm a little rusty on welding Al, took a few minutes to get the settings right, and it took a couple episodes of flashburn before I realized the battery in my mask was dead.    Using a very high tech method to get the angle just right. The area that the extruded portion will attach to still needs to be built up, using popsickle sticks, wood glue, carbon tow, and will be finished up with bondo.  | ||
Sifo |
I picked some blank circuit board locally from Fry's Electronics. Nice G10 material, strong as heck and machines nicely. Sorry man, but is you first grader helping you with the popsicle stick tower?  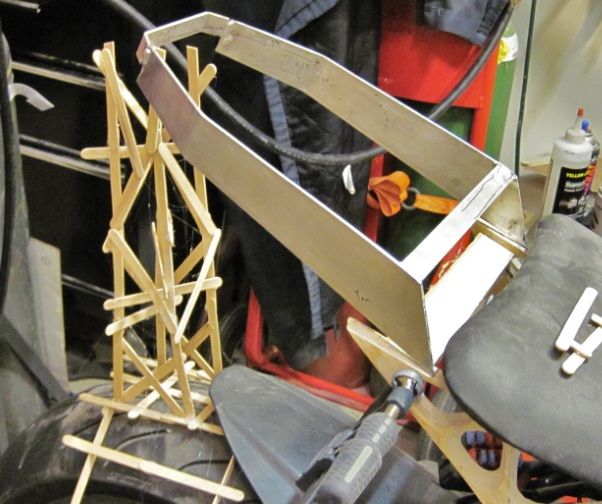 Actually I like the ingenuity, but it just looks so much like a first grade type of project I had to laugh. What ever you have that gets the job done!  | ||
Torquehd |
I was using a couple of 3/8 drive socket extensions put together to hold the subframe, but it wouldn't stay in place when i was test fitting the body onto the frame. All i needed was something stable to keep the subframe at the correct angle while I worked on it. I use popsicle sticks for a lot of things. When you're seperating the body from the mold, you can pry one side up and drop a few popsicle sticks in before you remove the plastic scraper. You can sharpen them and use them to push epoxy into pinholes. Or you can build a leaning tower of Pillion. They're cheap and versatile, and as you mentioned, even a first grader can figure out how to engineer something with them. Which is great for amateurs like me. | ||
Torquehd |
Apparently there's something I'm not understanding about the interaction between resistors and voltage. I set up a 2.5 VDC LED with a ground to my battery. I set up two positive leads, one with 112 Ohms resistance and one with 56 ohms. When I apply each in turn to the LED, the difference in brightness is decent, but when I measure the voltage at either lead, I'm getting battery voltage (downstream of the resistors). I thought resistors were supposed to reduce voltage... | ||
Davefl |
You are not reducing voltage that is your constant provided by the battery. What you are reducing is the current flow (Amps) to the L.E.D. with the increase in resistance. | ||
Torquehd |
Sorry for the lag in communication; Christmas leave is over, I started an intensive month-long Chinese refresher course this week, I'm in the process of closing on a house and planning for a wedding. Unfortunately, the Thunderhorse project is by necessity on the back burner. Will post again as time/progress allows. | ||
Torquehd |
Quick update. It's been difficult to get anything accomplished here lately, I've been so busy and even my freetime has been occupied with other things. I already gave it a quick sanding to knock down the few "pimples" left by the bubbles in the fiberglass mold.  Popped the airbox cover out of the mold yesterday. It Is UGLY. I don't know what the difference is between Fiberglass resin and Epoxy resin, but the fabric is much less conformable when using epoxy resin. It's like the individual fibers are unwilling to slide in the weave. The weave pattern is distorted and ugly, and there are a lot of air bubbles which need fillng. Working on that tonight. This will also end up having to be painted with opaque colors. Also have been working on the subframe trusses. I got the rear mounting portion figured out (thank you popsicle sticks and bondo). I didn't realize how many flaws were present in the surface until I painted them. Probably need to open up the can of bondo again.  | ||
Crashcourse411 |
For a flawless carbon job that its also structural. Do not be intimidated by pre-impregnated carbon. Small bits like what you are doing can be vacuum bagged and put in the oven.then slowly bring up to temp. No more air bubbles. It cuts out like vynle bumper stickers and goes down just a easy without wrinkles, with the aid of a hair dryer. No more difficult than wet layup, just some more patients on the first attempt. | ||
Torquehd |
While I like the idea, the only reason I haven't used prepreg yet is cost. I follow the OJT/learn as you go/trial and error/fake it til you make it theory. Eventually I'll make an omelet, but I'm not afraid to break a few eggs along the way. Hopefully I'll have these subframe patterns ready for casting tomorrow. I've been carried away trying to perfect the surface finish, but I know the porosity of the sand will leave the surface lightly porous. It's been awhile since I've cast anything, can't remember if I used sodium carbonate or sodium tetraborate in conjunction with KCl for flux/degass... The google machine seems to suggest either one is suitable, or that either one is not recommended. guess if one doesn't work, i'll try the other. Also, I need to order a paint gun and some paint. I definitely want to use hardener. I'm trying to think, most sportbikes probably don't use clearcoat do they? While I'm not bad with a rattlecan, I don't know much about paint-gun style paint. Are there base coats that are compatible with hardener? Any recommendations as to website/brand for the paint? (Message edited by torquehd on January 25, 2014) | ||
Torquehd |
I may as well post these - I made these back when I had freetime. This is the color scheme I'm considering doing.  Inside out radiator ducting:  And, if you're a paranoid conspiracy theorist who wants to stay "off the grid", there's also the stealth fighter mode.  | ||
Rocket_in_uk |
I love your stealth. It shows all of the motorcycle. Be interesting to see it in other solid colours too. I'm not a fan of your tricolours though. Stunning work. You're a talented genius. Rocket in England | ||
Brumbear |
Well that will be some accomplishment I have never ever seen the stock exhaust look good before, not only does the bike look awesome you did what NO ONE else could accomplish. Well done!!! | ||
Torquehd |
thanks for the kind words gents. I'll just do a solid color base coat first, then go from there. I thought the stealth fighter is closer to a real batbike than that huge hydraulic steel thing they made for the dark knight series. Well, my castings always have really rough edges - not sure if it's from not lining up the flasks properly, or if the sand isn't packed tightly enough and the edges fall off when I flip the flasks over. And I finally remembered, it was sodium carbonate (washing soda) used after the Kcl (lo-salt). The edges can be knocked down and cleaned up no problem, i was nervous about getting trapped sand grains in the aluminum, so i took a lot of time blowing all the loose sand out of the pattern cavity before I put the flasks together. I am STOKED that this turned out! for some reason i was really nervous handling the crucible of molten aluminum. it's never made me nervous before. Probably because i was doing it in my garage instead of out in the driveway. I mean I poured it in the driveway, but I had the kiln in the garage.  | ||
Teeps |
Nice job! Sand casting aluminum... takes me back to metal shop in 8th grade, "back in the day." Of course, the teacher did the pouring of the melted aluminum. | ||
Torquehd |
Need to do a better job of degassing it next time. I only used maybe 1/4 tsp of washing soda, i think i should have used a full teaspoon. They're going to be powdercoated wrinkle black anyway, so a little porosity isn't even going to show on the finished product.  While the subframe isn't welded up yet, all components currently weigh 3.3 lbs. I will add a few more piece of extruded flatstock but I believe I will stay under 4 lbs. This was the number i was shooting for; EBR's subframe weighs 2 pounds, but it's magnesium and of course it's optimally engineered. The stock 1125 subframe weighs 5.3 lbs. | ||
Sifo |
I wish my shop class taught those skills when I was a kid. I'm currently considering a small business venture that will require some casting to be done. It would be epoxy casting, but still, it would be nice to have been taught the basics. Thank God for the internet though. It's amazing what information can be found! That looks very promising! Congratulations. | ||
Torquehd |
Test fit - spot welded alum frame together to verify correct fitment. I can't wait to get the body painted.... still need to order paint and a gun. So... single stage or basecoat/clearcoat?? Opinions?   You can see why I want to make my own seat to match. And now it's back to the drawing board for making the undertray. Will have to figure out fitment for battery, fuse boxes, etc. And make a tail light. | ||
Sifo |
If you plan on multiple colors with taped lines, or vinyl graphics, decals, etc. a clear coat becomes a no brainer to me just because it will soften the taped edges and keep graphics protected. If it's going to be a single color, it really shouldn't matter as long as it's a paint that's designed to be a top coat. I've seen color coats that are designed to be cleared over have that step skipped and fade badly. I think most paints these days take a clear coat though, but you local paint dealer will know his products best. |