G oog le BadWeB | Login/out | Topics | Search | Custodians | Register | Edit Profile


Buell Forum » XBoard » Archive through June 28, 2011 » Changing rear cyl spark plug.. « Previous Next »

Author Message
Top of pagePrevious messageNext messageBottom of page Link to this message

Buford
Posted on Sunday, June 12, 2011 - 11:43 pm:   Edit Post Delete Post View Post/Check IP Print Post    Move Post (Custodian/Admin Only) Ban Poster IP (Custodian/Admin only)

Any tips etc. on how best to attack this?

thanks!
Top of pagePrevious messageNext messageBottom of page Link to this message

Terrys1980
Posted on Sunday, June 12, 2011 - 11:51 pm:   Edit Post Delete Post View Post/Check IP Print Post    Move Post (Custodian/Admin Only) Ban Poster IP (Custodian/Admin only)

The airbox cover and bottom piece will have to come off. Get a 5/8" swivel spark plug socket that has the rubber piece inside to hold the spark plug. Be extra careful when putting the new plug in not to cross thread it and don't forget the anti-seize grease on the threads.
Top of pagePrevious messageNext messageBottom of page Link to this message

Greg_e
Posted on Monday, June 13, 2011 - 12:55 am:   Edit Post Delete Post View Post/Check IP Print Post    Move Post (Custodian/Admin Only) Ban Poster IP (Custodian/Admin only)

Having done this once without the swivel socket and once with the swivel socket, you need the swivel socket. There really is no discussion.
Top of pagePrevious messageNext messageBottom of page Link to this message

Bicyclebob
Posted on Monday, June 13, 2011 - 01:11 am:   Edit Post Delete Post View Post/Check IP Print Post    Move Post (Custodian/Admin Only) Ban Poster IP (Custodian/Admin only)

Put a piece of fuel line on the top of the plug and tighten it in all the way by hand......then use the swivel socket.
Top of pagePrevious messageNext messageBottom of page Link to this message

Noone1569
Posted on Monday, June 13, 2011 - 08:19 am:   Edit Post Delete Post View Post/Check IP Print Post    Move Post (Custodian/Admin Only) Ban Poster IP (Custodian/Admin only)

+1 on the swivel socket. With the larger Buell Tool Kit (one that rolls up), it included a swivel socket that made changing these a piece of cake.

Just take your time, take care to hand thread it nicely before taking the wrench to it. I was able to just use my hand, but the fuel line method seems to work for a lot of people. The other buell site has a fairly good walk through video.
Top of pagePrevious messageNext messageBottom of page Link to this message

Gentleman_jon
Posted on Monday, June 13, 2011 - 08:59 am:   Edit Post Delete Post View Post/Check IP Print Post    Move Post (Custodian/Admin Only) Ban Poster IP (Custodian/Admin only)

Here is a good discussion of the problem from days gone by.

http://www.badweatherbikers.com/buell/messages/32777/498317.html#POST1588038

It includes a photo of the Official Sag Harbor Spark Plug Changing kit which should be in the tool kit of every right thinking Buelligan.


g


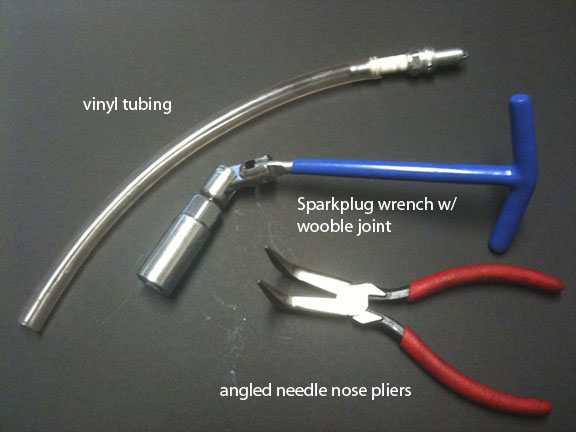
PS: There is a knowledge vault on this site, which contains the collective wisdom of the early XB owners who, together, solved just about every problem with these bikes. There were quite a few of them, if memory serves.

It is a bit difficult to search at times, and I have found the GoogleBadWeb function at the top of every page to usually works best.


(Message edited by gentleman_jon on June 13, 2011)
Top of pagePrevious messageNext messageBottom of page Link to this message

Slaughter
Posted on Monday, June 13, 2011 - 09:42 am:   Edit Post Delete Post View Post/Check IP Print Post    Move Post (Custodian/Admin Only) Ban Poster IP (Custodian/Admin only)

Kinda hate recommending Harbor Freight (but somebody has to support the Chinese workers)

They have a set of 4 sparkplug sockets for $11

http://www.harborfreight.com/4-piece-swivel-spark- plug-socket-set-95487.html
Top of pagePrevious messageNext messageBottom of page Link to this message

Midknyte
Posted on Monday, June 13, 2011 - 12:07 pm:   Edit Post Delete Post View Post/Check IP Print Post    Move Post (Custodian/Admin Only) Ban Poster IP (Custodian/Admin only)

I've not needed to remove my inner airbox to change the rear plug. But, absolutely, do use some rubber tubing or a length of fuel line to get the plug started. And patience. And a dab of anti-sieze.
Top of pagePrevious messageNext messageBottom of page Link to this message

Buford
Posted on Monday, June 13, 2011 - 01:52 pm:   Edit Post Delete Post View Post/Check IP Print Post    Move Post (Custodian/Admin Only) Ban Poster IP (Custodian/Admin only)

Awesome..thanks so much guys.
Top of pagePrevious messageNext messageBottom of page Link to this message

Terrys1980
Posted on Monday, June 13, 2011 - 02:11 pm:   Edit Post Delete Post View Post/Check IP Print Post    Move Post (Custodian/Admin Only) Ban Poster IP (Custodian/Admin only)

I looked back through the manual. Midknyte is correct on not having to remove the inner airbox.
Top of pagePrevious messageNext messageBottom of page Link to this message

Srwitt
Posted on Monday, June 13, 2011 - 10:27 pm:   Edit Post Delete Post View Post/Check IP Print Post    Move Post (Custodian/Admin Only) Ban Poster IP (Custodian/Admin only)

I just use multiple extensions and go in through a slot btw the frame and the airbox base. Its a PITA but I've managed to change the plugs 4 times so far and this is how I've done it. A wobblejoint would be much easier
Top of pagePrevious messageNext messageBottom of page Link to this message

Greg_e
Posted on Monday, June 13, 2011 - 10:43 pm:   Edit Post Delete Post View Post/Check IP Print Post    Move Post (Custodian/Admin Only) Ban Poster IP (Custodian/Admin only)

You would be surprised how much easier with the u joint attached to the socket like the pictured tools.
Top of pagePrevious messageNext messageBottom of page Link to this message

Irideabuell
Posted on Monday, June 13, 2011 - 11:02 pm:   Edit Post Delete Post View Post/Check IP Print Post    Move Post (Custodian/Admin Only) Ban Poster IP (Custodian/Admin only)

No jokes please, but I have small hands and am able to reach in and remove and rear cylinder plug and put it back in. I did need the swivel socket and even got the piece of hose, but never used it.
Top of pagePrevious messageNext messageBottom of page Link to this message

Luv2spd
Posted on Tuesday, June 14, 2011 - 11:27 am:   Edit Post Delete Post View Post/Check IP Print Post    Move Post (Custodian/Admin Only) Ban Poster IP (Custodian/Admin only)

I found this video very helpful, even though the video is a few minutes long, it takes a lot longer in real life, even longer if you have sausage fingers.

http://www.youtube.com/watch?v=aMeqOE5Jxsg
Top of pagePrevious messageNext messageBottom of page Link to this message

Gentleman_jon
Posted on Wednesday, June 15, 2011 - 10:24 am:   Edit Post Delete Post View Post/Check IP Print Post    Move Post (Custodian/Admin Only) Ban Poster IP (Custodian/Admin only)

Nice video, but really, that is sort of doing it the hard way.

There is no real need to remove the filter and inner air box cover.

Just remove the front plug with an ordinary box end wrench, (or ring spanner as we used to say), from the side after removing the scoop and spar kplug wire.

Using the Official Sag Harbor spark plug wobble wrench,(see above), the rear plug can be removed by sliding the wrench in from the side, under the frame.

The angled needle nose pliers make fooling around with the spark plug wires easier, especially if one is ham fisted.

Don't forget to check the wires for chafe and cracks. Always a good idea to replace them, especially on older XB's as there was an upgrade somewhere along the line.
Top of pagePrevious messageNext messageBottom of page Link to this message

No_rice
Posted on Wednesday, June 15, 2011 - 11:04 am:   Edit Post Delete Post View Post/Check IP Print Post    Move Post (Custodian/Admin Only) Ban Poster IP (Custodian/Admin only)

i use a cheapo set of spark plug boot pliers. alot safer then the needle nose since they wont tear of the rubber on the boot or wire.

and it really is a quick and easy job once you figure out how to do it.
Top of pagePrevious messageNext messageBottom of page Link to this message

Buford
Posted on Saturday, June 18, 2011 - 11:22 am:   Edit Post Delete Post View Post/Check IP Print Post    Move Post (Custodian/Admin Only) Ban Poster IP (Custodian/Admin only)

Got R done. The rear was easier than I had expected. Didnt realize both plugs are on the left side..ha.

Iridiums..
Top of pagePrevious messageNext messageBottom of page Link to this message

Dhays1775
Posted on Saturday, June 18, 2011 - 12:04 pm:   Edit Post Delete Post View Post/Check IP Print Post    Move Post (Custodian/Admin Only) Ban Poster IP (Custodian/Admin only)

I just bought some iridiums from Al at American Sport Bike. Planned on putting them in tomorrow morning. And I might as well change the oil while I'm at it. These bikes are easy to work on once you figure them out. I know it took me a little bit.

LEARNING HAS OCCURRED!!! WOOHOO!!!
Top of pagePrevious messageNext messageBottom of page Link to this message

Aj_brooklyn
Posted on Wednesday, June 22, 2011 - 09:01 pm:   Edit Post Delete Post View Post/Check IP Print Post    Move Post (Custodian/Admin Only) Ban Poster IP (Custodian/Admin only)

I just bought some iridiums from American Sport Bike also,what is the gap on those ? same as regular plugs or something different?
Top of pagePrevious messageNext messageBottom of page Link to this message

Terrys1980
Posted on Wednesday, June 22, 2011 - 09:10 pm:   Edit Post Delete Post View Post/Check IP Print Post    Move Post (Custodian/Admin Only) Ban Poster IP (Custodian/Admin only)

.035
Top of pagePrevious messageNext messageBottom of page Link to this message

Dhays1775
Posted on Wednesday, June 22, 2011 - 11:48 pm:   Edit Post Delete Post View Post/Check IP Print Post    Move Post (Custodian/Admin Only) Ban Poster IP (Custodian/Admin only)

Those plugs are already gapped. There's no need to mess with them. It even says so right on the box.
Top of pagePrevious messageNext messageBottom of page Link to this message

Aj_brooklyn
Posted on Thursday, June 23, 2011 - 08:20 am:   Edit Post Delete Post View Post/Check IP Print Post    Move Post (Custodian/Admin Only) Ban Poster IP (Custodian/Admin only)

Thats cool, thanks i didn't even look at the package yet.
Top of pagePrevious messageNext messageBottom of page Link to this message

Terrys1980
Posted on Thursday, June 23, 2011 - 09:18 am:   Edit Post Delete Post View Post/Check IP Print Post    Move Post (Custodian/Admin Only) Ban Poster IP (Custodian/Admin only)

Pre-gapped or not always check them.
Top of pagePrevious messageNext messageBottom of page Link to this message

Chessm
Posted on Friday, June 24, 2011 - 11:49 am:   Edit Post Delete Post View Post/Check IP Print Post    Move Post (Custodian/Admin Only) Ban Poster IP (Custodian/Admin only)

i just flipped the bike upside down and shook it really hard


also found a bunch of quarters
« Previous Next »

Add Your Message Here
Post:
Bold text Italics Underline Create a hyperlink Insert a clipart image

Username: Posting Information:
This is a public posting area. Enter your username and password if you have an account. Otherwise, enter your full name as your username and leave the password blank. Your e-mail address is optional.
Password:
E-mail:
Options: Post as "Anonymous" (Valid reason required. Abusers will be exposed. If unsure, ask.)
Enable HTML code in message
Automatically activate URLs in message
Action:

Topics | Last Day | Tree View | Search | User List | Help/Instructions | Rules | Program Credits Administration