| Author |
Message |
    
Fresnobuell
| | Posted on Friday, September 12, 2008 - 01:13 am: | 


|
Hell ya...if this happens to be something other than an isolated incident (meaning ONE bike other than Zacs) I will insist on being in the shop when the tech gets to my cams. That is within my rights, correct? |
Zac4mac
| | Posted on Friday, September 12, 2008 - 06:00 am: |
|
The only time I "noticed" any noise was at a rest-stop in Iowa on the way to Homecoming.
Thought I was low on oil, a trucker hauling Mobil 1 gave me a liter Coke bottle full of 15w40 just in case.
Still haven't gotten a good look at the follower, what I could see looked good, other than the one cam face.
I may have the oil tested, but I am Not worried at this point for the rest of the engine.
With the spark plugs out, I looked inside with a couple of medical-grade borescopes(arthroscopes) and saw nothing unusual.
Bad lobe is on front exhaust cam.
Oil changes -
500 miles, dump, clean filter(new ones weren't out yet) replaced with Valvoline Dura-Blend 20w-50.
Break-in oil was black, black dust on magnet plug.
620 miles - fresh Syn3, fresh filter, Valvoline was clear, plug was clean.
6700 miles - fresh Syn3, fresh filter, Syn3 darker but clear, plug was clean.
12,367 miles - dumped oil, dark but clear/clean, no metallic glints, about the same black dust as break-in.
I have 3 qts of Red Line 10w40 to fill her with this time.
Hope to have her buttoned up this afternoon and off to High Country's service bays...
Z |
Zac4mac
| | Posted on Friday, September 12, 2008 - 06:06 am: |
|
BTW, the screen I mentioned was the screen at the pick-up tube.
The one Bpt inquired about.
http://www.badweatherbikers.com/buell/messages/290 431/392305.html?1220931795
Z |
Rocketray
| | Posted on Friday, September 12, 2008 - 06:10 pm: |
|
I finally have my bike back together. Did the 3rd In-Service in my garage, and it is no piece of cake.
Started Monday Sept 1 and finished up today, estimating 20 to 25 hours into it. When I do it again, I bet I can get that time down to 16 hours. 
I talked to Zac4Mac during the procedure, he helped me out in a couple of crucial spots. Thanks!
Nothing during the job was really surprising, all went according to the service manual. I took digital pictures at various places during the teardown, which proved to be VERY handy putting it all back together.
Notes to myself for the next time:
1) Definitely clamp the rear wheel, and tie down on the back side. (I did a front tire chock and tie down --- which complicates many steps)
2) Step 6 section 3.4 -- The IAT sensor simply slides out of a rubber grommet. This is not like disconnecting an electrical connector.
3) Step 17 section 3.4 -- A finger squeese disconnects this connection
4) Step 18 section 3.4 -- There is an unused electrical connection inside the outer shroud, with purple/white wires.
5) Step 23 section 3.4 -- The speed sensor wiring is on the right side, behind the plastic heat deflector
(the one that some people say has melted, held on by a single torx bolt and fender washer.)
No need to take off the metal heat deflector on the header pipe.
6) Steps 26, 27, 28, 31, 32. Make good notes on where each fastener came from. A bit confusing here putting it together if good notes are not taken.
7) Step 28 b. The nut and washer are not welded to the frame. They will come off. 13mm
8) Step 30 very minor typo in figure 3-18 or in write up of step 30 (fastener - lockwasher numbers don't match figure)
9) Step 32 No pinch bolt for this center motor mount fastener, which is on the left side.
Step 1 section 3-10 Sealing Sleeve. This ignition cover plug can almost be removed with your finger nails. A very wide flat screwdriver works well, just to pop it off.
Step 1 section Camshaft assembly -- Valve covers. The valve cover fasteners are made in such a way, that they never will come out of the cover. Simply loosen them completely. The cover will come off
Step 6 Valve Clearance -- valve lash Removing the spark plugs. A narrow 5/8 plug socket fits the sparkplugs.
-- I turned engine clockwise, (hope this is direction of rotation of engine)
-- second note: I ground off the bevel from a crap 17mm socket, to that it would fit better onto the narrow bolt-type head - end of the crankshaft
The valve lash was within specs. Intake for both sides were .006 ( on the tight side, but within specs) and exhausts were .012 and .011
Putting it all back together. (I was feeling stressed at this point)
My inch/lb torque wrench is about 14 inches long. Really need something about 8 inches long to reach some of the tight places.
Used medium strength loc-tite on various fasteners. Hopefully on enough of the fasteners... time will tell.
Between steps 20 and 21 Installation of motor rotation (page 3-19). Be sure to install fasteners securing
the radiator outlet ducts to the K brackets. 4 bolts, and the top 2 have washers. I think they left this step out.
Step 21 (I think 86-96 in/lbs is too much torque for the radiator inlet duct fasteners. I stripped one.)
I spent about an hour trying to install the intake snorkel as step 31 ,
gave up, and disassembled back to step 27. Installed the snorkel as step 27 1/2, then proceeded with step 28. So next time,
I will do step 31 in-between steps 27 and 28.
Mishaps:
1) I only disconnected 1 of the horn's 2 wires, so during engine rotation, the back wire was stretched then broke.
2) During one of the times while moving the engine back up, the O2 sensor connector got wedged and stuck then stretched off of its wire. So.. new O2 sensor was ordered.
I think if I had the bike tied down from the back, instead of the front, this would not have happened.
3) While front valve cover was off, oil dripped out onto the front O2 sensor/header area, and during startup... this oil burned.. causing smoke. a bit unsettling during that first start up.
4) While checking the valve lash, I felt stressed that I would not be able to get it all back together. When it was all together, and the bike started. Whew! Great feeling!!
Hope this helps!!
Rocket Ray |
Slypiranna
| | Posted on Friday, September 12, 2008 - 06:20 pm: |
|
Rocket Ray,
Great post!  |
Slypiranna
| | Posted on Friday, September 12, 2008 - 06:25 pm: |
|
Based upon the fact that no major heat discoloration is viewed in Z's cam lobe pics...I'd bet to call this a bad core that got through Q.C...it happens.
Happy to hear that BMC is taking care of Zac's claim. Great call and hat is off again to all that are positive in resolve.
All the best Zack! mm |
Chevycummins
| | Posted on Friday, September 12, 2008 - 06:35 pm: |
|
Anybody know what the flat rate time is for a valve adjustment on this bike? |
Zac4mac
| | Posted on Saturday, September 13, 2008 - 07:54 am: |
|
I have heard 4-4.5 hrs.
Loretta is almost back together now, she almost looks like a motorcycle again.
Didn't get everything done I wanted to yesterday.
So far I have had a couple of small problems too.
Broke off part of the nipple on the top of left radiator removing the "ear clamp" on the rad equalizer hose on top.
Still enough to reconnect the hose.
Two of the brass inserts on the left pod came out, one is cross-threaded.
Re-inserted with a soldering iron inside, re-melted to the shell, seems to have taken well.
Thanks right back to Ray, it was a collaboration and eased both our minds as we worked thru this one.
I love BadWeB.
Z |
Chadhargis
| | Posted on Wednesday, September 09, 2009 - 11:30 am: |
|
I am probably going to try to do the valve check/adjustment myself.
It seems far less complicated than ones I've done where you have to remove the cams to lift the buckets. The finger follower makes things easy.
If not for the swingarm being attached to the rear of the engine, I'd be damn tempted to just remove the motor and set it on my bench. But removing the swingarm would be a real PITA. |
Blake
| | Posted on Wednesday, September 09, 2009 - 06:37 pm: |
|
Leave it attached? |
Spectrum
| | Posted on Wednesday, September 09, 2009 - 09:37 pm: |
|
No need to remove the rear swingarm. I watched the RMR guys tear down Danny's Buell for tech inspection this weekend. All they did was unbolt the rear shock. Took them about 15 or 20 minutes to get the bike to this point. I'm sure it would take me a good bit longer. I like to consume cold beverages when I work on the bike.
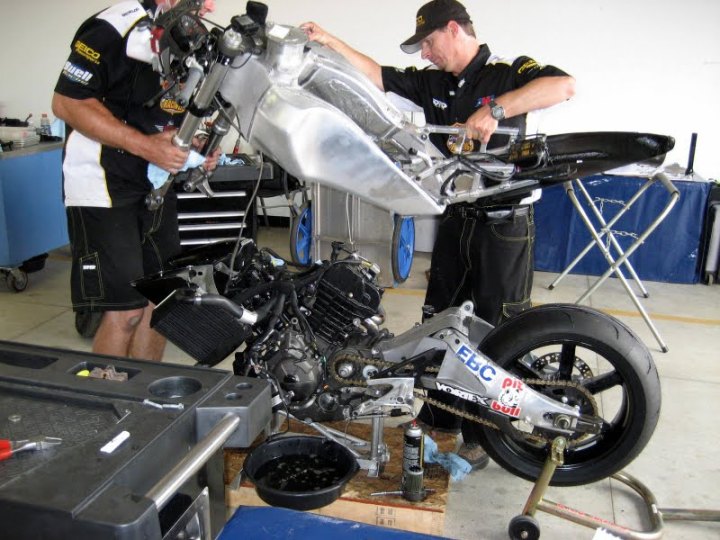
|
Smoke
| | Posted on Wednesday, September 09, 2009 - 09:52 pm: |
|
that looks easier than rolling the motor forward.
tim |
Avc8130
| | Posted on Wednesday, September 09, 2009 - 10:00 pm: |
|
Wow...that looks like a great way to do it. The belt wouldn't even have to come off. Exhaust could stay. Hmm...
ac |
Chadhargis
| | Posted on Wednesday, September 09, 2009 - 11:36 pm: |
|
Hummmm....now THAT'S a damn fine idea.
Plenty of room for my big hands to work. |
Bigblock
| | Posted on Thursday, September 10, 2009 - 12:38 am: |
|
Wow! I wonder if that's do-able with the stock bike, taking wiring harness, and etc. all into account? Man, that looks way easier than motor rotation!
Hmmm, I'd really like to pick those guys brains right about now... |
Fresnobuell
| | Posted on Thursday, September 10, 2009 - 12:46 am: |
|
That breakdown in Tech is WAY different from Fontana where Danny got his first two wins. I watched the whole process and it WAS a process. In Fontana, they dropped the motor in the traditional fashion. It was a trip cause the other two Japanese bikes were in and out in a quarter of the time (or less) it took the Buell guys to finish. Now I don't know if they were asking to inspect that same parts of the Japanese bikes, but the difference in the effort it took the various teams was extreme.
Obviously, the Buell team has gained experience in post-race Tech during the course of the season and they have developed a better way to get the job done. |
D_adams
| | Posted on Thursday, September 10, 2009 - 07:49 am: |
|
This method of separating the frame/tank from the motor/shock is listed/shown in the service manual. Not too sure about how easy it would be to do by yourself, but apparently it can be done. |
Avc8130
| | Posted on Thursday, September 10, 2009 - 08:10 am: |
|
I am going to have to look over the manual. Rotating the engine is definitely going to be less involved, but working on the engine will be much easier with the frame removed.
ac |
Xl1200r
| | Posted on Thursday, September 10, 2009 - 09:42 am: |
|
I don't know if I would call that easier... First off, there's a lot more wiring on a street bike than a race bike, as Bigblock pointed out, and on top of it the race bike wiring could be designed with plugs ins in certain locations to aid in this method.
Second, now you have to find a place to put the frame and everything - not really a big deal per se, but you don't want to scratch up anything on a street bike, and it does take up more room.
Third, I can't see doing this safely (for persons or machine) with only person - you'll need a buddy to help.
Fourth, the exhaust may be able to stay on IF yours is still stock and can be used as a jacking point. Otherwise, you'll need to come up with a rather creative way of suppoting the lower half of the bike under the engine (as these guys did in the picture above).
I think if this is something you can do in about the same amount of time, and you have the means to do it all, it would make working on the engine much easier. For the backyard mechanic, I have my doubts... but I'll be getting the service manual before I do my own valve adjustment and I'll look it over and decide which method might work best for me. |
D_adams
| | Posted on Thursday, September 10, 2009 - 10:38 am: |
|
A regular automotive cherry picker would probably do the trick if you're doing it by yourself. |
Ccryder
| | Posted on Thursday, September 10, 2009 - 11:26 am: |
|
Chad:
I'll help, err look over your shoulder err, make rude comments err, drink your beer LOL.
Anyway, between you and I we should be able to do the rotation. Z and one of the other BWB's had a step -by-step on how to do it including what they forgot to do the first time. Also what not to do (kinda important).
Later |
Zac4mac
| | Posted on Thursday, September 10, 2009 - 02:15 pm: |
|
It's all here Neil.
Blake resurrected the old post from last fall when Ray and I did this.
Thanks Blake!
As to the frame-off, Max did just that with one of our race 1125s.
Had to replace a frame, seemed more involved than "simply" rotating.
I think you'll have to pull at LEAST as much stuff as rotating.
The motor is DEFINITELY more accessible with the frame off tho.
Z |
Chadhargis
| | Posted on Thursday, September 10, 2009 - 02:45 pm: |
|
Neil,
When the time comes (you'll beat me to your next valve check I'm sure), feel free to haul her over to my shop.
I've got AC (or heat if needed), a beer fridge, compressed air, plenty of tools, a stereo connected to my iTunes library (or satellite radio if you choose) and a porn channel. What else can you need?
Oh yeah...I have stands, jacks, and such too.
Did I mention beer and porn...oh, and a service manual. |
Avc8130
| | Posted on Thursday, September 10, 2009 - 03:07 pm: |
|
Zac,
I don't think you adjusted any valves, did you? Would it be significantly easier (worth the extra effort) to pull the frame off if actual adjustments were necessary, rather than just a check?
ac |
Zac4mac
| | Posted on Thursday, September 10, 2009 - 09:54 pm: |
|
Tony - No adjustments made, all clearances were in spec.
If I had needed to change shims, the finger followers make it an easy step with the engine rotated, no need to pull the frame off.
You pop the plastic clip and the follower slides out of the way. V-Rod shims pop in easy.
I'll admit it sure looks cool with the frame off, and it only weighs a few pounds if empty of fuel.
Trust me, it's enough work as it is, pulling the frame on a street model would be unnecessary extra work.
If you do this, remember to disconnect BOTH horn wires and be careful with the radiator crossover nipples.
Like I said, Blake resurrected the whole thread, so 12.4 k service is all here start to finish.
Any questions, PM me or call me at home at 720four9fourzero78four.
Zack |
Avc8130
| | Posted on Thursday, September 10, 2009 - 10:24 pm: |
|
Zack,
I am only 1/2way there, but I will have to do the service next summer. I will definitely do it myself. I get so nervous when other people work on my bike.
ac |
|