| Author | Message | ||
Ulyful |
New to the site--GREAT SITE/INFO--looks like I have a few minor items to check (wheel bearings, sidestand, etc......went through the "new riders" section already). Back to my question......has anyone experienced instrument panel vibration on their '06 XB12X??? I just bought one with only 3,000 miles on it--great bike--but when the engine revs cycle up and down (mostly down) through around the 2,000 RPM range, I get a very annoying instrument panel vibration. I've seen some Buell Service Bulletins for some older model Buells (1995's) on the Service Bulletin thread that show an "Instrument Panel Stabilizer" that appears to help reduce the vibration on mid-90's Buells, but haven't seen anything for Uly's. This apparently is a known problem with past Buell models so wondering why Buell didn't see to it that this issue didn't happen on future models. The previous owner (original owner) said he took it in and the Buell dealer at the time just put a rubber pad in somewhere to help quell the vibration but it's still pretty awful. Before I start taking parts off the instrument panel/upper cowl one-by-one (starting with the wind/bug screens) and seeing which one may need to be stiffened/modified/better secured/replaced, I was hoping someone might tell me where the target problem area might be. Thanks. | ||
Pontlee77 |
as far as i know there are 3 rubber grommets to soak up that vibration. | ||
Etennuly |
Have you looked at any other Ulys while they are in their idle range? Depending on what windshield is attached they can shake like crazy at idle. The bigger the windscreen the more it will shake. You also may have a bad front engine isolator that can cause more engine vibes to get to the frame. | ||
Teeps |
The horns on some '06 Ulysses would rattle. If I recall correctly the solution was to reverse the mount. On my '06 the clear wind screen would rattle. The fix was to wrap felt wool around the locater pins to tighten them up in the grommet. | ||
Arcticktm |
Is it making noise that is bothering you? Vibration is inevitable, especially at idle on these beasts. If it is noise, take of the flyscreen and check for parts rubbing. 1st check would be the horn against the flyscreen or metal. It is crowded under there, so it is likely that simple, especially if a previous owner made any alterations. I added a larger horn and GPS wiring to mine, and it took some thought to decide how to re-arrange things underneath to keep them in safe positions. 1st photo with stock horn (see I added a rubber strip for vibe damping which also made the horn worthless). 2nd photo with replacement Fiamm horn and reorganized unders shroud wiring. 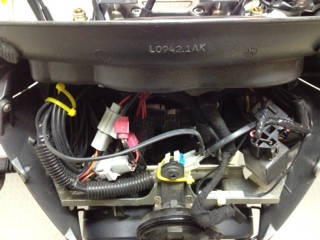 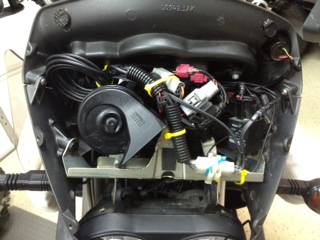 | ||
Ulyful |
The original owner that I bought the bike from didn't make any mods to the bike (according to him). I believe him. He "disclosed" the vibration issue to me (in the spirit of full disclosure) prior to me driving 500 miles to his house to come pick it up. The bike has the original windscreen/windshield, but if the vibration only gets worse with a larger windscreen, which I eventually plan to install (the biggest one I can find actually--I'm 6' 5" and don't like buffeting) I will need to be doubly sure I eliminate the issue before installing a larger windscreen. The vibration issue doesn't occur at idle, only around 2,000 RPM. I own a '12 Road King w/TC103 that shakes alot more than this bike at idle. I'm perfectly fine with the normal idle vibration on the Uly. The front of the bike seems to do more than just vibrate. It's a very healthy "shudder", brought on by engine RPM's. The shudder goes away with more (or less) engine RPM's. The front engine isolator makes sense. I will be sure to look at that very closely when I start the investigation. Has anyone replaced the upper locating pins in their windshield with the Chinese screw/rubber grommets sold on Ebay? ....or possibly factory ones? I would think the four-point secure system would be more robust and secure than Buell's OEM two fasteners and two push pins/locating pins system. The pics provided by Arcticktm really help drive home the point that there is ALOT of stuff underneath that flyscreen. I have the patience to wrap each and every hanging component in fabric to see if I can isolate the problem. Any others that might have an idea what might be wrong or where I should look, I'm still very willing to listen. Thanks all who have already responded. | ||
Hughlysses |
Ulyful- definitely check the front isolator. If that's OK, I'd check the primary chain adjustment. A too-loose primary chain will definitely increase vibration. About the windshield fasteners: The original standard height windshield was held on by 4 of the push-type locating pins, and they work fine for that. When Buell made the taller windshield available, they soon found out the pins were insufficient because of the greater forces on the taller windshield and they added the lower bolts as a recall. If you think about the force of the wind on and how it acts on the windshield, you can see that lower supports (bolts or pins) take something like 99.99% of the load anyway. As long as you have the factory bolts in the lower holes on your windshield, it's not going anywhere. | ||
Etennuly |
For your wind buffet problem try taking the screen off for a ride. Some folks found the shape or angle of their helmets and even their jackets caused their buffet problems. I tried the Buell tall windshield and it took me from a smooth air stream to making my helmet shake so bad I could not see at 55 mph. I am 6'. I agree with Hugh, if the isolator is good the primary chain is next on the list. | ||
Teeps |
Here's a thread with photos of a failed Isolator and a new one. http://www.badweatherbikers.com/buell/messages/142 838/626617.html | ||
Danair |
2 of my Uly's had some form or another of missing hardware and or the grommets when I got them. They are a pita especially the rear one so I can see someone going "yeah whatever" and its still in his toolbox somewhere. They make a big difference and if its getting your attention more than the stupid windscreen shaking in the flyscreen grommets, they're probably missing. | ||
Goodburbon |
I test rode an 09 XP that had the same vibrations that would cause an annoying rattle,, and the 09XT I just purchased has an ear plug wedged between the windshield and gauge pod to keep it from rattling as the plastic makes repeated contact. Check the isolator and see if its good. If so Remove the windshield and try it, if that fixes it you may just need to disassemble and clamp some high density foam between the pieces to keep it all tight and isolated as a poor man's fix. | ||
Britchri10 |
I have a 0g screen on an XP + Madstad brackets. I lined the front screen w/draught excluder tape. It dampens down the rattles quite well. I also installed the 6 front screen screws w/cotton wrapped around them for a tighter fit. (No loctite-I need access to the area behind the screen.) Oh, & I reversed the horn. YMMV Chris C | ||
Ulyful |
Thanks. I'll be checking: Front Isolator, Primary chain tension, missing hardware, horn vibration, and windscreen vibration. Will not stop until I find it. I'm currently distracted unfortunately with getting some outdoor house maintenance projects completed before the Michigan winter sets in. The XB vibration investigation may have to wait until the off-season. I'll be sure to let everyone know what it was when I find it. Thanks for taking the time to share your insights. | ||
Ulyful |
I kept poking around the awesome BWB site and found this thread that pretty much explains the vibration I'm experiencing... http://www.badweatherbikers.com/buell/messages/142 838/626617.html I looked at my front engine isolator and found there's no 1/8" to 1/4" gap between flange on the hex socket bolt that goes through the isolator and the rubber washers attached to the isolator itself (as shown in the "bad isolator" picture in the thread). I'm sure the engine is bangin' on the front steering head that the isolator bolt is attached to, causing the heavy shake on the front end of my bike. I'm gonna replace that sucker right away! I'll let y'all know if that takes care of the vibration problem. | ||
Argentcorvid |
mine does the same gauge cluster vibration at somewhere around 1800 RPM, and the isolators are good. It's good that you caught it, but it might not fix the rattle. | ||
Uly_man |
 | ||
Ulyful |
My '06 Uly front engine mount isolator definitely looks like the one in the first picture above (the "bad" picture). The original owner said the vibration has been with the bike since "Day #1". The bike only has 3k miles on it. It probably got progressively worse as he rode it and the rubber tore away from the steel sleeve. I'm expecting SOME vibration relief, but I've been told that the 1200 HD engine in this bike "just plain vibrates" at low RPM and that I have to get used to avoiding riding it anywhere from idle, to 2500 RPM or so. I'm getting good at that actually. Ordered a new isolator assembly from my local HD dealer on 9-13-13. $88 including tax. Should be in by the end of this week. Has anyone ever replaced theirs before? How did you support the engine while R&R'ing the assembly? I don't have a service manual (on my list of things to get). | ||
Uly_man |
Palmer parts used to supply a rubber washer/spacer that I thought was a good idea. I use one and it works well.  I guess you could make your own though for near nothing. | ||
Hughlysses |
Ordered a new isolator assembly from my local HD dealer on 9-13-13. $88 including tax. Should be in by the end of this week. Has anyone ever replaced theirs before? How did you support the engine while R&R'ing the assembly? I don't have a service manual (on my list of things to get). Seems like the earlier isolators were more prone to failure. It's one of several parts on the bike that have been upgraded at least a time or two since XB production started. It's an easy job. You can support the engine with a motorcycle lift and home-built muffler cradle (see archives for template to build your own) or just a floor jack and a piece of wood. You don't need to lift the bike; you just want to hold up the front of the engine while you change the isolator. The vertical bolt that goes up through the isolator and into a boss in the frame has been known to get severely corroded on some bikes, so be aware of that (I've never had a problem). Support the engine at the front, remove the clutch cable holding widget (older wire style as shown above or improved stamped steel version which was installed on many bikes as a dealer upgrade), remove the vertical bolt, and remove the two bolts that hold the isolator to the front head. Installation is reverse of removal. You may need to adjust the engine height with the jack slightly to get the vertical bolt to screw in. I'd recommend you get the proper torque values from someone with a shop manual; I don't have mine handy or I'd get them for you. Note- the manual does not call for Locktite on any of the bolts; I've never used it on these bolts and I haven't had a problem. | ||
Ulyful |
Thanks Hugh....My dealer called this morning. My part is IN! Picking it up today after work, then heading out on a scheduled ride with my MC club. Will attempt to tackle this job Thursday or Friday. If you get the chance, please look up and post the stem bolt torque spec and the torque spec for the bolts that go into the engine. I don't have a service manual. Thanks. | ||
Hughlysses |
George- Here's a pic of the page from the shop manual: 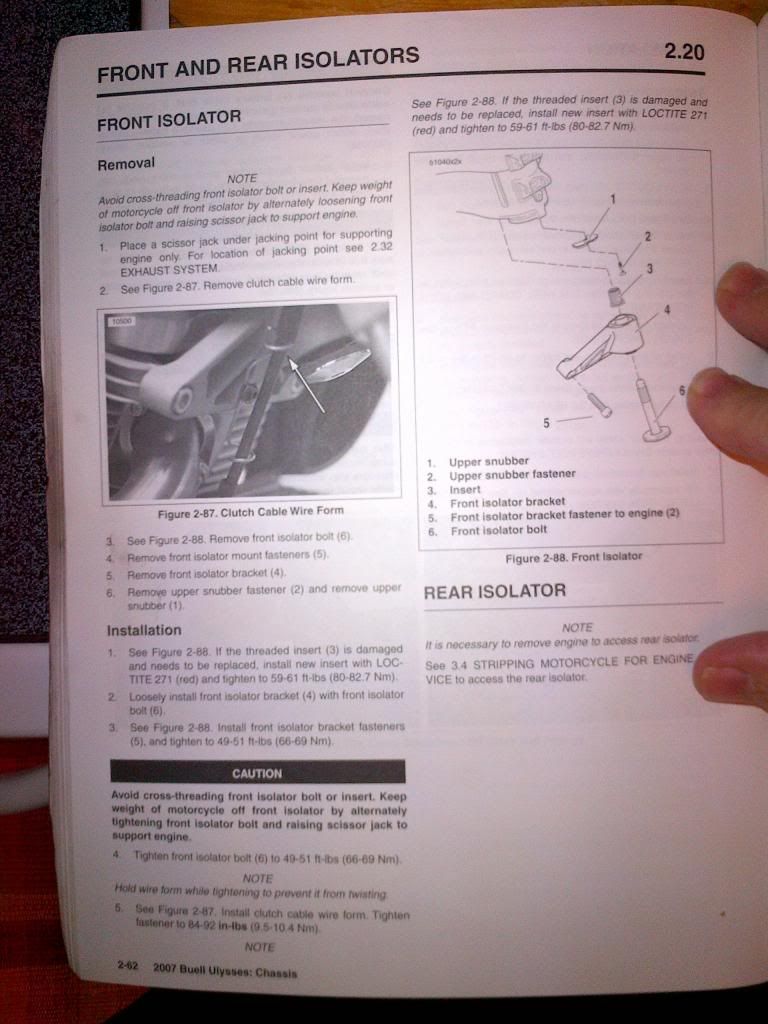 The critical points are when installing the new isolator, first loosely install the bolt that holds it to the frame, then install the bolts to the front head. Torque those bolts to 49-51 ft-lbs. Then tighten the frame bolt to 49-51 ft-lbs. The manual does not call for threadlocker on any of these fasteners. Do use red Locktite on the screw for the clutch cable bracket. Tighten that screw to 84-92 INCH-lbs, or just good-n-tite if you prefer. | ||
Etennuly |
When I have done mine I use a floor jack to support the engine. Jack it up until you see the isolator just start to move up on the front bolt. Remove the front bolt. You may have to lower the jack a bit as you go out/down because it is angled in relation to the downward movement of loosening the bolt. Then remove the isolator from the engine. This mount bolt can be a bear to unscrew all of it's thread length. I always did what I could to get some oil on the threads as I was removing it. I run it down a little, squirt some oil up on the threads and run it back up part way to spread the oil on the threads so I don't ruin the nut insert. You kind of have to start the head bolts and the big front mount bolt at the same time. Spend a little extra time making sure the isolator to head bolts are properly aligned so that they don't cross thread. I use thread locker on these two that screw into the head. The long big mount bolt threads gets used motor oil on the threads in my bike. I'm on my fourth replacement isolator and it has yet to come loose with oil on it. It may be tricky, but it is not really difficult to get the bolts all started straight. It is time well spent to make sure before putting a wrench to them. As the book says, going in with the front bolt may take moving the jack up as you tighten it. I also question the torque spec on the bolts that screw into the head. 50 ft lbs seems a bit much for an aluminum head. Therefore I stop at 38-40 with thread locker. But hey, that is just my opinion.  | ||
Ulyful |
Thanks for the tips and service manual page pic guys. I took notes. Will tackle the job in the next few days. The new isolator doesn't have a rubber washer included in the kit. It just has the isolator (including casting) and big flange bolt. I like the idea that a rubber washer is in place to help dampen the metal-to-metal contact if the rubber isolator fails again and falls down to the flange bolt. I will either re-use my old one or make a new one with some sheet rubber I might have laying around the house. I like the idea of a lower head fastener torque and loctite (into the aluminum head). I generally like using blue loctite (medium strength) though in joints I might have to one day loosen again. Red loctite is high strength and very tough to break loose (learned that the hard way through personal experience). One last question....where is the "recommended jacking location" on the muffler? Common sense tells me it's directly under or near the muffler attachment straps, but based on seeing Buell's poor design here on this front engine mount isolator, not sure if common sense can be applied. | ||
Hughlysses |
If you look closely on the right side of the muffler, there's a small triangle stamped in two locations to indicate the jacking points. ...but based on seeing Buell's poor design here on this front engine mount isolator, not sure if common sense can be applied. Just out of curiosity, what is it you think is poorly designed about the isolator? A piece of rubber failed on a 7 year old motorcycle. You don't know if/how the PO may have abused it. The bike remained rideable after the failure. Sounds like a pretty good design to me. | ||
Ulyful |
Has anyone seen or installed a front engine mount isolator with an offset steel sleeve (offset from the center of the outer housing) as shown in the picture? 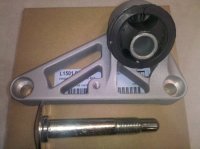 After taking a closer look, the steel sleeve in the isolator is not in the center of the rubber. Haven't seen this positioning in any of the "installed" isolator pictures of either "good" or "bad" isolators. I'm wondering if I got the right one. The picture of the isolator on BUELLPARTS.NET shows the same offset steel sleeve as the one I received. The part number the HD dealer told me I needed was L1501.02A8. It is the part number listed on the box I received. BUELLPARTS.NET also lists this same number on their website for the Uly application. However, the part number cast into the bracket on the isolator is L0501.4A8. I guess the second part number could be the original part number of the casting only....does the steel sleeve center itself in the rubber bushing once the weight of the engine is loaded onto the isolator? My guess is yes, since the gap from casting to bolt flange would be almost a half-inch if it didn't, which is alot more than the 1/8" to 1/4" gap I've seen others mention as what it should be. The picture of the isolator on BUELLPARTS.NET shows the same offset steel sleeve as the one I received. Hugh...in response to your inquiry.....Just out of curiosity, what is it you think is poorly designed about the isolator? A piece of rubber failed on a 7 year old motorcycle. You don't know if/how the PO may have abused it. The bike remained rideable after the failure. Sounds like a pretty good design to me. I'm a chassis product development engineer working for a very major automotive OEM (for almost 30 years). Believe me, it is a bad design! We would never load a bushing of this type/design in the orientation Buell did on the Uly application! Steel-sleeved bushings are not meant to be loaded in the direction this bushing is being loaded. Bushings of this type are meant to be loaded at a 90 degree direction from the direction this mount assembly design is being loaded. Fortunately, someone at Buell had the foresight to design the entire front engine mounting system (casting, bushing, wide-flange) to prevent a catastrophic failure (engine drops down severely) if the rubber tore off the bushing inner sleeve, which is the failure mode everyone appears to be experiencing with this part. The very large flange bolt "catching" the engine before it falls very far is indeed a good failsafe method, but it should never get close to doing that in the first place. With the Uly supposedly being designed to go pseudo off-road, and most of them probably not going off-road, it shouldn't be considered normal to replace an engine mount multiple times on the same bike (in Etennuly's case, 4 times). They should be more robust than that. The orientation/loading direction of the rubber isolator in the engine mount is why they aren't lasting very long. | ||
Froggy |
I don't know, I have over 40,000 miles on my 06 and another 40,000 on my 08, both on the original isolators. | ||
Uly_man |
"Red loctite is high strength and very tough to break loose (learned that the hard way through personal experience)". This stuff is used on all of the bike so watch for that one. "After taking a closer look, the steel sleeve in the isolator is not in the center of the rubber". I am not sure but I think you will find it will be right once it is under the load/weight of the engine. | ||
Hughlysses |
George- I'm sure that's the correct part; it certainly doesn't fit anything else the Harley dealer sells. I think the sleeve will center itself once it's installed and loaded. As far as the design of the part- I'd imagine Buell went to a supplier (maybe like your company) and gave them the parameters for the part. Isn't "rubber in shear" like this used for specific vibration isolation applications? Etennuly's had more failures than most; I replaced one, unnecessarily it turns out when I had a vibration issue that turned out to be a loose primary chain. They normally hold up pretty well. (Message edited by Hughlysses on September 20, 2013) | ||
Etennuly |
That is the correct part. The off center is kind of like the "preload" start location. The part numbers changed a couple of times due to how they packaged it, it came with the big bolt for a while. My first one failed at about 7500 miles. The next couple made it over 9000 miles. I'm guessing weight/load is a factor in tearing the rubber webbing. My Uly has seen a lot of two up service north of 500 pounds with gear and packed bags. Me, my gear, my camping gear, and travel stuff come it at over 325 pounds, then add a passenger. Combine this with back problems that have me sensitive to vibrations that reach the frame/seat/pegs,  I notice the web failing before most others, I have seen many who have had it completely fail before noticing the problem. I notice the web failing before most others, I have seen many who have had it completely fail before noticing the problem. (Message edited by etennuly on September 20, 2013) | ||
Ulyful |
Thanks all for confirming that I won't be installing the wrong part. Uly_man--My "oops" experience....I used red loctite on my 2000 Road King primary chain inspection cover bolts once many moons ago to make sure they didn't vibrate loose (no longer have that bike). Ended up stripping out the hex in one of the bolts attempting to loosen it later because it wouldn't turn. Had to drill it out (red loctited it previously). Managed to save the primary case cover (including the inspection cover) and only had to buy a new bolt. The hex cavity in the bolt head provided an ideal pilot for a drill bit slightly larger in diameter than the diameter of the threaded fastener shank--only had to drill down into the bolt until the head of the bolt popped off to get the inspection cover off. The beheaded shank came off with a pair of vise grips (after some of it was exposed by the now-removed inspection cover). That was the last time using red loctite on any bolts I anticipate having to take apart again. Blue loctite works pretty well too. Hugh--Some OEM's give a significant portion (or in some instances, complete) design responsibility of their sub-components to their suppliers. The OEM's that maintain that expertise in-house and know what they're doing, don't. Many of the OEM's that decided to "farm it out" pulled it back in-house after quality took a huge hit. Some suppliers can be considered experts in their field and OEM's can let them take over (i.e. Brembo). However, you will rarely see in the automotive industry this bushing design being loaded in shear, as this bushing is here. These bushings are intended to be loaded primarily in tension/compression. There is some tension/compression load being applied to this bushing, but the primary load on this bushing is the weight of the engine (shear load). Premature torn bushing rubber will be the failure mode in most instances. Etennuly--Yes, more heavily loaded MC's will put more "wear and tear" on components. That's a good general rule, but there are exceptions. Froggy--You rule dude!!! 40k on your original isolators??? Not sure how long mine lasted--my bike already had a bad isolator on it when I bought it--but I had only 3025 miles on the ticker when I picked mine up. What's your secret???  Thanks again all. I'm starting my 4th week of Buell Ulysses ownership today! I still have alot to learn. I sincerely appreciate everyone taking the time to provide the info you've provided. | ||
Froggy |
No secret, I've done nothing with them, I just ride the bike. I've done plenty of wheelies, stoppies, t-boning cars, and many other not so wise things. I've broken lots of parts and bones over the years, but not any isolators. | ||
Etennuly |
As a side note on Froggy.....he weighs in a 62 pounds wet and is no thicker than a cardboard cut out of  himself(of which he has printed many)! himself(of which he has printed many)! I, on the other hand, am built like an upside down tree stump(with a big lower limb knot in the middle) weighing in at 250 dry. I have few passengers under 200 lbs.  You are absolutely correct about the design fail of this webbing. Installing a spacer washer may help limit it's travel and save it a bit, but that also transfers vibrations to the frame rather than absorbing them as the length of it's travel is intended to do. The rear mount is done correctly and I have yet to hear of one being replaced for failure. These bikes sure do feel re-newed when a fresh front isolator is installed.  | ||
Ulyful |
Replaced the isolator this evening. It took longer to set up/take down (pull jack out, get tools out and put them back, etc.) than to replace the mount. It went very well. I was anticipating the engine moving around a bit when the big bolt let loose (completely loosened the big frame bolt first after loosening the head bolts a bit). The engine didn't move. I just placed a 1x6 piece of wood on top of my car floor jack and lifted the engine using the muffler (at the jacking point--thanks Hugh). I used Etennuly's trick of lubing the threads on the big frame bolt to help it into the frame threaded insert. With the constant load of the engine wanting to bend this bolt, doubt it will ever get loose (trusting Etennuly's first-hand experience here). It was going in a little hard, didn't want to strip or dislodge the threaded insert in the frame, so I squirted a little WD-40 on the threads a few times up near the insert to help ease the bolt into the insert. Had to use an old-fashioned L-shaped allen wrench for the job--didn't have those allen sockets for my rachet (have them with torx bits in them for my Harley but not allen bits). It took a little longer to get the big bolt out, but I'm a patient man (when I know how long I have to wait). Pics below show a sizable gap down below. Is this normal? 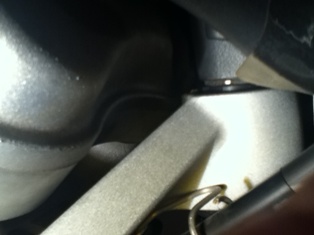 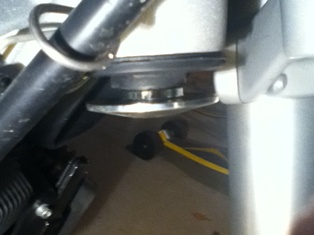 One thing I gotta say though, is this new mount makes a WORLD of difference with the vibration! Can't believe that I can actually cruise at 2,000 RPM down the street without wanting to jump off the bike! Best $88 I ever spent for a MC part!!! | ||
Etennuly |
Yep! that looks normal and you have now sensed the normal feel of the Uly's vibes! I tend to use torx bits in the allen heads for most of my work. As long as they don't fit loose they work fine. but don't tell anybody.....they will think you are doing it wrong! |