| Author | Message | ||
Dhays1775 |
What had happened was... I noticed a ticking noise coming from the front of the engine on the way back from a nice little ride to Borrego Springs. (Thanks Roguebiker!!) Any who... Felt like it was a little down on power, but only a little. I continued to ride, noticing the power drop a little more and a little more. Added a little oil, and my wife said that the ticking went away. With my helmet on I could hear it plain as day, but no helmet, no ticking!! Continuing on... Decided to change the oil, now at 22,500 miles. Just a little shy for the valve check, but decided why not? AAAAAANNNNDDDDD... This is what I found!!! 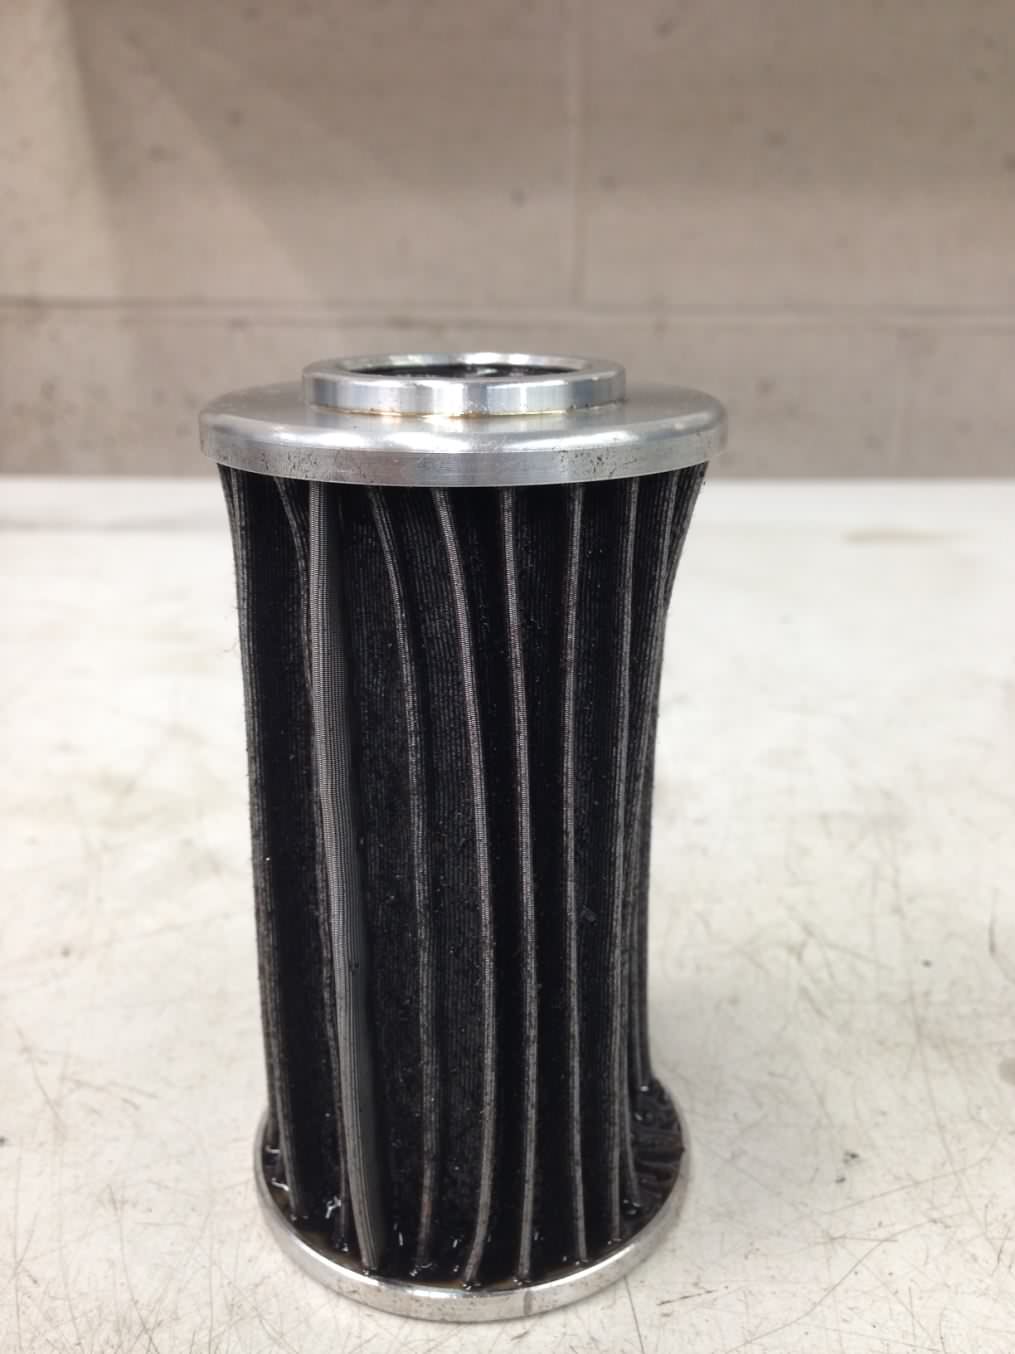 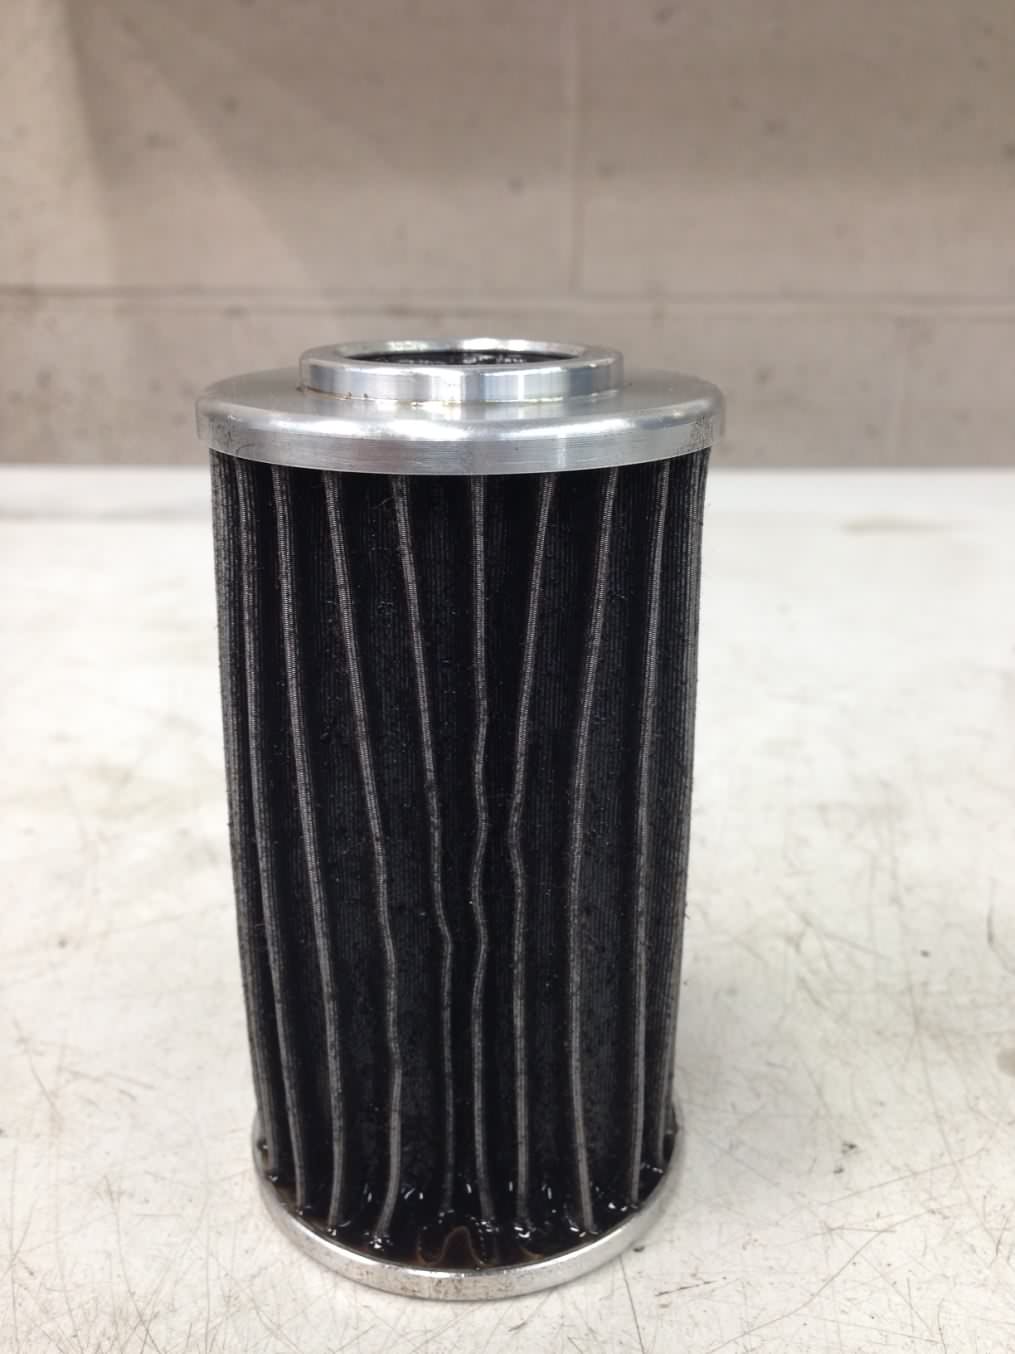 | ||
Jcjohnson33 |
Is that metal shavings? Looks to have clogged the filter to it looks all sucked up | ||
Dhays1775 |
I called up Al Lighton at American Sport Bike and he asked if I could bring it to him. So, I did. Al sent the pictures to his supplier and they determined that the filter did exactly as it was designed. This is the billet stainless steel filter from American Sport Bike. So the filter was crushed. Al was nice enough to send me away with a free paper filter. (Thanks Al!!!) Moving right along... Finally got my RT-3 from Dean Adams. Took a little bit, but Dean told me before hand that it was a fairly long lead time. He kept me posted on all the details and teaser pictures along the way. To say I'm pleased with the exhaust is an understatement! This thing is absolutely beautiful, beefy, and I can't wait to hear it!!! 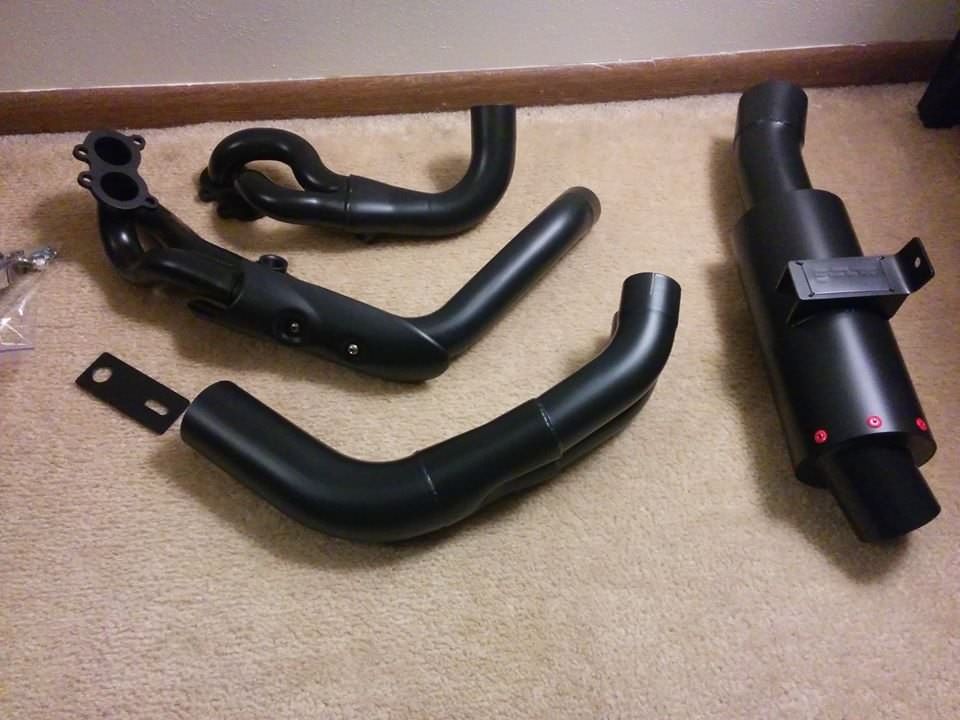 | ||
Dhays1775 |
Sorry, I'm breaking it up so I can better track what I post. Also, I have a few more pictures to share... | ||
Dhays1775 |
Needless to say, I went ahead with pulling the frame, so as to help facilitate header replacement. 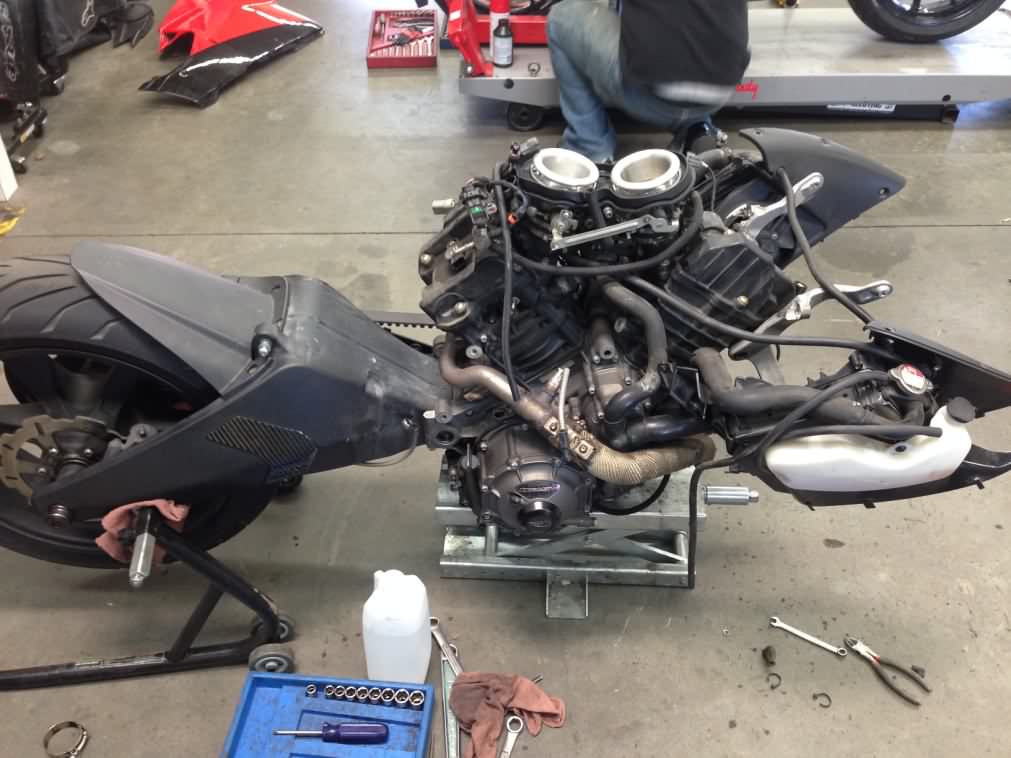 | ||
Dhays1775 |
So... Here we are, about to open the valve covers. Open the rear (since I knew it was fine), and all the valves were tight, but actually still in spec. Went ahead and shimmed them to be within spec, on the loose side. Open the front valve cover, and what do I find???? 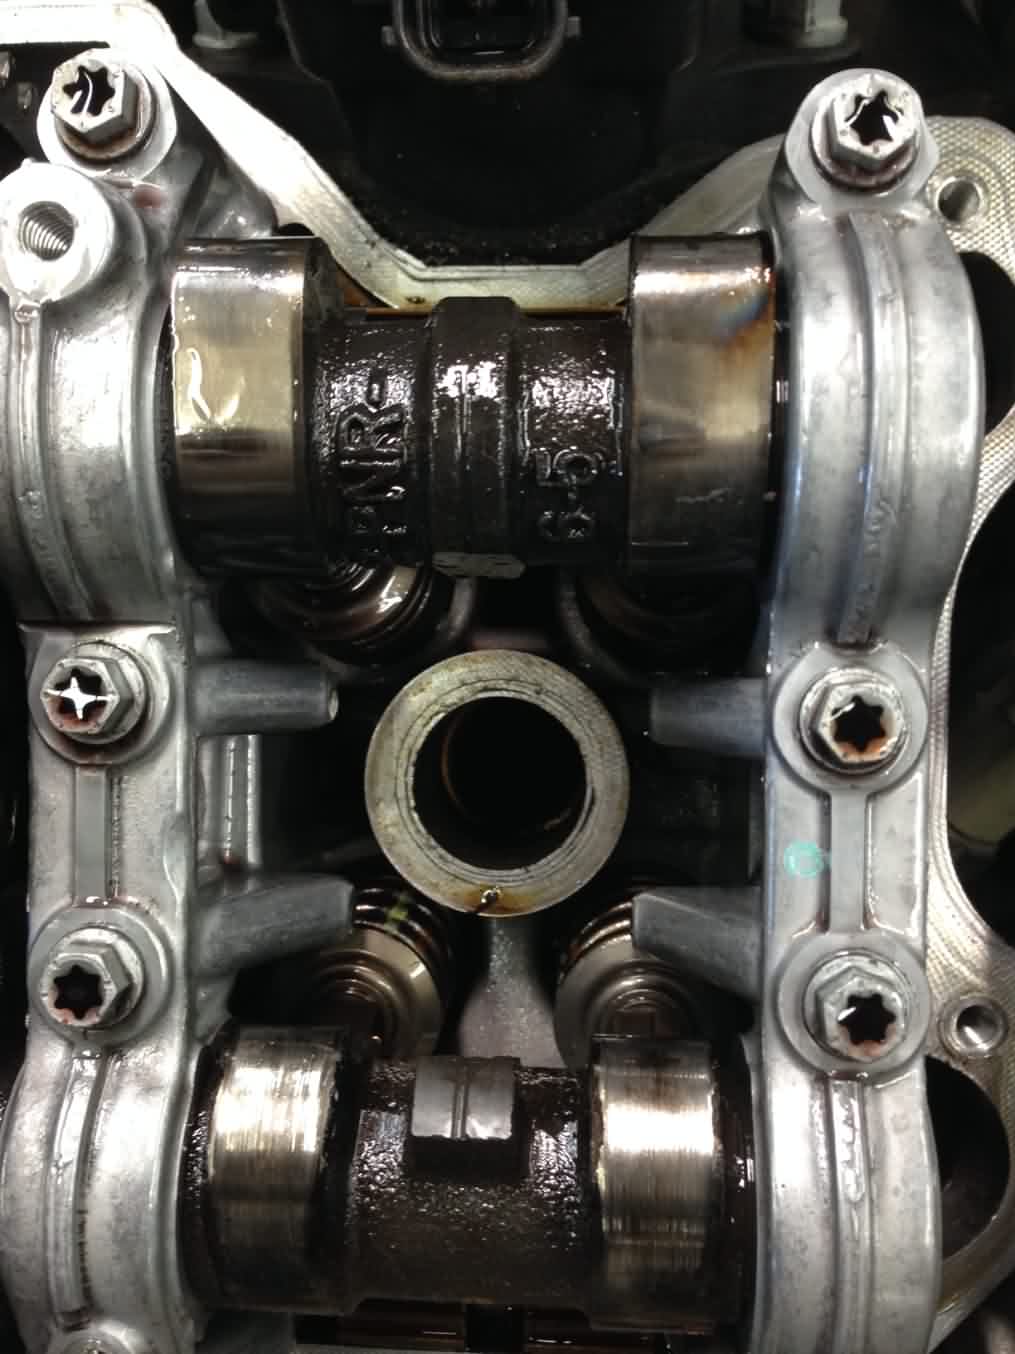 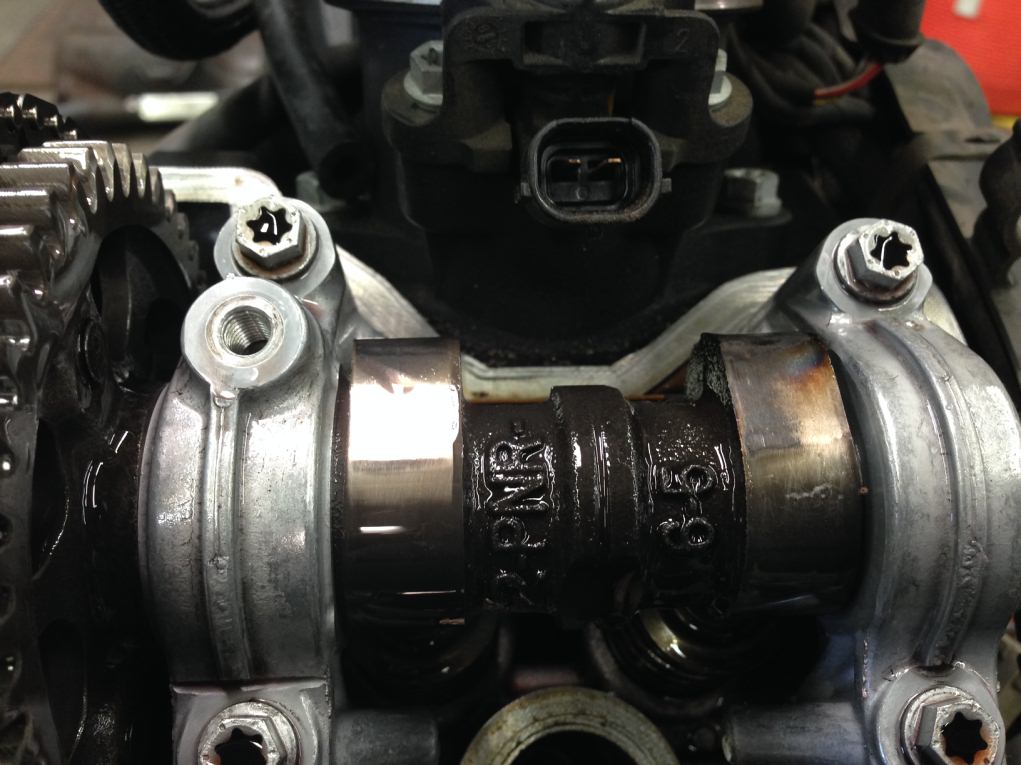 | ||
Dhays1775 |
Now for the crazy ones!!!! These are the front cylinder exhaust lobes. 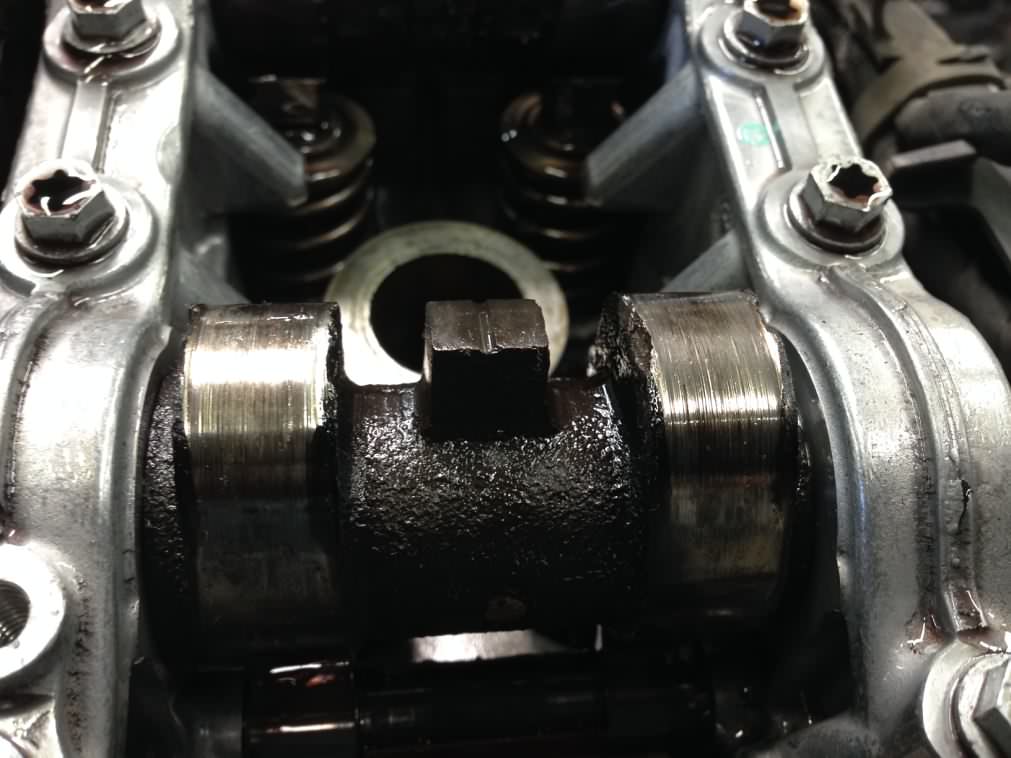 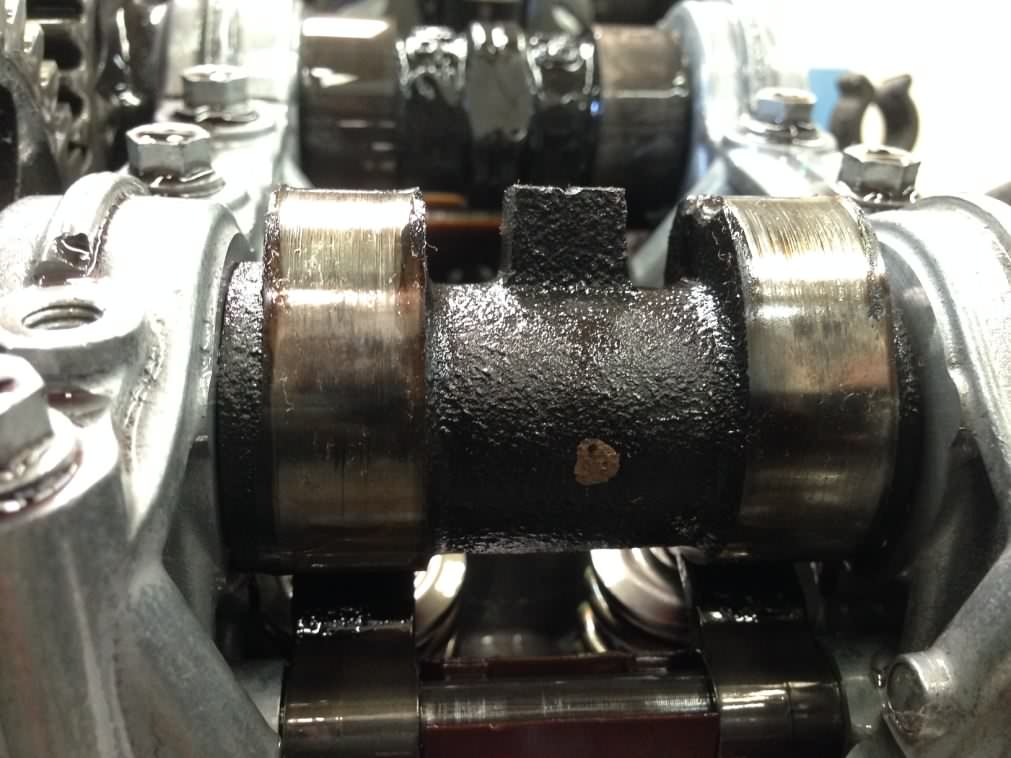 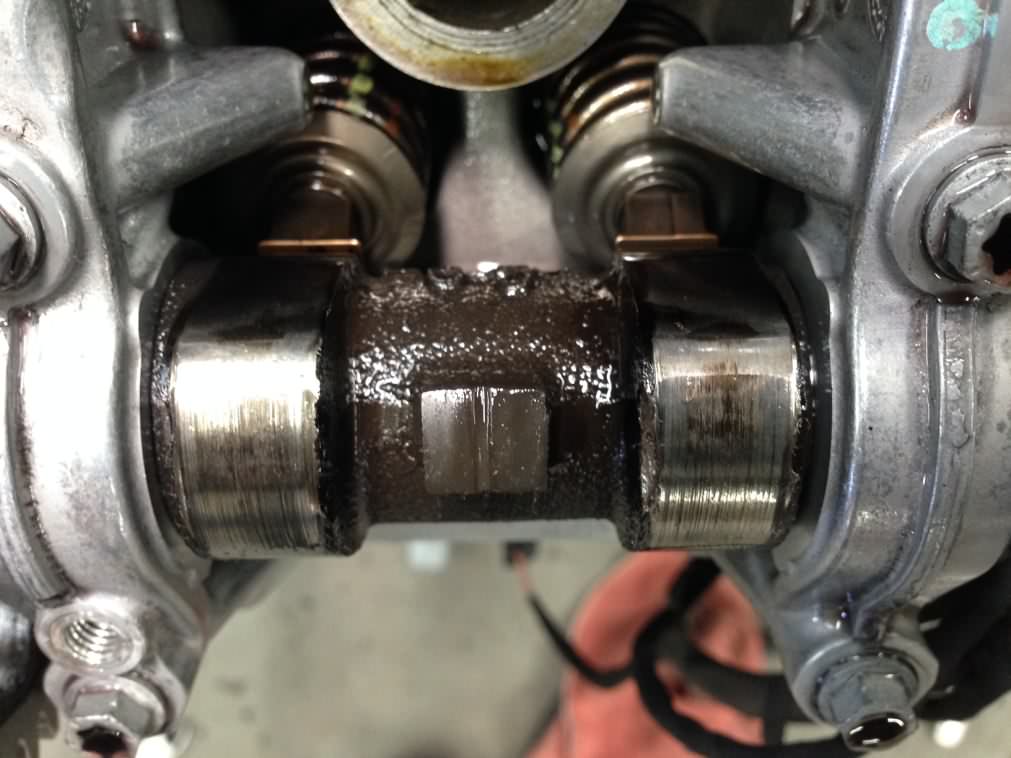 | ||
Dhays1775 |
So... Here I am, posting pictures. I ordered a head assembly form electronic bay, should be here between the 2nd and the 10th. It's a pretty simple swap to pull the cams from one and place them on the engine. Now, if you've taken the time to read what little bit I have posted, maybe anyone, ANYONE could help. My question is this: what the hell happened?!?! It appears that the front head is suffering from oil starvation, as evidenced by the cam discoloration and obvious malformation from grinding on the followers. I have a "modded" rotor, done by a guy locally. I fear that the oil jet he machined into the rotor was too big, thereby taking oil from the front head. Would there be any merit to this? When I dropped the screen, there were no big particles or chunks of anything. Side note, I have a brand new rotor to swap to EBR, so the core issue isn't a problem. So... What do I do now? Run it another 5,000 miles and replace the cams again? Replace the modded rotor with an EBR rotor to take that out of the equation? I just wanna ride my BIKE!!! Any help would be appreciated. Thanks!!  | ||
Stirz007 |
GEE-Narly. Post up photos of followers if you can. Maybes: - You think something got into the oil gallery to the head and blocked flow? - Blocked oil filter chicken/egg situation? Filter blinded a bit, starving oil, causing accelerated wear? - Ticking noise you heard: ticking or more like loud valve clatter? Are followers roached, or actually broken? While you have it open, double-check cam timing. Match cam gear timing marks (at TDC), and see if there is a witness line on the chain sprocket - if so, it should be parallel with top of head. I'm thinking it's more of a fluke than systemic, but you got to figure out root cause - not sure about rotor.... (Message edited by Stirz007 on April 02, 2014) | ||
Jdugger |
> It appears that the front head is suffering from oil starvation, That's my diagnosis, too. I'm ** NOT ** a motor guy, but this seems pretty easy to me. I doubt the damage is limited to the head. Here's my recommendation, and you aren't going to like it, but I think it's the right answer. You need to rebuild your motor. The oil starvation might be limited to the head, but since you are there, it's time to pull the bottom apart and go through the motor. At a minimum, main bearings need inspection. If you aren't a motor guy have a reputable motor builder go through it. I just had mine rebuilt and I was rather surprised at the number of parts the builder elected to replace because of wear. The cam chains and cam chain guides on these bikes are common wear items, and they are cheap. Go ahead and replace them now. And, from here on out, use an ordinary paper filter and full synthetic, and change it a lot more often than you are doing now. That oil looks horrible. You might also consider just buying a used motor and turning this one into a pile of good and bad parts. | ||
Oldog |
WOW! I hate to see that this has happened please keep us posted on to what you find. | ||
Stirz007 |
You MIGHT have just isolated damage, but JD's more likely right than not.....I'm really curious as to root cause so that's where my line of questions were headed. | ||
Cataract2 |
Probably clogged filter. He mentioned it was one of the SS ones. | ||
Musclecargod |
How is it that the filter "did exactly as it was designed"? Looking at the pictures of the filter (2nd picture towards the bottom) closely it looks like the stainless pleats have come loose from the base of the filter. If this is the case unfiltered oil could have been bypassing the filter. I am not really familiar with the stainless filters so this is just speculation. But it could be more than coincidence. This would be a malfunction in my opinion. How big is the hole in the rotor? Is it larger than the "normal" size? Also, I would definitely check out the condition of the followers. I would guess that they also show some wear. As Jdugger says you need to go through the motor. All the material from the cam lobes went somewhere. I think there were isolated issues of faulty cams but I believe that was limited to the '08 models. What kind of oil are you running and for how long? If you still have the oil that came out it would be interesting to do an oil analysis on it. I would strongly recommend a quality motorcycle specific full synthetic. As an Amsoil dealer I am biased towards their products, but I get a good deal on them so why wouldn't I be  There are plenty of other high quality synthetics. I think there isn't too much difference between them at the highest level. There are plenty of other high quality synthetics. I think there isn't too much difference between them at the highest level. | ||
Dhays1775 |
Where to start... The stainless filters have twice the filtering surface of the paper filters, and filter all the way down to 30 microns, whereas the stock paper filter is around 90 microns. Would it be possible that the steel filter caught everything that the paper filter was missing, which in turn clogged it up, reducing the flow? The steel filter is meant to catch all the debris, then crush to allow flow while holding onto the collected debris. (At least that's the way it was explained, I think) My plan, as of now, is to replace the cams, with followers. As of now, the oil/filter has 30-35 miles on it. I usually run Amsoil, but only had Royal Purple 20w50 V-twin formula available at the time. The oil I drained had around 4k miles. The rotor hole is about 1/8", maybe a little smaller. My plan is to replace the cams, then check the filter every 100 miles or so, followed by an inspection of the front cams at 500 miles. JDugger, I'm not against tearing the engine down. In fact, I would like to. The problem is that my bike is at the auto hobby shop on base, and they charge me by the day to let it sit, in pieces. So, I'd like to be able to watch it for a little bit. If anything needs replaced, I'd rather the bike sit at home for free until I get the parts I need. | ||
Dhays1775 |
Also, I have the 2010 chain guides, planned on putting those in soon. | ||
Jdugger |
> JDugger, I'm not against tearing the engine down. In fact, I would like to. > The problem is that my bike is at the auto hobby shop on base, and they charge me by the day to let it sit, in pieces. I hear you, but I wouldn't ride it again until you have torn the motor apart or replaced it. I made that mistake once and the main bearings seized and it cost me a collar bone and $10,000 for 8 fancy screws and a titanium plate. | ||
Oldog |
David H Some thoughts You have made 2 significant changes to the oiling system of that engine 1. 30 micron permanent filter Changing the filtration from 90 to 30 ( if the standard paper filter is 90 micron ) would effect the pressure drop and the flow rate across the filter, This seems to match up with the partially collapsed filter you posted pics above, the pump created suction on it, That indicates greater demand for oil flow than the filter can provide. 2. The EBR mod to the rotor as I understand it is about a 1mm [ .0395" ] hole, you drilled a 1/8" hole [.125"] that's about 3x the diameter. A change on an orifice of 2x diameter will flow almost 4x as much gas or liquid, so in essence more oil was being released from your over sized jet than was supposed to be I would suggest in light of what Jdugger has stated you might want to consider tearing the motor down, and replacing the rotor that you modded with an ebr modded unit, after inspection and repair are complete. sorry to see that your experiment did not work out but the cases are intact and there may not be any more damage to the motor so with some luck you will replace the cams, followers, pins and all else will be good. good luck... | ||
Sparky |
Ouch. Hate to see that happen.
If the rotor hole location is where the EBR's is, I would say 1/8" is WAY too big as compared to what I saw on my EBR rotor in which the dia is approx what a 20 or 22 ga single strand copper wire is. I didn't measure it, just guessing because it's barely visible. I would venture to say a larger rotor hole than EBR's would affect oil distribution for the rest of the engine. On the other hand, your stator must've looked peachy keen! | ||
Phwx2 |
Nothing to add, just support. Good luck man. | ||
Dhays1775 |
Well, a little update... I ordered the LEGIT EBR rotor and a new nut. I already have the crank lock tool. I reused the nut last time. Also, I have a new stator gasket. Ordered it a while back, but when I put the modded rotor on, the stock gasket was still good. (Didn't tear) I haven't ordered the gasket kit, it's a little over $300. (My wallet started hurting after the rotor and nut at $475...) Will begin exploring the engine this weekend when I install the cam chain guides. I'll do my best to take plenty of pictures. Wish me luck!!!  | ||
Mcelhaney14 |
David, if you're not sure whether to pull the motor down or not you might pull a head and cylinder and check the play in the rod bearing. If all that garbage ran though the oil system and took out the mains it will have most likely taken out the rod bearings as well. Cost wise at minimum it would add a head gasket and base gasket but it gives a good picture into whats inside. You can also look for discoloration of the big end on the rod which indicates a bad rod bearing. Also, when you have the side cases off for the cam chain guide changes you can check the radial play on the crank and pull out half of the oil pump if I remember correctly. If the oil pump gears are clean you're golden. If not, bearings are probably done. | ||
Dhays1775 |
Thanks for the heads up Bill! That could save me a bunch of time and hopefully a little money. I'll go ahead and tear into the engine to get started on the guides this afternoon. And there have been a few people who have offered to help, no matter the amount, I am grateful for the offers and I thank you! I'll keep everyone posted on what I find. Hopefully some pictures and measurements as I get them. | ||
Stevenfrye |
Keep us posted I'm close to doing a valve check my self | ||
Dhays1775 |
Well, not really a whole lot to update at the moment. With the help of Noobuell, we pulled the cams from the head. Pull the chain tensioner plug, remove slug, remove the long slender chain guide, slide chain off the gear for the cams. Here's where it was tricky. Went to place the new cams/holder on the head, and it wouldn't seat. Turns out, the dowel was placed differently on new cam assembly. So, put it back on, tighten it back down, remove the 5 bolts holding everything together (once for each set of cams), install new to me cams in the old correctly fitting cam holders, loctite and torque to spec. Drew was the one that caught it, so thanks buddy! We were able to get the left side off, pull the rotor, remove the upper balancer, remove the old cam chain guide, then install in the reverse order. It was pretty straight forward. Left the side open to install the EBR rotor upon arrival. Moving to the right side... Pulled the rear header, pulled the drain bolt for the radiator, commenced an ethylene glycol bath, removed the right side radiator, then water pump. Pulled secondary clutch cover, (after removing the clutch slave) then pulled the right side cover. Removed one of the bolts for the cam chain guides, but the other is not able to be removed due to the clutch pack being in the way. That being said, does anyone have a clutch hub locking tool available for purchase or rent? Just thought if ask. I'll take pictures next time, I promise! | ||
Dhays1775 |
Forgot to add, I can't get inside to check out the oil pump because of the clutch. That was one of the places I was excited to check out, just to see if there was any damage or anything. Beside the little snafu with the clutch, this engine comes apart pretty easily. Not sure if that's good or bad... Either way, I'll do better to document the next round of exploratory surgery. | ||
Mcelhaney14 |
David, as far as a clutch locking tool, you can make one out of some old clutch plates. Get 2 of each type and drill several holes around the friction surfaces, probably 6 or 8 hoes. Screw them all together and you have yourself a locking tool! | ||
Noobuel |
What is the price difference between a used clutch on eBay and a clutch locking tool? :-) We don't all have extra clutch packs laying around. :-) I'll answer my own question, the tool is cheaper: Tool Clutch Pack (Message edited by noobuel on April 06, 2014) | ||
Mcelhaney14 |
I don't have one laying around either. Last time I helped a guy out he found someone that sent him used plates for next to nothing. It was just a thought. | ||
Alex |
Dhays1775, are You sure that the cam holder dowel was repositioned? Do You have a trustable source for that information? Here´s why I ask: front and rear cam holders are not interchangeable because of the position of the oil spray nozzles on the holder. Therefore they have different dowel pin locations. This holds true for the outer holder opposite the gear drive. Maybe someone sent You holders for the opposite head? |