| Author | Message | ||
Upthemaiden |
This isn't specifically tuber related, but this board has been a bit slow lately, so I figured it couldn't hurt if it helps anyone out and saves them a little bit of time and money. I don't mind paying for something if I need it, but I hate paying someone to do something I can do myself. I've been changing my own tires for a few years now. I used to have shops do it, but then once it got easier and cheaper to buy tires online, and shops wanted to charge you even more to mount them, I figured I'd just give it a go myself. First I started with my wheel sitting on some 2x4 blocks and wrestled with the wheel on the floor for a few hours with tire irons, and it wasn't fun. Eventually I picked up one of the harbor freight tire changers. You need 2 parts: The normal tire changing stand, with the built in bead breaker and included steel bar/tire lever: https://www.harborfreight.com/manual-tire-changer-69686.html?_br_psugg_q=tire+changer and the motorcycle attachment. https://www.harborfreight.com/motorcycle-tire-changer-attachment-60810.html?_br_psugg_q=tire+changer Use some 20% coupons and you're looking at just over $60, which is pretty reasonable. The included mounting bar is guaranteed to beat the shit out of your rims and leave red paint on them, so you either need to get creative with ways to protect your rim when you use it, or pick up a mojolever https://www.mojotiretools.com/mojoweb.htm or the no-mar bar https://www.nomartirechanger.com/Mount_Demount_Bar_p/tc-mdbar.htm either will set you back about $150, although if you're resourceful I have seen people chop the end off of the original bar and make their own ends for it out of delrin. The built in wheel clamps are also steel that's painted red and they do a poor job actually holding your rim. Simple solution is to get some rubber hose, cut it into short chunks and slit it along the length so you can slide it over your rim, which I did for a long time and it works perfectly fine. You'll also need some kind of lubricant. NAPA sells gallon size containers of tire lube, plenty of people just mix dish soap and water in a spray bottle. The last thing you'll need is a way to hold down the tire stand. You put a good bit of leverage on it so it needs to be held solid. I drilled a few holes in my garage floor and hammered in some anchors. I've also seen people bolt it to a pallet or sheet of plywood big enough for you to stand on. Also seen people weld a 2" bar onto the base so they can stick it right in the hitch on their truck, which sounds pretty convenient. On to the work.... This is the tire stand in my garage, along with my old bald and new tire. If you look at the old tire you can see a little yellow dot right by the valve stem. The yellow dot is the lightest side of the tire. You want to mount that next to the valve, since that should be the heaviest part of the rim. 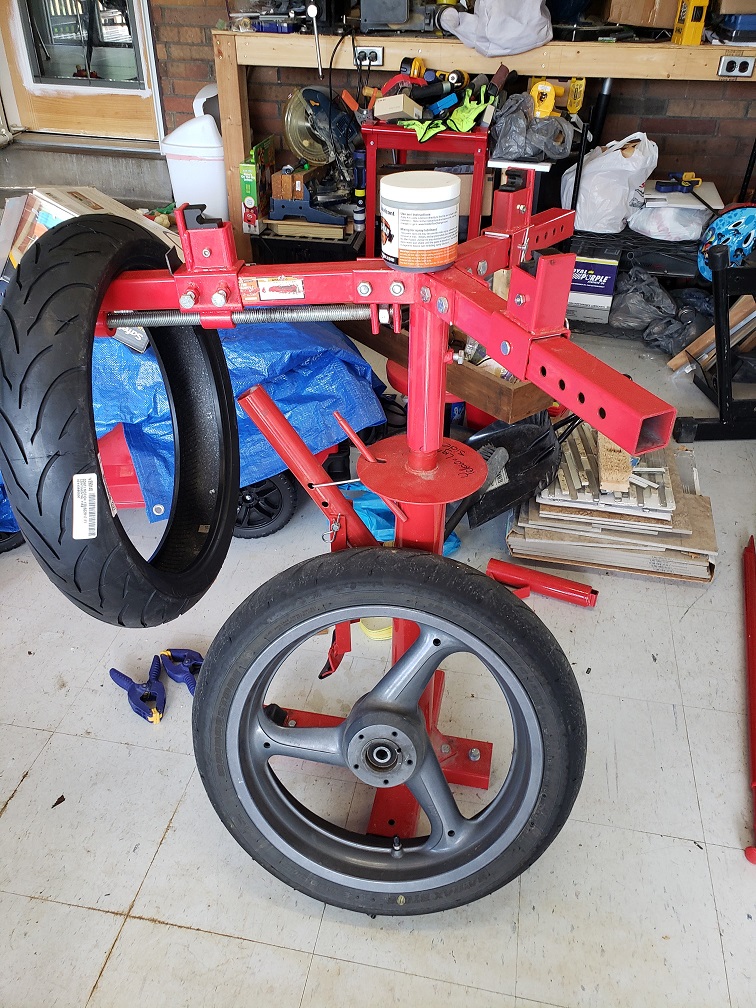 One common upgrade, not required, but nice to have are Mojoblocks. https://www.mojotiretools.com/mojoblocks.htm Nice plastic inserts for where your rim meets the tire stand. I've wanted some for a while, didn't feel like spending $30 on them. Made some out of about $4 worth of plastic that came out pretty well, and avoids the need for the rubber clamps. They also hook your tires in vertically, as opposed to the normal clamps that are perfectly straight and let your wheel pop out of the clamp on occasion. 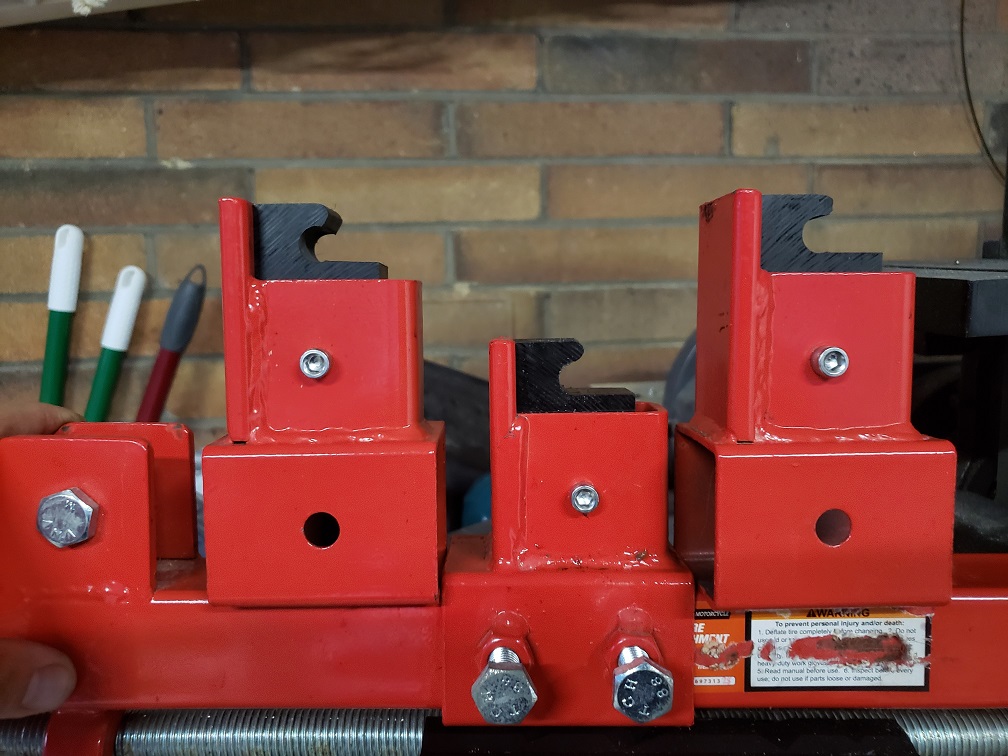 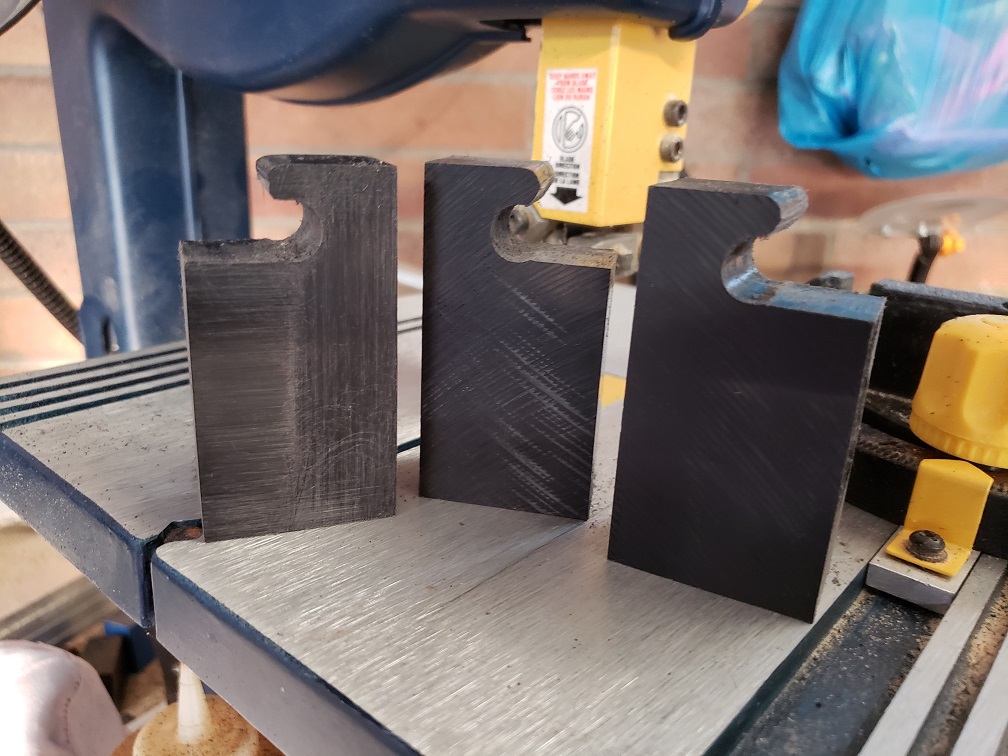 | ||
Upthemaiden |
Pull out the valve core and use the included bead breaker that's built into the base. It'll pop the tire off of the rim pretty easily. When you're pulling off the tire you want to make sure you keep the tire down in the center of rim. It's a smaller diameter and gives you a bit of extra room to work. They make special tools for this. I just use some plastic clamps to keep the tire away from the edge of the rim. 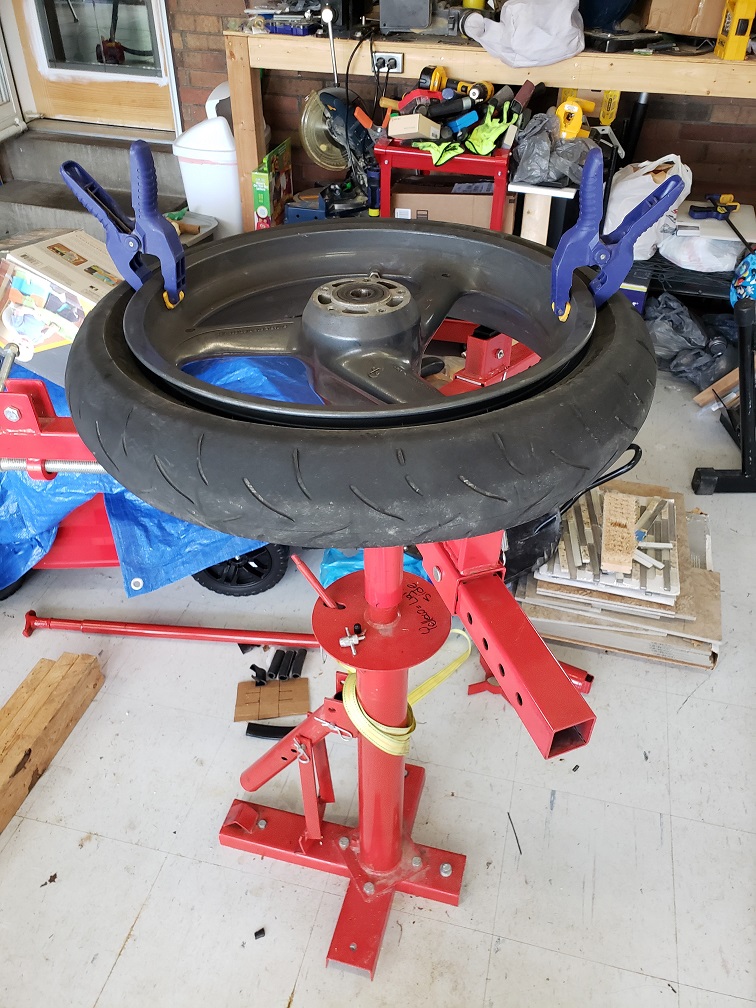 You can see I don't use the extra top pieces pictures on the HF website. I don' think they make things much easier, tend to get in my way, and the vertical round bar doesn't fit through the bearings anyway, so I just use a steel tube I had laying around. Fit the skinny end under the edge of the tire, pop it up over the rim, rest the tire mounting bar against that vertical bar, and spin it around to slide the tire off the rest of the way. You can see 2 of the wheel spokes have straps holding it to the stand, they help keep the wheel from spinning when you're pulling the tire on and off. 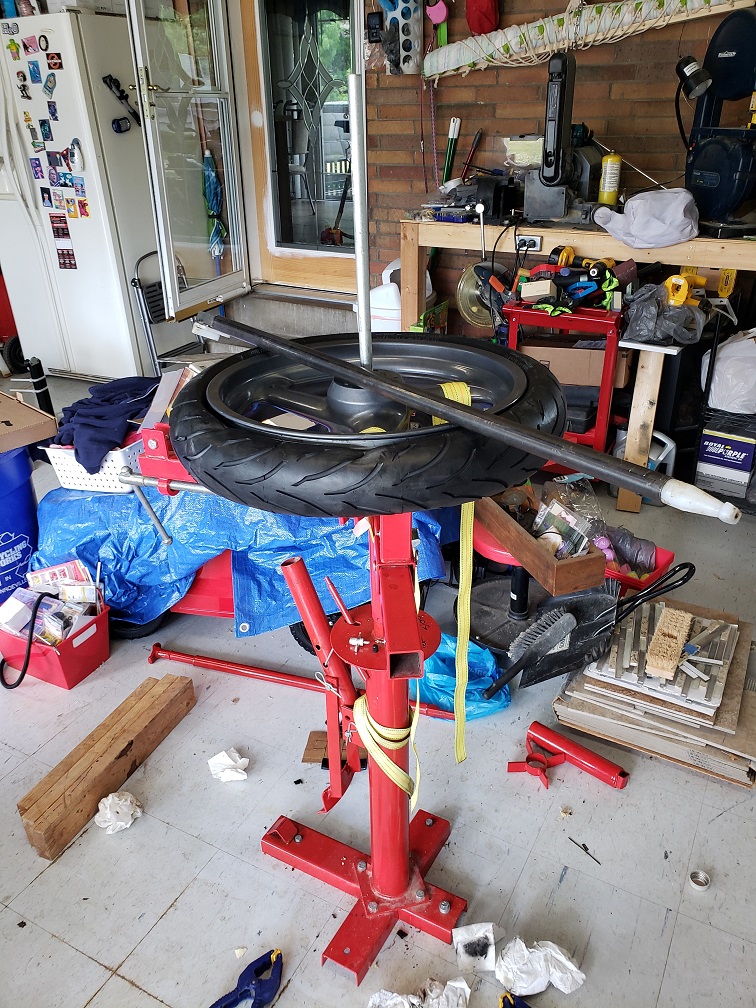 New tire fully mounted. You can see in the last picture there's still a gap between the tire and the rim. This is where the rim diameter gets wider and the tire won't slide onto it on it's own. With the valve core still out, use an air compressor to fill the tire, and the increasing pressure inside will *POP* the beads into place. Let the air out, put the valve core back in, and fill it up to your normal pressure. 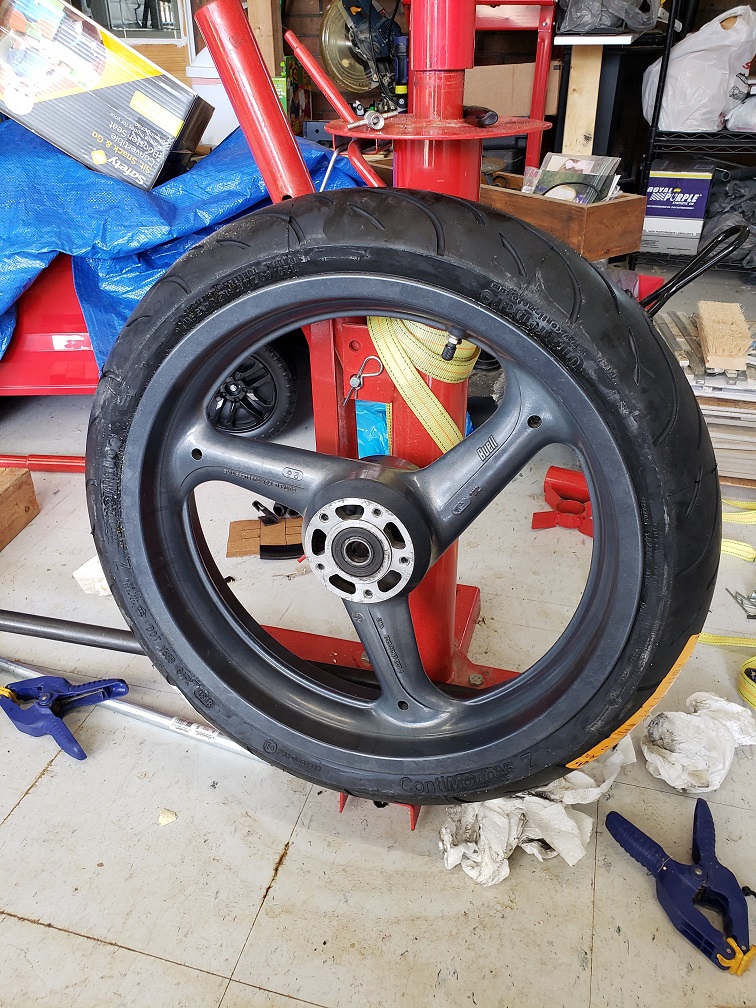 | ||
Upthemaiden |
Once your tire is on, it'll need balanced to make sure it's spinning smooth when it's up to speed. I've seen people do all kinds of things to balance them. People will stick a bar through the bearings and rest each end on a jack stand, which seems to work fine. You can also get cheap balancing stands. I have the HF version, which gives you a few extra bearings so there's a little less resistance, which helps. https://www.harborfreight.com/motorcycle-wheel-balancing-stand-98488.html You give the wheel a light spin, and if it consistently stops in the same position, that means the spot at the bottom is the heavy spot. You stick a weight at the top of the rim, and spin again. Eventually the weight will even out, and if the wheel stops in a different position each time you spin it, you'll know it's balanced.  | ||
Upthemaiden |
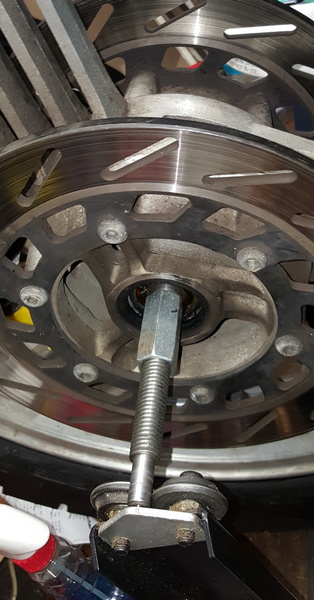
At this point, you're good to go. Just stick it back on your bike and go on with life. In my case, nothing is ever easy, and as soon as I started to bolt my caliper on I could feel it was stripped. I had bought this caliper used about a year ago, and aside from when I initially installed it, this is the first time I touched it. Torque wrenches are always good, but I couldn't have been at more than 1/3rd of the torque rating before I could feel the bolt start to spin, so that's just life with a 20+ year old poorly maintained bike.  If you don't have one, these things are wonderful. I was always jealous of the one they had mounted in the hardware section at lowes, but I got this one for Christmas last year. It's not that hard to figure out what size a bolt is, but this makes it about as easy as can be, especially when you're dealing with bikes like ours that are 50% SAE and 50% metric. 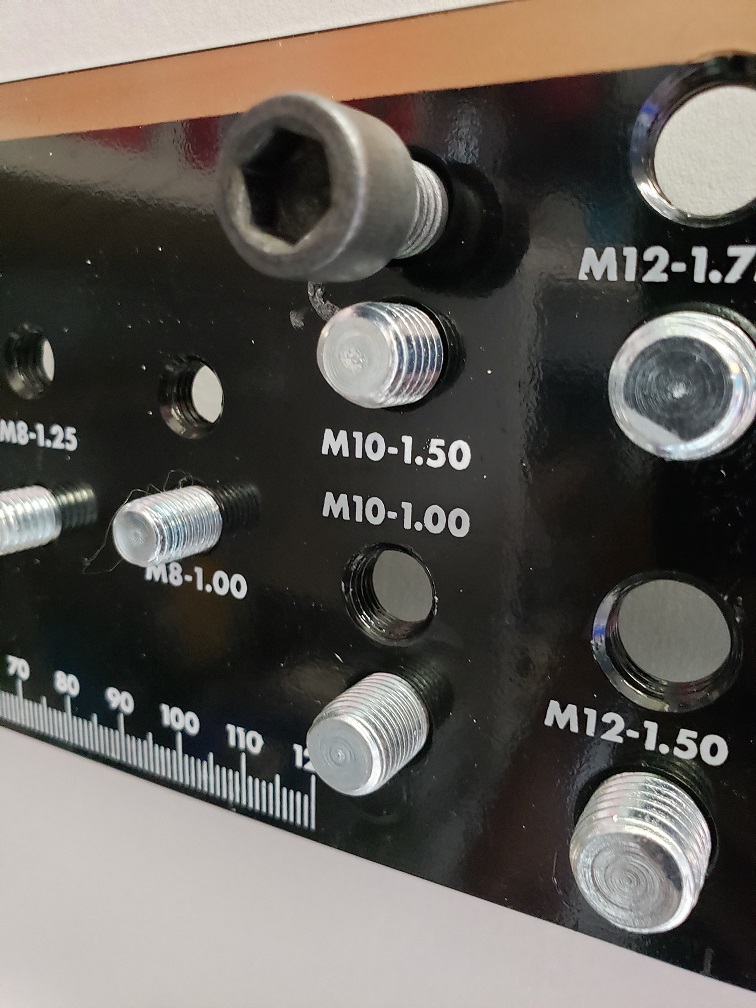 Cost me one extra day, but I got the caliper fixed and everything bolted back together. 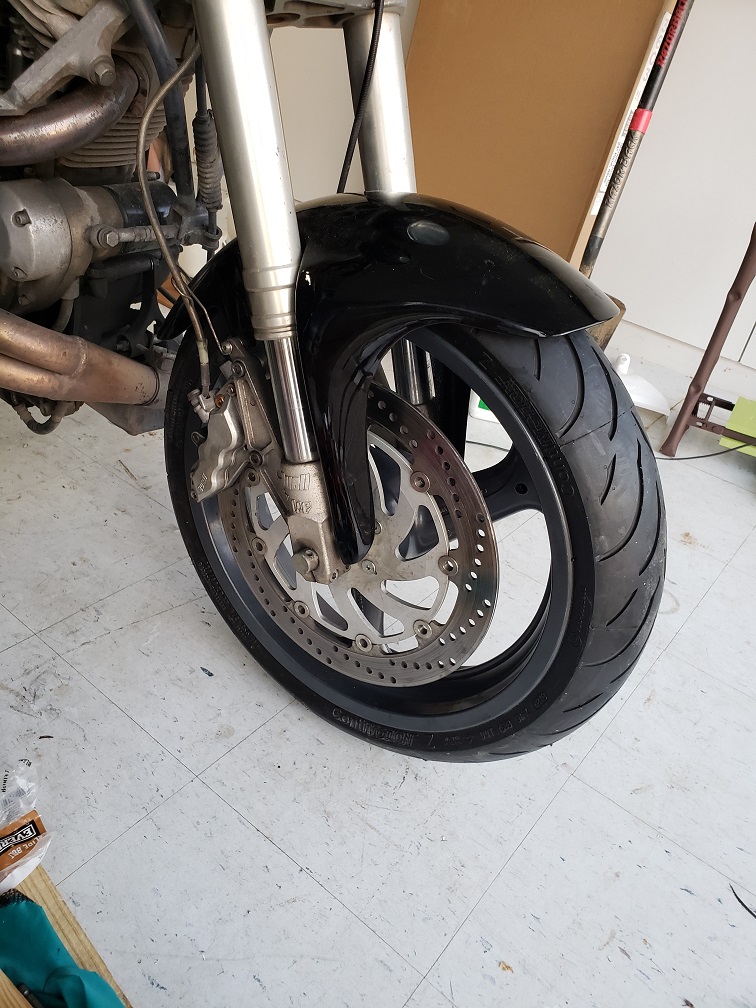 | ||
Upthemaiden |
As I was attaching those pictures I realized it probably would've helped if I had taken some pictures when I was actually removing and installing the tires, but I didn't think about it when I was working. Obviously the up front cost is higher than a normal tire change, but it'll pay for itself pretty quick, especially if you skip the mojobar and just find a way to modify the original bar so it doesn't scuff your rims, that would cut your cost in half. Once you get the hang of it, tire changes can go pretty quick. Had it not been for the stripped caliper, I could've had this done from start to finish while the kids were taking their afternoon nap the other day. The majority of my time was pulling the stand out and setting it up, and pulling the front wheel off my bike thanks to the clever design that means I have to unbolt the whole rotor just to be able to remove the caliper. The actual process of removing and installing the tire barely takes any time. There's a ton of videos on youtube that'll show you how easy it is, but for the guys who never even considered it, hopefully this was at least a little encouraging. | ||
Shoggin |
Every time I'm spooning a tire on, cursing my cheapness for not buying a NO-Mar, I think "We'll this is the last one for awhile" than SOMETHING else needs tires on it  . . The clamp trick is MINT! Thanks! | ||
Captainkirk |
Great write-up! My brother has a Coats 220 so for me it's always been pull the wheel(s) and throw them in the truck and head for his house. But I'm thinking it would be nice to actually have the capabilities to do my own here on my own schedule. I was looking at the Cycle Hill (No-Mar) unit. A couple tire changes would make it pay for itself. When you have 3 bikes like I do, tire changes come up fairly frequently. Thanks for posting this! Appreciate the detail and the pictures! | ||
Kmbuell |
My NoMar is my best investment! I�m always changing tires. I remember bringing an XB rear to them at the Charlotte IMS show many years ago. I could not break the bead. It took him about 30 minutes to do it. He said the XB rims are super hard to change because of so little drop in the rim. Great investment if you have a few bikes or buddies. | ||
Bsanorton |
I still do it on the floor. Using the tape method makes it easy 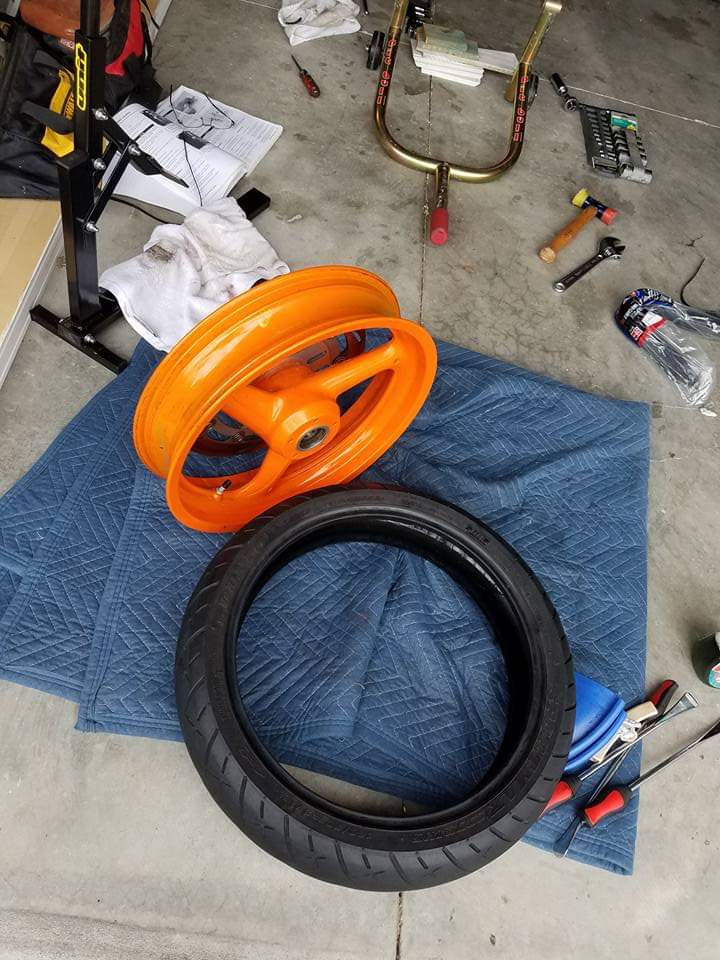 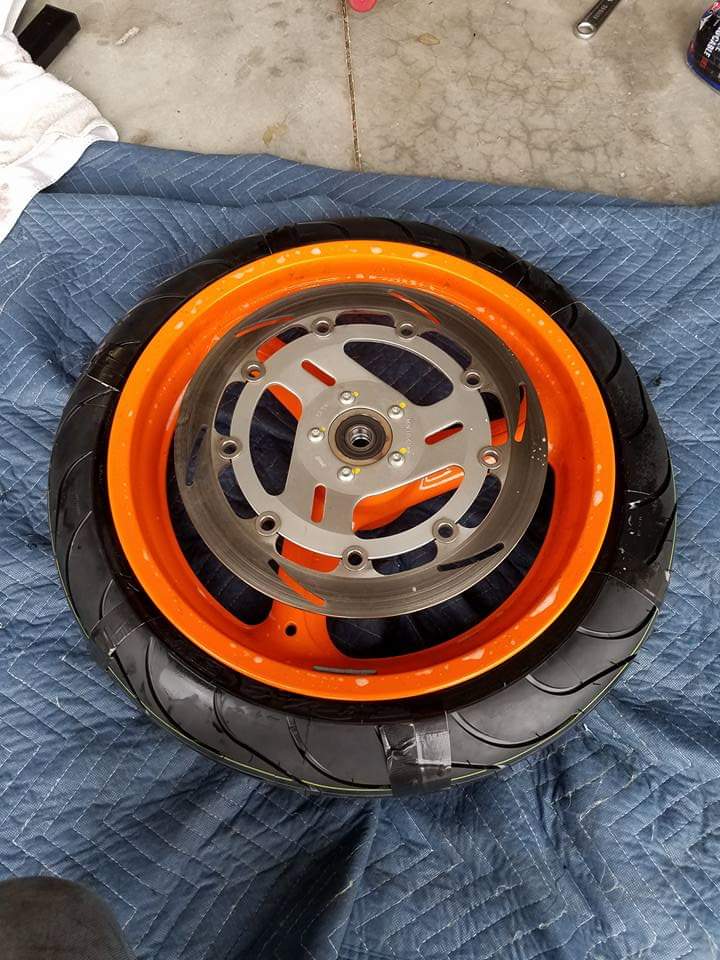 | ||
Ggggary |
I have a Coats 200 in the shed but in the winter I do them on the floor in the warm basement. Heat makes a lot of difference, in the summer tires sit in the sun, in the winter by the wood stove. Ru-glyde, no dish soap, pour some in a Windex bottle to apply. Use a scotchbrite or cloth and solvent but not steel wool to clean the wheel beads. If a bead won't pop let the air back out spritz problem area with ru-glyde re-air to normal pressure and WAIT a bit. Average about 10-20 tires a year. Ever changing fleet of bikes. Use an HF balance stand, but changed the axle to all-thread with the ends machined and threaded stop cones. Check the HF rod is straight. I have sidewalk chalk, change colors after adding a weight. | ||
Captainkirk |
Tell me more about the tape method. How do you get the old tire off the rim? Does the tape ever get stuck between the rim and rubber when you remove it? Your wheels look in fantastic shape, so obviously you're doing something right! | ||
Upthemaiden |
"The clamp trick is MINT! Thanks!" It was actually the first time I did that. I've tried all kinds of things, from wedging blocks of wood in there, which eventually pop out, to using clamps to squeeze to tire together. I was looking at the tire tool ( https://www.nomartirechanger.com/YellowThing_Tire_ Tool_p/ac-yellowthing.htm ) and tried to think of what else would do the same thing. Clamps worked perfectly. I agree the bar makes a world of difference. If I had a lathe and could weld better I'd just use the original bar and modify the one they give you, but they pop off amazingly easy compared to wrestling with the tire spoons and rim protectors. Thinking about it, my XB was probably the first set of tires I tried to change. Maybe that contributes to how long it took me to get them off. They come off the tuber rims pretty easily. | ||
Upthemaiden |
The chalk idea is genius. Got plenty of colored chalk around here. I usually tear off little pieces of masking tape and stick them on the high spot, but I'll steal your idea next time. Tape idea sounds good. I've seen people do something similar with large zip ties. I was also curious about pulling it off. I assume the tape onto works for putting it on. Unfortunately I came out of work today to find my new tire completely flat. I installed it wednesday afternoon, it sat with both wheels off the ground till I left for work this morning without losing any pressure. Ride to work felt fine, then I left work, completely flat. Not sure if the bead didnt seat well, the valve core went bad, someone came by and let the air out for fun... I did notice when I was looking at it, the valve body isnt perfectly round anymore. Not sure if that's new or not. Either way, I rode it, super slowly, 2 blocks down an alley to a gas station and filled it up with their air pump. The pressure checker wasnt working so I just filled it for a bit. I could tell it was way too much as soon as I got on the road, but figured that was fine in case it was still leaking. My pressure gauge only goes to 60psi, but the tire maxed it out when I checked it, oops haha. I set it at 40psi for now and I'll check it tomorrow and see if it dropped. If not I'll wheel it out into the sun again to see if that changes anything. Dont assume it would, but I'm spitballing here. | ||
Cupcake_mike |
Haha, I did just spooned on a new rear for my CR this evening, the summer sun does help tremendously. For shits and giggles I set a timer on my phone when I walked in the shop and when I finished it read 32 min...that's a personal best for me. That's removing the belt guards and wheel from the bike, dismounting the old tire,mounting the new one, a quick spin on the balance stand, reinstalling the wheel and guards and I also installed a tail tidy. I end up doing probably 4 or 5 tires a year. The last few I've done are Pirellis and at least for them, I've found their red dot indicates the heavy spot on the tire, maybe it's a coincidence but I haven't had to add or subtract any weight on those as long as I put the dot opposite the valve stem. | ||
Upthemaiden |
That's a good point I'm sure they're all different. I've been sticking with continental conti motions because that's what came on my S1 years ago, and they keep wearing out at different times, so I just keep buying the matching tire to go with the good one. | ||
Bsanorton |
Captain kirk> I forgot that part. I push very large zip ties around the old tire while it's on the rim after I break the bead. I think this is the youtube video I saw and tried it. https://www.youtube.com/watch?v=U9MpgD-xIjg&t=6s | ||
Mikes_bikes |
Upthemaiden - Where did you source the plastic for the clamp blocks? Did you shape it with standard woodworking tools? | ||
Court |
I love reading this stuff. . . In the day when lackluster dealer service has come to be � normal�. . . I�m convinced that with a bit I�d need, coupled with innovation and creativity. . . .we can do a lot of this stuff not only ourself, but better. I�m the same way about my cars. I�ve been fortunate to find a crummy old garage in Westchester County that does a great job, allows me to wander about under the car while it�s on the lift and I can count on them to do precisely what is need3d, included things they discover while working, to race track standards. I�m will8ng to pay to have it done right. With some of the vintage stuff. . . . MG and Cushman ...I�d never allow anyone to touch them. I I am in desperate need of having a couple tires done and just wish one of you were within riding distance in t(e Hudson Valley!. . . I change rarely and if anyone has a suggestion in the Danbury, CT or Woodstock, NY area I�d love to know it. Keep up the great tips! | ||
Falloutnl |
I'm bookmarking this. Jealous that you guys are able to do this kind of work. Have never attempted it, but maybe I will. It's so much cheaper to order tires off the internet and do it yourself. | ||
Upthemaiden |
Mike: I bought it on ebay. I searched for delrin, and found someone who has a bunch of listings that appear to be leftovers. As wonderful as a mill would be I just used regular wood tools... drill press for the initial holes, bandsaw to cut out the notch, and a bench sander to get it just skinny enough to drop in to the base. Nothing that couldnt have been done with with a hand drill, hacksaw, and sandpaper. I've found a few more upgrades I want to do to the stand eventually as well when I get time. I made a little hook that holds up the bead breaker attachment when you're not using it, it can be annoyingly in the way. In that first picture, if you look through the wheel you can also see I made some black plastic covers for both parts of the bead breaker that touch the wheel. The part on the upper arm worked well but will need glued on so it holds better. The piece on the base broke off as soon as I tried to use it because it was too thin. I originally tried making something out of thicker plastic but couldnt heat it up enough for it to bend well, without it just starting to melt. I'll have to find something better to use. I've also seen people drill a hole straight through the round tube where the base and top attachment connect for a steel locking pin. It comes with a threaded knob to lock it in place, but it still has a bit of play. I think something with a tighter fit would hold it better. | ||
Upthemaiden |
"Have never attempted it, but maybe I will." Glad to hear that. It's the entire reason I made this post. I hoped people who had just never considered would see it and realize they could do it. Court: that's the main problem. I can pay for good service, but I feel like you rarely get it. Some stuff I won't touch... I had an electrician friend come install a sub panel. I need a new furnace soon, I'll have to pay someone for that. Otherwise you're typically always better researching something, buying a couple new tools, and going at it yourself. There are great tradesmen out there but you've gotta weed through the ones that will do a halfassed job and run with your money to find them. | ||
Ggggary |
 My balancing stand rod mod. Just changed out the "like new" Metzler on the front of a new to me 90 Yamaha Venture Royal, date code was 1999, extensive sidewall cracking. One of the easiest changes I've done.  Replaced with a Shinko. Back tire on order Bike had 40K only 200 miles, in last TEN years. | ||
Court |
I�m in the same boat ....Uly that was sent to me for my birthday in 2008 ... has few miles ...but, I�m sure original tires are due. I just hate to let a dealer touch it. | ||
Upthemaiden |
I was wondering about the rod you made. I assumed you drilled out and tapped the original cones. What keeps them in place without lockouts? Did you turn them down so they just slide straight into the bearings like the axle spacers do, or are they still tapered like cones? | ||
Two_seasons |
Gary: The guy that sold you the 90 Yamaha Venture Royal, was his name Kenny (retired Milwaukee PD) by any chance? If yes, that is my BIL, great guy!!! | ||
Ggggary |
The Venture came from George's widow it had been sitting since 2014. George got it from a friend with dementia and didn't ride it. 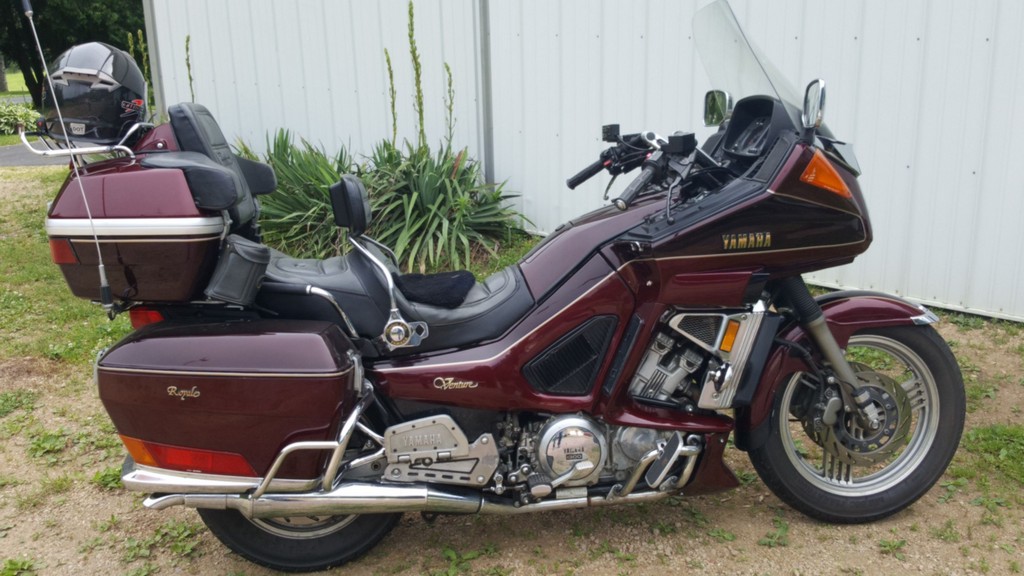 40K miles, exceptional condition for 30 years old. Put on 300 miles, waiting for a new rear tire. So far the big project was fixing the computer controlled air suspension by resoldering some circuit board joints. LOL Fits the bill for my "road couch" this year. | ||
Captainkirk |
Another option for those who are space-constricted... https://www.youtube.com/watch?v=CCLTSsIi110 | ||
Captainkirk |
https://www.ebay.com/itm/Tire-Changer-EVO2-Motorcy cle-max2h-com/293067734050?_trkparms=aid%3D1110010 %26algo%3DHOMESPLICE.DISCCARDS%26ao%3D1%26asc%3D20 200220090753%26meid%3D651fa9c3a3674a98bd8c3ff94113 c6df%26pid%3D100009%26rk%3D1%26rkt%3D1%26mehot%3Dp p%26sd%3D143642261034%26itm%3D293067734050%26pmt%3 D1%26noa%3D0%26pg%3D2047675%26algv%3Ddefault&_trks id=p2047675.c100009.m1982 | ||
Shoggin |
I like that ^^^^ Wish I knew a real person that can tell me if it's legit or Frachthafen. |