| Author | Message | ||
Jolly |
thanks again Steve, sure appreciate your help on a busy Sunday!!! | ||
4speeder |
Since I know nothing about this engine mounting system and have no experience with it, if you could bear with me I have a few questions. Why didn't you guys adjust the clevis rod (tiebar) out so that the eyelet lined up with the threaded hole in the engine case? If the side force was great enough to bend the first bolt, won't that same side force be pulling on the new bolt? Why doesn't it line up to begin with, is the frame hanger bent or some other frame issue that has caused the misalignment? Are there factory specs on the clevis rods that give exact center to center measurements of the eyelets so when the engine is hung in the frame it is in the correct alignment? Shouldn't the motor be supported evenly all around so the rubber mounts can work properly instead of having an uneven preload on them? I'd like to learn about this mount system if you or Steve would be kind enough to share your knowledge. Thanks! | ||
Jolly |
Others will chime in with their experience, but I think my case might not be the norm. I believe my front tie bar bolt was bent because it had been loose. The two long bolts that go through the engine case and hold the front of the shock mount were also loose so I think that is why my engine case was damaged. lining it up was just a matter of ...well....lining it up. the tie bars are set at the factory and "shouldn't" be adjusted if removed. I think I also had a left isolator that is old and worn so when the side plate was installed it didn't correctly capture the isolator so that may have been pushing the motor over to the right a bit as well. the bike will get new isolators once the new plates are made. | ||
Firemanjim |
Was the bike ever in an accident as a front hit/fall would bend that bolt | ||
Hootowl |
I think I would make sure that the rear tie bar lines up correctly (maybe someone tried to adjust the tie bars) now that you've got the front one in place. You may have introduced some stress in the frame/engine by forcing it over. The only things keeping the frame from wiggling are those tie bars. If you had to force it, one of them may not be adjusted properly. | ||
Jolly |
I took another look at the issue, as you guys are, I am concerned about any side force force required...however, some might be necessary to get it properly settled....  anyway, I jacked it back up and pulled the left side plate, the old isolator is pretty beat up and it wasn't seating in the side plate pocket correctly, finally got it line up, bolted the side plate down and then took the nut off the tie bar at the frame "V" point and there was no load on the bolt connecting the tie bar to the frame "V" mount point. I was able to turn the bolt by hand and slide it back and forth a few threads with out the use of a wrench which to me implies no side force at the tie point the bolt passes through the tie bar. I'm feeling much more comfortable about that now. anyway, I jacked it back up and pulled the left side plate, the old isolator is pretty beat up and it wasn't seating in the side plate pocket correctly, finally got it line up, bolted the side plate down and then took the nut off the tie bar at the frame "V" point and there was no load on the bolt connecting the tie bar to the frame "V" mount point. I was able to turn the bolt by hand and slide it back and forth a few threads with out the use of a wrench which to me implies no side force at the tie point the bolt passes through the tie bar. I'm feeling much more comfortable about that now.  | ||
Jolly |
Oh, Fireman Jim, to answer your question... I don't think the bike was ever in an accident, the frame looks good and I see no indication of damage or re-welding. it was just VERY poorly taken care of... the bike would have been in better shape had it been found abandoned! | ||
4speeder |
Jolly that is great news! I feel better about that mounting system on your bike now that the side load is gone. No doubt the rubber engine mounts will work as they should, and engine vibration will be isolated from the frame as it was designed. Your bike may be smoother than you ever imagined!!! | ||
Jolly |
Well..... I've logged all of about 15 miles on a buell s2 so far..... 14.5 in the rain.... On one I was looking at buying and 1/2 mile on this one before I stripped it down.... So.....practically nothing on an S2... But I am in deep!!!!!!! Now the x1/ s1/ s3...... Lots of miles!!!! I've rattled on during this build with sometimes minor updates but my intent is two fold.... One help other people with something that they may be about to take on themselves and just need a little bump in confidence or exposure and of course... The second.... An opportunity for smarter more experienced people to chime in and let me know to rethink something. | ||
4speeder |
I enjoy the details of the build, the pictures, the problems encountered, the resolutions, the input from others, and the general discussion. It is all good stuff and I thank you for sharing. | ||
Jolly |
starting point for tuning... I am running the stock header with a 2.0 inch collector, the older supertrap megaphone style exhaust with exposed tuning discs and a CV carb. My choices for an ignition module are the stock S2..clearly not the best bet...and a choice between a stock S1W or the ignition module that came with the S3 motor which has thunderstorm heads from the factory based up on year of donor bike. so...which module and what carb jetting do you guys recommend for a starting point? elevation for MD..basically sea level.. with trips up through skyline drive...4k above sea level roughly. thanks for the expertise! | ||
4speeder |
Sure wish I could help with your CV jetting, but I messed with mine for several weeks tweeking and tuning and I never was satisfied with the way the bike cruised on flat ground at 60-70mph or with the crispness of the throttle response off idle. My nephew owns a custom bike shop and builds big inch Harley big twins, and he told me several times to stick a Mikuni on the "little" 74 inch S2 motor. I resisted because the CV carb seems to make sense to me like a vacuum secondary 4 barrel carb does on a car. I finally caved and had him get me the Mikuni and stick whatever jets in it he thought I needed. I put that 42mm Mikuni flat slide pumper on it and oh my, it's hard to explain how much of a difference it made. it was truly like night and day. It cruises so smooth and without any hint of a surge, and the off idle throttle response is as crisp as the first bite of an ice cold granny smith. With the CV carb the bike would backfire and pop out the exhaust when the throttle was closed from speed to come to a stop. The Mikuni nearly erased all of that popping. The only mods, other than the pumper carb, are Andrews N4 cams , a V&H pipe, SE ignition box, and K&N filter. I'm sure the CV could be tuned to perfection by someone with the right skill set, but it sure was easy taking that Mikuni out of the box and sticking it on the engine and going for a spin. The hardest part of the swap was wiping the smile off my face after that first ride!!! | ||
Jolly |
I have a Thruxton that I recently did a 904 big bore kit, plus head work, plus a clutch, it desperately needs 2 not 1...2 FCR flat slide carbs....my S1W should have a mikuni instead of the CV... Al still laughs at me for running that CV on my S1W....and I deserve it... so I've got three other carbs to buy before the S2 gets a mikuni.... I just need to get this thing really tested, tuned and running before I jump in to adding a 4th carb to the list..... | ||
Jolly |
it took two carbs to build one good carb for this bike...silly stuff previous owners had done... one of the carbs had the fuel overflow tube cut off at the base of the float bowl and then filled the drain hole with JB weld...probably did'nt know what the brass tube did, then cut it down, then realized it was kind of there for a reason... oh well! motor installed, oil lines run, carb installed, throttle cables hooked up.... getting closer!! I sent a few more parts off to be powder- coated and sent the exhaust off to Jet-Hot jet coating to have it ceramic coated. the primary cover was really rough so I had it powder-coated to match the heads and the cam cover.... I like the way it turned out. carb has a 190 and a 45 with the air mixture set at 2 1/2 turns out. I will be running stock 2 inch header with a megaphone style supertrap exhaust with adjustable baffles (add or subtract a plate - 12 plates?) 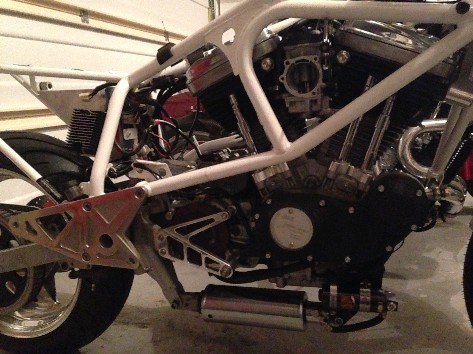  | ||
4speeder |
What type of crankcase breathing system are you going to use? I can't tell from the pic but it looks like the vented bolts that screw into the heads? | ||
Jolly |
I have the XB style rocker-box covers so I will be using the vents out the top into a catch can, just not installed yet. | ||
Phelan |
Looks great David! Are those cyls diamond cut? | ||
Jolly |
no the cylinders are not diamond cut, as I look at that photo though it really does look like it! I think its a combination of the light in the garage and the resizing to lower resolution that gives the illusion. | ||
Jolly |
by the way, I stopped in at the local Harley shop and they actually have a silver paint that matches the cast finish on the grey motors. its called "silver bead blast" part number 98606BY I used it to touch up the motor and it looks great! | ||
Puls4521 |
Oh my, I have been way to selfish with my own thread. I need to dive back into the archives of this thread, its exciting to see another tuber on its way back up! Especially one a few steps ahead of mine! | ||
Jolly |
well today I filled it with primary oil, set the clutch and adjusted the primary chain. I set the chain with 3/4" of "play" at the tightest spot. to do this I pulled the inspection plate since it was only loosely set on to keep things from getting in there.. and put the bike on a stand to be able to rotate the rear wheel. set the rear tire air nozzle at 12:00 and took a measurement of the play in the chain and set it to 3/4" play (measuring from low point down to pushed up to high point). then rotated the rear wheel (transmission in 5th gear and spark plugs removed) and I checked it at about 8 more places, I found 2 spots that were tighter than my beginning point and set the tightest to 3/4 inch. for measuring I took a piece of paper and cut it down to 1 inch wide and about 6 inches long, marked 1/2 and 3/4 inch on width for reference, then covered it in packing tape to preserve it, and used it as a side rule for measuring, laid it flat against the primary cover with the "indexes" over the hole... worked like a champ! so clutch is set up and primary chain is set up... 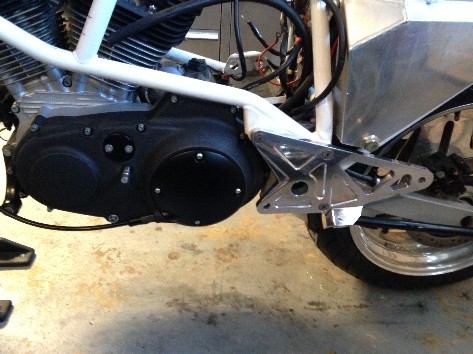 oh yeah (as if I forgot...  ) ) that side plate in the photo is the finished project after 8 months of work to design (re-create and modify the limited production run of plates that Jim Gilbert had made) plates that take the later model tube frame kick stand.. see separate write up for full details. once I get my exhaust back from jet hot jet coating it'll be ready to start! (Message edited by Jolly on March 03, 2014) | ||
Jolly |
left on the list.. 1. replace brake fluid 2. replace brake pads 3. check wheel bearings 4. replace front forks with new set then rebuild these and store them for next project 5. sort turn signals 6. install header and muffler 7. start and fine tune 8. finish body work, needs a front fender painted black sapphire and the tank cover touched up and saddle bags painted to match 9. seat from Baldwin saddles 10. install rack and bags (S3T conversion, frame already welded with new tabs, not required but had to repair a broken tab so figured might as well weld on rear tabs instead of using those hanging straps) 11. carbon fiber intake cover from American Sport Bike to go with the American Sport Bike billet breather backing plate 12. take a road trip! | ||
Jolly |
I got the rest of the critical stuff done to prep the bike for a "start/run" test this weekend and found a SURPRISE!!!! ..... so you all probably already know this but... the ignition module on a 95 bike is a 7 PIN connector and the connector on a 98 S3t ignition module is an 8 PIN connector... imagine my surprise....  so I called AL at American Sport Bike, I swear I'm gonna start calling him Uncle Al, (Al if you're reading this I mean that in the absolute best of ways possible!!!), anyway called Al and between the two of us with over 20yr old vision and poor lighting and... well we were able to work out the schematic pin to pin changes so that I could re-wire the plug...and just after all of that circuit chasing.. Al found a 8 to 7 PIN conversion adapter from Drag Specialties... part number DS 243068 ($42.95)which allows me to plug in the 8 pin ignition to a 7 pin wiring harness with out rewiring a connector.... but I bet you guys all knew that..... found some low profile grips for 1 inch bars from AVON, got those ordered and should have them this weekend... and... I sent some measurements off to my machinist to have another new part custom made.... need to get ahold of Loren (BADWEB = gowindward) at Baldwin motorbike saddles and get a seat for this bike since I am finally getting close to being done! and then....get started on my S1 I just rescued.. then check myself into the "Betty Ford Clinic for Buell buying addiction center" and see if I can put an end to the madness.... | ||
Beardo |
The S1 you just rescued? You do realize I rode that bike just last year, right? I told you I took two trips out to Columbus and back. It's getting old reading the pot shots Dave... | ||
Jolly |
No pot shots!!!! I'm going to restore this bike to PERFECT!!! It runs great, started right up with no issue!! Have said NOTHING negative other than cosmetically it's rough, and it's exactly what I was looking for since I've got all the parts to bring it up to a 9 or a 10! Perfect purchase and I'm going to have a great time restoring/building it to its best glory! | ||
Jefc73 |
Iam sure it will come out great Jolly. Cant wait to see the before and after pics. Personally myself I like to restore/refurbish to almost like new then ride the wheels off it. Everyone has their own preference on how they want and expect a bike to be. | ||
Jolly |
these adapters are even available on amazon... you need to specify though 7 pin to 8 pin module or 8 pin to 7 pin module... depends on which direction you're trying to convert to, though I cant imagine why anyone here would want to put an older module on a "newer" bike wiring harness... http://www.amazon.com/Slinger-Airflow-Werks-Igniti on-Adapter/dp/B000GTVY5U/ref=sr_1_1?ie=UTF8&qid=13 94670416&sr=8-1&keywords=slinger+7+pin+to+8+pin+ad apter | ||
Jolly |
IT LIVES!! fired the bike up yesterday, it fired on about the second revolution, caught immediately and stayed running! A few things left to sort out, it has a slight leak in the carb, old carb, rebuilt, but old and worn... and I am a little unsure of the exact mounting of the megaphone style supertrap exhaust, it looks like the bracket is dangerously close to the oil lines, even with the protective heavy sleeves over the oil lines I have concerns of it vibrating and cutting a hole in one or both of the lines...maybe I'm overly cautious? need to tighten up the drive belt, change the front forks, change brake pads, and the throttle actuation is a little tight and doesn't always snap back (old carb, old cables...), so a little attention needed there and then the body work goes on and I could test ride it except for the 5+ inches of snow we got over-night. this megaphone style supertrap with 12 discs sounds great and the S3T motor with the S3T ignition module revs freely, no stumbles, the conversion plug for the wiring harness as a huge success. need to source something better than the stock boomerang style shift set up...and of course I have something in the works with the machinist that did the other parts for me...  this bike is going to be a lot of fun! | ||
Hootowl |
"need to tighten up the drive belt" Be careful. Easy to get it too tight. | ||
Hootowl |
"need to source something better than the stock boomerang style shift set up..." The 2001 M2/S3 shifter works. http://americansportbike.com/newdir/Item/17501 |