G oog le BadWeB | Login/out | Topics | Search | Custodians | Register | Edit Profile


Buell Forum » Old School Buell » S2 Thunderbolt » Archive through February 05, 2013 » Road_Thing's blown-up S2 » Archive through November 11, 2011 « Previous Next »

Author Message
Top of pagePrevious messageNext messageBottom of page Link to this message

Road_thing
Posted on Thursday, October 27, 2011 - 07:10 pm:   Edit Post Delete Post View Post/Check IP Print Post    Move Post (Custodian/Admin Only) Ban Poster IP (Custodian/Admin only)


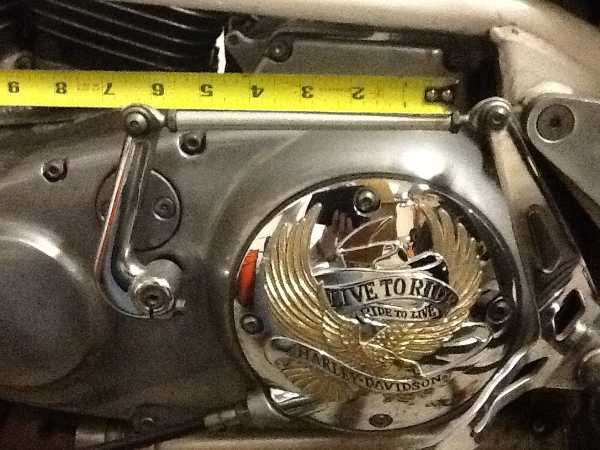
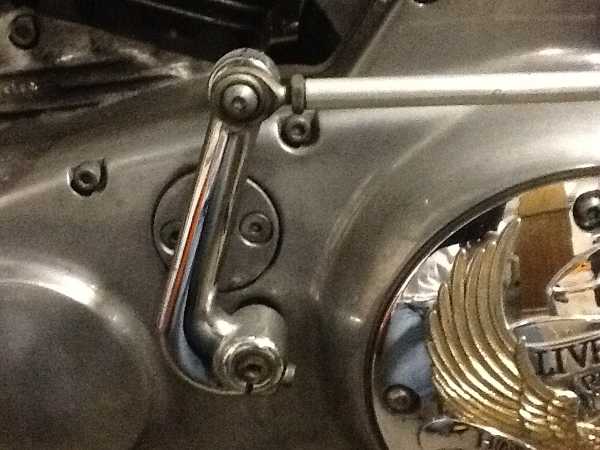
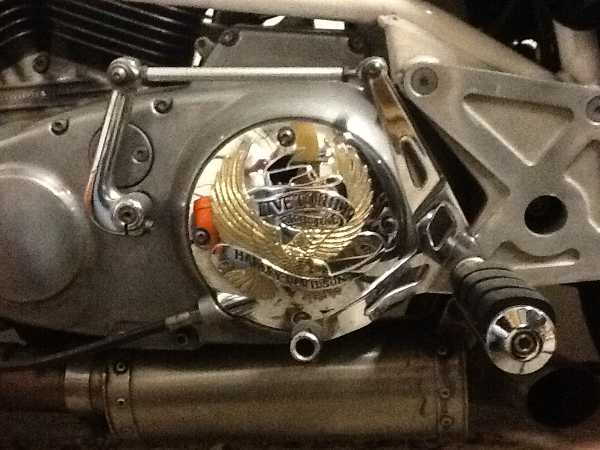
Here's the photo that got Hootowl and me talking about sideplates. I went out to the shop this afternoon and looked at them very closely and it appears that Court has been correct all along, those are cut-down stock S2 sideplates. It looks like the previous owner trimmed the back ends to remove the passenger peg mounts, then milled new holes to mount the operator's pegs up an inch and back about 6 inches.

The rider pegs on my bike were mounted in the hole in the middle of the rear triangle on the sideplate. If you compare my picture to the one Hootowl posted, you can see the difference in peg position: the stock peg location is in the hole at the lower front of the plate.

That probably explains why this bike has always been tough on my knees and wrists, the relocated pegs make me rock forward, bending my knees more and putting extra weight on my wrists. I'm going to move the pegs back to the stock location.

Now heres a question for you S2 owners, if you're inclined to help me out: How long is the stock shifter linkage rod (the one with Heim joints at each end that connects the boomerang to the shift lever on the primary)? And how long is the pin that connects the rear brake pedal to the master cylinder? It looks like I may need to replace or modify what I've got.

Thanks!

rt
Top of pagePrevious messageNext messageBottom of page Link to this message

Blake
Posted on Thursday, October 27, 2011 - 11:02 pm:   Edit Post Delete Post View Post/Check IP Print Post    Move Post (Custodian/Admin Only) Ban Poster IP (Custodian/Admin only)

Unarchived and moved to the S2 section for ya.
Top of pagePrevious messageNext messageBottom of page Link to this message

Road_thing
Posted on Friday, October 28, 2011 - 07:56 am:   Edit Post Delete Post View Post/Check IP Print Post    Move Post (Custodian/Admin Only) Ban Poster IP (Custodian/Admin only)

Thanks, Blake!

rt
Top of pagePrevious messageNext messageBottom of page Link to this message

Hootowl
Posted on Friday, October 28, 2011 - 10:07 am:   Edit Post Delete Post View Post/Check IP Print Post    Move Post (Custodian/Admin Only) Ban Poster IP (Custodian/Admin only)

I will check when I get home Tom.
Top of pagePrevious messageNext messageBottom of page Link to this message

Hootowl
Posted on Friday, October 28, 2011 - 06:49 pm:   Edit Post Delete Post View Post/Check IP Print Post    Move Post (Custodian/Admin Only) Ban Poster IP (Custodian/Admin only)

RT

The threaded rod on the shifter is 5 3/8 inches long. That's just the rod, not the eye- to-eye length of the whole assembly. I'm guessing you just need the rod length.

On the brake side, I think it is highly unlikely that the PO cut that rod down, since it's only about two inches long to begin with. If the rod is two inches long before entering the boot for the master cylinder, you've probably got an unaltered rod.
Top of pagePrevious messageNext messageBottom of page Link to this message

Road_thing
Posted on Friday, October 28, 2011 - 07:08 pm:   Edit Post Delete Post View Post/Check IP Print Post    Move Post (Custodian/Admin Only) Ban Poster IP (Custodian/Admin only)

Thanks Jeff! I've got the brake side figured out, it needed a short extension. I'm sure I can cut the shifter rod down and re-thread it, now tha I know how long it needs to be. The one that's on there is way too long.

rt
Top of pagePrevious messageNext messageBottom of page Link to this message

1313
Posted on Friday, October 28, 2011 - 08:47 pm:   Edit Post Delete Post View Post/Check IP Print Post    Move Post (Custodian/Admin Only) Ban Poster IP (Custodian/Admin only)

Just a word of caution, there were at least 3 different shifter setups on S2's. IIRC, each required a different length shifter rod.

Dontcha just love running changes?
1313
Top of pagePrevious messageNext messageBottom of page Link to this message

Hootowl
Posted on Friday, October 28, 2011 - 10:16 pm:   Edit Post Delete Post View Post/Check IP Print Post    Move Post (Custodian/Admin Only) Ban Poster IP (Custodian/Admin only)

Hmmm...I'll take pictures of mine. Might help you determine if they're the same revision. It's a 95.
Top of pagePrevious messageNext messageBottom of page Link to this message

Hootowl
Posted on Friday, October 28, 2011 - 10:49 pm:   Edit Post Delete Post View Post/Check IP Print Post    Move Post (Custodian/Admin Only) Ban Poster IP (Custodian/Admin only)


1


2


3


4


5


Pretty sure my shifter's bent in at least one place near the toe piece...hope it isn't too far off to give you a clue about what you need.
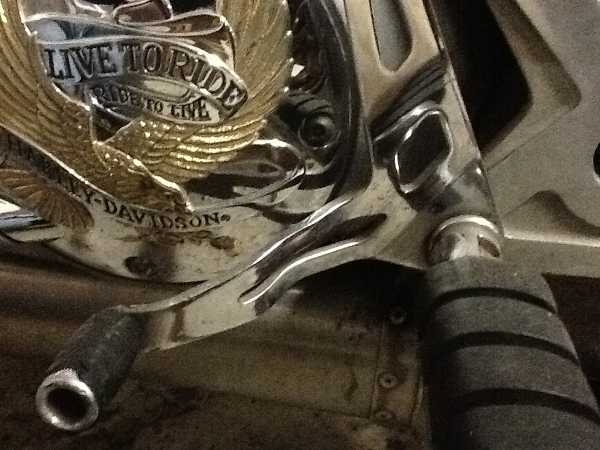
Top of pagePrevious messageNext messageBottom of page Link to this message

Road_thing
Posted on Saturday, October 29, 2011 - 08:51 am:   Edit Post Delete Post View Post/Check IP Print Post    Move Post (Custodian/Admin Only) Ban Poster IP (Custodian/Admin only)

Thanks, Brankin! Mine's been bent and re-bent, I guess because when the DPO moved the pegs back, it didn't need to bow out so much for derby cover clearance. Fortunately, I am a master of heat'n'beat engineering....

If only I had a chrome shop...


rt
Top of pagePrevious messageNext messageBottom of page Link to this message

Bluzm2
Posted on Sunday, October 30, 2011 - 11:14 am:   Edit Post Delete Post View Post/Check IP Print Post    Move Post (Custodian/Admin Only) Ban Poster IP (Custodian/Admin only)

Tom, the levers are stainless right?
Just polish the heck out of em and there's no need for chrome!
Top of pagePrevious messageNext messageBottom of page Link to this message

Road_thing
Posted on Tuesday, November 01, 2011 - 09:37 am:   Edit Post Delete Post View Post/Check IP Print Post    Move Post (Custodian/Admin Only) Ban Poster IP (Custodian/Admin only)

I'll check that out, Brad. Thanks!

rt
Top of pagePrevious messageNext messageBottom of page Link to this message

Road_thing
Posted on Tuesday, November 01, 2011 - 05:50 pm:   Edit Post Delete Post View Post/Check IP Print Post    Move Post (Custodian/Admin Only) Ban Poster IP (Custodian/Admin only)

Well, if it's chrome, it's tough chrome, 'cause I beat it with a hammer and it didn't come off. But if it's stainless, it's magnetic stainless.

Who knows? At least it's all together.

rt
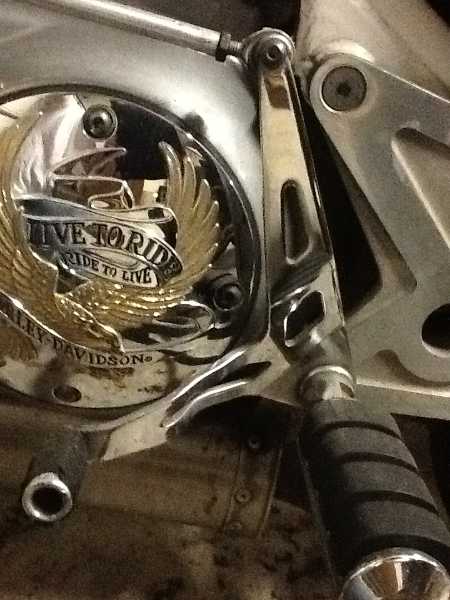
Top of pagePrevious messageNext messageBottom of page Link to this message

Road_thing
Posted on Friday, November 04, 2011 - 09:25 am:   Edit Post Delete Post View Post/Check IP Print Post    Move Post (Custodian/Admin Only) Ban Poster IP (Custodian/Admin only)


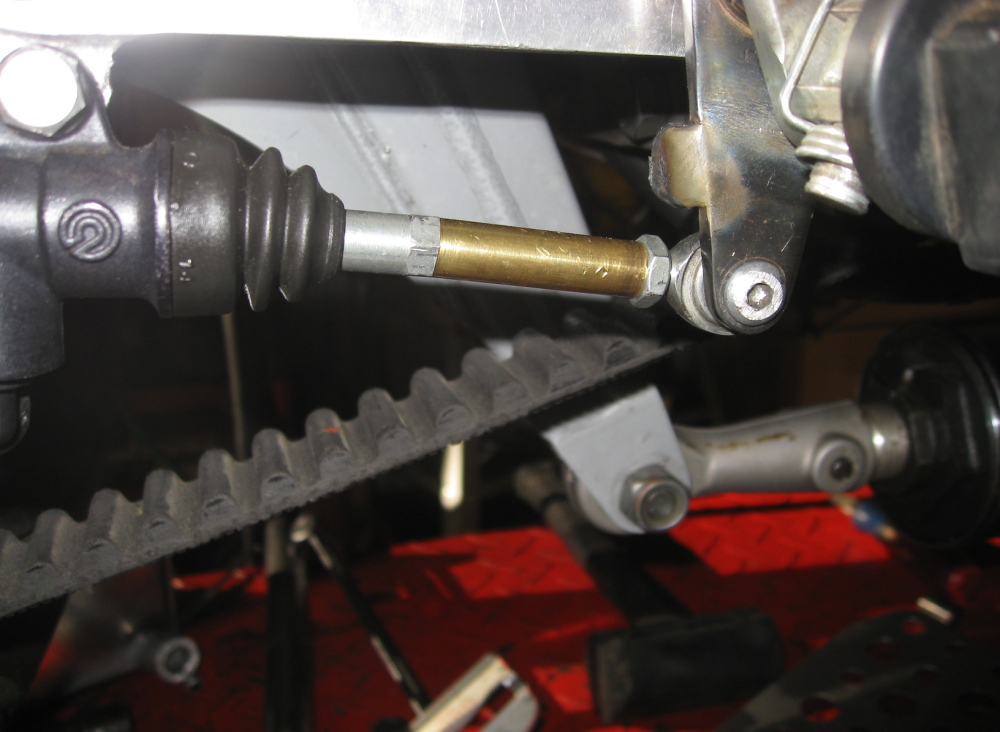
Here's how my linkages turned out. I had to make a short spacer for the brake rod, and turn a little more taper on the nipple at the end of the rod to let it clear the opening to the master cylinder.

The shifter rod surprised me. The one that was on the bike had a little groove in it about 6" from the end with the left-hand threads. That looked like a good place to start shortening it, so I chucked it up in my little toy lathe and started parting it off. Turns out there was a steel shaft threaded 1/4x28 inside--looks like whoever did the rearset mod just put an extension on the shifter rod. All I had to do was back the threaded rod out and screw in the Heim joint.

Yesterday I connected the new oil lines to the pump and vent fittings and ran them up to the tank area, then started in on replacing the wiring harness.

rt
Top of pagePrevious messageNext messageBottom of page Link to this message

Road_thing
Posted on Sunday, November 06, 2011 - 06:26 pm:   Edit Post Delete Post View Post/Check IP Print Post    Move Post (Custodian/Admin Only) Ban Poster IP (Custodian/Admin only)

More progress. Oil tank is in and plumbed up. Wiring is done. Fairing mount and instruments are on and wired up. Rear brake is on with new pads and bled.


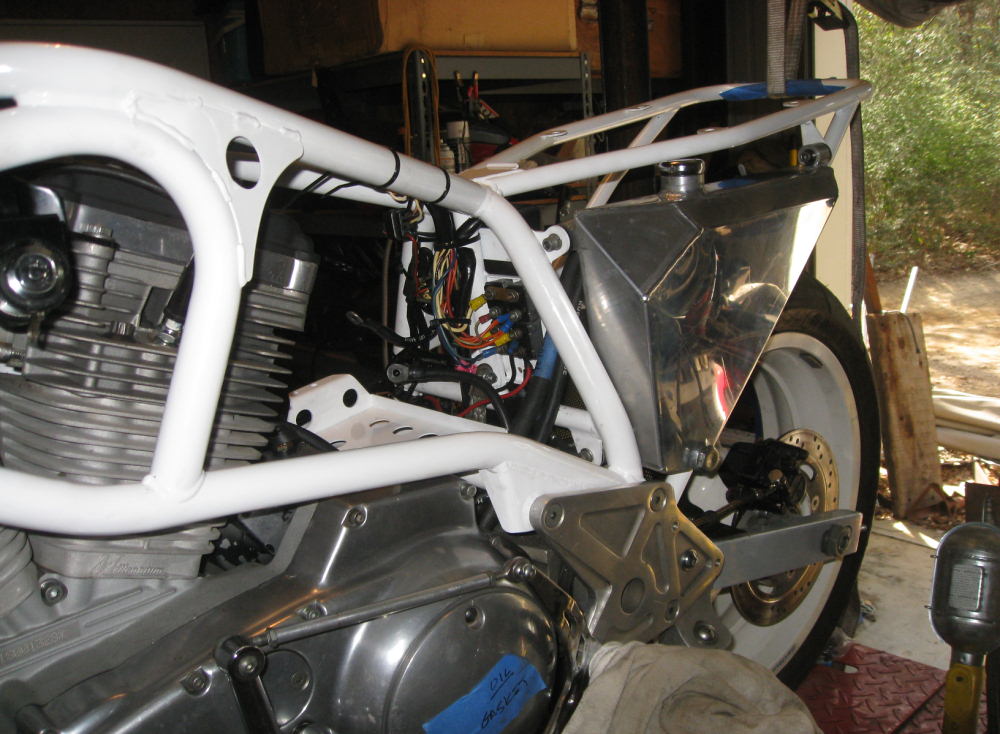
Still have to install handlebars and hook up wires and cables, install and bleed front brake. Need to get a new battery (the old one went in my mule this spring), go over everything, then put it on the trailer and take it to Houston for the initial startup with Jet Peek, who built the new motor.

rt
Top of pagePrevious messageNext messageBottom of page Link to this message

Reepicheep
Posted on Sunday, November 06, 2011 - 07:11 pm:   Edit Post Delete Post View Post/Check IP Print Post    Move Post (Custodian/Admin Only) Ban Poster IP (Custodian/Admin only)

Looking good! Is that the original fuse block? Or was that a retrofit?
Top of pagePrevious messageNext messageBottom of page Link to this message

Phelan
Posted on Sunday, November 06, 2011 - 09:16 pm:   Edit Post Delete Post View Post/Check IP Print Post    Move Post (Custodian/Admin Only) Ban Poster IP (Custodian/Admin only)

Looks original to me. #ihatethose
Top of pagePrevious messageNext messageBottom of page Link to this message

Road_thing
Posted on Sunday, November 06, 2011 - 10:03 pm:   Edit Post Delete Post View Post/Check IP Print Post    Move Post (Custodian/Admin Only) Ban Poster IP (Custodian/Admin only)

Stock breakers. They come out easy, but they're a bitch to put back in!

rt
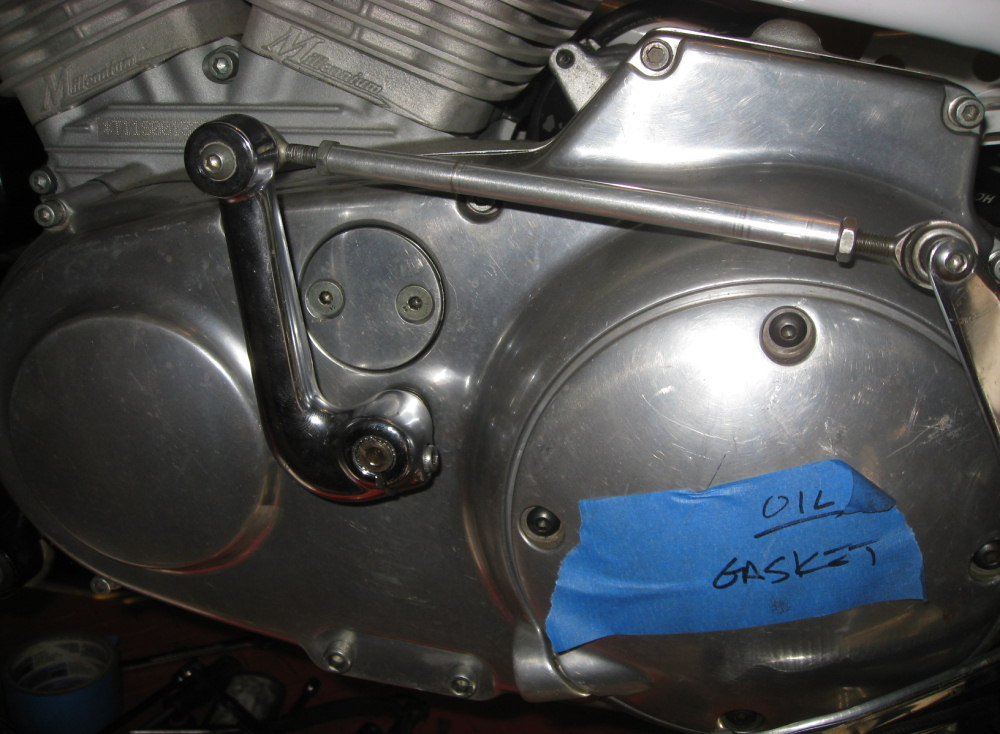
Top of pagePrevious messageNext messageBottom of page Link to this message

Road_thing
Posted on Monday, November 07, 2011 - 03:52 pm:   Edit Post Delete Post View Post/Check IP Print Post    Move Post (Custodian/Admin Only) Ban Poster IP (Custodian/Admin only)

Primary is buttoned up, bars and controls are on, clutch is adjusted, carb is on.

Note to self: never grab the business end of a soldering iron unless you're absolutely, positively certain that it's not hot...


rt
Top of pagePrevious messageNext messageBottom of page Link to this message

Bomber
Posted on Monday, November 07, 2011 - 06:01 pm:   Edit Post Delete Post View Post/Check IP Print Post    Move Post (Custodian/Admin Only) Ban Poster IP (Custodian/Admin only)

good lookin scoot, hermano . . . .even seems to be some air in the tahr!
Top of pagePrevious messageNext messageBottom of page Link to this message

Road_thing
Posted on Monday, November 07, 2011 - 09:09 pm:   Edit Post Delete Post View Post/Check IP Print Post    Move Post (Custodian/Admin Only) Ban Poster IP (Custodian/Admin only)

Yessir, back tire is much better than the last time you saw it...front's gettin' kinda thin, though.

My plan is to powdercoat the wheels and replace the bearings on the next tire changes.

;-}

rt
Top of pagePrevious messageNext messageBottom of page Link to this message

Bluzm2
Posted on Monday, November 07, 2011 - 10:24 pm:   Edit Post Delete Post View Post/Check IP Print Post    Move Post (Custodian/Admin Only) Ban Poster IP (Custodian/Admin only)

Looking good Tom.
Yeah, the breakers suck. Just ask Frank..
Top of pagePrevious messageNext messageBottom of page Link to this message

Court
Posted on Tuesday, November 08, 2011 - 06:32 am:   Edit Post Delete Post View Post/Check IP Print Post    Move Post (Custodian/Admin Only) Ban Poster IP (Custodian/Admin only)

This is so cool to watch . . . .
Top of pagePrevious messageNext messageBottom of page Link to this message

Whitetrashxb
Posted on Tuesday, November 08, 2011 - 10:47 am:   Edit Post Delete Post View Post/Check IP Print Post    Move Post (Custodian/Admin Only) Ban Poster IP (Custodian/Admin only)

agreed, i'm diggin' this thread Mr. Thing

As an obviously biased fan of white, i'm curious if you're gonna go a different color on the wheels?

James
Top of pagePrevious messageNext messageBottom of page Link to this message

Road_thing
Posted on Tuesday, November 08, 2011 - 11:13 am:   Edit Post Delete Post View Post/Check IP Print Post    Move Post (Custodian/Admin Only) Ban Poster IP (Custodian/Admin only)

I plan to stay with white. I like the look, even though it's a pain to keep clean. At least I don't have to clean chain lube off the rear wheel!

rt
Top of pagePrevious messageNext messageBottom of page Link to this message

Road_thing
Posted on Tuesday, November 08, 2011 - 04:58 pm:   Edit Post Delete Post View Post/Check IP Print Post    Move Post (Custodian/Admin Only) Ban Poster IP (Custodian/Admin only)

OK, I think it's about ready to fire up. Instruments on, wiring complete, both brakes on and bled with new pads, headlight is on, need to mount the horn and get a new battery, route breather lines and install bodywork.

rt
Top of pagePrevious messageNext messageBottom of page Link to this message

Road_thing
Posted on Friday, November 11, 2011 - 01:47 pm:   Edit Post Delete Post View Post/Check IP Print Post    Move Post (Custodian/Admin Only) Ban Poster IP (Custodian/Admin only)

All I lack is a spark plug connector and a couple of feet of fuel line.
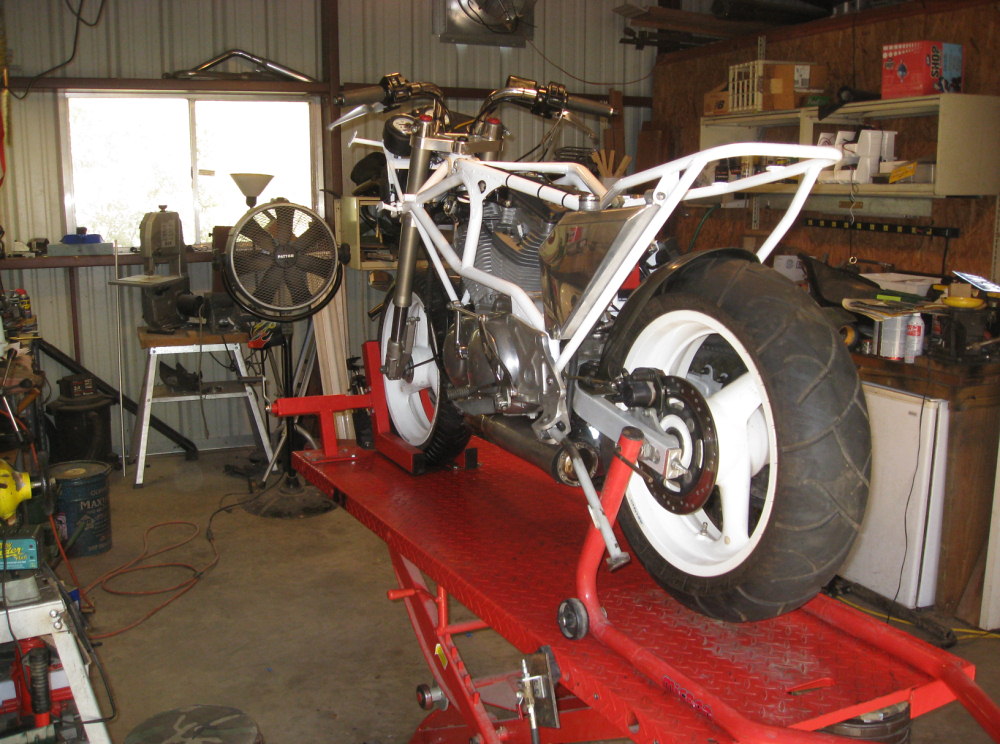
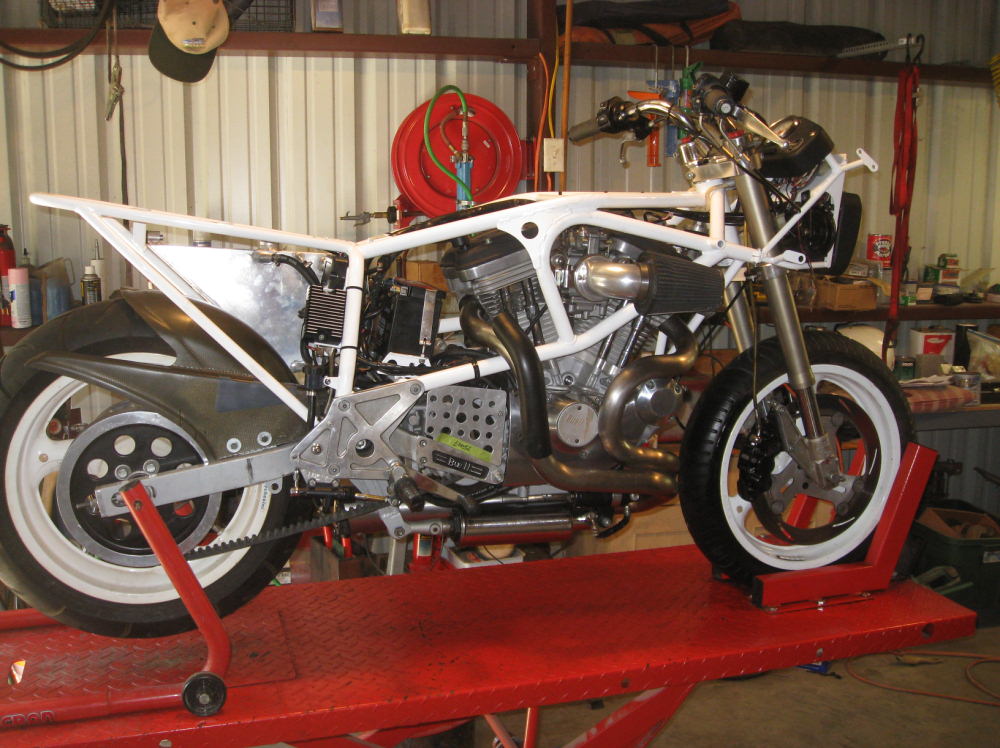


rt
Top of pagePrevious messageNext messageBottom of page Link to this message

Road_thing
Posted on Friday, November 11, 2011 - 04:33 pm:   Edit Post Delete Post View Post/Check IP Print Post    Move Post (Custodian/Admin Only) Ban Poster IP (Custodian/Admin only)

OK, a nice afternoon ride on the Road Pig, a $10 visit to the NAPA store, a plate of tacos and enchiladas and I'm about 30 minutes away from being done!

rt
Top of pagePrevious messageNext messageBottom of page Link to this message

Hootowl
Posted on Friday, November 11, 2011 - 04:42 pm:   Edit Post Delete Post View Post/Check IP Print Post    Move Post (Custodian/Admin Only) Ban Poster IP (Custodian/Admin only)


Now you can help me go through the one I just bought, oh master of S2 restoration. : )
Top of pagePrevious messageNext messageBottom of page Link to this message

Road_thing
Posted on Friday, November 11, 2011 - 04:57 pm:   Edit Post Delete Post View Post/Check IP Print Post    Move Post (Custodian/Admin Only) Ban Poster IP (Custodian/Admin only)

If we start on it now, we might be ready in time for the Arkansas trip!

rt
« Previous Next »

Topics | Last Day | Tree View | Search | User List | Help/Instructions | Rules | Program Credits Administration