| Author | Message | ||
Aaomy |
yup,, that is what is currently on my s2t. aaron | ||
Rickie_d |
Aaomy has a different approach to the XB crank vent and PBR catch can fix�didn�t anyone notice or curious enough to ask him about it??? Just throwing it out there�there is shit happening in the background of some of these pics. It is a mini �where�s Waldo� goin on here. If I get permission to tell an S2 side stand story I will post it with my version of Aaomy�s side stand fix�otherwise I will just post the pics later when I find them. | ||
Blazin_buell |
Aaron, I just noticed the flame etching on the can you sneaky artist you. I dig the kickstand ,it looks like it might have been a pre-production unit to go on my "25r". The oil catcher reminds me of the old fuel filters you used to see on old buses and such and one of which is on my hotrod '69. Black, now that looks like a comfortable S-1 seat,two cheeks instead of just the twig n berries resting on it....I get it. | ||
Rickie_d |
Blazin - it is not just the fact that the catcher exists and what it looks like; it is where it is routed from that is interesting�  | ||
Phelan |
I had a similar catchcan creation a while back... 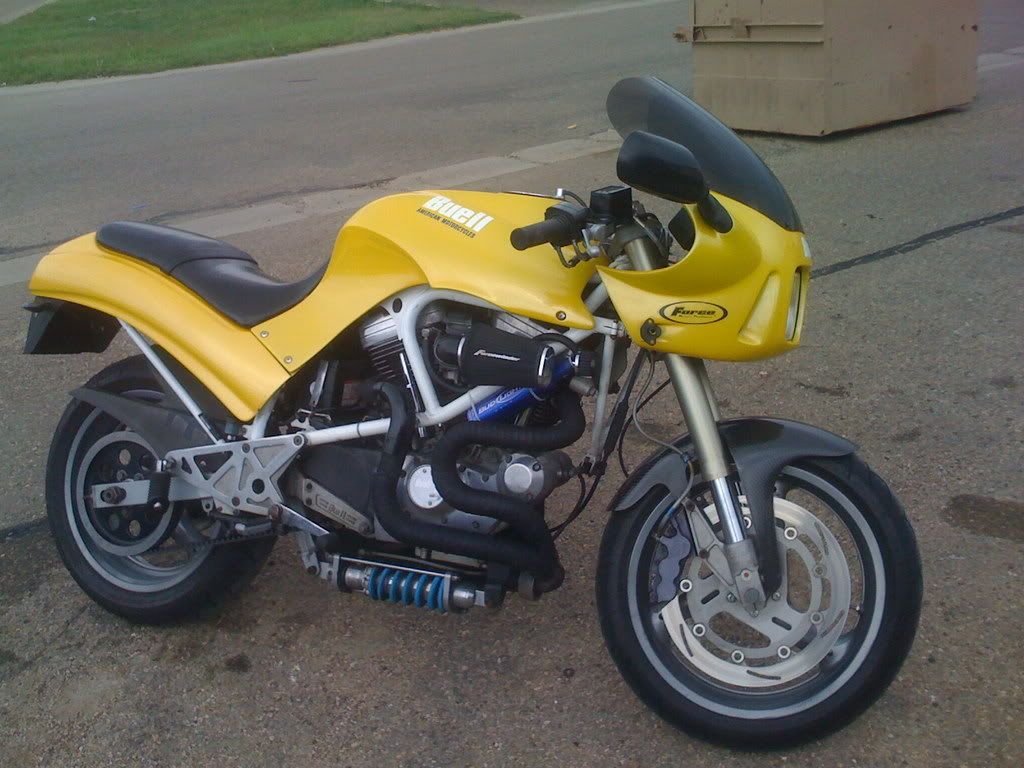 | ||
Aaomy |
blazin buell,, glad you like the flames,, they even extend to small accents on the polished al swingarm. that is if you look in the top pictures i posted for the kick stand.. rickie d thats not the first time different has been used in conjunction with my name!!! alot of the things i have done all go un noticed.. unless some one know to look.. like sumax billet push rod tubes.. one of my favorite things is my air cleaner\ intake... that to the naked eye looks pretty much stock.. the catch can story... while xb heads take a different front motor mount,, front bosses are not drilled or taped for the breather or carb mounting,, and are also .025 shorter than the standard sportster heads (stock on a s2t).. to start i slightly deck the heads and clean up the gasket areas.. then check the displacement of each head and remove a little more until both combustion chambers are exactly the same displacement. after that you need to face the front mounting bosses and drill and tap them for your carb mounting and breather set up.. instead of drilling and taping into the pocket where the engine would normally breath from i stopped short and carefully drilled in from the back.. these holes have to be very carefully placed as you will see in later picks.. 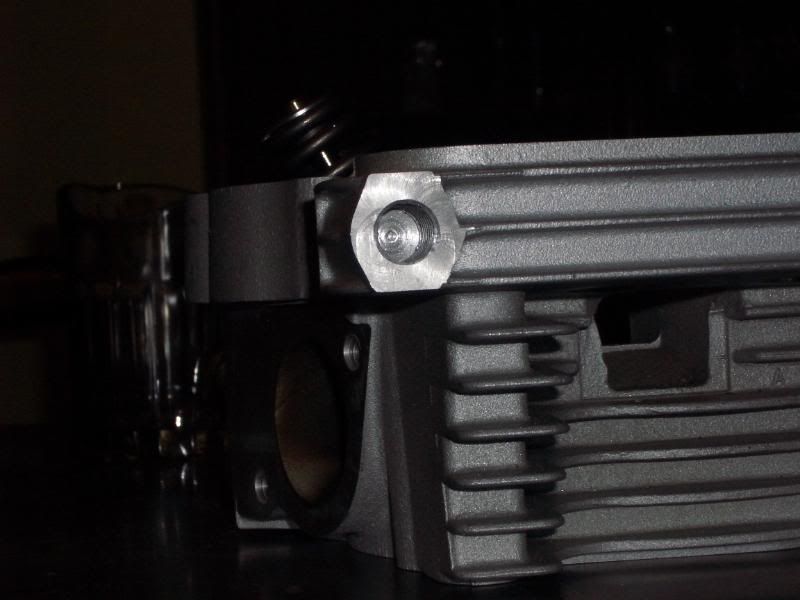 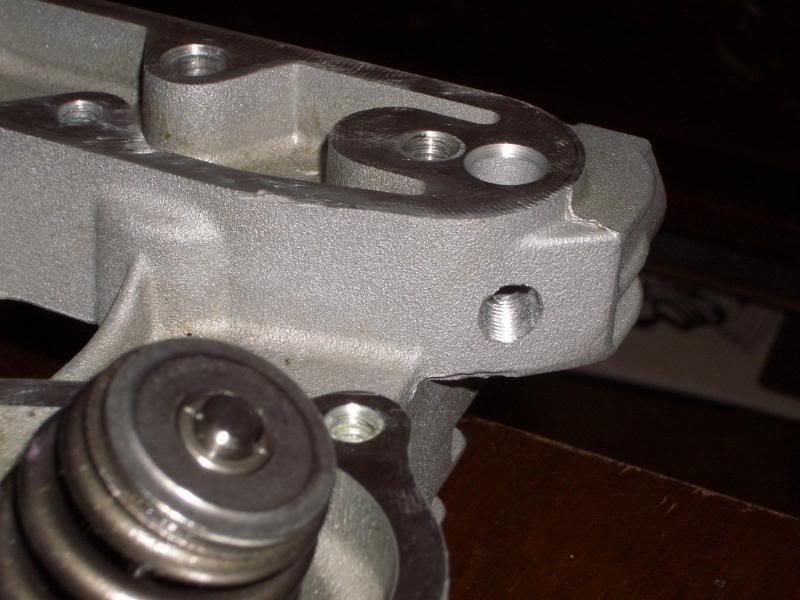 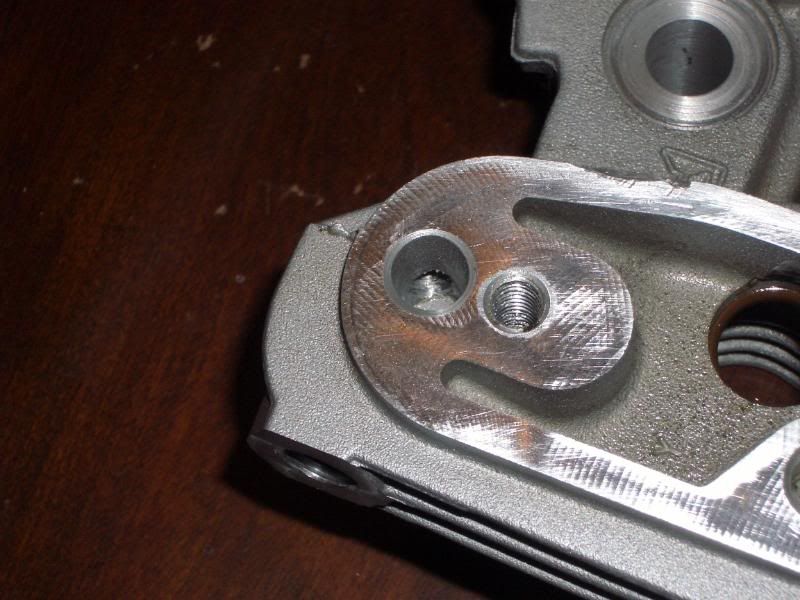 this hole will allow the motor to breath out the back of the head instead of the front and into the carb.. 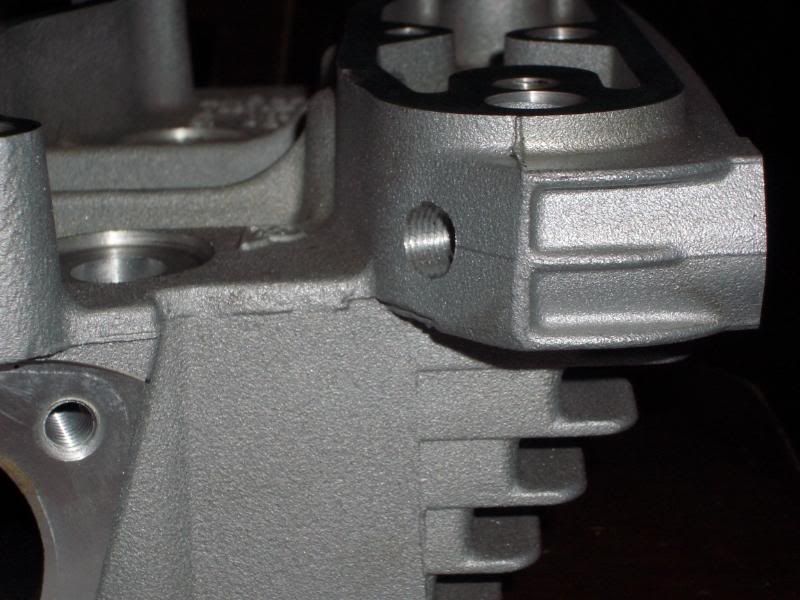 this image give you an idea of where the breather tube will exit the head over the intake port.. 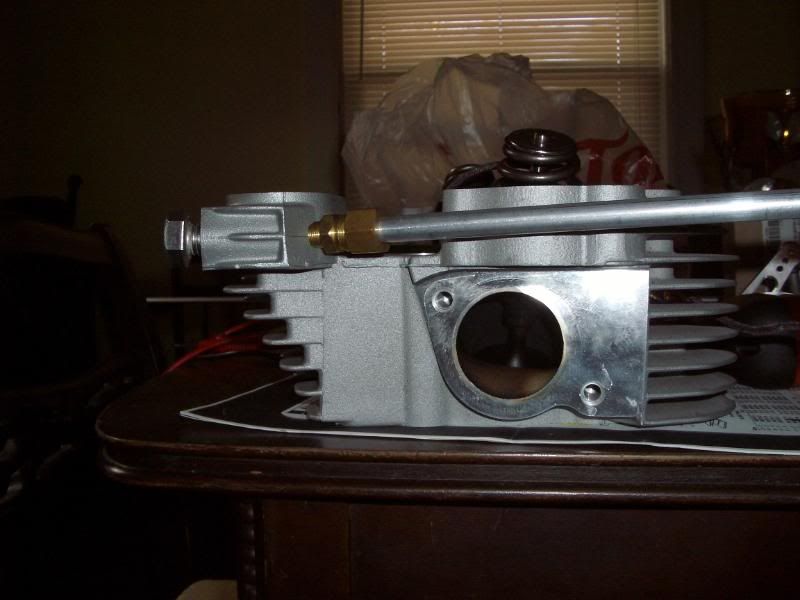 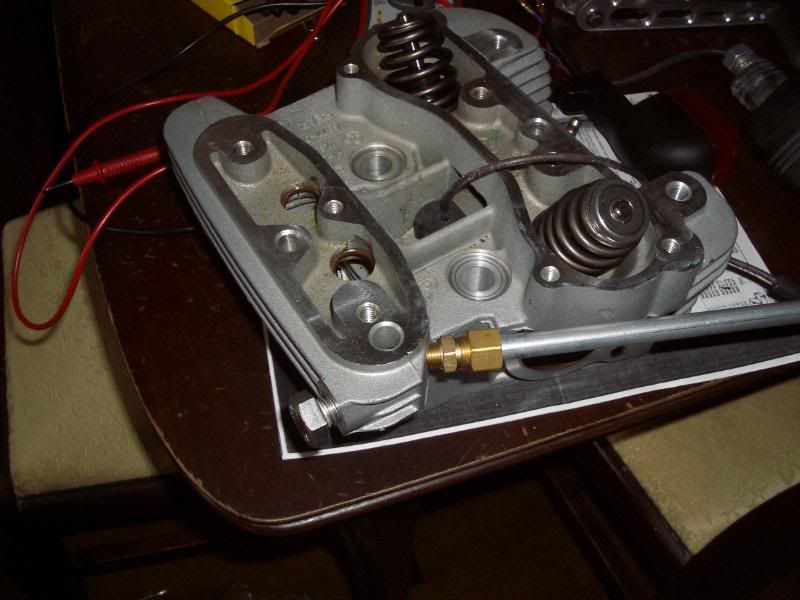 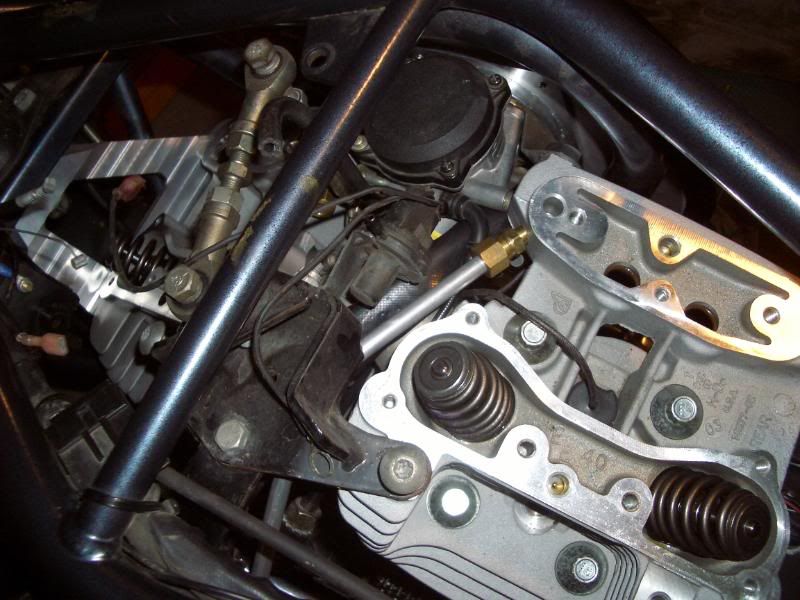 these images show the tubing route threw the heads, see how close everything gets in here,, the carb linkage and choke enricher cable are really close to the breather tubing.. this is why placement is so critical... 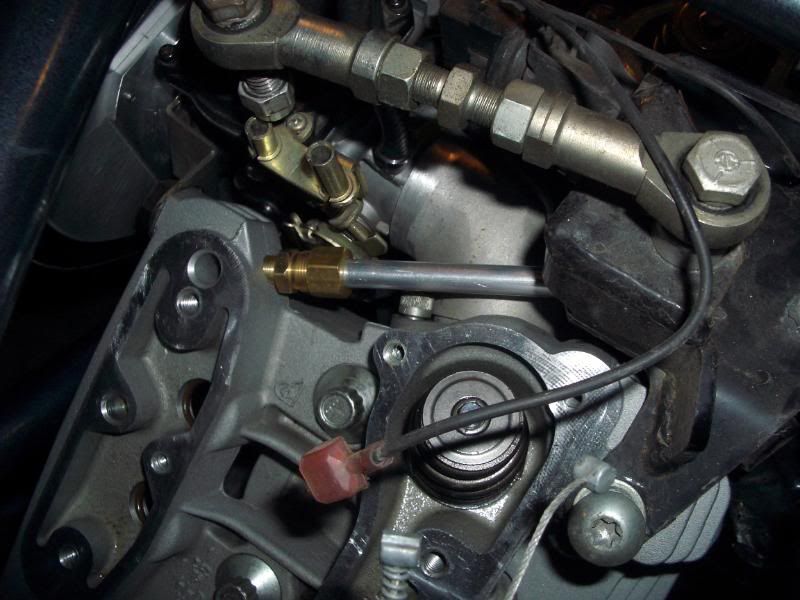 now the start of the catch can 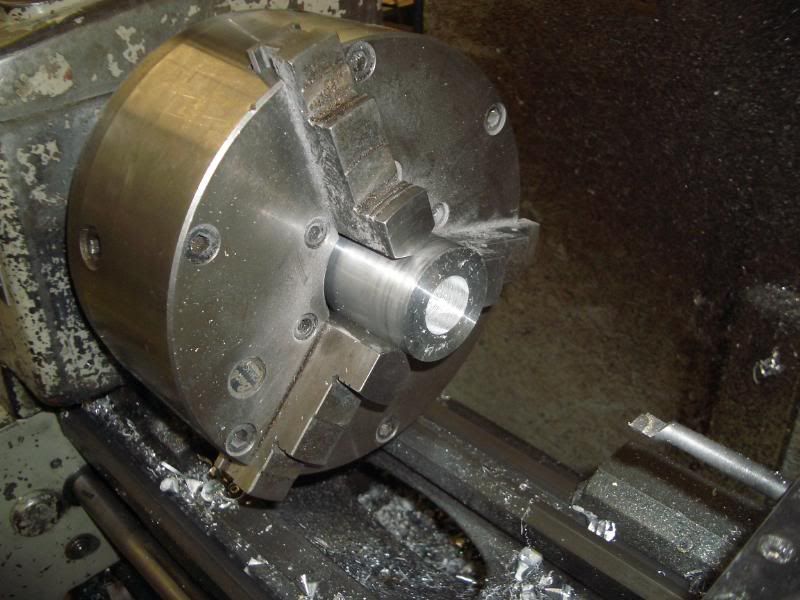 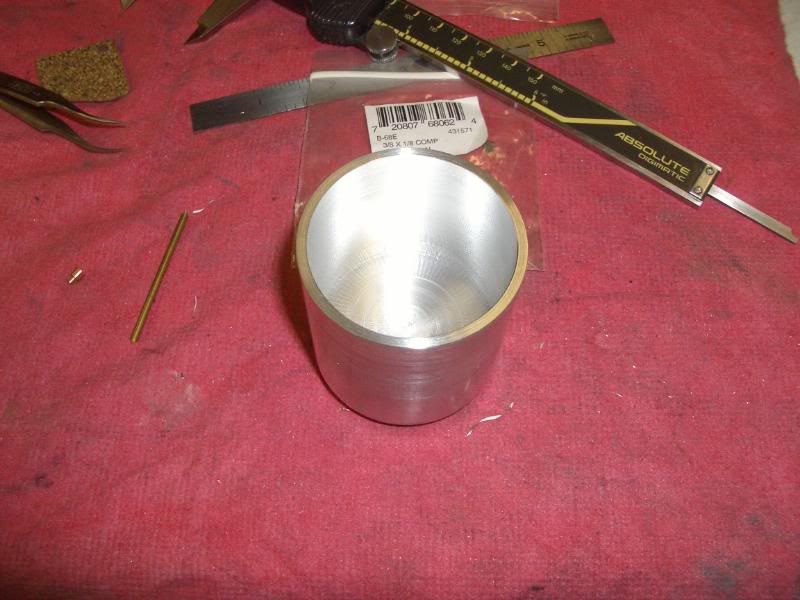 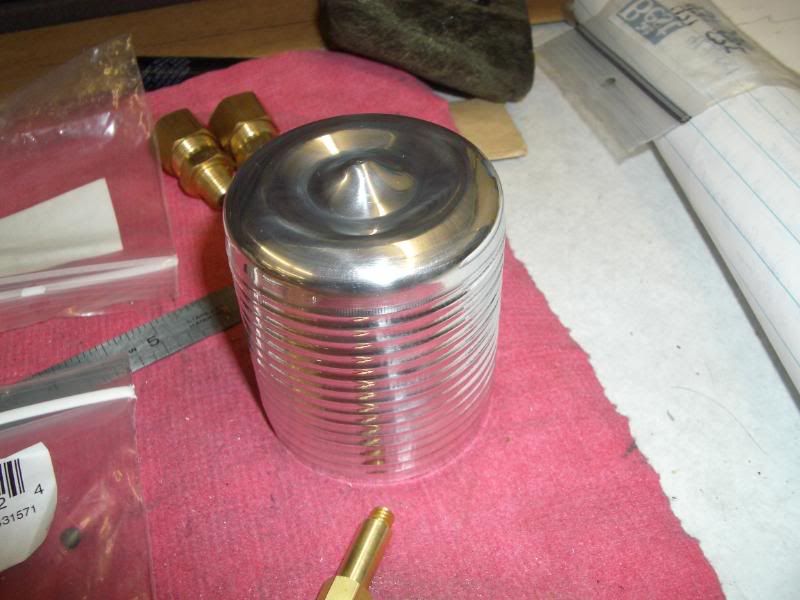 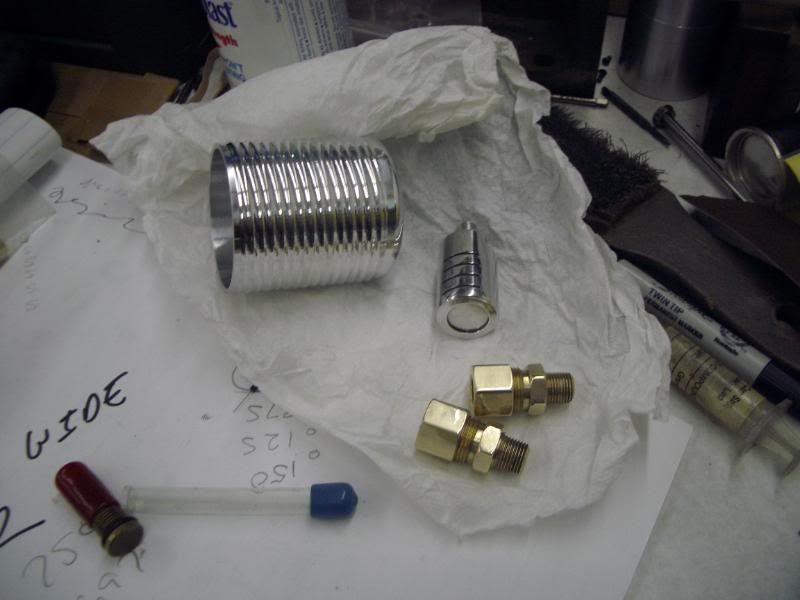 mmmmmmm,, billet 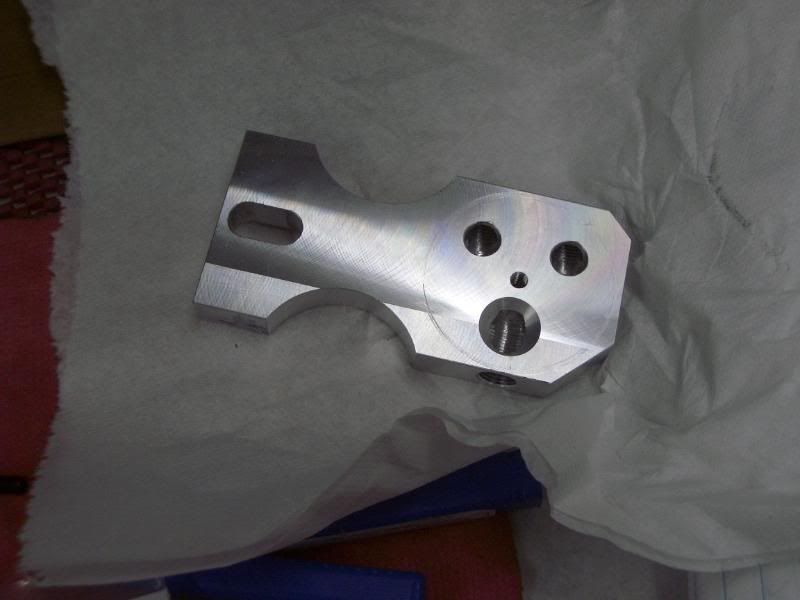 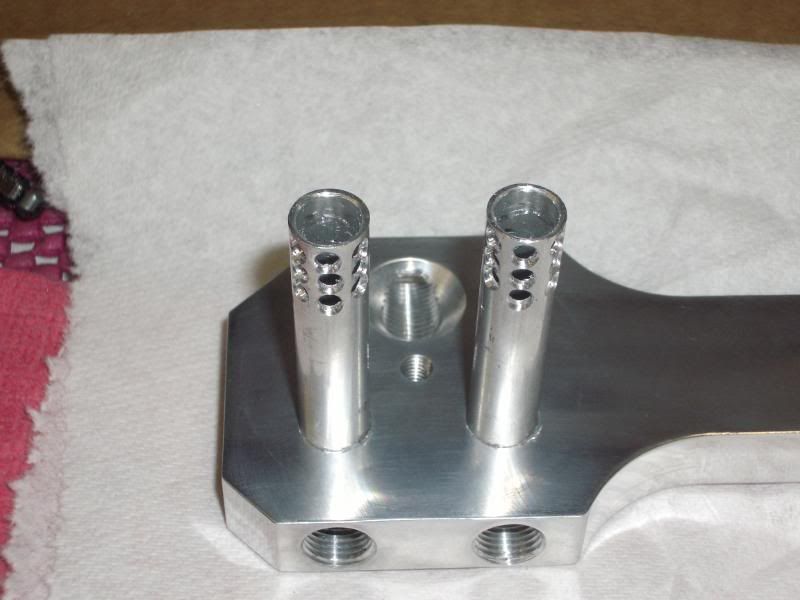 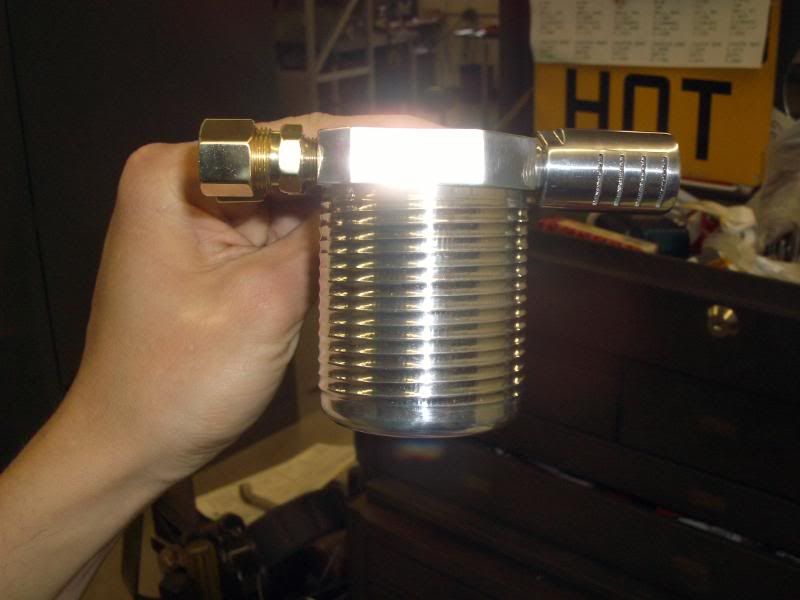 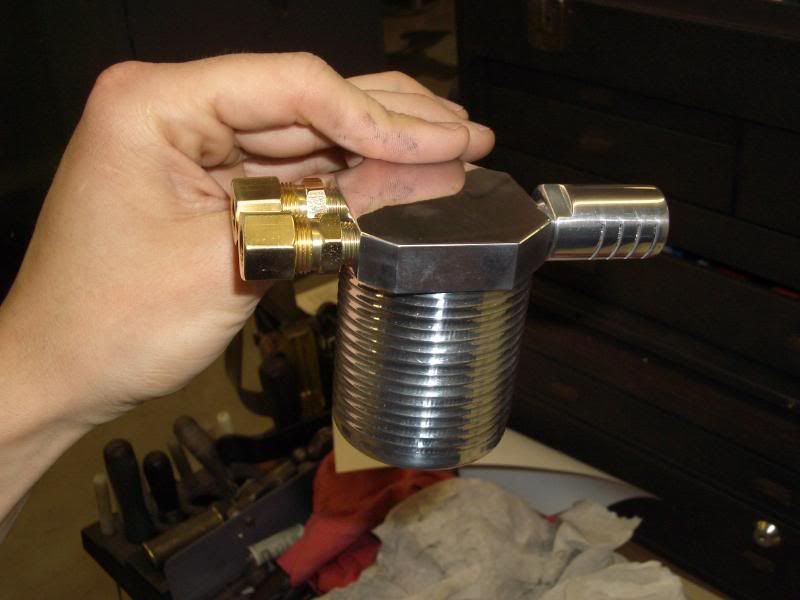 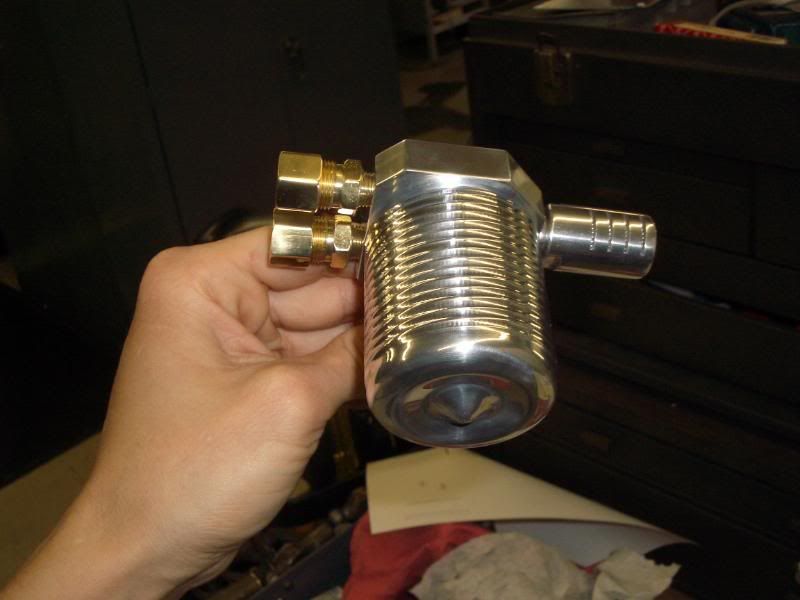 xb head have an extra lug on the rear heads,, so i thought what a perfect place to mount a catch can... 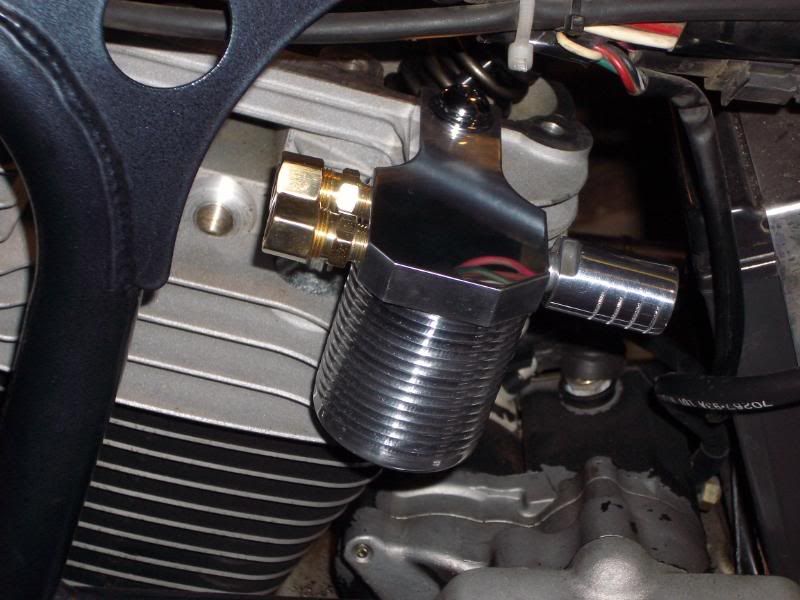 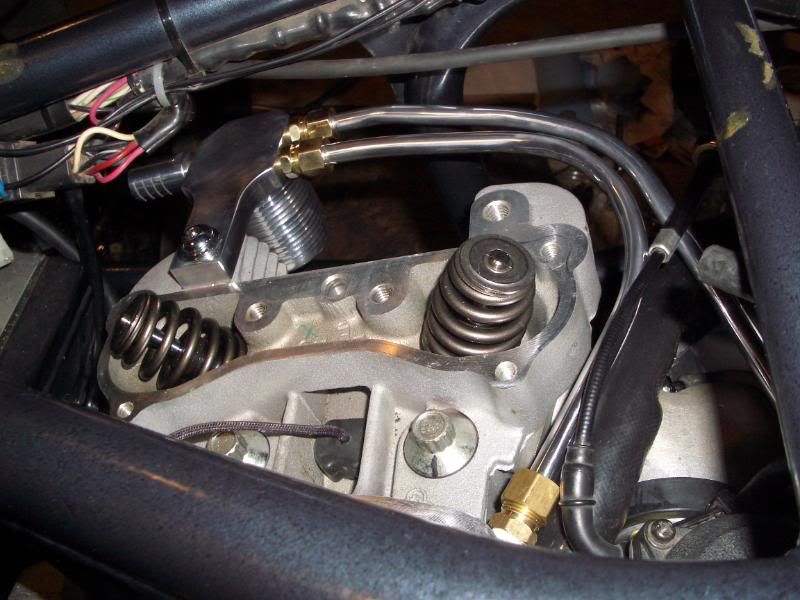 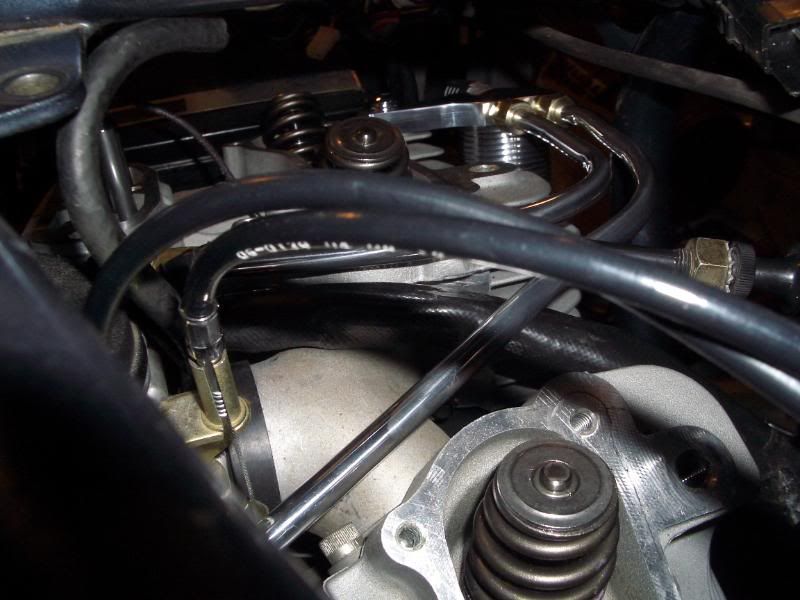 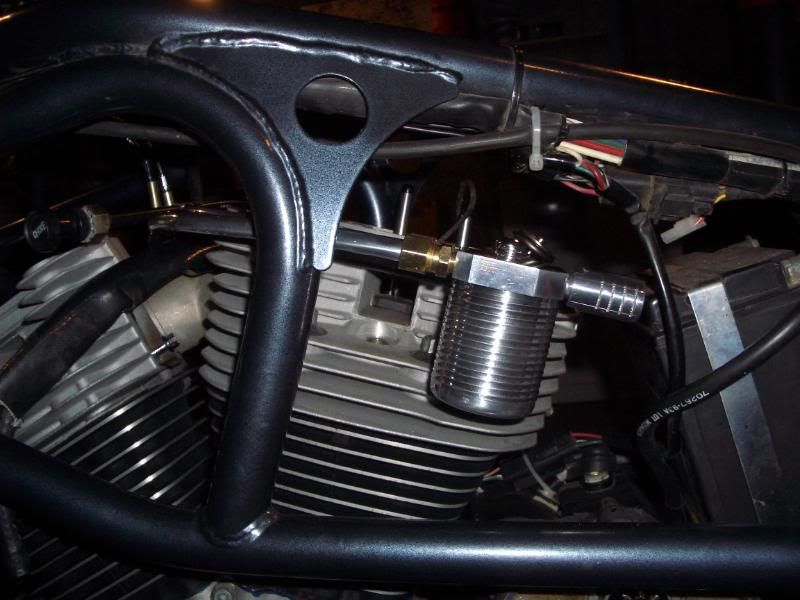 from the front you dont see anything..  hope you guys enjoy, but its late and i need sleep , aaron | ||
Blks1l |
Aaomy, all that nice fab work, and you don't have a small tubing bender? It all looks great though. | ||
Aaomy |
yeah,, yeah,,yeah,, no tubing bender.. actually the tubing is not that bad in person,, it reflects the stuff around it and gives it a dented appearance.. like trying to take a good picture of chrome.. the photos just dont look the same as it actually does in person,, flash and reflections in a dark basement.. but yes they would have been nicer if i had a nice tubing bender,, but i dont  so that is my excuse and im sticking to it... so that is my excuse and im sticking to it... aaron | ||
Xl1200r |
he catch can story... while xb heads take a different front motor mount,, front bosses are not drilled or taped for the breather or carb mounting,, and are also .025 shorter than the standard sportster heads (stock on a s2t).. You guys do know that 2004+ 1200 Sportster heads are exactly the same as XB heads but already have the breather in the old location? Right? Just might have saved a bit of time. | ||
Brinnutz |
It's the Screamin' Eagle XL Heads. Not the stock ones. HD Part No. 16677-05 (Message edited by brinnutz on January 07, 2010) | ||
Guell |
Nutz, the screaming eagle head is decked a little for a small bump in compression a 2004+ xl1200 head is the same as a xb head but has the holes for the breather/carb support | ||
Brinnutz |
I was always told the SE heads were the XB heads. Hrm.... | ||
Xl1200r |
Again - since 2004, Sportsters and XBs have the exact same head minus where the breather setup is. I'm certain of this having owned both. The only S.E. I'm aware of was the Lightning heads that were a stock Buell item, but I'm by no means an expert on them. (Message edited by xl1200r on January 07, 2010) | ||
Phelan |
the new SE heads are the the same heads as both the XB and '04/up XL1200 heads. The only difference, as mentioned above, is the deck for the raised compression. Also as mentioned, the SE heads and XL1200 heads already have the breather bolt holes drilled/tapped. (Message edited by Phelan on January 07, 2010) | ||
Brother_in_buells |
Rickie d , thanks for the compliments on my aluminum work! It,s a very nice S2 you build! And it,s good to see and read that people are making such nice things ,and not only for them self but also for other people. This thread also proves that a lot of buells are a one of a kind bikes ,and owned by one of a kind rider. I like to see more and more and more custom work!!   | ||
Rickie_d |
I don�t have XB heads on anything, and I cannot speak for Aaomy, but I do see he is a lot like me. From my perspective I would not buy new heads to modify (and those are not stock ANYTHING). I use what I have or what I can get used at a reasonable price that can be modified for the application. Why would we do that? Because we can; and if we didn�t, it would be like everyone else�s stuff. I don�t let existing on nonexistent holes get in my way, but that is just me. My custom has non breather heads converted to breathers on my S&S short block just because they were on my shelf�and cheap�FYI - I have 883 heads on my 79� Buell with my own custom cut pistons. Brother � I will dig up some pics of my sheet metal work if you want�It�s not buellshit, but cool. I will get back to more parts later... | ||
Aaomy |
rickie d,,, yup,, thats pretty much how it goes.. yes i did know about the xl heads at that time and yes could have had them special ordered,, then ordered valves, springs,, keepers,, collars,, yadda, yadda, yadda,,,, its a good way for some one whom has the money and not the time,, but i do my own work so cleaning up two bosses and drilling and tapping two holes is not that much work compared to the price difference.. the xb heads were off a totaled bike with 516 miles on it.. at a fraction of the cost... plus the xl head would still breath out the front into the carb or threw banjo bolts.. i really dont like paying full price for something i am just going to modify.. the heads are decked with the combustion chambers matched.. the pistons are stock s2 flat tops,, copper base gaskets were used to adjust the squish band.. the cylinders them selves checked out nice round and true so they only got honed and pistons re ringed.. hope this helps,, aaron | ||
Blazin_buell |
Aaron, at first I was wondering about metal fatigue in using the tubing instead of hose, but since everything is mounted on the motor I guess the vibes wouldn't be as bad. Looks awesome! How does the can attach to the mount since I didn't see any threads? You and Rickie's carving skills are exquisite,you two should really set up shop do it full time. | ||
Aaomy |
thanks blazin buell,,, in the bottom of the catch can inside is a blind taped hole,, blind hole dosent go threw the material.. any ways a stud extends up from the bottom of the can to the top plate.. the gasses from the engine enter the top of the can and are expelled at the bottom of the can,, the can is filled with a stainless steel, well kinda like steel wool only much wider flat coils.. this provides tons of surface area for the oil vapors to collect on and eventually make there way to the bottom of the can,, to remove the can you simply twist,, i did have to make a small gasket for the top to help it seal but other than that it has always worked great.. metal fatigue is not a problem.. every thing is bolted in place no real stress exerted on it. aluminum cylinders heads cases so even the aluminum tubing expansion rates would be similar. if the catch can was not very securly bolted to the rear cylinder head i would worry but thanks to the extra mounting boss on the rear head everything is grins.. thanks again aaron | ||
Jayvee |
Hey Aaron, Can you give some more info about the mounting shoe for the collector where it goes into the muffler? That's my next project, and it looks like you have a spiffy mount on your bike. Did you make that too? Any details available? Thanks! | ||
Aaomy |
jayvee,, may take a couple days to get some picks.. that was built more for function than looks but yes i did make that too.. thanks,, aaron | ||
Brother_in_buells |
Rickie d, I like to see the pictures of your sheet metal work! Here are some pictures from another handmade custom stuff ,the removable luggage rack i made for the xb! It,s also removable with all the gear on! It,s already posted in the accessories,bags,luggage area!     | ||
Rickie_d |
Nice, Adjustable width to boot!!!! I will get back with the tin work. | ||
Rickie_d |
I bought a 96 S2 in 03 from a dealer in Tennessee to go down and ride, then load up and bring back for a project. It was a repo and his daughter�s toy until I bought it. By the time I got there, she chunked out the side stand - and dropped it. I then borrowed it to a fiend that was thinking of buying a Buell � He dropped it. I got it back and started it with a false neutral indicated and launched it into the shop � on its side again. Another buddy was in town and I borrowed it to him so we could go for a ride and lunch. Even though he had his own S2 at home and familiar with the issues, I told him that anyone who has turn the key on that thing had flopped it on its side. I warning him anyway to park it in gear and make sure It�s in neutral before hitting the starter. So, we drive a mile to the station to top the bikes off, go it to pay, and on the way out a woman approaches us with a hand full of blinker pieces and says, �Does this stuff belong to you guys�!!! We look past her car and only see one bike, this one was lying on its side again. 1 � hours later with new signals, clutch lever, shifter, and a mirror; we headed off to lunch. If I remember correcty, my lunch was free that day. Bought a blast side stand for 5 bucks and cut the mounting bracket off� 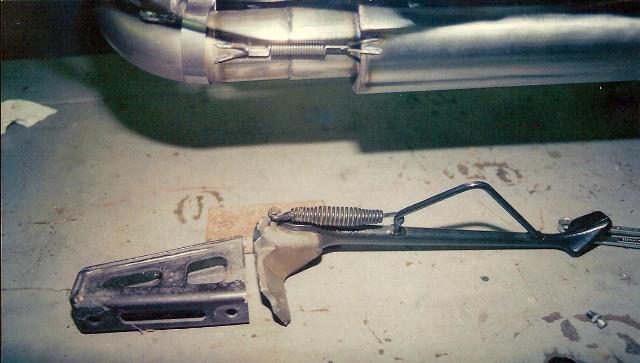 Got an idea of the angle I was shooting for� 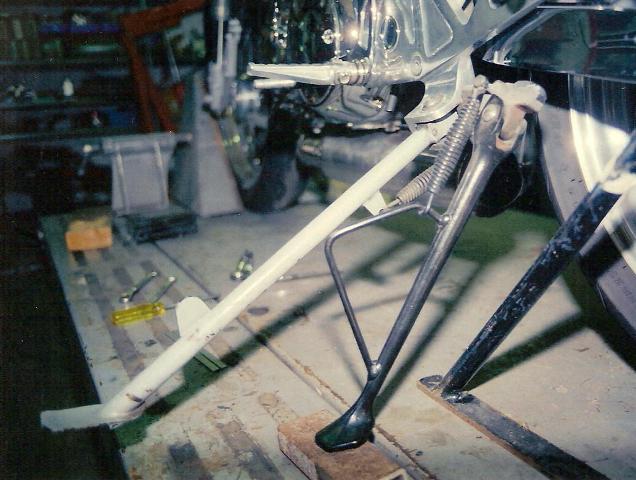 Cut the old side stand receiver off the isolator plate, leaving a braced tab to mount a replacement. 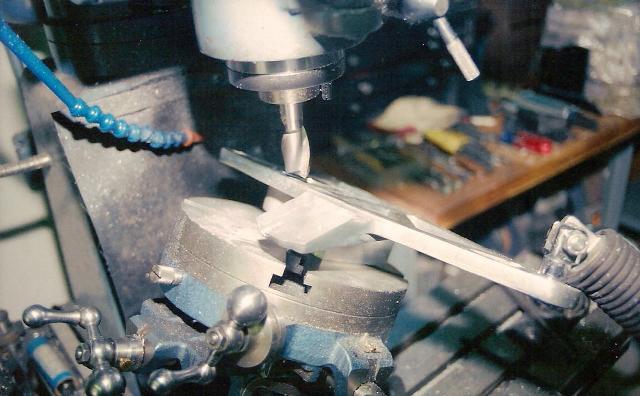 Using the blast side stand pivot, I built a shoe to slip over the Isolator bracket and in-between the bracing on the backside. It is attached with a through bolt that sandwiches the isolator bracket boss.   The side stand was then shortened to suit and the kick bracket trimmed  (Message edited by Rickie_d on January 08, 2010) | ||
Rickie_d |
Mini indicator dash drilled and hollowed out for a circuit board I built with four clear LED�s. They turn red for oil pressure, green for neutral, blue for high beam, yellow for signals or four-ways. This one was built for handlebar mounting on my Softail, but I have made them for dash panels and put them in gauge faces.    | ||
Aaomy |
rickie d like the side stand fix,, cheep and effective.. that little led indicator block is sweet,, are the two extra down tubes between your riser tubes for wiring? that is a nice clean set up... i have a red high beam indicator in the back of the head lamp,, does that count?  lets just say it is very relaxing to watch the world go by in the back of that head lamp!!! | ||
Rickie_d |
Aaomy � I have spent a few hours behind one of those headlights� Yes, the stainless tubing does contain the wiring�I tried to do something a little different. I carved the triple trees with built in signals and hidden stem that threads in from the bottom. They are cross drilled for the brake fluid passage through the lower and wiring through the upper.  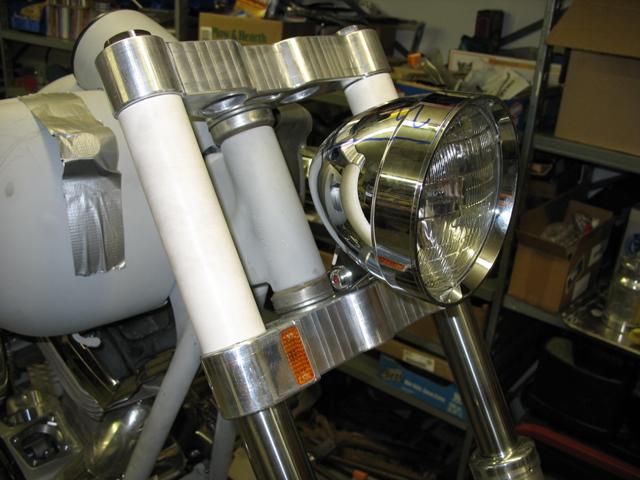   | ||
Rickie_d |
Here is a 74 Z1 Kaw that I performed a face lift on with some Buell parts and subtle tin work and fabrication. I formed up a chain guard to replace the warped ugly plastic unit that incorporates a tire hugger using part of a metric cruiser front fender.   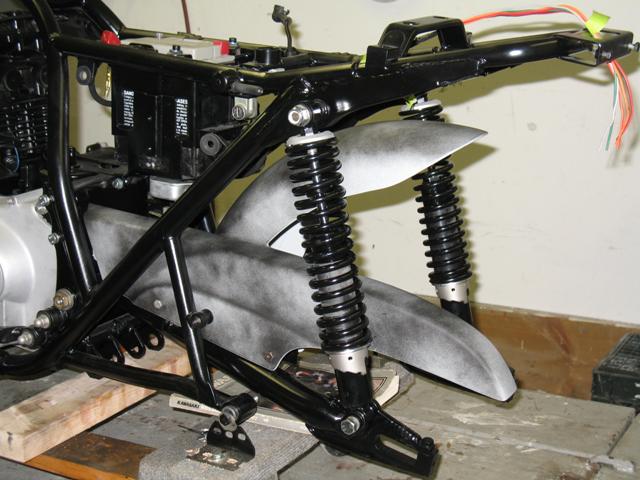 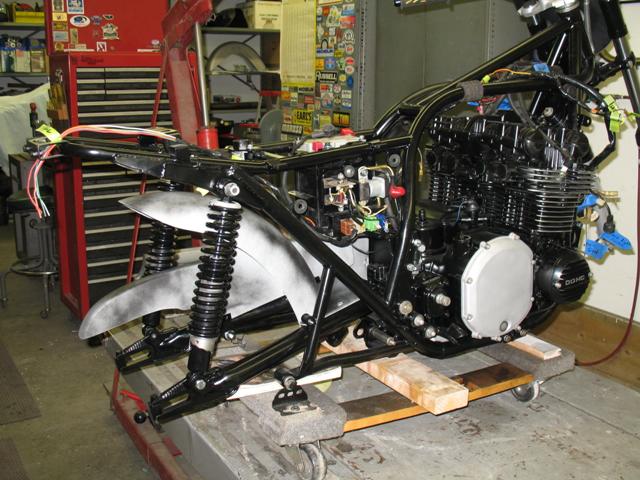  I wanted to take some height out of the seat so I formed up a new seat pan utilizing the stock center hinged section then sent it to the upholsterer.  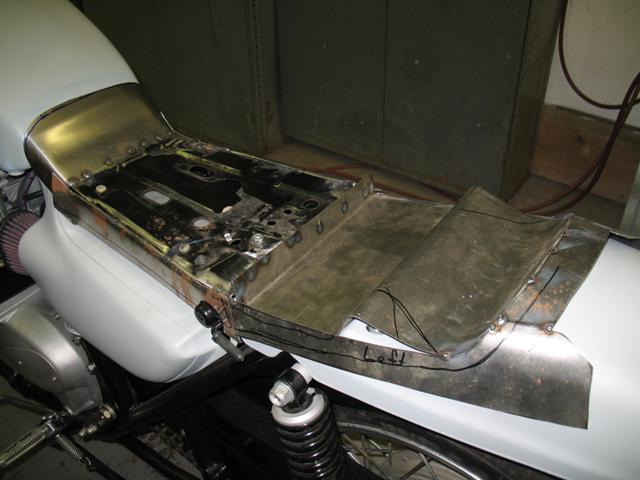  I added a M2 headlight, fly screen, mirrors, and front signals; then removed the humongous rear fender and taillight assembly & installed a XB style taillight with integrated signals. I added some bright paint with Rising Sun graphics and you have a nice Kaw.  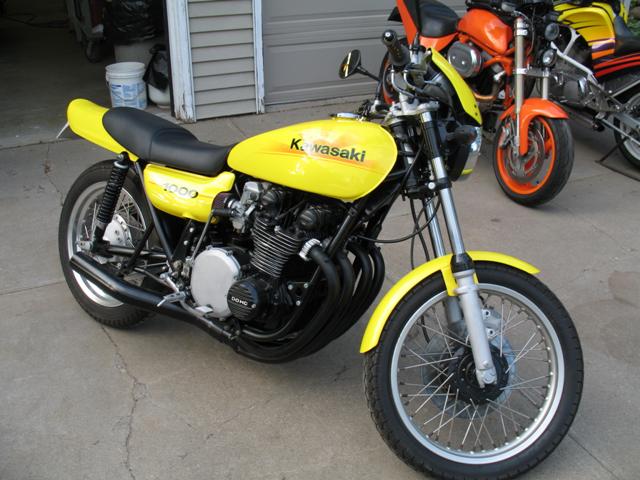 And the front fender is a cut down HD unit... (Message edited by Rickie_d on January 13, 2010) | ||
Blazin_buell |
Very nice Rick! A buddy of mine just picked up a KZ400 for free that has less than 5k on the odo and had been sitting in storage for who knows how many years. I would love to go crazy on it but it's his first streetbike and he says he just wants to return it to stock so he could learn on and hopefully make a decent profit on later. | ||
Brother_in_buells |
rickie d ,that has cost you some hours but very nice work you have done!  |