| Author | Message | ||
Oldog |
First: I would like to thank Aaomy [ Aaron O. ]who pops in from time to time, a number of us are fortunate to have pieces that he has made for us. His skills are beyond question. It was his catch can that I patterned mine after, I how ever do not have access to extensive assortments of machine tools and being some thing of a tight wadd did not want to spring for say a Jazz, or similar bit of kit, I was some time ago a machinist, by trade and had gone another route, {Aaron is an engineer by trade} I decided to try to find things to fashion a catch can from a "Mag lite" 2D size was about the right diameter, but a bit long, Ok and a 16$ for the billit trinket, a good start  This was taken to work and cut in 2 with a pipe cutter by hand[like a copper tubing cutter only bigger]  I belt sanded the end smooth and checked it for square.  We have a rather large chunk of 6061-t6 plate 1" thick so I asked for a piece of it. | ||
Oldog |
 I told my boss Tom that I was going to cut the piece off with my reciprocating saw and a wood cutting blade, This raised a question in his mind about my sanity, and abilities.  Aluminum may be though of as Stringy or sticky, a coarse tooth blade and some wd40 will cut it well, and If I had a NEW blade rather than the bent ragged out one that I used I would likely have taken about 3 or 4 minutes rather than about 6 or 7.  With the lump hacked out the part inside was layed out 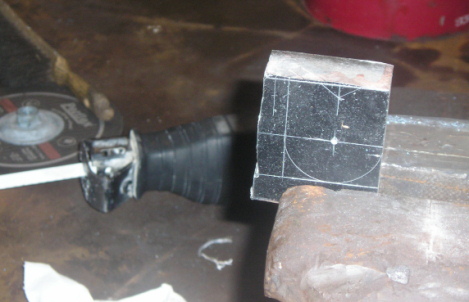 additional material was sawn off using a new fine pitch blade ( to cut straight and close to the lines ) | ||
Oldog |
 Here I have cut the angle in the back and trimmed the sides and end to rough size I will use a WET belt sander [ industrial strength ] for the front contour and clean up of the aluminum.  This is the Wet sander, Hand profiling the radius took about 5~7 minutes or less, here I worked slowly and carefully to avoid messing up the part.  when the profile was sanded I went to the bench and filed the V in the back by hand to smooth it up. The shape is done and I am about to start the holes. | ||
Oldog |
 I wanted an O-ring to seal the can body to the top when the bolt is tightened. I used an 1 1/2" hole saw and cut 3/16" deep and used an oring on the other end of the flash light, told ya I was cheap.  I hand tapped the holes after drilling them. you should have a pipe fitting to check a pipe tapped hole as pipe threads are cut on an angle, ( the one in the top is a little shy yet. ) I chamfered the holes to ease starting of the taps, (Message edited by oldog on October 29, 2006) | ||
Oldog |
 this will give you a general Idea if what the finished part will look like. 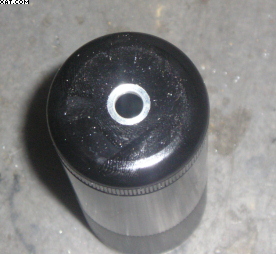 I am holding it together as Aaron did his, with a long bolt. I will use a stud and nut in the end, Also I need to drill into and tap the cap for a screw or pipe plug for a drain. I spot faced it for a socket head cap screw and a gasket. [ nut, washer and gasket ]  this is the oring ditch from the bottom the saw chattered as most do but it is adequate for the function. I had to make some adjustments as well I was closer on the threads than I thought. 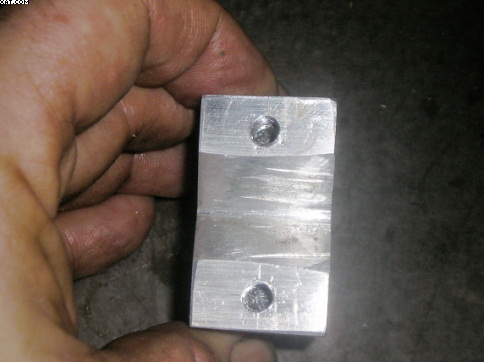 I added 2 holes for a back strap that I will either make from some bar stock or from the drop that I sawed off.  I secured it to the bike for the purpose of routing the lines, and ran new hoses [ no braid ] to get the lengths, I had to put the seld back together by lantern light. I'm not done with it yet I'll post more as It developes. | ||
Bomber |
Dawg-- as you know, or discovered, goodf workworking edges can do a great job on aluminum -- I've been using a $90 ears 3-wheel band saw on aluminum for a long far now -- I've about worn the poor dear out, and have only wished I had a REAL metal cutting bandsaw once ot twice in the last 20 years -- cool project, sir -- I look forward to seeing the rest! | ||
Diablobrian |
Looks good! Nice use of available materials! | ||
Oldog |
I made a clamp bar from the drop as you can see If I had it to do over I would reverse the hole positions for the top and side ports.  I will think about it for a while. I may make another one later I am looking at the mondo radial drill for some light milling duty. This catch can is doable with commonly available items, and its billit ... I wunner if rattle can BBQ black would work here | ||
Oldog |
Mcmaster Carr has the aluminum stock in block form small blocks at fair prices, you could drill the back hole over size and saw the block off .. 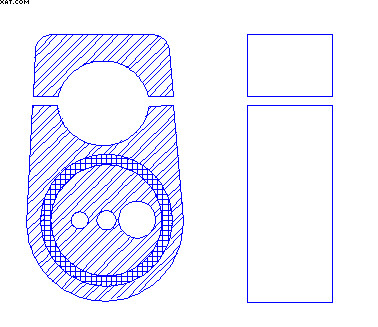 or stack the 2 pcs with a friable spacer and drill the hole. the fasteners for the cap you get into space issues where its mounted but the back bar needs to be beefy to clamp solidly | ||
Djkaplan |
Hey! I can't find my flashlight... | ||
Road_thing |
Nice work, Dawg! rt | ||
Not_purple_s2 |
Now that's some mighty fine redneck engineering. | ||
Oldog |
I may have to stuff the can with steel wool, its oiling the sled after 40 miles even though the air makes a couple of turns it is still carrying enough oil to stain things. BUT THE BACK WHEEL IS CLEAN! Hey! I can't find my flashlight...  it wern't me .... it wern't me .... Thanks rt Now that's some mighty fine redneck engineering. by your friendly BWB redneck please note no buell motor cycles were destroyed in the fabrication of the device. stay tuned more to come. | ||
Oldog |
Hey Bomber you seen those little 8" toy band saws at the local big box store think that one of those would do the job? for cut out?, 200$ will provide me a sander and a saw , I have the drill press. all of these items are dimunitive think that they might be suitable? | ||
Bomber |
Dawg -- so long as your patient, you bet! cutting anything more than 1/2 think will take a long time, and you'll be re-mounting the balde if you puch it, but get a metal blade for it and you'll be fine . . . . rather than steel wool, try bornze wool (no rust ever) or a pot scrubber from the grocery store | ||
Diablobrian |
One of those K&N style filters on an outlet hose could solve the venting problem too. | ||
Djkaplan |
"I may have to stuff the can with steel wool, its oiling the sled after 40 miles" To separate the oil from the air, I shoved a plastic net pot scrubber in my ho'made catch-can and vented the top with the little K&N filter that came with my Forcewinder. | ||
Oldog |
The little K&N is dead, and I want no oil emissions from the atomspheric vent thingy I think I will hack another one out, taking more time with it and making it more like my sketch above with a profiled back clamp. I also want a sintered re usable exhaust filter. To be continued..... | ||
Tattoodnscrewd |
One more thing to think about ... the spew after 40 miles .. on your inlet hole, make a solid tube to the bottom so it exits at the bottom, put a small thin piece of perforated metal standing up, will make it slosh around less, and depending on where you have it mounted - looks like the front - you may want to re-think that - I found with mine up front - as it got half full, at speed, the air passing by the vent creates a vacuum I believe and sucks it out (and all over the bike)... I just moved mine more towards the middle, behind part of the frame, added the perf metal that came with the can and after 40-50 miles tonight, I have no crud sliming my bike. I suspect it still might if not emptied often enough. But moving it out of direct airflow and adding the baffle inside to prevent sloshing to a degree .. it seems to be much cleaner ... (so far) I posted a picture of it in another thread today. Very creative catch can though .. nice job !! Brian | ||
Oldog |
I used some stainless mist eliminator material ( a woven mesh ) Your plate Idea works on a larger scale, it is effective in 4" and 6" compressed air / vacuum lines  I think that you are right about the low pressure created by movment, I saw the clamp thread for yours Sweet,  The pipe in to the can going to the bottom may cause some of your "discharge" like blowing on a straw in a drink glass. Putting a pipe part way down may work well, industrial air filters have a cyclone  (baffel) to spin the air and spooge to help sling it {the spooge} out. (baffel) to spin the air and spooge to help sling it {the spooge} out. I have considered a 20.00 compressed air filter with a bowl for the application. ( its just fuggly ) thanks for the compliment the input is welcome I will try another one soon bilit is redily available. Hey Tatt: What pipe thread size are the hose connections 1/4" pipe or 1/8" pipe? on your catch can? (Message edited by oldog on November 10, 2006) | ||
Tattoodnscrewd |
I want to say they are 1/4" npt x 3/8" barb fittings.. one 90 degree, and one straight You are right - the tube going down is not all the way to the bottom, but a good ways down, but I believe that helps to keep it from blowing right out. The plate actually is what came with the can - I didn't use it at first, but I threw it in when I moved it from the front of the bike -- maybe a combination of all of the above is why I get no mist out of it now. Yours can is much longer but in my case if I filled the can with anything other than the perf metal would cause it to fill way too fast. For reference purposes - I bought mine used (would never pay that much for one new) but it's the exact same as the one offered by american sportbike, might even be the one. edit: I just went out for a smoke .. looked at it, and I think it's 3/8 on both ends .. checked the hose - it's is 3/8 and the threaded side is the same as the barb .. (you'll have to forgive me - I went ot school for B.A. and E.E. -- only in my home plumbing do I mess with pipe , and that is usually 1/2" ..  ) ) (Message edited by tattoodnscrewd on November 10, 2006) | ||
Raceautobody |
On my X1 I installed XB rocker covers and ran the PCV lines to a catch can also. But now after having this setup for about 10,000mi I am getting lazy and don't want to mess with draining it (I usually have to once per tank full of gas). I was thinking if it would work to not use the catch can but run the PCV lines striaght to the outlet of my supertrapp. The PCV valves are one way valves and would not the exhaust exitting the muffler cause additional scavaging for the breather system. The condesation would also just get blown clear of the bike. What do you guys think? No more catch can or filters to slime the bike. Al | ||
Tattoodnscrewd |
The things that come to mind with routing to the exhaust - how much breather line do you really want to run around the bike - I like the idea that less is more in most applications ... I also wonder if having such a long line run to the exhaust if there would be enough of a vacuum created to be beneficial .. I just don't know (others might have a better idea) .. the last thing (actually the first thing that comes to mind) - when I empty mine - every now and then I get a faint smell of gas, I wonder if there is a risk of igniting ? Wouldn't want that. IMO it's easy enough to drain, so drain it. I thought with the XB rocker covers that it pretty much eliminates the 'spooge', or at least makes it drastically less, now that I think about it- I can go 2-3 tanks of gas before I have to drain mine, maybe 1-2 for aggressive days. (I usually fill up every 120-150 miles - my reserve hits early) Every bike is different though, hard to say. (Message edited by tattoodnscrewd on November 11, 2006) | ||
Oldog |
Tatt: I'm not a plumber either I build electrical appratus-es [ PLC panels ] do programming and scada programming. I quit working as a machineist back in '86 I got tired of being broke..... Common 3/8" hose fittings have 1/4" pipe treads I need to do a drain plug in the can I have to dismantle it to empty it I'm thinking #8 or #10 screw spot face the hole and use a rubber washer for a gasket rather than a brass dump valve thoughts? | ||
Tattoodnscrewd |
On the drain plug.... I'd go a little bigger, when you drain it, it's thick and does not drain like water, too small a hole will not allow it to drain very well. The drain on mine is about the same as the holes for the inlets, might actually be a little bigger. A rubber o-ring is what is used on mine, and it works well. Not using the dump valve will leave it with a cleaner look anyway. Brian |