| Author | Message | ||
Artur |
Hello guys! I bought the XB9 primary chain and engine sprocket with the intention to replace the original primary gearing in order to gain some acceleration for the price of the top speed. I thought I had all the parts and the tools, so I started the operation. It was going quite well until the moment when I wanted to unscrew the engine sprocket. It turned out that I don't have the right wrench/socket to unscrew the bolt holding the engine sprocket. I have a set of metric hexagonal sockets, but it doesn't cover the whole range - I have 27mm and directly 30mm. The bolt must be either 28 or 29mm, or (what would be worse) it may be even some inch scale size. Does anyone have a clue what is the size of that bolt? Another potential problem is that the torque that has to be applied to attach the bolt must be over 250Nm and my torque wrench covers only up to 210Nm. I'd appreciate any views from you. Cheers, Artur My bike:   (Message edited by Artur on September 04, 2009) | ||
Ourdee |
That is what it used to look like. I want to see it's innards. I'm sure someone will be along shortly with all the answers. | ||
Dmhines |
I also did the XB9 gear swap in my XB12. I was deliberating doing it myself until I asked the dealer how much they would charge. Came to $160 which included labor, oil and all new gaskets and o-rings. Good luck with the swap ... | ||
Kmfw160 |
160=done. that's a good deal | ||
Metalstorm |
$160 for everything ?!? Wow! My local shop would probably charge at least $300. That's not meant as a complaint against them. They're a good bunch. Everything is super ridiculously expensive in my part of the world. | ||
Metalstorm |
Artur, I havn't retorqued my nut yet (like I'm supposed to but it ain't knocking so....) I don't know the size but I recommend buying, renting or borrowing a torque wrench that will give you the correct amount ft lbs. Might as well do it right the first time  (Message edited by metalstorm on September 04, 2009) | ||
Blake |
Must be 1-1/8" (28.6mm) If you don't have a service manual, please get one. You MUST follow procedure on this job or risk serious problems later. Proper torque and locktite are vital. Do NOT use any kind of hammering or manual hammer impact wrench to remove the nut. A big tire iron type of wrench works best as it avoids putting radial load into the roller bearings. | ||
Petebueller |
Artur Torque on the Engine sprocket nut is 250ft-lbs which is about 340Nm. 250Nm would be pretty dangerous. You will need to follow the workshop manual carefully to avoid deforming the alternator rotor when you press the old one out and the new one in. | ||
Artur |
Guys, I have the service manual. It doesn't however give the nut/bolt sizes... The torque to be applied on the engine sprocket nut is (as per the manual) 190-210 ft-lbs (257.6-284.7 Nm). I live in Belgium, and the HD/Buell garage wanted to charge me over 500 Euro ($700) just for the labour (I already have all the parts). Cheers, Artur | ||
Rays |
Artur, The spec on the torque for that nut has been updated - what Pete listed above is correct. http://www.badweatherbikers.com/buell/messages/327 77/155801.jpg | ||
Petebueller |
Hi Artur. My dealer charged me 2 hours labour when I changed mine. Came to AU$210 which is US$175. $700 is crazy. If you do it yourself, think about getting the dealer to do the pressing. Mine quoted me AU$25 for that which would be less than $100 from your dealer  | ||
Artur |
The nut is 28mm metric. Thanks for the update on the sprocket nut torque. And you must be right since there's no f***ing way to unscrew that bolt. Unless I use some very long arm on my wrench... And I still have no clue how to make sure I apply the right torque to attach that nut... (Message edited by Artur on September 05, 2009) | ||
Dmhines |
FYI - it was Stone Mountain Harley in GA that did the swap for me for $160. While they were at it they also updated my 2006 Cable Bracket to the new improved variety .... Besides not getting my hands greasy I also did not have to worry about breaking the Clutch Cable attachment at the primary cover ... if they broke it they would have had to replace it! | ||
Artur |
You don't have to disconnect the clutch cable from the primary cover. It can stay there, but then of course you cannot put the cover too far away. The garage I used to take my bike to charged me recently 120 euro ($170) for replacing the front tire with my own tire. It took them 15 minutes (remove the wheel, change the tire, balance the wheel and put the wheel back on the bike) and they still charged me so much. When I asked them about the primary gearing swap and they mentioned about "500 euro" I decided to never get back there. | ||
Dcmortalcoil |
Replace the nut with Jims MegaNut and you won't need to worry about torquing it so high. Relatively cheap. Uses two existing bolts to prevent the nut from loosening. 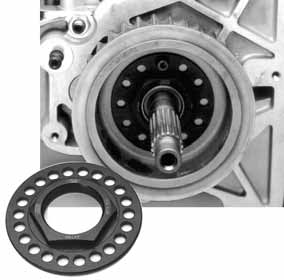 | ||
Hughlysses |
Artur- Here in the U.S., some auto parts stores have "loaner" tools. If you have anything similar there that would be one way to get a torque wrench with sufficient capacity. If you can't do that, at least one Badwebber went back to basics to do it. He weighed himself, then figured out a what distance he would have to stand on a breaker bar to apply the required torque. Depending on your weight, you may need a fairly long wrench. | ||
Ochoa0042 |
1-1/8" for the engine sprocket 1-3/16 for the clutch hub, which is a left-hand thread im pretty sure you have to take off both because there isnt engough slack in the chain for you to loop it around another (Message edited by ochoa0042 on September 05, 2009) | ||
Artur |
Thanks guys for all the tips. I'll try to borrow some tools from the friendly car garage. I hope they'll have all I need. If not, I'll just buy my tools from ebay, however this will delay everything... | ||
Andy47 |
I did the XB9 gear swap on my 09 XB12scg in July. I used the American Sport Bike kit. http://www.americansportbike.com/shoponline/ccp0-p rodshow/A17192.html I highly recommend getting a service manual for your year and a primary locking bar. http://www.americansportbike.com/shoponline/ccp0-p rodshow/16075.html I took my time and followed the manual to the letter. It took me about 6 hours start to finish. I am very happy with the results. Good luck. | ||
Artur |
Andy47, I got my kit from AmericanSportBike too. I have the workshop manual, but don't have the sprocket locking tool. I'm going to fabricate it myself using a flat steel bar. I'm only afraid if the steel locking bar isn't going to do anything bad to the sprocket teeth... I'm just waiting for my last tools to arrive (I ordered on eBay a torque wrench that goes to 350Nm) and I'll be ready to start the work. I'll snap some photos and post them here for the next generations. (Message edited by Artur on September 08, 2009) | ||
Andy47 |
The locking bar I got from American Sport Bike is steel. It's about 4.2" long x 1.0" wide x .25" thick and tapered at the ends. The ends kind of look like a dull chisel. As far as I could tell it did no damage to my sprockets. | ||
Ochoa0042 |
i used a small 6mm wrench as a locking bar  | ||
Andy47 |
Ochoa0042, Good idea! | ||
Artur |
Ochoa0042, I tried that as well, but the little wrench just got kinked  | ||
Artur |
OK, here is where I stopped last time:  To be able to move on I fabricated my own Sprocket Locking Tool:   Then I unscrewed the Engine Sprocket nut:  Then I removed the Retaining Ring and Adjusting Screw Assembly:  and unscrewed the Clutch Shell with Clutch Sprocket:  Then I removed the Engine Sprocket, Clutch Shell with Sprocket and the Primary Chain. It turned out that the Engine Sprocket is attached to the Alternator Rotor Assembly:  I unscrewed the Engine Sprocket from the Rotor Assembly:   but they stick to each other really hard and I cannot split them. Here is what the manual says about how to remove the sprocket from the rotor:  Now I have to find some press... (Message edited by Artur on September 10, 2009) | ||
Petebueller |
Hi Artur You have to use a press and the bench has to be perfectly perpendicular to the press. I know someone who stuffed 2 Rotors doing it. This is why I suggested that there may be value in getting a dealer to do this part of it, providing you are sure they know what they are doing. The magnets are fragile and the rotor can bend. Peter | ||
Ghost_rider33 |
Were you using a torque wrench to untourque the engine sprocket nut? My LPO would have my a$$ if he saw me do that. Damn torque wrenches have to be turned in for calibration all the time. Sorry, thread on. | ||
Artur |
Ghost_rider33, yes I did. but I set it to the highest value (350 Nm, which is the value the nut should be torqued to), and it didn't click. It means the original torque was less than 350. Anyway, I used the torque wrench to unscrew, because it was the only wrench with a long enough arm. | ||
Ochoa0042 |
i guess i need to buy a new torque wrench or get mine calibrated....  | ||
Artur |
I took the rotor to the garage, where they are going to swap the engine sprocket for me. Once it's done I'll continue with my work and my writeup. | ||
Blake |
This is a wonderful writeup. Thanks Artur! Suggestion for others, if possible, fabricate the sprocket locking bar tool from aluminum or even wood rather than steel to be sure to avoid damaging the sprocket teeth. I'm not saying that using steel would absolutely damage the sprocket, but it's better to be safe I think. | ||
Artur |
The original locking tool is made of steel too. | ||
Artur |
Here is the rest of the story: http://www.buellxb.com/Buell-XB-Forum/Do-It-Yourse lf-Buell-Mods/DIY-primary-gearing-swap-step-by-ste p-with-pics | ||
Artur |
Complete writeup: http://www.badweatherbikers.com/buell/messages/384 2/496214.html?1253443742 |