G oog le BadWeB | Login/out | Topics | Search | Custodians | Register | Edit Profile


Buell Motorcycle Forum » XBoard » Buell XBoard Archives » Archive through November 30, 2008 » DIY frame and swingarm polishing « Previous Next »

Author Message
Top of pagePrevious messageNext messageBottom of page Link to this message

Buellbuster
Posted on Friday, November 21, 2008 - 11:18 pm:   Edit Post Delete Post View Post/Check IP Print Post    Move Post (Custodian/Admin Only)

I am coming to the end of my "winter project" #1 being polishing my frame and swing arm...I have seen quite a few people asking questions about doing this, and I have learned quite a few tricks and tips along the way, so if you got a question shoot it my way and I'll do my best to help!
Top of pagePrevious messageNext messageBottom of page Link to this message

Jeffroj
Posted on Saturday, November 22, 2008 - 03:18 am:   Edit Post Delete Post View Post/Check IP Print Post    Move Post (Custodian/Admin Only)

I am not going to do this, but I am curious, what did you use to remove the powdercoat?
Top of pagePrevious messageNext messageBottom of page Link to this message

Teddagreek
Posted on Saturday, November 22, 2008 - 09:54 am:   Edit Post Delete Post View Post/Check IP Print Post    Move Post (Custodian/Admin Only)

I just started doing heel guards figured they'd look better raw or polished...

My boots keep wearing through and looks like shiz..


Did you use a orbital sander and just go finer. than a buffer?
Top of pagePrevious messageNext messageBottom of page Link to this message

Buellbuster
Posted on Saturday, November 22, 2008 - 10:26 am:   Edit Post Delete Post View Post/Check IP Print Post    Move Post (Custodian/Admin Only)

"what did you use to remove the powdercoat?"

I used aircraft paint stripper, but the trick was to pour it on and barely touch it with the brush, and it just fell off!

"Did you use a orbital sander and just go finer. than a buffer?"

Well I started with just a palm "wiggle" sander and I went all the way through 1500 grit, then I started buffing with jewelers rouge, and it wasn't coming out the way I wanted, so I went back down to 400 grit and did it all by hand with a rubber block, keeping the strokes going all the same direction, up through 1500 grit again. then went to the buffing wheel, but this time I started with a slightly courser compound, and holy smokes it looks good! Like a mirror!
Top of pagePrevious messageNext messageBottom of page Link to this message

Ustorque
Posted on Saturday, November 22, 2008 - 10:31 am:   Edit Post Delete Post View Post/Check IP Print Post    Move Post (Custodian/Admin Only)

pics?
Top of pagePrevious messageNext messageBottom of page Link to this message

Buellbuster
Posted on Saturday, November 22, 2008 - 11:14 am:   Edit Post Delete Post View Post/Check IP Print Post    Move Post (Custodian/Admin Only)

still have 2 sets of compound to go through in this pic, but you get the idea....shiny!
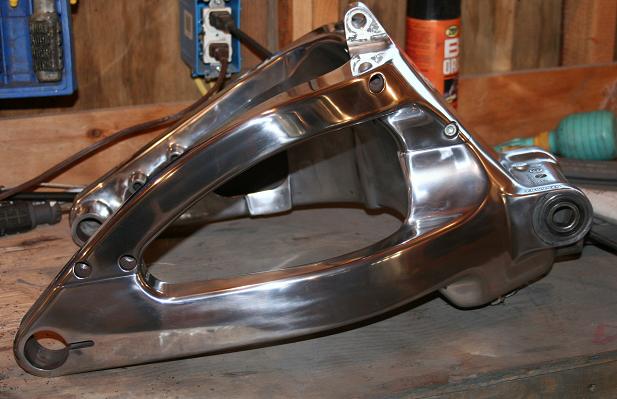
polished swingarm
Top of pagePrevious messageNext messageBottom of page Link to this message

Ustorque
Posted on Saturday, November 22, 2008 - 11:21 am:   Edit Post Delete Post View Post/Check IP Print Post    Move Post (Custodian/Admin Only)

nice work... what are your plans when the polishing is done? are you going to clear them or just maintain the polish?
Top of pagePrevious messageNext messageBottom of page Link to this message

Teddagreek
Posted on Saturday, November 22, 2008 - 11:24 am:   Edit Post Delete Post View Post/Check IP Print Post    Move Post (Custodian/Admin Only)

Very Nice...

Where did you get the polishing compounds.. Auto store?

Some one told me try a westmarine store..
Top of pagePrevious messageNext messageBottom of page Link to this message

Buellbuster
Posted on Saturday, November 22, 2008 - 11:28 am:   Edit Post Delete Post View Post/Check IP Print Post    Move Post (Custodian/Admin Only)

dont want to clear them because I dont feel like re stripping it after it turns yellow...so I am going with a good coat of the eagle one nanowax and a heavy coat of regular wax.


picked the compounds up at lowes
Top of pagePrevious messageNext messageBottom of page Link to this message

Werewulf
Posted on Saturday, November 22, 2008 - 04:57 pm:   Edit Post Delete Post View Post/Check IP Print Post    Move Post (Custodian/Admin Only)

nice job...
Top of pagePrevious messageNext messageBottom of page Link to this message

Dtmb
Posted on Saturday, November 22, 2008 - 06:15 pm:   Edit Post Delete Post View Post/Check IP Print Post    Move Post (Custodian/Admin Only)

Eagle one wax sucks. Get some Zaino products.
Top of pagePrevious messageNext messageBottom of page Link to this message

Skinstains
Posted on Saturday, November 22, 2008 - 07:17 pm:   Edit Post Delete Post View Post/Check IP Print Post    Move Post (Custodian/Admin Only)

Wow ! I am kind of the anti-shine but wow that looks cool.
Top of pagePrevious messageNext messageBottom of page Link to this message

Ochoa0042
Posted on Saturday, November 22, 2008 - 08:40 pm:   Edit Post Delete Post View Post/Check IP Print Post    Move Post (Custodian/Admin Only)

Let me know when it's all finished; IMO polishing the swingarm may be too much bling, but I'll love to take a gander of the finished bike. I might want to follow your footsteps

Do ya have any picks of the bike in the garage with no swingarm? I'm interested in how you managed to prop the bike and remove the swingarm. Seems like taking it off is the best way to polish the swingarms' multifaceted surfaces.

I used the aircraft remover too, but in the easy on spray-can bottle. And I was told/read that going in opposite (90degree) direction of the previous grits was the best way to polish, this way your 'dig' into/out/away the previous grits mess. And progressively moving to 2000grit.

In case you havent done the frame yet.... make sure to give extra attention to the steering-head-area with the coarse grits because that area has bubbles & is somewhat pourus. Sand it down much more than the rest of the frame, so to not have the sand papers grit getting lodged into the frames pours. If you dont it'll look dotted, dull, with little grey holes}
Top of pagePrevious messageNext messageBottom of page Link to this message

Punkid8888
Posted on Sunday, November 23, 2008 - 07:47 am:   Edit Post Delete Post View Post/Check IP Print Post    Move Post (Custodian/Admin Only)

That look Sweet

So how many hours invested?
Top of pagePrevious messageNext messageBottom of page Link to this message

Buellbuster
Posted on Sunday, November 23, 2008 - 12:58 pm:   Edit Post Delete Post View Post/Check IP Print Post    Move Post (Custodian/Admin Only)

Ochoa0042 -- here is a pic of my "suspended buell!"


Punkid8888 -- many many hours into it!


hanging buell


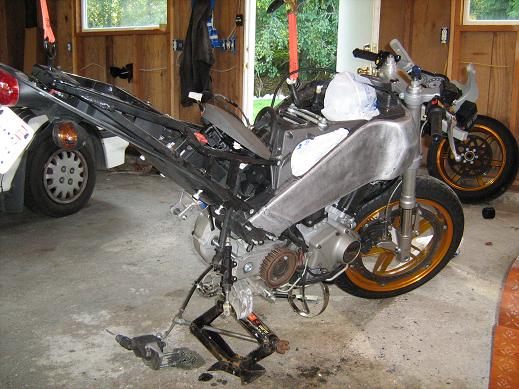
just a jack under the exhuast mount, and two ratchet straps up to the rafters!
Top of pagePrevious messageNext messageBottom of page Link to this message

Buellinachinashop
Posted on Sunday, November 23, 2008 - 02:23 pm:   Edit Post Delete Post View Post/Check IP Print Post    Move Post (Custodian/Admin Only)

the upkeep is gonna be insane and with no clear coat, corrosion on bare aluminum is gonna happen.

Nice work though!
Top of pagePrevious messageNext messageBottom of page Link to this message

Ochoa0042
Posted on Sunday, November 23, 2008 - 11:05 pm:   Edit Post Delete Post View Post/Check IP Print Post    Move Post (Custodian/Admin Only)

oh you can see in my photo how dull the steering head was,
for a later project: I had to refinish it to look as good as the frame, double time on the frame's neck

PICK
that doesnt look safe....
I dont think I will be able to remove the swingarm.... how did you have to do it???
does it involves removing the primary drive system and clutch basket???
Top of pagePrevious messageNext messageBottom of page Link to this message

H2owerker
Posted on Sunday, November 23, 2008 - 11:36 pm:   Edit Post Delete Post View Post/Check IP Print Post    Move Post (Custodian/Admin Only)

Ochoa0042 This may look safer...


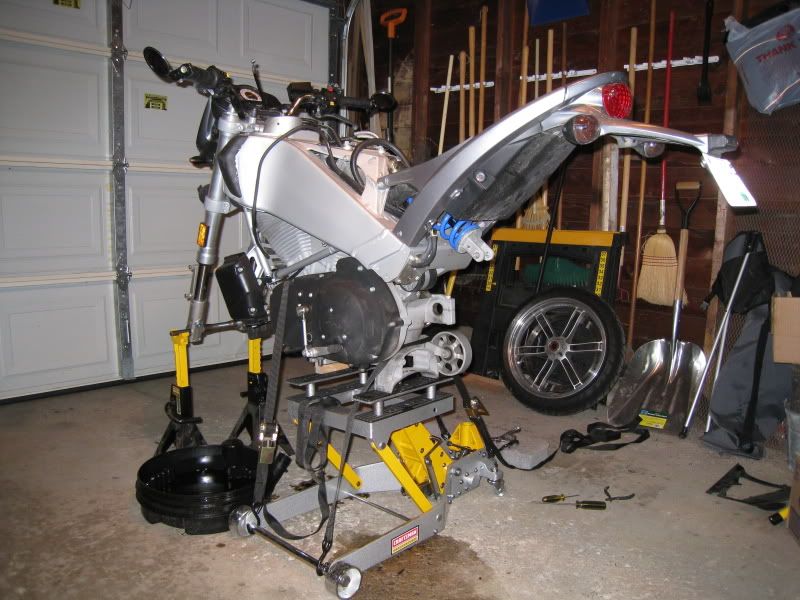
You could use a widow-maker to hold the rear up and leave the front wheel on. Use a 1/2"x18" ratchet extension through the front axle across 2 jack stands.
No need to remove the primary drive stuff, just the belt drive, rear wheel, oil lines, brake caliper/line, oil lines, and suspension.
Top of pagePrevious messageNext messageBottom of page Link to this message

Ochoa0042
Posted on Wednesday, November 26, 2008 - 08:48 pm:   Edit Post Delete Post View Post/Check IP Print Post    Move Post (Custodian/Admin Only)

how the poishing job doin BB?
Top of pagePrevious messageNext messageBottom of page Link to this message

Ochoa0042
Posted on Wednesday, November 26, 2008 - 08:56 pm:   Edit Post Delete Post View Post/Check IP Print Post    Move Post (Custodian/Admin Only)

I recommend getting these things, it compliments the bike well, for like $35 at the dealer
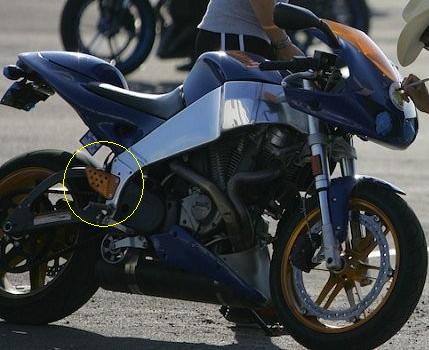

Top of pagePrevious messageNext messageBottom of page Link to this message

Buellbuster
Posted on Wednesday, November 26, 2008 - 10:36 pm:   Edit Post Delete Post View Post/Check IP Print Post    Move Post (Custodian/Admin Only)

Its going well!
got one side of the frame most of the way done. And just got my ECMSpy cable in the mail today too woohooo!

I plan on painting the the foot guards black to match the new pegs that I asked santa for
Top of pagePrevious messageNext messageBottom of page Link to this message

Kmfw160
Posted on Thursday, November 27, 2008 - 04:28 pm:   Edit Post Delete Post View Post/Check IP Print Post    Move Post (Custodian/Admin Only)

looks good bro. I've done my frame and side rails and I here to tell you it is time consuming. I used a drill with sandpaper flapper wheels then hand wet sanded then finishing up with compound bars. I want to do my swing arm too but the damn maintenance is killing me. It takes the better part of a day several times a month to remove the crud and restore the shine. Does anyone know how to 'seal' the polished parts?
Top of pagePrevious messageNext messageBottom of page Link to this message

H2owerker
Posted on Thursday, November 27, 2008 - 09:38 pm:   Edit Post Delete Post View Post/Check IP Print Post    Move Post (Custodian/Admin Only)

Try using an automotive clear-coat w/ a flex additive for ABS plastic bumpers. The additive will help it resist chipping.

Or get some of that clear 3M paint protective film and apply that to the polished areas.

(Message edited by h2owerker on November 27, 2008)
« Previous Next »

Add Your Message Here
Post:
Bold text Italics Underline Create a hyperlink Insert a clipart image

Username: Posting Information:
This is a private posting area. Only registered users and custodians may post messages here.
Password:
Options: Post as "Anonymous" (Valid reason required. Abusers will be exposed. If unsure, ask.)
Enable HTML code in message
Automatically activate URLs in message
Action:

Topics | Last Day | Tree View | Search | User List | Help/Instructions | Rules | Program Credits Administration