| Author | Message | ||
Kalif |
Merry Christmas to All I ve got CR1125 with `12,000 miles on it. And it started to have oil leakage on clutch side I wanted to ask if i need to take off the exhaust so i could be able to pull off the water pump out.And any other suggestions on solving this problem would be highly appreciated http://www.twinmotorcycles.nl/webshop/artikelen/4FC52931-C05F-4971-823F-961EA4EBCE36.jpg (Message edited by Kalif on December 28, 2013) (Message edited by Kalif on December 28, 2013) (Message edited by Kalif on December 28, 2013) (Message edited by Kalif on December 28, 2013) | ||
Kalif |
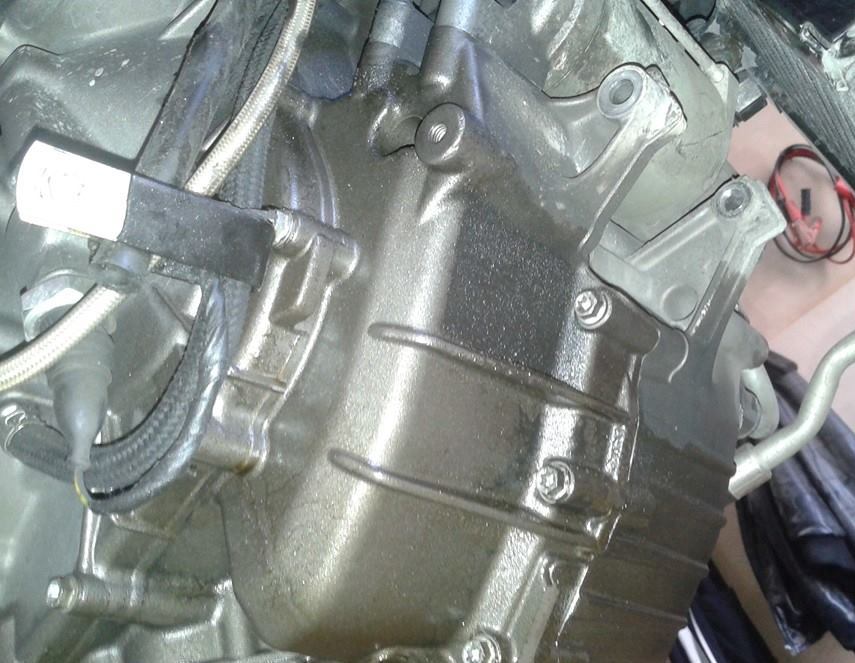 It is not brake fluid. its engine oil (Message edited by Kalif on December 28, 2013) | ||
Mcelhaney14 |
It's hard to tell where it is actually coming from. You may want the wash it down with some good degreaser and monitor it for the origin of the leak. To me it looks like it could be coming from the clutch side cover, case half seam, or the starter o-ring. The first two will require significant tear down. I would also suggest checking the torque on all the accessible bolts in that area. I have found them loose in the past. | ||
Sparky |
I had a leak happening in the same area similar to what your pic is showing and it became evident by dripping on the muffler which became annoying while stopped or moving slowly. The source of my leak seemed to be coming from between 2 of the bolts of the clutch cover gasket, one of which holds a P-clamp for some hoses and was loose. It took a few days of cleaning and sleuthing to pin point the actual leak source. See the video in this post for a little more explanation on how I found the leak. Fixing the leak didn't cost hardly anything. What I did first was check the torque on those two bolts then clean up the area with plenty of brake cleaner spray when the engne was cold, focusing on the gasket area between those 2 bolts. Next I applied a couple drips of industrial strength Super Glue from Harbor Freight (any super glue will do) to the gasket area between the 2 bolts, quickly wiping up any excess glue that started to flow away on the crankcase. That did it - no leaks, no mess now whether on the rear stand or on the side stand. | ||
Kalif |
Mcelhaney14 I made the same thing what you advised.washed and monitored the from where the leak comes from it is from clutch cover gasket. the only way to fix it, is to change the gasket, am i right ? | ||
Kalif |
Sparky i did not understand your method correctly, you mean you fixed the leak without changing the gasket? or i get it wrong?? | ||
Mcelhaney14 |
Kalif, Did you check the torque on the bolts? Looks like Sparky was able to fix his without changing the gasket. From the sounds of it he was able to wick some glue into the gasket on the area that was leaking to seal it up. | ||
Sparky |
Kalif, Sorry, I wasn't too clear in my explanation. You are correct in that I did not take anything apart or change the gasket. The glue drip was made approx 1/8 to 3/16" wide & 2" long to wet the cover, gasket and crankcase between the two bolts. Note, the video in the referenced post is kind of misleading because the P-clamp is removed from the lower bolt for clarity in the investigation but the torque on both bolts was verified prior to making the video. For the fix, the P-clamp was reinstalled and the bolt torqued to spec prior to final cleanup and glue. I hope you have good luck finding & fixing your leak. | ||
Kalif |
Sparky I watched the video my bike haves the same leakege, on same place but it leaks slowly while working I will have to rotate engine, take off the exhaust system to get to that damn gasket or using that magic glue i can stop the leak, am i right ?)) (Message edited by Kalif on December 31, 2013) | ||
Sparky |
It's either the hard way or the easy way. I'm not making any guarantees as YMMV, but hopefully the easy way will work for you first.  | ||
Kalif |
Sparky What glue did you use (link/name?), and once again would you explain how to use it. Thank you very much Hope it will help Happy New Year)) | ||
Sparky |
Sure, Super Glue from Harbor Freight Summarizing: 1) check the torque on the bolts 2) clean up the area with plenty of brake cleaner spray 3) apply a couple drips approx 1/8 to 3/16" wide & 2" long of industrial strength Super Glue to wet the cover, gasket and crankcase between the two bolts. Use caution around Super Glue. It's an instant skin bonder and its vapors can cause breathing and eye irritation. Remember, use it sparingly; according to the wiki, "a very thin layer bonds more effectively than a thicker one that does not cure properly". | ||
Zac4mac |
Kalif - There are also "accelerators" available. One that I remember was "Tack Pak", basically freon if you can get that. Do a Google for "cyanoacrylate accelerator". Z | ||
Kalif |
Thank you all for advices and comments Sparky i will follow your instructions and hope they will help All this procedure i can do without taking the cover off,right? Zac4mac thank you.i will try) (Message edited by Kalif on January 04, 2014) | ||
Kalif |
Today had a little time and decided to clean up the engine to take detailed photo to share with you. Torqued all bolts on the cover(cold engine), started the engine let it warm up, made a 20 meter ride.after the ride Your thoughts ?  | ||
Cataract2 |
Well, you have one of two options. You can do the super glue thing. Or you can get a replacement gasket for that location, but that is definitely leaking from those bolt locations as I'm sure you concluded. Do you have a service manual? | ||
Kalif |
Hi Cataract2 No i dont have service manual.i will be glad if someone could help me to get it what about the "super glue"- method, where i have to spread the glue? in holes where the bolts screw in ? or around the place where cover and engine block meet,and the oil comes out? if it will not help i will change the gasket definetely (Message edited by Kalif on January 05, 2014) | ||
Shawns |
I thought those bolts had a rubber washer on them. | ||
Advanguard |
Second cheap fix: remove leaking bolts, clean oil off bolt and threads on engine with alchol or brake cleaner, use loctite on threads tighten torque. 242? the blue color? loctite has sealing properties, and is recommended for most bolt installations. 24 hr cure. I would recommend RTV (red high temp), but not sure you will get them back out. | ||
Oldog |
Is the gasket possibly damaged? The FSM states that the engine must be rotated and you would need the crank locking tool & new gasket as a minimum | ||
Kalif |
i dont know about the gasket condition. anyway i will have to disassemble it to see i have already crank locking tool, thanks to my stator  that have burned before that have burned before i have recieved all parts.gasket and other seals that might be needed to change while disassemble. also i noticed one problem,i did not start it since it started to leak,and wanted just to check if battery is ok, when i started it, the idle revs were at about 4 k RPM i probably have low pressure fuel problem already, could it be because of that?? please advice, (Message edited by Kalif on February 27, 2014) | ||
Mhpalin |
You can check the fuel pressure in dig mode on the cluster with key on it should be around 517KPA 380-415KPA at idle and 4000rpm When my fuel pump failed it just died,would not start,here is a link to a fuel pump. http://www.ebay.ca/itm/New-Intank-Fuel-Pump-for-Bu ell-1125-1125R-1125CR-2008-2009-/271223281251?pt=M otorcycles_Parts_Accessories&hash=item3f262ad663&v xp=mtr&_uhb=1http://www.ukbeg.com/forum/viewtopic. php?f=17&t=5794 | ||
Kalif |
i am not sure if it is fuel pressure pump, because mine works well when it is hot,it is just high revs when you start it on cold after you turn the engine off and start it again after few attempts the idle becomes normal.1500-1700 rpm thanx anyway for link.i already have new one.just needs to be replaced (Message edited by Kalif on February 27, 2014) (Message edited by Kalif on February 28, 2014) | ||
Sprintst |
I just did mine, actually the next level gasket inward. I did the engine rotation method, but I think the frame removal would have been better. Those gaskets were pretty easy. Check your clutch piston assembly while you are in there, on my 09 it was leaking after reassembly, I can see where the aluminum housing is scored so I'll be doing the EBR upgrade next. Valve check while you are in there?   (Message edited by sprintst on March 15, 2014) | ||
Mhpalin |
Another thing to replace when you are in there is the lower cam chain guide the 2010 one is inexpensive and was changed to lube the cam chain better for the price why not.  | ||
Kalif |
Dear Sprintst Thank you for sharing the photo and for your advice.i changed the slave cylender , upgraded it to EBR Where can i get parts-tools that are needed for valve check ? Mhpalin, is the replacing lower cam chain is very needed, also please advice is there any difference between 2010 cam chain and 2009 ? does it performs better ? (Message edited by Kalif on March 26, 2014) | ||
Mhpalin |
What it does is lubes the cam chain better and there is less cam chain noise here is a pic of the difference. 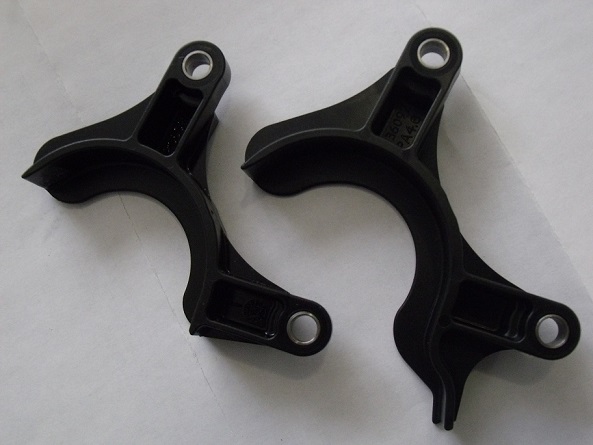 The 10 is on the right | ||
Redbat |
Mhpalin, can you post the part number for the 2010 lower right cam chain guide shown in the picture? I only have the parts manual for my 2009 1125CR, thanks. | ||
Dhays1775 |
Pert number: F0058.1AMB The only reason I posted this is because I'm looking at mine right now. They're the same part number for both sides. Good luck! | ||
Mhpalin |
Cool just got home from work saves me from hunting it down in the shop Mike | ||
Redbat |
Thanks guy's. | ||
Redbat |
Hey Sprintst, when you replaced the right side cover gasket did you need to first remove the clutch cover and diaphragm? I was told it may be possible to remove the large main cover without removing the primary cover first. Just loosen/remove the big nut under the puck. Your experience? | ||
Sprintst |
I removed the clutch cover and diaphragm It's easy, and the gasket is reused. I actually pulled the clutch too, just for fun and to inspect the plates (Message edited by sprintst on April 04, 2014) | ||
Noobuel |
When DHays and I were working on his bike today he tried to get the clutch side chain guide out without removing the clutch. No luck. The rear bolt head just would not get past the clutch. The bolt was loose, but just couldn't get wiggled past the gear on the back side of the clutch. Not sure what the manual says about the need to remove the clutch in order to remove the chain guide. |