| Author | Message | ||
Timebandit |
"I'd be interested in a crank locker, particularly if it's less expensive than the one H-D would sell me." Because only one person has expressed interest, I haven't talked to my neighbor yet. I've been asking him for lots of machine work favors lately, and I don't want to overdo it. If I were to ask him to make a dozen of these things, I want to be sure that he wouldn't get stuck with them, and that it would be worthy of his time to make a batch. The problem with making one-off tools is that it's more expensive in terms of time/effort to do the setups for one tool than for a batch, and that CNC machines can do it more cheaply than an old guy making them by hand. The H-D tool would probably be cheaper to buy than a one-off. That's why I bought mine from EBR instead of trying to DIY one. The $60 was cheap compared to buying/shipping a small order of quality parts and then paying someone else a fair rate for their time to put it all together. I try to limit my neighbor-favors to the kinds of custom work that I can't buy anywhere else. Kent-Moore mass produced a bunch of those tools, and economy of scale brought the price down to about $60. I have no idea what a retired machinist would want to do a small run, or what kind of appearances forum members would consider minimally acceptable for home-made tools. I think making them as pretty as the Kent-Moore product would be cost prohibitive. Looking at materials costs for hardened steel rods, mounting sleeves, threading, shipping, etc., it might not be cost effective to make them. It may be better to see when the K-M product is back in stock, and only consider DIY fabrication if the K-M tools are no longer available. | ||
Yugi |
BTW, Permatex revised their thread size for 27200, as I've seen it in the store now, it says 10 to 38mm. Price is $11 at O'Reilly or $7.80 at Amazon for 10 ml bottle. On the other hand, we have 24mm thread on the crankshaft, and not 32mm. 32mm is a socket size. So Permatex 27200 should work, even if it says 10 to 25mm. Here are the pictures:   | ||
Timebandit |
well that's good news. now finding the right threadlocker isn't such a problem. good bird-dogging on your part! | ||
Bartone |
damn, I wish this was posted before I bought my 272 | ||
Timebandit |
A sidetrack on Permatex / Loctite: I have some old 10cc bottles of consumer grade "blue" and "red" loctite and permatex that I bought in the "carded" blister-pack packaging perhaps 10 and 5 years ago, respectively. I bought them long enough ago that they weren't giving lots of details on the consumer packaged threadlockers, they just sold them as "blue/medium strength" and "red/high strength." The much older one was labeled "loctite" brand. As I'm digging through some of this older stuff a few months ago, I notice that the slightly newer "permatex" branded bottle of threadlocker has a carded blister pack that looks exactly the same. I mean EXACTLY the same. the only difference was that the "loctite" logo was replaced with a "permatex" logo. If you put your thumb over the brand name logo on the blister pack, you couldn't tell the packaging apart. Every color, every font, every minute deail was identical -- even the part number except for a couple of extra digits. The only thing that changed was the brand logo. When I mentioned this to someone, I was told that Loctite and Permatex were the same company. One had bought the other. I was skeptical about that. I know that Henckels owns Loctite, but I don't know who owns the Permatex brand. I never was able to find out. I spent a lot of time looking at threadlocker specs a few months ago, and back then Permatex didn't offer a 272 equivalent. Now it appears that they do. What I find interesting is that the new Permatex product that duplicates the specs of 272 has part number 272000. What's up with that? Is this just a coincidence, is it a purposeful play on the similarity of the numbering system whey one company's parts numbers mimic the other? Or is one company pulling the wool over our eyes b y selling threadlocker under two brand names? | ||
Kruizen |
Loctite also expanded its industrial product base through several key corporate acquisitions. Most notable among these acquisitions was Permatex, an automotive line acquired in 1972, and Woodhill Chemical Sales Company, purchased in 1974. Permatex's gasket dressings made it a leader in the automotive repair market; Woodhill's product line of adhesives opened up new markets for car and home repairs. It was Woodhill that introduced Super Glue to hardware stores across the country. The two companies were combined into the automotive and consumer division of Loctite in 1974. http://www.fundinguniverse.com/company-histories/L octite-Corporation-company-History.html | ||
Timebandit |
Thanks. that explains why the blister packaging is the same -- they've been the same company since 1972. | ||
Baf |
@Zac4mac: good point on the titanium. Not sure why I thought tensile strength was the important part. Does anyone know of an affordable source for small quantities of acceptable steel for this application? Amazon, grainger, etc all have plenty, but I don't know what is sufficient. I wonder if a screwdriver with a 1/4" shaft would be hard enough (tool steel). | ||
Zac4mac |
Shank on a screwdriver likely isn't tempered, MAYBE the tip is. Might be able to use a long drift-punch. Check out surplus places for rod-stock. You don't really NEED the threads, right? Once you start applying torque, it ain't goin' nowhere. I haven't needed one yet, so I haven't crossed this bridge. Z | ||
Timebandit |
Craftsman #2 Philips? BTDT. Bottom line is that it's not the right tool for the job. Once before I posted that just about anyone had a suitable "ghetto locking tool" in his tool box. I was referring to a #2 Philips screwdriver. The shaft on a long Craftsman #2 Philips is about the proper size. If you cut to length and round off the tip, you'll find that it will fit into the locking port in the crankshaft lobe. Although it will fit in the recess, and the handle will fit into the locking tool port in the engine case (!), the screwdriver won't lock in place since it's not threaded. This makes the rotor nut a 2 person job. (One fearless person gets under the bike and holds the screwdriver in place & immobilizes the crankshaft while the other torques the nut.) It's very difficult to hold the screwdriver in place since it's not threaded and won't lock in place like the K-M tool. And holding onto it under the bike adds an element of danger for the helper. It's definitely a kludge technique. If you're going to DIY a tool, then you definitely need to fab a threaded locking apparatus for safety reasons. And if you're going to fab a threadlocking apparatus, you might as well build it around a proper hardened steel shaft. And if you're going to go that far, don't forget to add the torquing adapter. At that point you're pretty close to duplicating the proper tool. The other downside is that the screwdriver shaft doesn't seem all that hard. (I don't know the Rockwell rating. Anyone?) You could probably get by with it, but after messing with a Philips I opted to buy the proper Kent-Moore tool with the hardened steel shaft, which has a built-in locking apparatus, handle, and a hex-head for torquing the tool into and out of the engine case. Having the proper tool also makes the job a lot safer to perform. I appreciate everyone's desire to DIY as much of their bike work as they can, but this job involves the need for some special tools and supplies. If you can't get your hands on a proper crank locking tool, a proper torque wrench, and a proper threadlocker, maybe hiring the work done wouldn't be such a bad idea, depending on your comfort level. | ||
Timebandit |
"You don't really NEED the threads, right?" IMO you do. Having the threads keeps the shaft centered in the hole, so that the torque application does not force the metal shaft against the threaded opening in your engine case. If you bugger up the threads in the access port for the locking tool on the bottom of your engine case, then you're going to have problems putting the plug back in, and perhaps an oil leak. My advice: You don't want to screw up your engine case's threaded opening on the bottom. Use a proper tool. | ||
Zac4mac |
Makes sense Bob. I will probably make my own. I have a bench lathe and mill in my garage and have access to a real machine shop again. I try to make my own simple tools when I can. Z | ||
Baf |
I agree with you Timebandit, both on the threads, and having the proper tool. I would buy said tool in a heartbeat if I could find one in stock anyplace. The only reason I was interested in DIY was so I could get the job done. Aside from being unsure how to lock the crank without the proper tool and without fubaring anything, I am fully confident that I can complete the job, torque and threadlock the nut properly, etc. | ||
Kruizen |
http://www.badweatherbikers.com/buell/messages/290431/664972.html homemade locking tool (Message edited by kruizen on April 23, 2012) | ||
Baf |
Thanks for the link, but the question still stands as far as where to find the appropriate rod. I can find plenty on grainger, amazon, etc, but finding specs on hardness (and knowing how hard it must be) isn't so easy. :-/ | ||
Kruizen |
Here are some pictures with measurements of the original tool 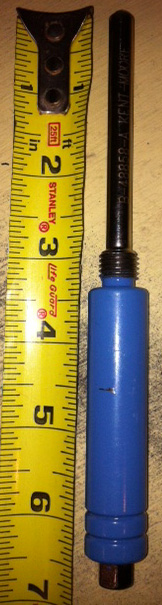  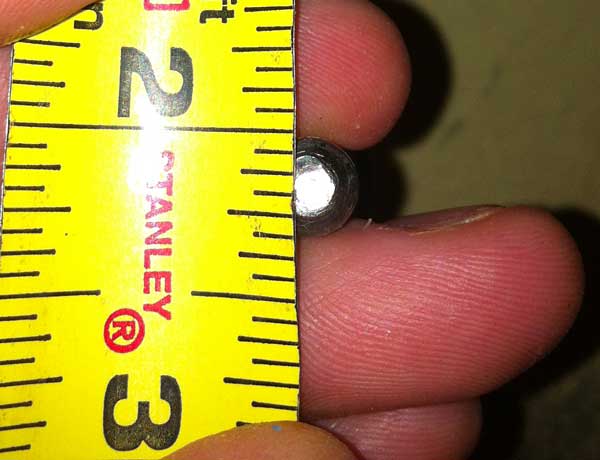 | ||
Baf |
Or, failing the DIY route, is anyone who has a locking tool interested in renting it out? | ||
Kruizen |
I was thinking about an extended for drill bits, its 1/4 inch, but I wasn't sure about how hardened it was. http://www.google.com/products/catalog?q=drill+bit +extender&rls=com.microsoft:en-us:IE-Address&oe=UT F-8&rlz=1I7SNNT_enUS375US375&um=1&ie=UTF-8&tbm=sho p&cid=11950366361616386335&sa=X&ei=cPaVT5etNuHq2AW Y8ITgDQ&ved=0CIUBEPMCMAE# here is hardened rod you buy in 3ft sections: http://www.maudlinproducts.com/1120.xml (Message edited by kruizen on April 23, 2012) | ||
Baf |
Ah, there we go, sounds like what I'm looking for. I'll probably order a piece of that hardened rod then and drill a bolt out for the threads. Thanks for those links as well! | ||
Kruizen |
I wonder about something like this? 240-880 Rotax 912-914 Crankshaft Locking Pin. A must have inexpensive tool to lock the crank. Threads into v in crankshaft at #1 TDC. Neccessary to preform a host of tasks including gear removal, flywheel removal, friction torque testing, etc. or OEM Aprilia Top Dead Center Lockscrew for all V990 (0240880)http://www.af1racing.com/store/Scripts/prodView.as p?idproduct=3168 | ||
Kinder |
Do you need to swap out the sprag clutch as well? | ||
Timebandit |
when you take off the rotor, you can take the rotor, sprag clutch, and starter gear off as a unit. you can lift the starter gear off of this assembly with a slight twist, but the sprag clutch assembly is bolted to the back of the rotor. you have to unbolt the sprag clutch from the old rotor and install it on the new one, using the proper threadlocker. | ||
Kinder |
Any reason this has to be done as they look the same? Holding both I don't see any differences. | ||
Bartone |
^ The modified Rotor oil jet that sprays oil on the stator. Did you not look into what you were buying? | ||
Baf |
Interesting... in my quest to find a replacement rotor nut before my trip next weekend, I emailed EBR about buying the 1190RS rotor nut from them. The person I spoke with there told me that reusing the rotor nut is acceptable (as long as all the old loctite is cleaned off it well), and that he personally has done it, and the race team does it as well. I'm pinging back about the fact that others have said not to reuse it. | ||
Baf |
I just got back clarification. He said they generally always say to replace it, but it isn't strictly necessary unless the nut has come loose or has been reused more a few times. So it sounds like the nut should be okay to reuse once or twice. | ||
Yugi |
Rotor nut is now available on the EBR website for $17.75. The part number is different from the original one: CD0032.1B6 vs original CD0032.1AMA http://www.erikbuellracing.com/store/parts-accesso ries/powertrain/charging-system-rotor-nut.html | ||
Timebandit |
I like the fact that they're beginning to advertise related parts on the web site -- there's a little picture of a rotor exchange and a crankshaft locking tool on the page for the rotor nut. It seems that they're beginning to embrace the idea that it helps to advertise all of the parts that customers are going to need to perform the rotor swap, so that everyone can do one-stop shopping with them instead of having to order some parts separately from HD. Too bad that they don't want to offer a complete "kit". | ||
Dannybuell |
Timebandit ~ A kit! Thats a good idea. | ||
Bartone |
Ok so I'm in the process of replacing my rotor with the modified one. I managed to get the rotor nut off but I can't seem to figure out how to pull off the rotor.... I hear a click when I pull/ push it back in but that's probably just the gears moving. Do I need to remove the 6 small bolts before I take off the rotor? |