| Author | Message | ||
Xbimmer |
Well I'd finally become tired of a tapping noise coming and going for 30K or so, the oil leaks everywhere, the blowby saturating my air filter and box, so last w/e I dove in and started pulling things off to the point I couldn't change my mind (again) and put it back together so I could ride. Actually I've been putting this off due to lack of funds and the possibility of having to split the case due to a hesitant 2-3 shift issue but I'm tired of waiting so in I went. I'll be posting some pics later in another thread of the insides of my 90K engine, but thought I'd share what I found last night. Started to disassemble the rear head and found THIS: 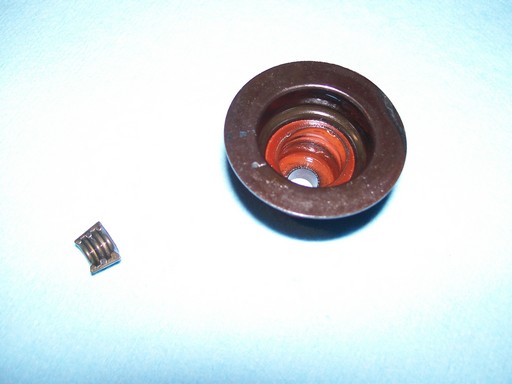 No I didn't drop a keeper when I released the intake valve. That's an extra thoughtfully provided by some •••••• at the factory when they assembled the head, nicely positioned under the valve seal cap. The cap was bent from leverage and spring pressure and the seal had worn in at an angle: 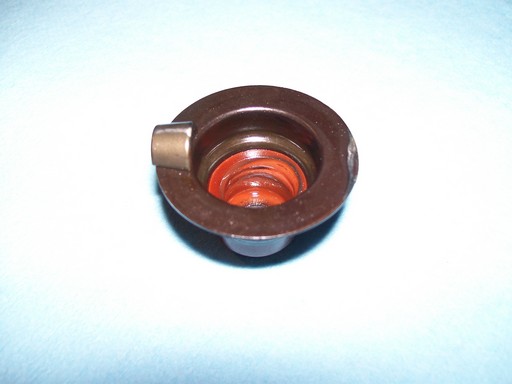  The head was scored also: 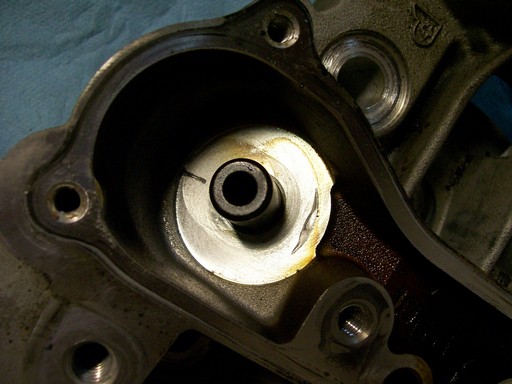 This really ticked me off so I went inside, had a beer and decided it probably wasn't such a big deal after all. Went back out to the garage to continue taking the head apart, pulled out the exhaust valve and FOUND THIS!!!:  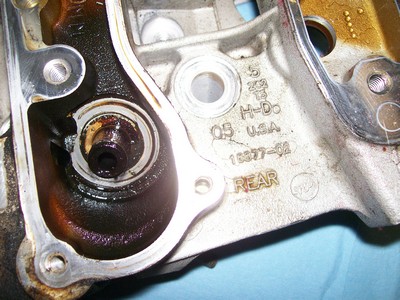 What kind of overpaid IDIOT was working on parts destined for somebody's motorcycle that day? It's bad enough to not notice you've installed a valve seal on top of a stray keeper, but to continue assembling a head with a broken chunk out of it? That's all for now, I'm getting pissed off again... | ||
Teeps |
Relax Dean, it went 90k despite the workmanship defect, it's going to be ok. | ||
Sagehawk |
Not to be out of place, but that sorta shows how tough these motors can be in spite of the human element! What does the other head show? | ||
Xbimmer |
Relax Dean, Yeah I know Tom, I'm actually feeling pretty good about finally getting hands on experience with these engines' internals. Never even seen the insides of a Buell engine before except via the internet. Sagehawk I'll pop the valves out of the #1 head tomorrow and we'll find out. ... but that sorta shows how tough these motors can be... I'm thinking that too, I expected more wear at this mileage but except for the massive amounts of carbon there's no real evidence of wear other than the teflon(?)coating on the piston skirts. Any advice on a good way to get the carbon off? 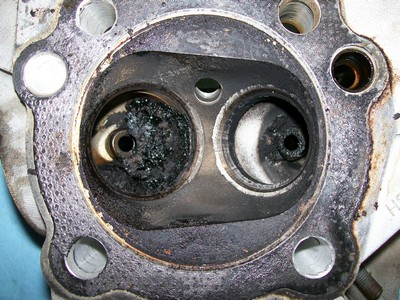 | ||
Hughlysses |
Dean- Regarding the carbon, the rear head on my 07 looked worse than that when I tore it down at 30k miles. I happened to have several cans of brake cleaner on the shelf, so I turned the head upside down and shot a bunch of that in the intake port and let it soak a while. I knocked it right out after a couple of applications. Make sure you use the old style, non-eco-friendly brake cleaner that has CFC's in it. | ||
Thumper1203 |
Whoa, that's a lot of carbon! I can understand a drooling guide from a compromised seal coking oil in the pocket, but is this a general trend for our motors? you say yours was bad too, eh' hughlysses? (I wonder how mine are looking, lol) ..shucks, a guy might want to slip in a set of guide seals upon a rotate for rocker gaskets @ 20-30k! Dean, great write-up! ...how's the other head look? (keep the pics coming!!!) | ||
Hughlysses |
Thumper- Mine was on my 07 motor that had a bad crankshaft. The cylinders were scored badly too, apparently from shrapnel flung from the rod bearings. I think the excess carbon/funk buildup in my rear intake port was from the crankcase breather system (which vents into the air box in the stock configuration) made worse by blow-by from the cylinders. The first thing I did when I installed my "new" 09 engine was to vent the PCV valves directly to atmosphere. | ||
Thumper1203 |
@ Hugh.. yeah, I followed your "catastrophic crank failure" thread, back in the day! Oh good grief, I had forgotten about the breather re-route! (facepalm) that's one of the very first things I have done to my XB's.. should make a long term difference.. whew. Were your breathers re-routed Dean? | ||
Natexlh1000 |
The cool thing is now you have an extra keeper just in case you lose one. These engines are made on the same line as the sportster line. They make(made) more sportsters than XB engines. I can only assume that if this happened once in an XB, it must have happened many more times to XL1200 owners. Not too many 90,000 mile sporty guys though. | ||
Etennuly |
I did the breather reroute after I discovered the intake on my '06 was caked with carbon like that also. I had my intake off for new seals and spent more time cleaning the carbon out than the time it took to do the job. Well Dean, I think you got the better engine than the other guy who got shorted a valve keeper! Bet that guy wondered why his ate a valve, piston. cylinder, head, crank, rod and more at some short mileage mark. 90,000.....you won!  Hoping I will see 100,000 out of mine.....someday  . . | ||
Teeps |
I would try carb cleaner first. Or, take it to a automotive machine shop and have the whole head dipped. Just make sure they know the head is aluminum... Here's a link with a variety of suggestions. http://www.practicalmachinist.com/vb/general/remov ing-carbon-deposits-146031/ Pick and choose carefully. | ||
Mnrider |
I guess it's luck the valve spring didn't break and cause a huge mess seeing the spring was cocked to one side. | ||
Zac4mac |
Xbimmer - as far as the valve spring seat goes, almost all of them look that bad. There's always a chunk missing for the drain. If you have a crystalline break-face, that means the piece is probably someplace it shouldn't be tho... Sometimes I open that area for a set of race heads so they drain faster. The extra lock is something I have NOT seen in some 300 sets of heads. Z | ||
Xbimmer |
Thanks for the tips and advice guys, I'll be back with some results. | ||
Thumper1203 |
Any updates? | ||
Xbimmer |
Slow progress. The built up burned on carbon has been a bitch to remove, the stuff that worked best on the heads was CRC gasket remover and lots of brass brushing, I put the pistons in a can of Berryman carb parts cleaner for a couple days with good results. The problem has been getting things clean enough for my satisfaction, and the silver paint on the heads and cylinders is stained beyond repair apparently. Adding to that the CRC bubbled the paint wherever it made contact. Next time around I'm buying a 5 gallon pail of the Berryman 0905 (the stronger stuff for parts dipping) and let the paint disappear along with the stains. I like raw aluminum anyway. Soaked the heads for a few days each in atf after carbon removal, more brushing and I think they're fine now. Hand lapped the valves and seats on the front head it's as good as it's going to get. 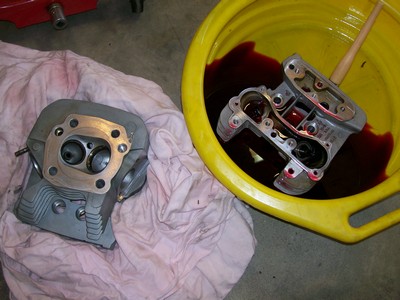 Everything seems OK, tapping may have been a lifter giving up like I'd been told. Think I'll hone and re-ring it and button it back up with new lifters and see what happens. Screw the ugly paint, I need to go for ride... Oh yeah, the other head also had a chunk out of the valve spring seat though not as big, not stressing that anymore and I haven't found any more loose parts. | ||
Teeps |
Xbimmer Posted on Monday, November 18, 2013 Think I'll hone and re-ring it and button it back up with new lifters and see what happens. When you hone the cylinders make sure to use a Correction added here by Blake. See following post by Tootal. (Message edited by Blake on January 08, 2014) | ||
Tootal |
When you hone the cylinders make sure to use a precision rigid hone. The local H/D or independent repair shop should have one; if not, then automotive machine shop for sure will have such a hone. Unless you are going to larger pistons DO NOT use a rigid hone. A rigid hone will remove material and if the cylinders are not in torque plates the bore will not be round. All you need to do is bust the glaze with a ball hone or a bottle washer hone. Same thing. Just try and get a 60 degree cross hatch and the rings will seat well. You probably already know that, I just wanted to clarify for anybody reading along. | ||
Xbimmer |
I'd planned on using a 240-grit Flexhone as per the manual, thanks for the input guys. | ||
88b |
That's impressive for 90 k | ||
Xbimmer |
Update, things are moving along now, sort of. Ran into a snag but it's not insurmountable. Seems the Cometic Complete Engine Kit uses a flat gasket for the pushrod covers instead of the stock rubber cups: 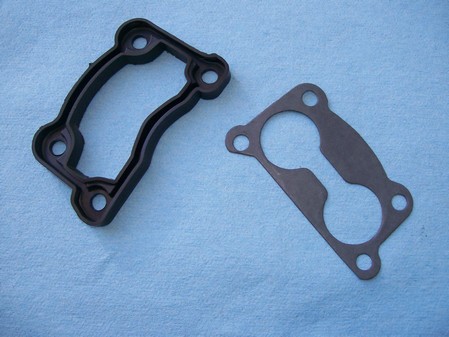 Not a big deal, I figured, Cometic responded to my query about this with a response that their flat gaskets work fine without a sealant. So today before I fitted the ringed barrel assemblies and before installing the heads I thought to check the fit of the Cometic pushrod tube gaskets. Uh-oh..... 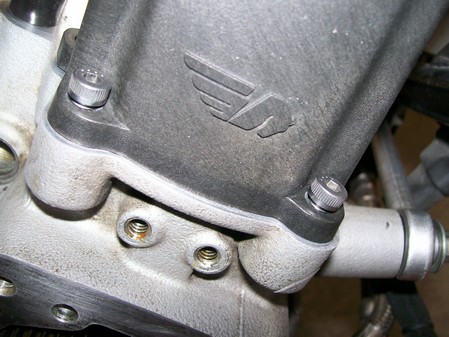 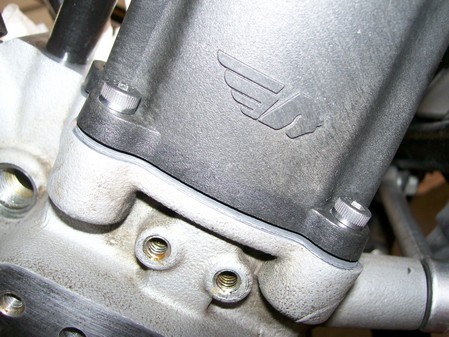 Notice that the shouldered bolts bottom against the case before the gap gets closed. Looks like I have a couple of unusable parts here. Guess I'll stick with the stock rubber base cups, which by the way still seem very serviceable, they're still very resilient. Anybody ever reuse these, maybe with a touch of Hylomar for insurance? Anyway I'm glad to be putting it all back together. Think I'm liking the black barrels, hope the paint lasts for awhile: 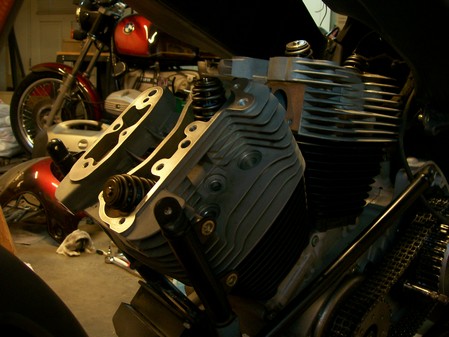 (Message edited by xbimmer on January 06, 2014) | ||
Xbimmer |
A few before/afters: 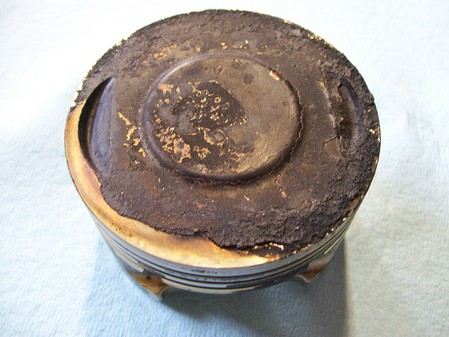    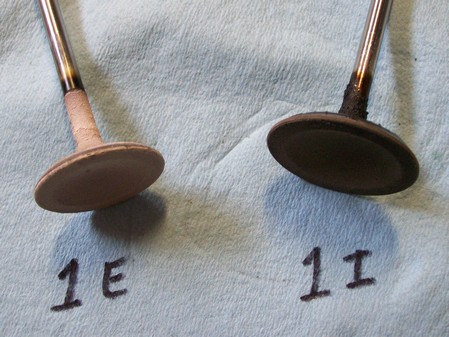 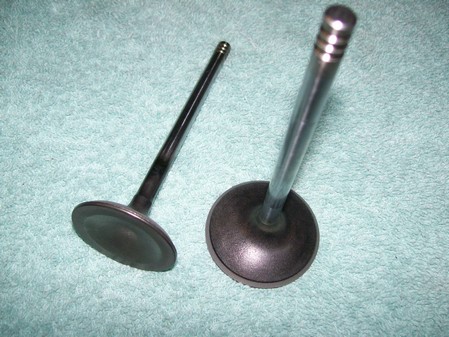 Getting there: 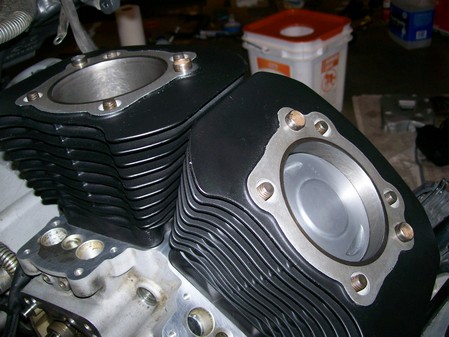  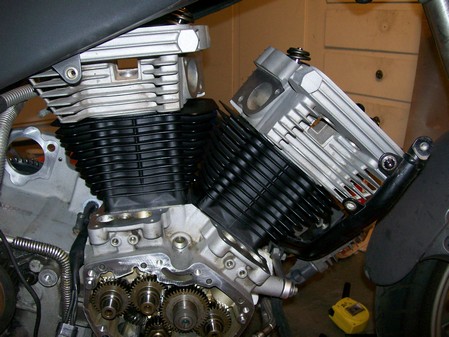 | ||
Reepicheep |
Looks nice! | ||
Elsinore74 |
Thanks for the posts and updates. Helps me (and others with moderate mechanical experience) gen up the confidence to wrench on our bikes. My past experience with local H-D/Buell service convinced me I'm on my own with the Uly. Good luck with the rest of the work! | ||
Etennuly |
Did you always run premium gasoline? I recently found that soaking pistons in diesel fuel for a couple of days made it easier to clean them up. That is some serious carbon on those pistons. Did it run OK otherwise? | ||
Woodnbow |
I do like the look with the natural cases and heads, black barrels.. too bad it's mostly covered up after assembly.. | ||
Natexlh1000 |
Those are the stock pistons just cleaned up? | ||
Xbimmer |
Thanks for the compliments, it hasn't been difficult except for the carbon cleaning. Easier job than my old Honda 550 but not nearly as easy as my R100S. Did you always run premium gasoline? That is some serious carbon on those pistons. Did it run OK otherwise? Always premium Chevron/Mobil/Shell when it was available. As far as running OK probably not, it has been down on power but not a significant loss, and vibration had increased some. The valves were definitely not sealing well with carbon tracks all over the seats. We'll find out soon enough. Those are the stock pistons just cleaned up? Yep, and they weren't easy to clean, cooked oil was caked in the ring lands, wrist pin area. Heads were far more difficult though, the ports were a bitch. I'm having no illusions about what I'm doing here, at 90K this is just a cleanup/freshen up. Hopefully new lifters will quiet things down and at the 100K mark I'll consider getting back into it fully. If nothing else oil control will be better. | ||
Xbimmer |
This'll be a good read: http://www.badweatherbikers.com/buell/messages/142 838/729009.html?1389087748 Looks like his oil drainback o-rings gave up sometime after 50K like mine did. | ||
Xbimmer |
Lifter choices, Federal Mogul/Sealed Power HT-2148 far left and center, Melling JB-2079 second and fourth from left, original (Delphi?) 18538-99B on far right. The Mellings appear to be exactly the same as the stockers, and after physical comparison at the local HD dealer the HT-2148's appear to be the EXACT same lifter as the factory 18538-99C which has now superseded the B. The Mellings were $12 each at Autozone and the Sealed Powers were basically just above cost (meaning cheap) at my workplace. I'm inclined to install the 2148's now and save the 2079's for later. Opinions? 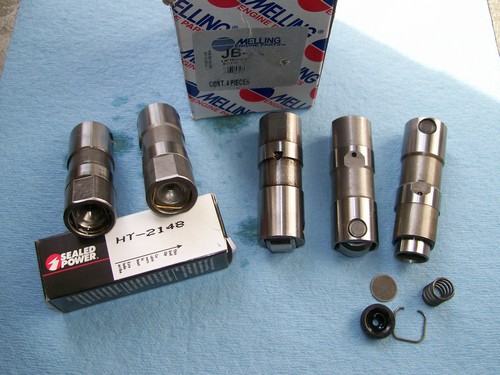 (Message edited by xbimmer on January 08, 2014) |