| Author | Message | ||
Etennuly |
Hi Hugh. Sorry to see this thread. I can tell you that the carbon build up is probably normal. I had my intake off at about 48,000 miles for new seals, it had about 3/16" solid thick carbon built up in the bottom of it. There was also a lot in the intake port as seen in your picture. Maybe a puke can for the vent tubes is in order. Typical of an emissions compatible engine. EGR's will cause the same on car and truck engines, I just went through cleaning this kind of mess on a diesel with an EGR. | ||
Hughlysses |
Hey Vern- that's another good piece of info. I only went to a open crankcase breather setup about a year ago, so there was plenty of time for buildup from crankcase vapors to happen. BTW- does anyone know if the shop manual procedure is the only way to remove the lifters? It says pull the heads, then the pushrod covers, and pull the lifters out of the top of the cases. Seems like you could pull the side cover, remove the cams, and drop the lifters out of the bottom, without pulling the top end of the engine off. I'd really rather leave the heads in place if I can get by with it. | ||
Scooter808484 |
I'd really rather leave the heads in place if I can get by with it. Somehow, though, you've got to get a look at those cylinder walls to make sure nothing got scored up with all that metal floating around. I'd pull the heads, you've already done all the work but those last 8 bolts. If it turns out to be a rod end, you've got to do it anyway.} | ||
Tootal |
Hugh, I would try what you said first. If it doesn't work what have you lost? If it's rod related then yes you'll have to pull it apart but if it's tappet you'll be able to see the damage from below after pulling the cams. I don't know if they will drop out on the bottom. An evo Harley does but sportsters/buells use multiple cams and I don't know if there is enough room. Bottom line, if there is no tappet damage then you're going to have to pull the engine completely out. If there is damage then you can fix it in place. | ||
Rubberdown |
Sorry to hear about your bike, Hugh. I feel the suck. Knowing you, it will be back better than ever! | ||
Hughlysses |
Proceeded to stage 2 of disassembly tonight. No pics. First I removed the timing cover, plate, sensor and trigger wheel, then I removed the cam cover. No sign of metal shavings in the bottom of cam cover/galley which is NOT good, because that means the shavings I found had to come from the crankcase. I pulled all 4 cams. Only thing of interest is rear intake cam showed a distinct ~1/8" wide line around the cam lobe; this corresponds to the gunked up intake valve. Possibly it is sticking which is putting a little more load on this lifter/cam lobe. I didn't remove the lifters because at this point, there's no point. All four lifter rollers looked perfect and would spin freely. The bronze oil pump drive gear looks good and shows no abnormal wear. That leaves one source for the shrapnel found in the oil filter- the rod bearings. With the cams out of the way I put a socket on the crankshaft and I could detect a definite "clunk" when I'd reverse the direction I turned the crank. That pretty much nails down the source of my knock. I'll pull the heads and cylinders off to see how much slop I can detect in the rods but I'm virtually certain that's the problem. I'm gonna go back and look at my replacement parts spreadsheet; I'll post that just to show what the parts cost for the repair. Next step- decide whether to fix this engine or buy a used one. | ||
Hughlysses |
Here's my take on the minimum parts to do a crank replacement: 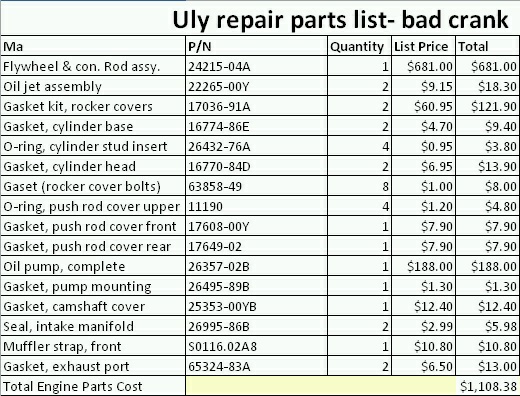 I've probably missed something, but that's my take on the required parts. I'd think a decent shop could just replace the bearings (and crankpin if necessary) so that may be worth investigating. The XB's used a specific roller bearing assembly with a silver-plated cage, and it's not listed as a separate part, so a repair might mean going with an off-the-shelf Sportster part. I'm not sure I want to do that. Of course, I may find that the filings got flung up in the cylinders and scored the hell out of them which could necessitate a lot of work I'm not accounting for. | ||
Bluzm2 |
Hugh, Just go with a top end gasket set. It's cheaper than the individual parts and includes intake, rocker, head, base, exhaust, etc. | ||
Hughlysses |
Brad- thanks for that. Substituting an engine overhaul gasket set for the separate gaskets knocks about $70 off the price. I probably need to add piston pin bushings for the new rods though, which adds about $18. | ||
Hughlysses |
Revised parts list: 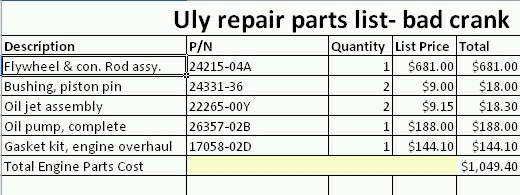 | ||
Reepicheep |
Why a new oil pump? Is there evidence the current one was damaged? | ||
Hughlysses |
No, but all the shrapnel went through the pump so it's suspect. I'll definitely pull the old one apart and check it before I arbitrarily replace it. I could also just replace the gerotors without replacing the whole pump. I just spent some time reading the shop manual regarding crank replacement. I'm not sure it can be done without specialized tools unless the right side inner bearing sleeve can be removed and reinstalled on the new crank. Otherwise, the new sleeve has to be lapped, measured and a suitably sized replacement bearing selected and installed. The parts book doesn't list alternate sizes so I don't know how you obtain them. I could strip the crankcase down and take it somewhere for the crank swap, but I'm sure that'll add substantially to the price, which will get it very close to the price of a used replacement engine. | ||
Tootal |
Hugh, it could still be the small end rod bushing. Pull the head and cylinder and check the bushing. That could be repaired in place. Still hoping it's not the big end rod or crank. | ||
Hughlysses |
Yea, I guess a small end rod bushing is still a slim possibility. The evidence points against that though since there wasn't any apparent brass/bronze in the oil; everything I found was silver colored and magnetic. I've got to pull the heads and cylinders anyway, so I'll know when I do that. Oh yea, it doesn't look like the oil jet assemblies have to be replaced either. I catch hell trying to follow the shop manual in places and it first appeared removal of those is a mandatory step, but I don't think it is. (Message edited by Hughlysses on March 08, 2011) | ||
Buellhusker |
One thing you must do is clean everything completely to remove any and all of the bits & pieces from the engine cases, oil lines, oil cooler, oil tank, oil pump ect. If you don't you will be rebuilding this all over again. | ||
Reepicheep |
Thanks for bringing us along on the adventure Hugh! I'm sure I'm not the only one that intends to keep a Ulysses on the road for as close to forever as I can manage... so there will be a lot of us going down this road, it's just a matter of time. Good to know you can "refresh" the motor on a Uly to new for less than I would pay for a used VStrom or SV-650. | ||
Hughlysses |
Well, I think I found the answer to one thing I'd been wondering about. Can you repair a Buell crankshaft? Apparently not. From http://www.powerglides.co.uk/crank_rebuild.php
| ||
Dirt |
There are a few shops out there who repair Harley/Buell cranksshafts. Not sure if any are sponsors here, but one to try is Darkhorse Crankworks (Hoban Bros). I just pulled the engine out of my Softail and am getting ready to send the crank to them for repair. | ||
Froggy |
What about switching to the more robust 08 crank and flywheel? | ||
Hughlysses |
Dirt- I just found Darkhorse and e-mailed them to ask about my crank. Froggy- I've seen a couple of threads about the 08 crank upgrade. If I have to buy a new crank it sure seems like it'd be worth doing. OTOH I'm just pretty appalled at all the special tools and hand-fitting of parts required to change crank bearings in this engine. I think if I go with a new crank (07 or 08) I'll end up having to take it to a shop to have that done. I'll swear, some of it's like steam locomotive technology (something I DO know about). | ||
Fltwistygirl |
+1 what reepi said. times two (2 ulys) | ||
Tootal |
Pressed together cranks can be rebuilt. If you send a crank out to get balanced they have to take it apart to do it. You need to take it apart, use a press. I realize you don't have a press Hugh but there are folks out there who do. We have a 50 ton press at work and I have done cranks on it so I know it's possible. I just threw in "Harley crank repair" in my search engine and up pops http://www.darkhorsecrankworks.com/ I don't know these guys but they were just one of many that popped up. I would do a search and check them out on the BBB. Great tool for an unknown shop. | ||
Hughlysses |
Tootal- I guess I knew pressed Sportster cranks could be re-worked but I was a little worried the Buell parts might be slightly different and unavailable (the 06-up XB has a silver-plated roller cage on the rod bearings for instance). I found a good thread a few years back about a guy building a killer bored/stroked Sporty from a new stock 883. He showed step-by-step photos of the crank disassembly and reassembly process, including the alignment. I have no idea how they do this on a mass-production basis. I found Darkhorse last night and e-mailed them. There are several threads scattered around Badweb about their work. Apparently they've done quite a few 08 crank retrofits to earlier XB's as well. I'm waiting to hear back from Darkhorse. I also found Johnson Engineering; I already heard back from them and they say they can do it. Looks like cost would be around ~$200 cheaper vs. a new crank, but shipping expense will eat into that. | ||
Johnboy777 |
Hugh, Revolution Performance (Revolution Performance) Here's their machine shop services page: http://www.revperf.com/Products/machineShop.html I had this bookmarked for some reason - hope it helps. . | ||
Hughlysses |
I took a few photos of the bike and parts tonight: "Hermetically sealed" engine storage:  Backside of cam cover: 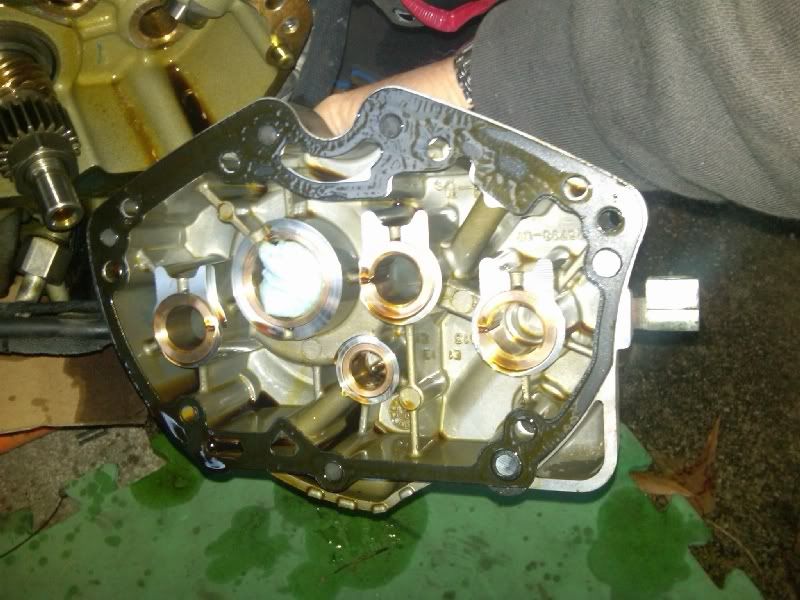 I was surprised to see this has an old-style paper gasket and not a coated aluminum one. Engine case with cams removed: 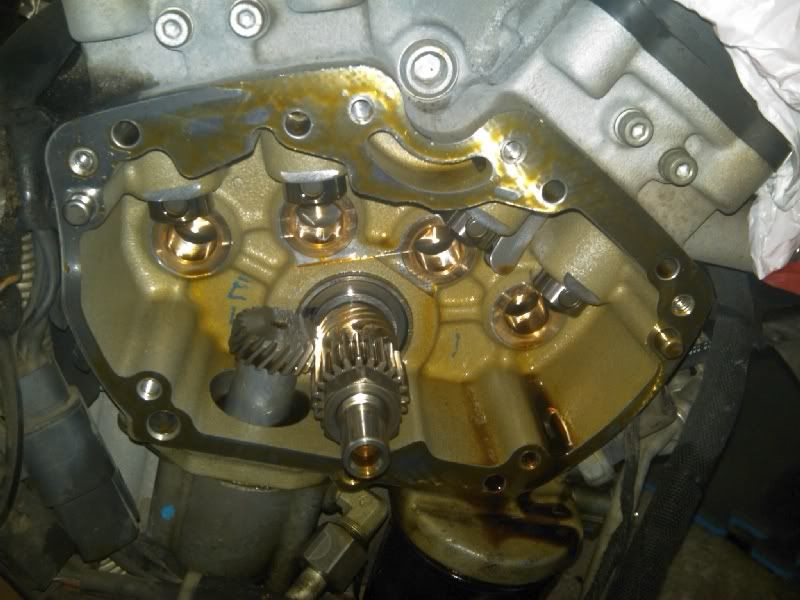 Closeup of oil drive gear from front: 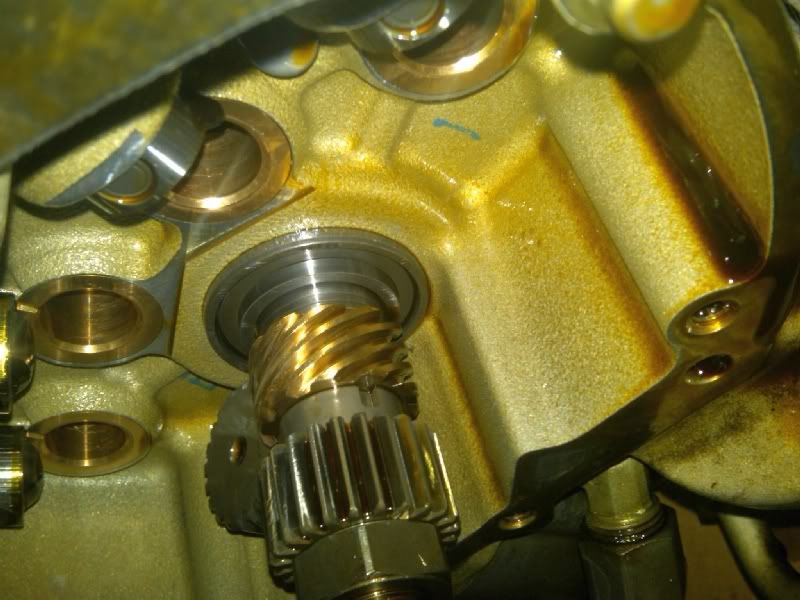 Closeup of oil drive gear from rear: 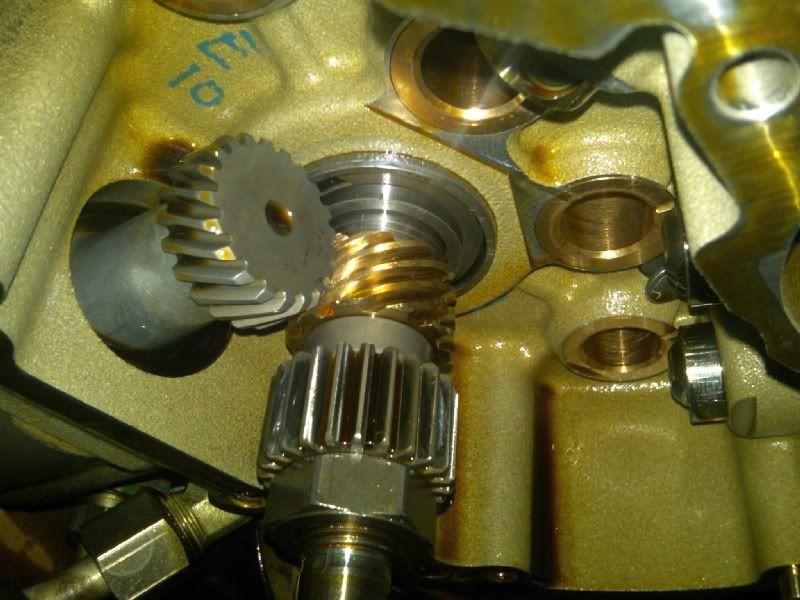 Cams: 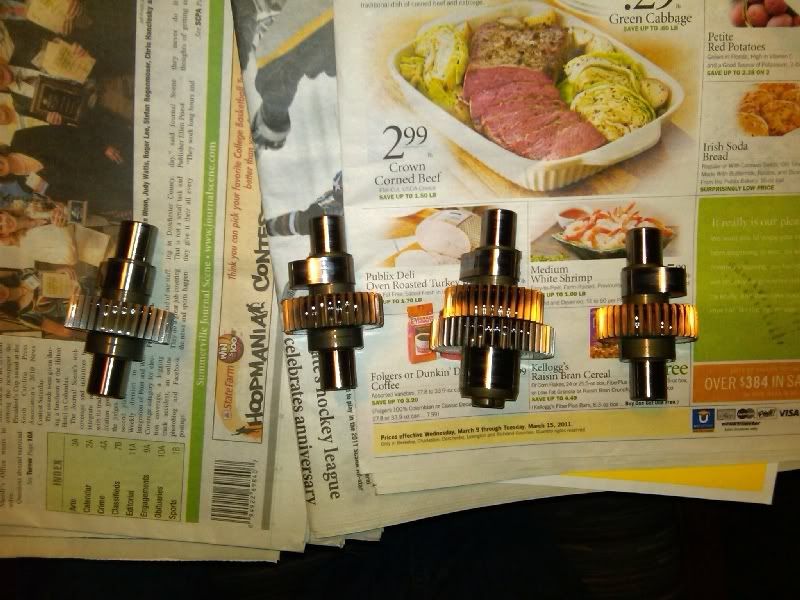 Rear intake cam w/odd wear line visible: 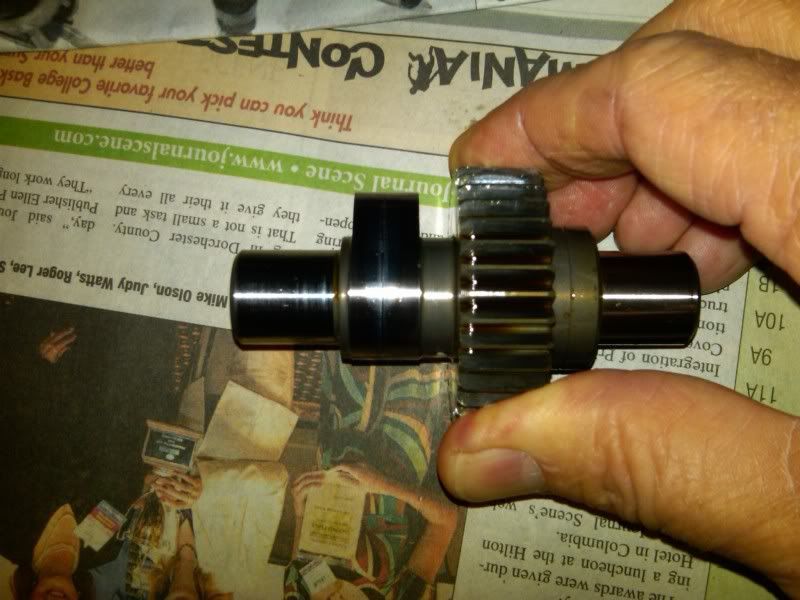 Closeup of rear intake cam lobe wear mark: 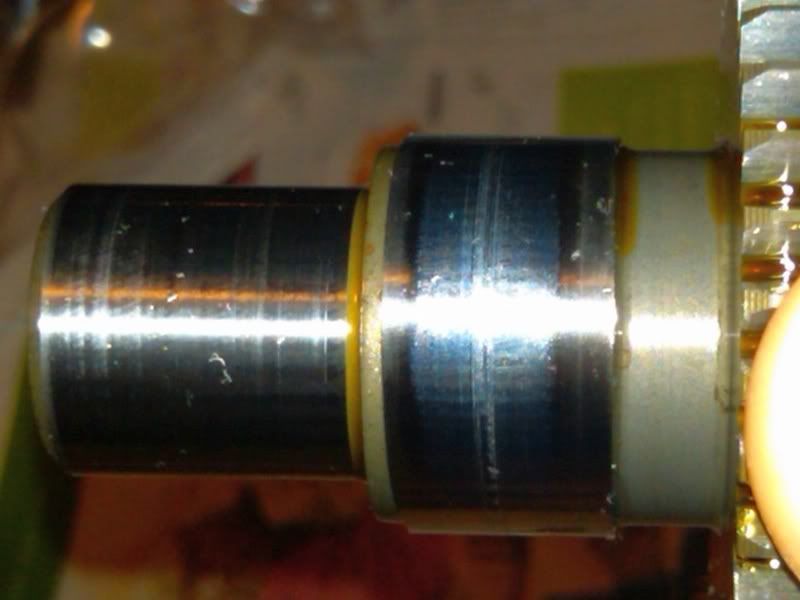 The wear mark has me a little concerned; you can actually feel it with your thumbnail. Cams bagged and labeled for storage: 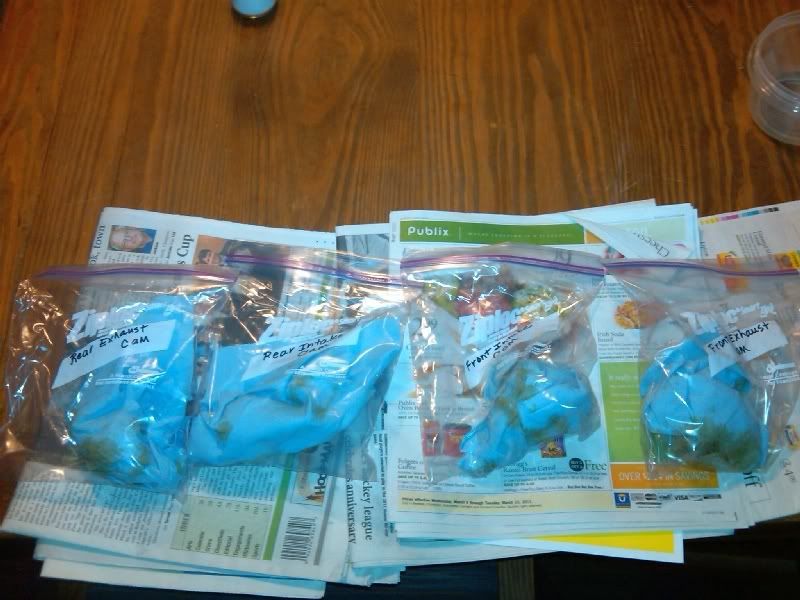 I plan to pull heads and jugs on Saturday. That should 100% nail down that this is a case of bad con rod bearings. I'll post more pics then. Barring the finding of additional damage, THEN it's on to frame removal so I can take the cases apart. | ||
Stellaglide |
Hugh Sorry to hear about your bike. I've been following your posts over the last week or so. I don't know much about the sporty/buell cranks but a good bit of the guys who build their HD motors with power over 100hp/100tq will send their crank assemblies to outfits like Darkhorse or Revolution Performance for balancing and welding so the 2 flywheels don't "shift" from the added stressors. There are plenty of built sporty motors making in access of 120hp so someone out there has to have experience with rebuilding cranks. Best of luck. blk-betty, aka Mark | ||
7873jake |
Hugh, If you find you need to seal the engine better than simply bagging it, the moving and storage/boxes/handtrucks section of Lowes or Home Depot sell the mover cling wrap in rolls that make that process much tighter and cleaner. The small single hand rolls work beautifully and because they cling/stick to themselves, they rarely stick to the other surfaces which makes clean-up and removal easier. This helps keep crap out during those long pauses between tasks, like shipping out a crank for machine work and waiting for it to return. | ||
Hughlysses |
Jake- Thanks, that's a good suggestion; I'll get some. My wife is not adverse to me bringing projects in the house so I'll do the crankcase disassembly inside when I get to that part. I've been bagging everything in ziplock bags except for big parts like the rocker boxes, which I just put in plastic grocery bags. They're inside and reasonably well protected. | ||
7873jake |
If you want some more 'help'...at the risk of being a day late and a dollar short or too deep in your kool aid: I have a bulletin board in my garage that I cover in kraft paper (the stuff they make paper grocery bags out of) for each new resto project. I write on it in sharpie, dividing it up into sections (valve train, carbs, intake manifold, etc, etc) and buy small (and cheap!) 2"x3" and 4"x5" ziplock bags at the craft store that I pin to it in their respective sections. They sell by the 100 for a buck or two. In each bag goes nuts, bolts, washers, etc along with a small post-it or some other small piece of paper or stringed tag that identifies it with a simple alpha-numeric catalog system I created. For instance, the front valve cover/rocker box hardware on an old BSA gets tagged V-F-1 (v=valve, f=front, 1=the number order I choose to take them off in, in this instance, the first). I take pictures of the different stages of disassembly and print them so that I can write notes on them as well as label those same nuts, bolts, washers, etc on the pictures with the numbers I spoke of above. This helps with classing them on the cork board and with reassembly and I notebook it along with notes for the future. Makes 'visualizing' that area of the engine easier for rebuild as well as after its all been put back together. Also nice to give to the owner or buyer to see where I've been. It sounds like a lot of work but it really isn't when compared with disorganization and the stress of losing something irreplaceable in a 40 or 50 year old engine. It keeps me from self-inflicting anguish and having to smash my own fingers in the vice as penance for screwing up. (Message edited by 7873jake on March 10, 2011) | ||
Florida_lime |
Hugh, I sent you a pm through the ADVrider forum. I feel your pain.  | ||
Hughlysses |
For any of you that have been following this on Big, Bad, & Dirty, I pulled the heads and cylinders off today. Both cylinders and piston skirts are scored pretty badly- apparently the filings from the failing rod bearing got flung upward into them and worked mischief. The front connecting rod crank bearing is definitely the culprit. I've also included a video illustrating the amount of movement in it. Heads removed, front combustion chamber:  Rear combustion chamber: 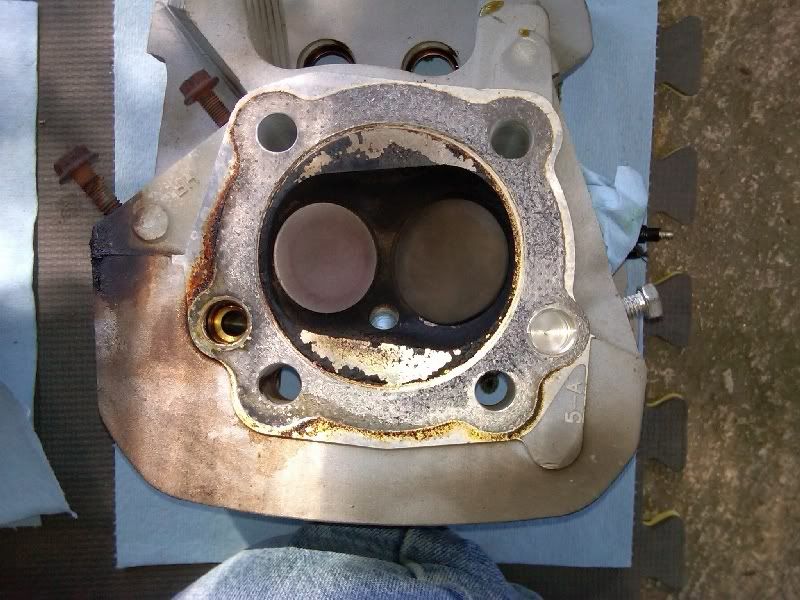 Inside of front cylinder showing scoring: 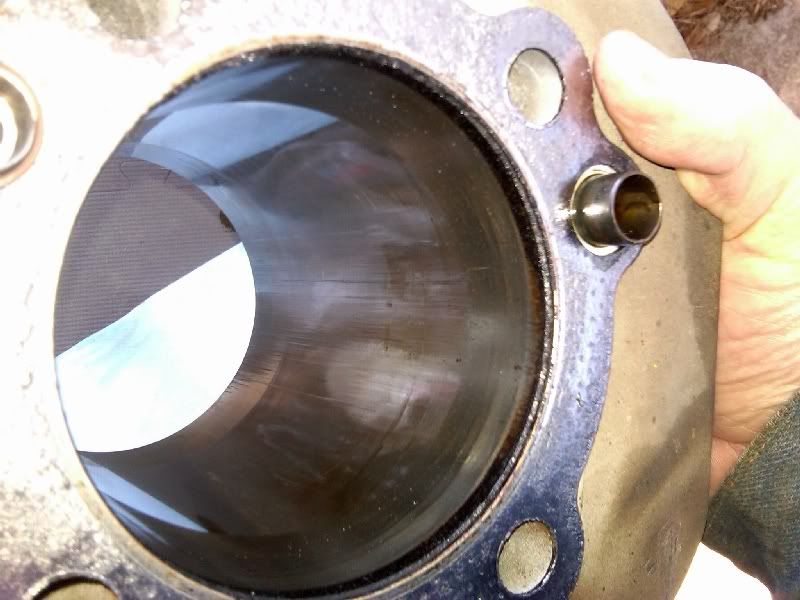 Inside of rear cylinder showing scoring (the funk on the rear cylinder fins is from my failed rear rocker box gasket a couple of years ago). : 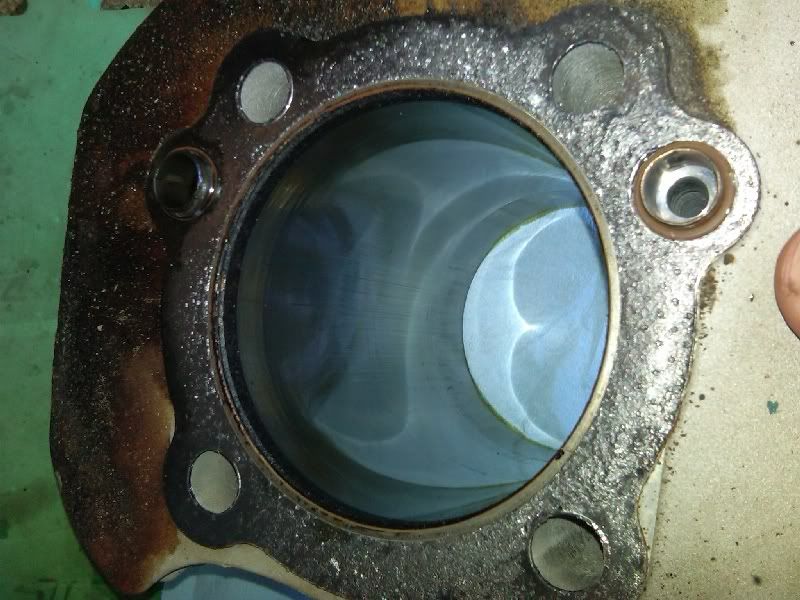 Front piston skirt showing scoring: 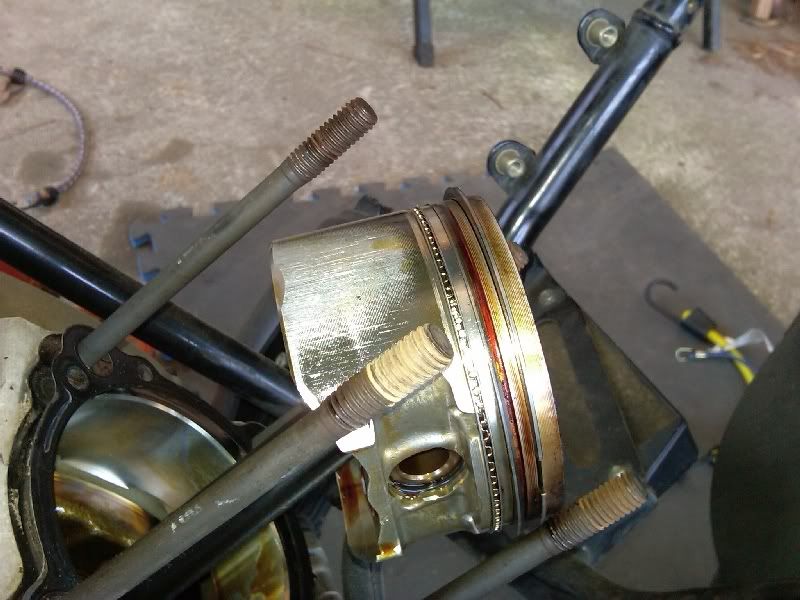 Rear piston skirt showing scoring: 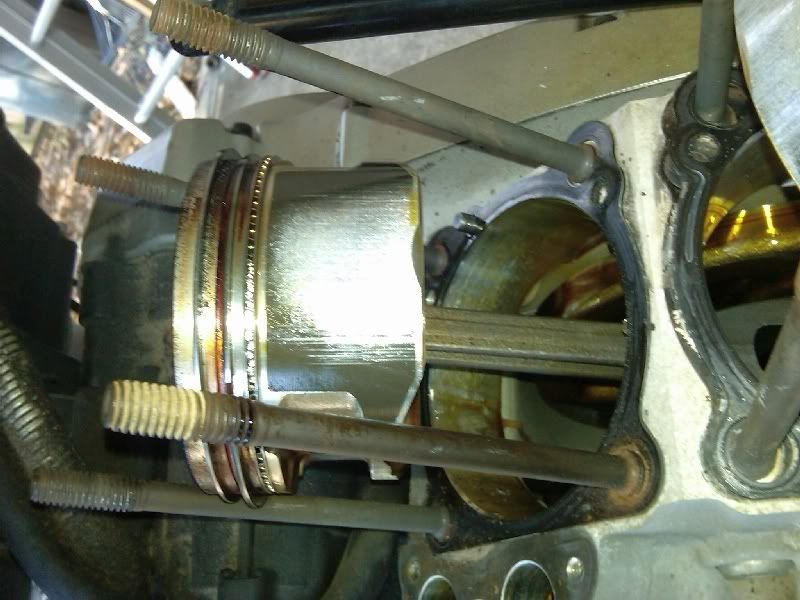 Here's a short video illustrating the play in the front rod bearing: I'd say the play is around 1/8". BTW- I found a thread on the HD Sportster XLForum; several riders were complaining of front rod crank bearing failures at around 30,000 miles. By the way, the lifters can NOT come out from the bottom, the cam bearings are in the way: 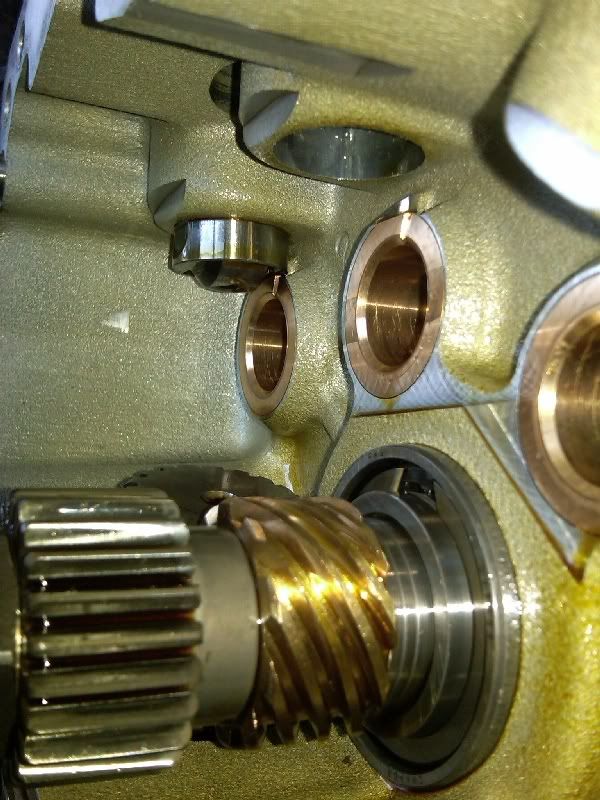 Looks like some shrapnel even worked it's way into the crankcase side cam bearings; here's a closeup of some scoring in one of those: 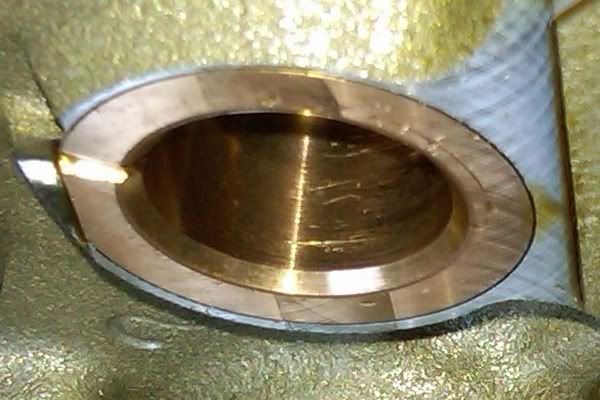 That actually doesn't look too serious, and the cam bearing surfaces look fine. All four lifter rollers looked pristine, so the marking I found on the rear intake lifter is apparently not a problem. Well, this is pretty much worst case of why I expected to find. I'm looking at a minimum of a crank repair, honing the cylinders, and getting new pistons and rings. May be cheaper to replace the cylinders if I'm doing that. NOW I've got to decide whether to tackle all this engine work or just bite the bullet and buy another engine. Either way, this engine has got to come out. Uggg..... | ||
Hughlysses |
Here's the most interesting post on the XL Forum I mentioned above. This shows what a failed connecting rod bearing looks like. Apparently it's usually the front rod (center bearing) that fails: http://xlforum.net/vbportal/forums/showpost.php?p= 1434021&postcount=74 | ||
nobuelled |
Sorry about the outcome, but it has been very interesting. Thank you for taking the time to document the process. Thinking back, did you notice an increase in the sound level or do you think it happened all at once? | ||
Hughlysses |
I rode the bike to work and back on a Friday, a route of about 50 miles. Everything was fine and I didn't detect any increase in noise. The next day, I went out riding on streets and backroads near my home and began to suspect the engine was getting noisier. I even stopped at one point and listened, couldn't tell any difference and decided it was my imagination. After lunch, I went out riding again and when I stopped at a stoplight, it was obvious the engine was knocking. I got home, pulled off my helmet and took out my earplugs, and the bike sounded just like it does in the video in the original thread. So everything seems to have happened over the course of about 100 miles while riding fairly sedately. I'd sure like to know why that bearing was fine for ~28,900 miles and suddenly gave out at ~29,000. |