| Author | Message | ||
Ray_r |
I was installing my comfort kit, and while I was removing the plastic tail section, I stripped the head on one of the torx screws. It's the rear one on the side rail. So I got out my easy-out, and while carefully trying to unscrew the bolt, the head broke off. So now at least I have the plastic piece removed and can get a good look at the what's left of the screw. I again tried removing it with the easy-out, and apparently the screw is aluminum or some other soft metal, because all it does is grind out more of the metal from the bolt. That bugger is stuck! It appears there's some sort of collar there that's attached to the frame section. Does anyone know if that's a threaded piece that I could somehow remove? Or am I looking at some helicoil work, or a new frame piece? Any suggestions? | ||
Sperz1 |
http://www.sears.com/shc/s/p_10153_12605_009531530 00P?vName=Tools&cName=Auto+%26+Mechanics+Tools&sNa me=Taps+%26+Dies I use this kit for most broken screws/bolts and have never been beaten! | ||
Hughlysses |
Ray- a photo would be an immense help for helping you. | ||
Etennuly |
It would have thread locker on it. They are stainless screws and it is likely your easy out hasn't got a bite into it. Do you have the screw type or square blade type? I have found the square blade type work better in these kinds of metals. Heat that thing with a heat gun or soldering gun to release the thread locker, tap the easy-out in to get a bite and try again. If any of it is sticking out, it probably had a shoulder on it, use vise grips on it at the same time you turn it with the easy-out. There are no rules, triple up on that thing, it will give! | ||
Ray_r |
I've never had an issue using an easy out before. But it seems with this particular screw, the easy out just grinds more of it away. I've tried both the screw-type and blade-type. Here's a photo. Does anyone know about the collar? 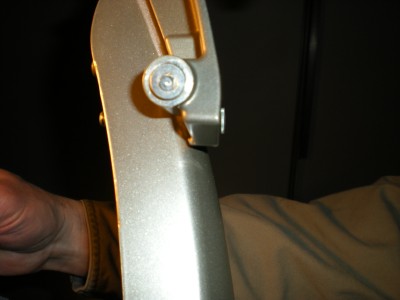 | ||
Davidxt |
just drill it out and re tap it | ||
Ratbuell |
The collar is a thread-sert. They can be removed...but usually not with the screw in them. Can't tell from the pic, is the broken screw above or below the level of the piece it screws into? If above, or even near, that level...I use a Dremel cutoff wheel, and make a notch in the end. Presto - flathead screw. +1 on the heat, though. Notch, heat, remove would be my plan of action... | ||
Ray_r |
The screw is broken at the same level as the collar. And I've already done some drilling into the screw for the easy-out, so I don't think there's enough left to slot. I'll try the heat and easy-out route again tonight and see what happens. If the collar is thread-sert, could I simply drill out the screw and then remove the thread-sert? I'll obviously demolish the thread-sert removing it, as it looks like the only way to do it is with vice-grips. Maybe I could slot the whole piece, collar and screw, and try that route? I'll work on it more tonight. Thanks for all the suggestions and help. It sounds like heat may be one key I was missing. | ||
Ray_r |
I tried it all. Heat, slot, easy-out, etc. I gave up. So now I've removed the tail section entirely and will take it to a machine shop and see what they can do. If they have to burn the paint to heat it enough to get it out, I may as well just get a new tail section. Frustration has set in for the night........ And to think this all started with simply trying to install the comfort kit.  I hope I can remember how it all goes back together! | ||
Glenn |
One last thing you may want to try that has worked for me well in the past for really stuck screws is an impact screwdriver. Make sure you have a good deep slot that matches the screwdriver bit fairly well. A Dremel tool would be good for this but if it protrudes enough, you could also do it with a hacksaw. I have sometimes put two blades together in the hacksaw to make a wide slot. Heat it up, put the tail section on an old towel and whack it with the screwdriver. http://www.harborfreight.com/cpi/ctaf/Displayitem. taf?itemnumber=37530 | ||
Nopork |
Have someone weld a nut to the screw itself. Place a nut on top the screw wire weld down thru the middle of the nut to the screw filling up the center of the nut. Take a wrench and turn it out. The weld will only stick to the steel part not the aluminum casting. I have used this method in this situation numerous times on studs, broken bolts, stripped screw heads etc., while rebuilding damaged motorcycles. | ||
Ray_r |
Well.....I learned a few things today. 1) That screw does not go into a thread-sert as was suggested above. I know this because I tried to remove it, and it's a machined piece of the tail section. 2) The cost for a machine shop to repair the mess I made of the tail section (grind the collar, retap for a REAL thread-sert, and create and install said thread-sert, is $150. 3) The cost of a new tail section is $193. 4) My dealer has a 15% off parts special today. 5) The tail section is available, with delivery likely on Tuesday. I'll let you all figure out which route I went.  | ||
Froggy |
L0009.1AKYBQ TAILSECTION, RH, MAGNESIUM TONE Retail Price:$112.00 L0010.1AKYBQ TAILSECTION, LH, MAGNESIUM TONE Retail Price:$112.00 L0046.1AKYBQ TAILSECTION STRUCTURAL CTR,MAGNESIUM TON Retail Price:$193.00 Unless you are planning on detaching the side rails somehow, you might need more parts. | ||
Ray_r |
The side rails detach from the tail section just fine. It's the tail section that has the screws. | ||
99savage |
Keep telling you guys - If you are trying to drill out a broken screw GET A LEFT HAND DRILL More often than not the screw comes out while in the process of drilling it out. | ||
Ratbuell |
GET A LEFT HAND DRILL BIT Fixed it for ya  | ||
Ray_r |
I tried my right hand drill, but I turned it upside down and used my left hand to run it. Does that count? While I appreciate the continued wisdom and suggestions on removing that screw, it's no use trying to get it out anymore. I f#$%^d up the collar so bad, there's no cost effective recovery that would look right. While I'm waiting for the new tail section to arrive, I went back to installing the comfort kit. I got the underseat part done, and it was really easy getting that big plastic fender piece back on with the tail section removed. Now all that's left to install of the comfort kit are the easy parts. I got the battery back in, ECM back in, wires back in place.....good progress. Feeling much better about it tonight.  Prior to this, I was thinking of removing the headers and having them ceramic coated black. I thought that would accent the black engine well, and provide a little more heat protection. But after reviewing the threads indicating what's involved with that project, I'm having second thoughts. Everything fits in such tight little spaces. And having to remove the entire airbox and drop the engine? Just imaging the damage I could do!  But since it seems the rainy season has set in for the winter here in the great northwest, what else do I have to do?  (Message edited by Ray_R on December 16, 2009) (Message edited by Ray_R on December 16, 2009) | ||
Etennuly |
If you want to cover shipping both ways you can send it to me. I will remove that stubborn screw and fix the hole for you. I own a body shop, we got the stuff to make it happen. PM me if you would like. | ||
Ray_r |
That's a very kind offer, but no need. The new part will arrive on Tuesday. Thank you though! | ||
Etennuly |
You are welcome. | ||
Ray_r |
My new part arrived today, and I got everything back together. Even the new replacement tall seat I ordered fits great (see tall seat thread). All is well with the world. There's a kind gentleman from this board that's offered to buy the old tail piece from me. I guess he's got some special project he's cooking up for his own bike. |