| Author | Message | ||
Beefsupreme |
Alright, so last thread I made I asked a few questions of which only general knowledge was supplied (and it helped me, so thanks guys!) The story is that my 2009 1125R was reading above 18V before the dash shut off when it was cold, indicating that my voltage regulator wasn't... regulating the voltage. It would work after it warmed up, but in the mean time, I had to wait, or it'd shut off my dash, and ran the risk of blowing light bulbs out. So I wanted to make a thread using *exact* information on where to plug what. And if you find this thread five years from now and it's long dead, feel free to PM me as it'll go to my e-mail and I can answer any questions. Honestly though, it's pretty straightforward. I wanted to leave the stock regulator in place so I can undo the new one at will and reconnect the old one, and this process allows that. THINGS YOU'LL NEED The CE 605 SB Voltage Regulator which I purchased from Roadster Cycles at this link: http://www.roadstercycle.com/Roadstercycle%20New%2 0Series%20Regulators.htm A new Deutsch DTP04-04P [u]receptacle[/u] a.k.a. FEMALE; order without pins. It's labeled as DTP04-4P-Assy Receptacle Assembly http://www.deutschconnector.com/products/deutsch_d tp_4-way_connectors.html And three pins for the stator wires, specifically this part number: Pin 1060-12-0222-PS http://www.deutschconnector.com/products/deutsch_d tp_pins_and_sockets.html You'll also need wire crimpers, a screw driver, needlenose pliers and a 3/8" socket with a ratchet. Mounting it is completely up to you how you want to do it, and there are a half dozen threads about it if not more. I'm putting mine under the seat in the open. You *should* probably get crimpers for those specific pins on that Deutsch Connector, but I just clamped the shit out of them and gave it a "pull test" and they were fine. http://i.imgur.com/xSlFZYa.jpg Alright, so what you have here are all the PLUGS. First things are to unplug the Deutsch Connectors coming from the stator, and going to the regulator. If your Buell doesn't have the HD harness fix, I believe they should be the same connector. As you can see, my 1125R is a 2009 and it does have the HD fix. So unplug those Deutsch connectors, and next unplug the power connector coming from the stock regulator. These plugs I've left unplugged with the exception of the male deutsch connector that goes to the stator, which obviously I connected to the new one. What I didn't do that I could is connect the new regulator to where I pulled the old connector from. That would require buying that connector, or splicing it that way. I decided to go the easy route and just put ring terminals on the battery. If you don't like your battery having wires coming off of it, consider finding that connector or just splicing it. The three black wires come from the Regulator. Those three wires were stripped, and pins were put on the end of them. Crimp the pins onto the wires, which again I did with needlenose pliers and wire crimpers. I then electrical taped them, though if I had the foresight I would have slipped heatshrink over them. The three wires with pins were slipped into the Deutsch connector in slots 1, 2, and 3. 4 is left empty. Then, use needlenose pliers to grab the wedgelock and wedge it in the middle of the 4 pins. Double check that things look exactly the same as your factory pins. http://i.imgur.com/0hvn80k.jpg Here you can see the V/R, the battery wires, and the three stator wires. You'll notice the little red box looking thing on the positive battery wire; it comes with the kit and needs to be put in line between the regulator and the battery. The V/R has five wires coming from it (three to the stator and two to the batt) and you can see all of them here. All of the terminals come with the V/R if purchased from the link I posted, along with a few more if you wanted other options. Be generous with the heat shrink, as there are plenty of sections that come with the unit. So that's pretty much it. Feel free to ask me anything on my process and I'll get back to you sooner than later, and I can take any more pictures if you'd like. I haven't mounted it just yet, so it's still in pieces, but I did start it up. I haven't let it run for more than a minute so I haven't gotten a voltage rating yet, but when I mount it tomorrow I'll take it for a quick spin and monitor the voltage. | ||
Bubba_ |
beef, thanks for the post.. i've been following along closely. i'll be interested to see how the install works out for you. what brought you to the decision to place the new VR under the seat? from what i've seen here, most folks have opted for the under the tail section area. (for air flow i think) No concern for heat/ poor air flow with this location? | ||
Beefsupreme |
I meant under the tail section. Some people go to the trouble of mounting them up front, but I think that's not only ridiculous but counterproductive given the ambient temperature. It'll be mounted under the tail just in front of the license plate. If I were slightly more creative I'd incorporate the license plate holder into the VR a la a couple of the guys, but I don't have spare material to play with, so I'm just drilling holes in the plastics below the tail and hanging it. From what I've read there are no clearance issues with this location. | ||
Beefsupreme |
great success. Mounted it under the tail, looks clean and works, and rode about two hours; voltage stayed above 14 pretty much the whole time, unless I'm in traffic then it dips into the thirteens. | ||
Froggy |
Beef, would you mind posting pictures of your mounting? | ||
Blacknightrain |
Does this location look like it will work? I have my bike on the lift tied down. I hung 200 more pounds off the tail and still had 2" left 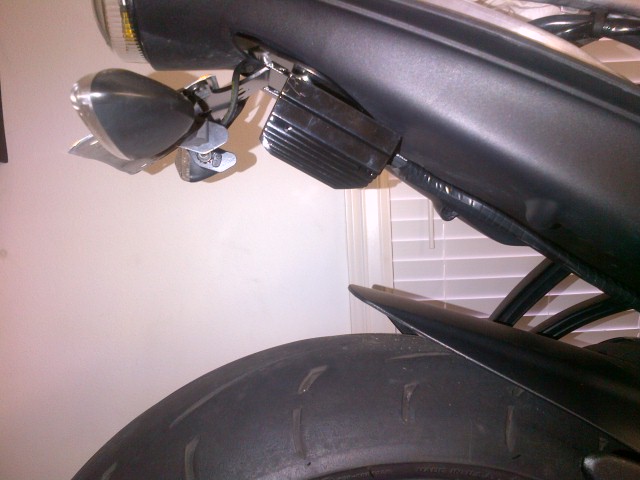 | ||
Beefsupreme |
I've got mine even further forward than that, just about the end of the hugger, and I've had no clearance issues. | ||
Sparky |
I used 2 ratchet straps to compress the suspension on my S1 while checking wheel travel clearances. Was able to fully deploy the suspension to the limits of the shock. | ||
Figorvonbuellingham |
did you check to see if the voltage regulator relay needed replaced? might have been all you needed. | ||
Sinnister |
Nope he had the exact same issue as I have and I have my relay bypassed. How's she running now Beef? Everything still good? I'm going to probably be ordering mine in the next week or so and wanted to see if yours was still going good. | ||
Beefsupreme |
Sparky, that's the smart/correct way to check. I was in a hurry to get to a group ride so I just drilled 3 holes and zipped it on there quick. I say three because due to my poor planning, the fourth hole ended up being obstructed. So... 3 bolts. With nylock nuts. Figor, I did the bypass, had the exact same issue. Sinn, So far everything is golden. My battery is a few years old (somehow still rocking) so my voltage isn't as high as others have reported when sitting and idling in traffic, but when moving it's a steady 14.1 all day long whether it's cold or hot. Idling it'll dip as far as 12.7, but that wasn't where the problem was in the first place, and I blame the battery. Maybe I'll get a new one next season. Just make sure you tape the •••• out of the little relay that's meant to be attached to the batt cable; it has exposed terminals. I was fitting the fairings on in a hurry and just stuffed the wires where I could fit them and got sparks everywhere. Turns out the plastic cover for it came off, so I just electrical taped the hell out of it | ||
Sinnister |
How are things running Beef? I went ahead and ordered everything today since I went to go for a ride last weekend and my VR is now dead so I will finally pull the trigger for the upgrade. I had a quick question though. Do you have the upgraded rotor or not? I have a rewound stator over a year old that's been holding up good and am still wondering if I should do the rotor or just do the upgraded VR and hope that pulls enough heat away to keep me going for a while till I can get some more funds together for the rotor. Wondering if I can hold out till about May for the rotor. | ||
Shawns |
Still need to do the rotor. i advise that you do it soon. The prices seem to be going up on the EBR site. The cost of the front brake rotor just about doubled. | ||
Sinnister |
I realize I need to do it eventually. I'm back in school so budget is very tight and my XB blew the transmission and since its my commuter I need to get it back on the road before next semester starts back up. I was gonna do the VR since mine is blown for sure and wait till my savings recovers from the trans repair in about April, May timeframe. It probably won't even move till then anyways since I don't ride the 1125 in colder temps. I have my XB for that. Just curious if Beef had done it. I will definitely do the rotor before my XB gets sold cause I'm done with it for now since I have a supermoto itch now. | ||
Beefsupreme |
Being in the midwest, I've only been able to ride it so many times, but not a single one had any high voltage issues. I'm getting some drop below 12V when the high speed fans are on and I'm idling a while, but I had that problem before the install, and my battery is definitely showing age; IIRC I checked and it's the one that came from the factory five years ago. While riding, it's still rock solid at 14.1. "Do you have the upgraded stator" That's a negative. I'm almost positive about it, but I guess you can never be sure without opening it up. Having the series VR should help the life of whatever stator you have though. |