| Author | Message | ||
Dawiz50 |
Noticed the fan not running on my 06 Uly when I shut it down after a 30 minute ride on a 90 degree day...and I remembered the last time I heard it run last summer, it sounded like the bearings were going bad in the fan motor...so I figured it blew a fuse, checked the fuse it was OK...no engine light�so I gambled...and replaced the fan and after a 30 minute test ride...shut her off and still no fan...any suggestions? I guess my next move is to pull off the air box and check the temp sensor and wiring for grounds? PS-I do not have the ability to interrogate the ECM for codes/data. (Message edited by dawiz50 on May 16, 2016) (Message edited by dawiz50 on May 16, 2016) | ||
Teeps |
You can check the voltage drop on the engine temp sensor by CAREFULLY back probing the correct wire at the ECM. Or, check the resistance of the ETS to ground at the same wire/terminal in the gray connector. http://www.ecmspy.com/pinouts.shtml#1 see 1) DDFI-2 See chart in post #2 http://www.buellxb.com/forum/showthread.php?36097-Head-Temp-Sensor-Diagnosis (Message edited by teeps on May 16, 2016) | ||
Dawiz50 |
Thanks for the info and tech data resources! �being an old carburetor guy caught up in this fuel injected/ECM world �all this is quite intimidating�forgive me for sounding ignorant�well I guess I am, so here goes� Seems to me it would be way too tricky to try and probe around the back of the connector with the bike running and vibrating�and watch the values move in real-time�so�I assume the proper method for checking the voltage at the ecm would be: 1) Ignition switch in the ON position. 2) Kill switch in the RUN position. 3) Check the voltage/resistance at ambient temperature to verify the reading is what is expected there according to the table.(+/- 20%) 4) Ride the bike to operating temp. 5) Check the voltage/resistance again to verify it is close to the value according to the table at operating temp. (+/- 20%) I do not have a temp gun to verify actual engine temps�so it would just be a judgment call that in fact the values are indeed changing with the engine temp rising from ambient to operating temp�correct? Please feel free to suggest a better more appropriate method if need be�like I said I have ZERO experience with this type of trouble shooting! | ||
Teeps |
Yes what you have outlined above will tell you if the sensor is within specs according to the chart. Probably best to disconnect the connector(s) from the ECM and just test resistance to chassis ground (or negative post of the battery.) Actually, before you do that; test that the fan motor will turn on by grounding pin 6 in gray connector or BK/O (black/orange) wire at the ECM with the key and kill switches on. | ||
Teeps |
It's easy to diag engine running problems if you break down the sensor circuits into 3 parts. sensor wires ECM Of course always make sure the battery is good and fully charged, the terminals (battery) and terminations (chassis ground and fuse box power) are secure. | ||
Dawiz50 |
Great!!!...thanks for the confirmation and additional info...I also downloaded the 2006 Ulysses manuel from BuellMods and have it as a reference...and a whole lotta reference it is...all 638 pages of it! I just started a 14 night run at work (we work 12s)...so it will prob be the 28th before I have a chance to pull the Uly back out and pull the airbox off and spend the time to slowly start 'poking' around on the ECM and wiring educating myself along the path of trying to diagnosis the temp sensor wiring trail. I will reply back to this thread when I have an update...or more questions!?!? Thanks again and wish me luck! | ||
Dawiz50 |
Ok...here�s what I found so far... 1) The only engine code is a "21"...which makes sense cause I have disconnected the exhaust valve when I installed the Hawk muffler mod.(guess I need to pick up an exhaust valve emulator) 2) Grounded the #6 pin at the grey connector and the fan runs. 3) Inspected the Engine Temp sensor and its wiring...no broken or chaffed spots in the wire...but the protective fabric wrap was� so I rerouted the wire to get it off the rocker box and out from under the wiring harness. 4) Measured the resistance of the head sensor from pin #9 of the grey connector and negative of battery at ambient temp ~90F...and reads 56K...chart shows it should be ~41,295 at 77F and at 104F should be ~25,647. Warmed it up in the drive way for 15min and it read 59K...went for a 20 minute ride...tested again and it read 59.5K. Looks to me that the temp sensor is bad...but the flow chart in the Manuel as a test for Code 36 (which I don't have?!?!?)...page (2006 Buell Ulysses: Fuel System 4-83)...reads as follows: Fuse OK? - YES > Voltage at pin 6? - YES > Jumper pin 6 to Gnd, fan run? - YES > Replace ECM. (Message edited by dawiz50 on May 28, 2016) | ||
Reepicheep |
If you tested that head temp sensor correctly with it disconnected, that sounds like your problem. If it fails in a sane range (instead of totally open or totally shorted) I can see how the ECM never sees it as bad. It is really odd that a thermistor fails that way though. But it is a failure, and all failures are odd. | ||
Sagehawk |
If yall remember a coupla years ago, uly man spoke of temp sensor that had a 'threshold shift'. 50� if I remember right! Ecm still got info, just wrong info. Every so often, I'll take ambient temp of fuel tank, hook up spy and see what iat, clt, and compare. Pretty much within 6 � of each other all the time. Used this for a baseline for a while. To see if sensors are within reason over time. Haven't had issues with these but I am suspecting a shifting o2 sensor now. | ||
Dawiz50 |
Reepicheep - The instructions from the manual were to test the sensor at the #9 pin of the grey connector of the ECM to ground/neg...when you say 'with it disconnected'...are you referring to testing the sensor at the sensor connector itself? | ||
Teeps |
Dawiz, On the outside chance that the wire, between the sensor and ECM, is shorted to ground. You should test the resistance at the temp sensor connector, just to be sure... The chance that the wire is shorted to ground through a 56k resistance is very unlikely. | ||
Dawiz50 |
Teeps, I will give that a try next chance I get to pull it back apart...least at that point, if the sensor still test bad, I can leave it apart...and I'll gamble the $78 on a new sensor from Surdyke and try that...probably next week sometime...this work thing are getting in my way! And on that note...from the looks of the placement of that sensor, I guess I'll have to buy a set of loooooooong needle nose to try and get the rubber boot off and the socket on?!!?!?...any feed back / advise on removal of the sensor? | ||
Teeps |
http://www.buellxb.com/forum/showthread.php?6024-C ylinder-head-temperature-sensor Check photo in post #9. I have not changed one yet, but, I believe the wire is potted into the sensor. | ||
Greg_e |
Wire is potted into the sensor. I took a deep socket and cutting wheel, cut a slot on the socket to get the wire out and turn it. I also did this with the heads off so it was easier, not sure how nice this will be with the head still attached. | ||
Dawiz50 |
The sensor plugs into the wiring harness and that plug (connector 90) is easy to get to and test from...but...the sensor has a rubber boot made around the wire that 'snaps' (I think) down on top of the sensor...getting that off to get the home made socket on will be the trick, do to how deep down in the rear head the sensor is located...I can barely see it much less touch it...hench the loooooong nose pliers theory! Yes, it would be much easier with the head off for sure. Been raining/flooding here in South Texas for DAYS...between work and the rain...it will be next week before I have time to further trouble shoot...will update as it happens! | ||
Sagehawk |
I don't remember a boot on top of temp sensor when I rolled my motor. If your having socket problems, you can borrow my snap on socket. I took mine out and cleaned, Re mounted as a preventative thing during motor roll. Hope your doing ok with all this rain. We're soaked thru and thru here in angleton | ||
Dawiz50 |
See boot here... http://www.ebay.com/itm/like/282056586745?lpid=82& chn=ps&ul_noapp=true ...floating here in Texas City too...work in Alvin and still poooooring now! | ||
Dawiz50 |
Sagehawk, Just ordered the sensor from Surdyke...what size is the Snap-On socket? I am going to just buy one and cut the groove myself...if that proves to not be successful..I will hit you up to borrow the Snap-On...Thanks for the offer! | ||
Greg_e |
One important thing, the sensor that is installed may take a large amount of force to remove. I had to cut the old wire off, then use a regular socket to get the sensor out of the head. I want to say 1/2 inch, but might be wrong, and I know I don't have my custom socket here. | ||
Livers |
1/2 inch is correct. | ||
Sagehawk |
The 1/2" socket needs to be a 6 point for sure. Be sure of no slop as there can be no rounding off of hex. Really be stuck then. Long handle ratchet If you have one. I don't remember a boot like that. If there was one, it was rotted and not useful anymore. Also ,I got 1/4" vacuum hose and cut to length to cover wire up n out of head area so wire wouldn't rub on head , or rocker box. Ugly, true that , but I covered a bunch of those wires to protect them in that manner. What do you do in alvin, dawiz50? | ||
Sagehawk |
 | ||
Greg_e |
That tool is much nicer than the one I made. | ||
Sagehawk |
Snap on lifetime warranty. After buying bike used, I figured money saved, I could spend some on luxury stuff. Thusly, ecmspy for 72.50, socket for 59.00. Arai helmet for 600.00. Proper tools make so much easier wrenching. being a machinist, millwright for 42 years, I pick n choose like everyone else what is important for my dollars to be spent on. Also, I surely don't mind helping anyone that needs help on their scooter. Not many of us in this area for sure! | ||
Dawiz50 |
Sensor supposed to ship 06/16...guess I'll have a week or so to make my socket! Thanks for the pic...helps to know how to shape it around the wire. I'm a System Operator for TNP. | ||
Sagehawk |
What is tnp? Google says a fishing outfit. Ummmmm. Do you have a stock ecm as bueib is listed as 05 thru 07. I can help with that if you need. | ||
Dawiz50 |
Texas New Mexico Power Co...Sorry...you live in our service area so I figured you would recognize TNP. lol What is bueib? Yes...it is a stock ECM...I did the breather mod, airbox mod and a Hawk muffler mod. Next was going to be the K&N...but this fan/sensor is eating up my 'fun money' lately! ...and I just bought and installed a set of NOS 2007 forks from St Paul HD...made a big difference in the spring rate/rebound! | ||
Sagehawk |
ecm types for the different years and models and country. 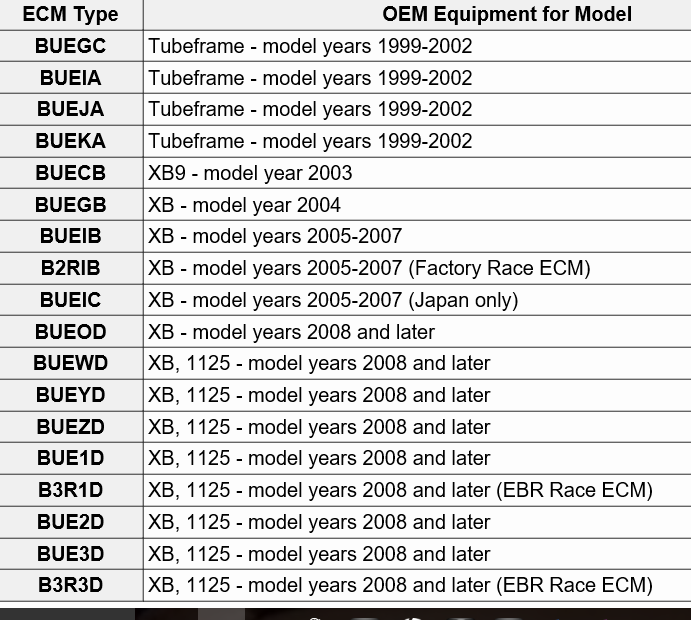 I would've recognized tnmp but with all the hockey playoffs going on, I didn't snap to tnp. I'm squared away now though. The listing is from the ecmspy website. when you first connect to ecm,, this designation will appear in box for your info. when in spy , there is a screen with serial#, date of manufacture as well. were gonna have to get together sometime. | ||
Ducbsa |
Are those program numbers to be flashed on an ECM that a Buell tech at a HD dealer would look up and use? How do they relate to ECM part numbers? | ||
Sagehawk |
I would think that ecm part number would rank first in their parts system and this series of designation would reflect the eeprom loaded into that particular ecm to service a model, year, country, etc. This is the designation for ecmspy as to how you pay for licensing fee as well. |