| Author | Message | ||
Easy_rider |
Compliments of "Buellistic" BUELLers: A picture is worth a THOUSAND WORDS !!! This how you set the BELT ADJUSTMENT up ... CENTER rear axle - CENTER swing arm pivot point - CENTER countershaft sprocket !!! ZERO slack on the tight spot(yes belts have tight spots just like chains) ... Once you have the belt set up correctly you will never have to adjust the belt again ... If you wear out a belt or break a belt, you just put the new belt on and the belt will be in perfect adjustment .. The OEM Tube Frame belt should be replaced at 50K(same as a SPORSTER 128[some models] pully teeth) ... When you tighten your AXLE NUTS(torque them correctly) do not over-tighten as it compresses the wheel bearing spacer(soft metal) and causes the bearings to "FAIL" !!! If you have more questions feel free to ask ??? In BUELLing LaFayette Ljenne73c@verizon.net  | ||
Easy_rider |
The rest of the story ... "DRIVE BELT" ADJUSTMENT("Tube Frame" Models 1986 to 2002) I'll start out with my usual disclaimer: This is my opinion and not the opinions of BMC or anyone else. There, that's out of the way. "IMHO" this what I think. Every BUELL that I have checked out on the road has had its rear drive belt adjusted TOO TIGHT. Many of them seem fine when checked without a load on them, but as soon as the rider hops on, the belt TIGHTENS RIGHT UP. 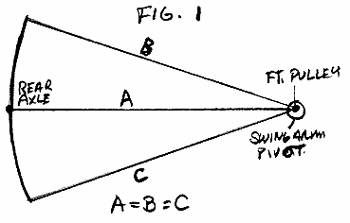 Here is the REASONING behind this problem. In an ideal design, the pivot point for the swing arm and the center of the front pulley would be the same point, as in Fig. 1. Then, no matter where the swing arm is in the arch, the distance from the center of the two pulleys is always the same. Fig. 2 shows how a Buell is set up. The swingarm pivot is in between the centers of the two pulleys. On a Buell, the swing arm center is about 1/3 of the total distance away from the front pulley. With this setup, the distance between the pulley centers is always greatest when the three points are in a straight line. The further the swingarm pivot is away from the front pulley, the greater the difference will be between the straight line measurement and upper and lower measurements. What this all boils down to is that the belt tension will tighten up when the three points are in a straight line, which is when you sit on the bike and as the suspension swings up and down the arch. 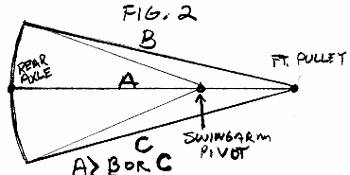 On a BUELL, the difference in the measurements is enough to make the BELT too tight at the center of the ARC if not adjusted correctly. The FACTORY SERVICE MANUAL(1999/2000) recommends 1 1/2" to 1 3/4" of slack with no load on the bike (on the BELT tight spot). So go out to your bike and feel the slack (BELT must be on the TIGHT SPOT to be "CORRECT". "YES" BELTS have a TIGHT SPOT just like "CHAINS".) in the belt with no load. Then lie over the seat to get the bike loaded and feel how the belt has tightened up (even more so when you pack double). A belt that is too tight will cause the following problems. First will be wear and tear on the belt(it will not last 50K miles). Next will be more chance of belt failure when foreign objects get caught between the belt and pulleys. There is no slack in the belt to make room for the object so something has to give. Tight belts also overload the rear wheel bearing and the output shaft bearing of the transmission. Last would be the effect on the suspension. A tight belt will bind the movement of the swingarm and reduce the effectiveness of the suspension (rough ride packing double). All of these things are bad for your bike. Here's how I set up the belt tension. I like about ZERO slack when the three points (Center of rear axle, swing arm pivot, and countershaft sprocket) are in a straight line. Get the rear wheel off the ground, remove the rear shock bolt and raise the rear axle with a small HYD.jack. This works out to about 2" of slack in the unloaded state. I'm sure that some of you are thinking that the belt will jump over the sprocket teeth (this will only happen if the rear sprocket pulley is in need of replacement) due to too much slack. A number of years ago, Jay Hawley (FIRST Grand Po Pa of American Thunderbike Club) was out at E. Troy riding with some BMC test riders. They were showing him some nice local roads. They were also testing the effects of too much slack in the rear dive belts. They had moved the rear wheel all the way forward for maximum slack. Then they rode the hell out of the bikes... Wheelies, hard riding and riding double. No matter what they did, they couldn't make the belt jump. So belt skipping is not a problem (this will only happen if the REAR PULLEY is WORN OUT). IF THE BELT SLIPS (JUMPS TEETH), THAT IS AN INDICATION THE REAR PULLEY IS WORN OUT (it wears out prematurely when the belt is adjusted too tight since it is aluminum alloy !!! "IMHO" the number of belt failures, rear wheel bearing and transmission bearing failures, and front pulley problems would be reduced by simply ADJUSTING THE DRIVE BELT CORRECTLY!!! "PRIMARY CHAIN"("TUBE FRAME", BLAST, and XB): The PRIMARY CHAIN should be adjusted to 3/4"(COLD) on the tight spot(FACTORY SERVICE MANUAL 1999/2002 says 3/8" to 1/2" which is TOO TIGHT when the engine is at operating temperature)!!! The KEY WORDS are 3/4" and CHAIN TIGHT SPOT ... If one can not find the CHAIN TIGHT SPOT all else means nothing ... THIS IS HOW YOU DO IT BY THE NUMBERS (this also applies to the BLAST P3 as the FACTORY METHOD IS ALSO NOT GOOD ENOUGH) !!! WITH THIS PROCEDURE THERE IS NO NEED TO REMOVE THE PRIMARY INSPECTION COVER(the BLAST does not have an inspection cover) !!! 1) Get the rear wheel off the ground("i" use car body stands under the foot pegs) ... 2) Remove the spark plug/plugs(make sure to blow away any FOD(anything that could cause damage it gets into the spark plug holes before removing the spark plugs) ... FOD stands for Foreign Object Damage, that is if it gets into the spark plug holes !!! 3) Rock the rear wheel so the transmission will shift and put transmission in 5th gear ... If you do not do this and try to force it transmission to shift the result will be transmission damage !!! 4) Back the 7/8 inch lock nut on the Primary Shoe Adjuster ... 5) With a 1/4 inch allen wrench back out the adjuster bolt ... 6) Now with the 1/4 inch allen wrench, screw in the adjuster bolt finger tight ... 7) With a Machinist Ruler (any small ruler with 1/16 inch increments), measure the adjuster bolt length from the primary case to the end of the adjuster bolt ... RECORD THIS MEASUREMENT !!! 8) Using the rear tire valve stem as a reference, turn the rear wheel one revolution ... 9) Repeat steps 5) thru 8) 10 times to get the longest adjuster bolt length(REMEMBER TO RECORD THE MEASUREMENTS) ... 10) Now take the longest measurement (this indicates the primary chain tight spot) and add 1/8 inch to it to have the adjuster bolt this long (from the primary case to the end of the adjuster bolt) ... 11) Holding the primary adjuster bolt still with the 1/4 inch allen wrench, tighten the 7/8 inch lock nut ... 12) Rock the rear wheel and put the transmission back in neutral... 13) Put the spark plugs back in(clean the spark plug/plugs, re-gap if necessary, put anti-sieze compound on the spark plug threads, and torque each to 12 foot pounds(the FACTORY SERVICE MANUAL says 11 to 18 foot pounds, "BUT" they will stay tight at 12 foot pounds so there is no reason to tighten them more) ... REMEMBER THESE ARE "ALUMINUM ALLOY" HEADS !!! 14) Remove the car body stands if you used them ... NOTE : The primary chain will now be perfectly adjusted to 3/4 inch chain play on the chain tight spot !!! The PROOF that you are adjusting the PRIMARY CHAIN TOO TIGHT is how much the primary chain has worn into the plastic on the adjuster shoe !!! If too tight it can •••• the flywheel assembly moving the pinion shaft oil pump drive gear away from the oil pump gear causing a slight mismatch causing the pinion oil pump drive gear to fail !!! Excessive heat from the crankshaft main bearing causing the crank shaft oil seal to fail, the alternator(burns out the stator, also voltage regulator !!! Excessive pressure on the clutch hub(clutch basket) bearing which takes away smooth clutch operation!!! Transmission does not shift well with transmission mainshaft cocked !!! "PLUS", decreases the speedometer pick-up problems on BUELLs with the electronic speedometer( ie:excessive metal in the transmission fluid/oil !!!) Over tightening, not using the correct "TORQUE" on axle nuts(front and rear) compresses the soft wheel bearing spacer causing the wheel bearings to "FAIL" ... This is extremely important on the "BLAST" P3 Model ... TRANSMISSION OIL with the bike in the up-right position(on level ground) should just come up to the CLUTCH DIAPHRAGM SPRING ... REMEMBER THIS: "IF" the drive sprocket shaft oil seal goes bad, the oil in the transmission will get into the engine ... That is why "i" run the engine oil SYN3 20W-50 in my transmission !!! This information was PLAGIARIZED from the writings of Jay Hawley(FIRST Grand Po Pa of the American Thunder Bike Club) and up-dated by LaFayette Jenne'(AKA BUELListic) If you have QUESTIONS, feel free to ask ??? In BUELLing LaFayette, Ljenne73c@verizon.net | ||
Reepicheep |
Nice primary adjustment procedure LaFayette! | ||
Bigblock |
I have found a pretty easy and 8 year multiple bike so far failsafe method, is adjust the belt, so when leaning over and weighting the seat,it has enough slack so that you can still pull up on the belt and make it just touch the bottom of the swingarm. I would wager that this method puts you within a gnats ass of the above posted method. | ||
Buellistic |
Have a son-in-law that is FAA certified to work on airplanes with that close enough is good enough, needless to say "i" will not fly on any airplane that "i" know he has worked on ... | ||
Bigblock |
So adjust your belt how you want. The original factory method, published in the service manual, was known to be too tight, and led to many belt failures. Belts don't fail by being too loose. THey've been tested and run SCARY, CRAZY loose. I bet you probably know this already. The method I use is actually quite common, and was taught to me by a Buell mechanic. I stand by my method, I believe it to be very good. If anyone feels it not quite accurate enough, then don't do it, use the above method. I also believe your method quite good, just a bit more work. The trick is weighting the suspension. If you are too light to weight the suspension properly, you have to reach over with your other hand and pull up on the swingarm to compress the suspension more, to the point of making the belt as tight as you can. Now you should just be able to touch the bottom of the swingarm with the belt. You may all think I am crazy, but I think this is probably even a slightly looser adjustment than as listed above, I personally believe the belt on a tuber should never be so tight that there is zero slack, ever. These, I would hope is obvious, are strictly tuber procedures. (Message edited by bigblock on February 02, 2009) (Message edited by bigblock on February 02, 2009) | ||
Sokota |
interesting , to tight primary can be the cause of the oil pump drive gear wearing. This post should be a "stickey" |