| Author | Message | ||
Henrik |
Jim: I was just quoting the price I got from Chicago myself. Sound like you got a great deal on those S2 bags. Henrik | ||
V2win |
Anyone here know if the lids will interchange with all years of the S3 hard bags? | ||
Dave |
No they won't John. '97 and '98 are one form while '99 and up are another. Your lids mate to the inside assembly by sliding them forwards or backwards with a dowel like connection. (true male/female connection?) '99 and newer connect with more of a tongue and groove. (Hmmm ... nevermind) DAve | ||
Josh |
John, They're goin' on ebay pretty reasonable. Oh, and the 99 parts manual lists the #s for the 98 lids. the 00 manual has it correct. Josh | ||
Whybhi |
Could anyone show me a close veiw of the mount to the breadbox and leg fairings for an s3t. Got a set that don't seem like they are right. Thanks Brian | ||
Dave |
Brian ... did you get your pictures of the bread box mount? DAve | ||
Whybhi |
yes got a pic sent to me. Thanks | ||
Jerome |
I've finally abandoned the idea of installing S3 bags and mounting hardware on my M2. I had great help from some of you, sending me pictures to understand how is mounted the system on S3 and how one could adapt it to an M2. But the result is a system which is not so easy to remove when unused, and aesthetically speaking, it's not paradise... Therefore, if one of you wants to jump on a great bargain, here we are : the two S3 bags are still for sale, at the great price of 229 Euros (about 200$) + shipping. The seller is Milwaukee Twin, Buell dealer in Metz, France. Phone : +33 3 87 36 99 99 (ask for Gilles Slivinski), fax : +33 3 87 75 25 08. The bags are from a 97-model. They are in great shape, green, with the soft inner luggages provided. | ||
Jerome |
I forgot to say that they have the deep cover. | ||
Grndplane |
Is there anything made for X1's, Bags, or racks? Thanks -Mike | ||
Joem |
TheX1Files.com ...look under Misc for bags | ||
Shieldshade |
(Post deleted by admin.) | ||
Henrik |
S3T bags on S2: I got the brackets to use S3 bags on my S2, and have just mounted the bracket. Fits well and doesn't look too obtrusive. Bike looks better without it, but it ain't bad. The turn signal brackets and relocation however are badly under-engineered - unless I'm not reading the directions right. The brackets put the turn signals beyond the rear edge of the license plate bracket, but worse; it seems that they intend for the wiring to just get clamped under the bracket, run on the outside of the bodywork and then through the hole for the original turn signals. I think an additional hole for the wiring and a support/re-enforcing bracket on the inside of the mounting point would be a better solution - especially considering the price. I'll post a couple of pictures later. Has anyone else installed this kit - any good suggestions to improve the signal mounting? Henrik | ||
Dana |
Ok, Today I worked on my prototype 3 seat pan / tag mount. The first two were destroyed by vibration. Good thing I don't do this for a living. I used the wrong type of aluminum on proto 1 (one year lifespan). 5052 aluminum was used on proto 2 with a backing plate from the seat pan (two year lifespan). Proto 3 has thicker aluminum for the tag mount and an ever so gentle radius bend. If this doesn't work I'm going carbon fiber and damn the cost. Here for your enjoyment are some pictures: 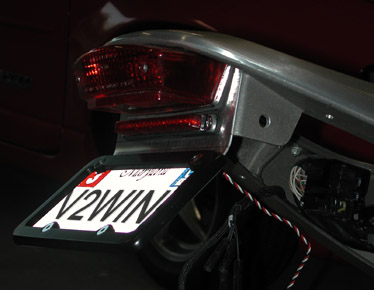 As you can see I added a LED light bar to let people know I'm stopping (it also has a running light mode). Now this next picture is TOP SECRET! Since part of the seat pan was cracked I had to add another piece. 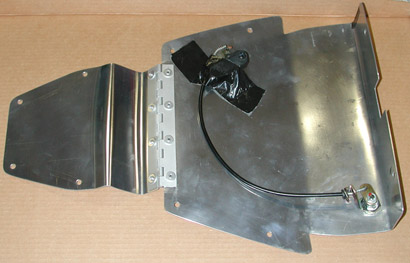 Thinking back to a post on this very site, someone asked, "How do I release the seat after my cable broke?" I remove my tag and... 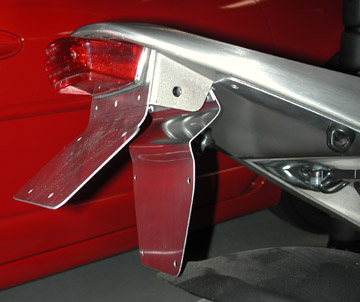 Viola! I have access to my seat release and I can play with the back of the brake light and turnsignals without removing the seat pan. Also it was one less bend I had to do. I hope you guys aren't giving me the same look I got from my wife. 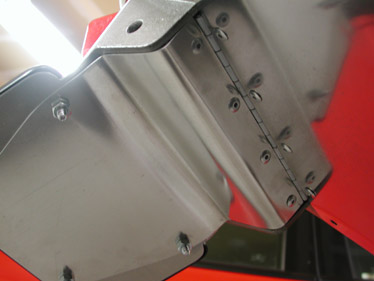 Look! RIVETS! Tomorrow, I'll finish up with another piece and some paint. Culater Dana out. | ||
Kahuna |
WOW! That is very impressive.  Are you using a Dremel to form your pieces? | ||
Dana |
Kahuna, I used mat board to make my templates (lightly score the back of the bend with a knife to make a clean bend). Once you have the basic shape transfer that to the aluminum. I use a jig/saber saw to cut the aluminum. A variable speed saw makes for a steady cut. The aluminum I used for the seat pan is .065. The Dremel would take for ever with that. I tried a little grinding wheel to clean up an edge but the aluminum just clogs up the bit. It would be nice to have a break (? metal bender) bending the aluminum but I've managed with a work table, 2x4 and some clamps. Another tricky part is judging were the bend will end up when you finish the bend (mat board is easier, unfortunately it doesn't hold up well to weather). I had a thought once I finished up my project yesterday. If you have a WORKMATE (work table with a clamp like top) that would make a nice bending table. Next tool is a belt sander, cleans up that nasty edge from the saber saw very quickly. It also helps you round off corners and tweak your design when it doesn't fit. After all that I use an orbital sander to finish up the edges (belt sander is too hungry for this). I'll use the orbital on the whole piece if I'm going to paint it. The paint sticks pretty good to the aluminum, even without primer. I didn't paint the bottom of the seat pan so it would blend with the tail section, a good thing too because road debris coming off that rear tire sand blasts it. I�m trying .090 aluminum on that piece the tag is hanging from. Hopefully I won�t have to repeat this thing again. That V twin has a veracious appetite. I think back to my FJ1200 (4 cylinder) and the fender eliminator I ordered for it. It was just this thin piece of stainless steel. That�s when I said, �Say I could make this thing�....� Dana out. | ||
Reepicheep |
This may sound stupid (would not be the first time), but what would happen if you took your matboard prototype, dropped it in a gallon of polyurathane (deck sealer or something) and let is soak for about 10 minutes, then pulled it out and let it drip dry? | ||
Bertsdirt |
Dana, That looks great. I've been wanting to do something similar myself. I know how to woodwork, but metalwork is new to me. I just can't see spending the money that the aftermarket suppliers want for their fender elimination kits. Yours looks real professional, whenever I do it, I hope mine looks as good. Reepicheep, I was roughly thinking the same thing. I've thought about making the fender kit with some type of cardboard or foam, and then fiberglassing it. Or Carbon Fiber if I can get some documentation of how to do it. It should be just like fiberglass, but I don't know for sure. Kevin | ||
Hans |
Aluminum is easy to file. If you put plenty talcum powder on the file before, you can clean it out with any brush or a copper wire brush. Hans. | ||
Blake |
Dana: Stainless Steel sheet is WAY stonger/tougher than aluminum sheet, especially 5052 (a not so strong Al alloy). Recommend you try stainless steel. Fatigue is what is killing you (generated by vibration induced bending stresses). The thicker sheet may also do the trick. Very nice work. Bill: Dipping paper into resin won't yeild a durable or strong enough material. Covering the paper with a fiberglass or CF fabric and resin might work well enough though. | ||
Bomber |
Hans . . . . .talcum powder works great, but it kept absorbing moisture in my garage and being difficult to get out of the can . . . . . .I switched to using chaulk .. .. . . . | ||
Road_Thing |
Dana: For bending sheet metal, try using two pieces of 2" angle iron clamped together to form a "T" shape, with the metal to be bent sandwiched between the two legs forming the upright of the "T". You can clamp the whole assembly to a workmate or to your bench, then form the bends pretty accurately on the outside angles of the iron. It's a po-boy brake, but it works for me! r-t | ||
Dana |
I finished up the Tag bracket project last night and it was fighting me most of the way. 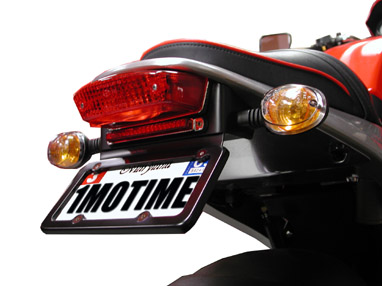 [You know it's hard to take a picture around a license plate with a flash.] TIP: before you paint something, preassemble the parts first to make sure everything fits together. Then you won't have to worry about scratching the paint as you modify it. One of the nice chrome screws that came with the tag frame must have been a anti theft device. I was taking one of them off to make some adjustments and the nut just froze on the screw. Wouldn't budge either direction. Pissed me off. I had to drill it out to remove it!! I forgot which color wire went on which tab of the brake light. Hey, it's a 50/50 shot. I was never very good at gambling. As I was swapping them the bulb contact/connector pulled out of the light assembly. SHEESH! Remember that hinge I put on the back of the seat pan. Wellll that left me almost ZERO tolerance to put he nuts back on the seat retainer mechanism. It did fit though, I planned that. SHAAA! THEN when I was testing out the brake light I discovered that my front brake switch ceased to function. I was able to "fix" it last time with some WD-40. Apparently not a long term fix. I drilled out the 3 little spots that held the switch together and cleaned the contacts with a Dremel wire brush. I just dropped some epoxy in the drilled holes and put it back on the bike. Of course all of that rushing was for naught because it has been raining all day today. I also wanted to evaluate my PRO PAD (gel like whoopee cushion). It doesn't look too bad on the bike, But maybe I'll just stuff it down my pants before a ride. Dana out. | ||
Henrik |
Dana: sweet looking job. Let's know how it holds up. Maybe you could scan your cardboard templates and post them here with some measurements on them? You'll like the ProPad. I surgically implanted one in my S3 seat - worked great. 6-700 mile days with no *rear* pain. Henrik | ||
Brentx1 |
Since we are on the topic of fender eliminators, here is a pic of mine. 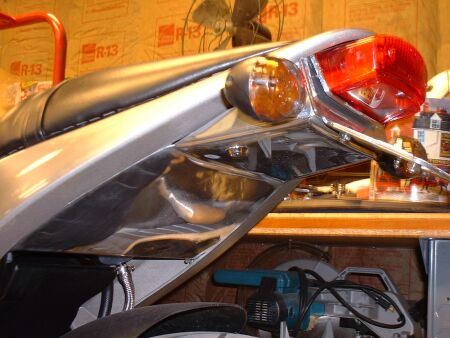 | ||
Blake |
I'm not familiar with the X1 tail. I'm wondering... why the hinge, why the two pieces backing the plate, and what is the cable for? Blake (ignorantbutcurious)  | ||
Dana |
Blake, I put the hinge in because my original seat pan cracked right across that area. I didn't want to remake the WHOLE thing. And it allows me access to the brake light and turnsignal bolts. Having the seat pan flush with the tail section doesn't leave you a lot of room at the rear end. 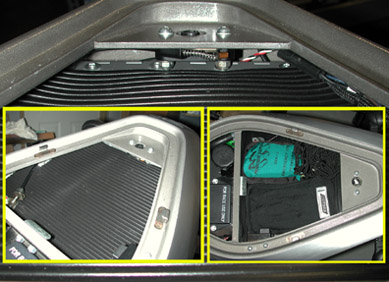 ________________________________________________ Which reminds me BRENT(X1) is that tail piece of yours all one piece? And how do you get to the bolts on your turn signals and tail light? ________________________________________________ I used the two pieces for my tag because on prototype 1 & 2 I had a one piece design and they both cracked right at that compound bend. And I like the smooth wrap around piece behind the turn signal brake light. I guess I could have tried to bend that .090 aluminum as one piece but that would have been a muther. 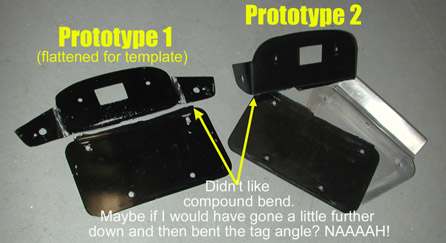 Now when the tag bracket cracks I can just replace that with another piece, and another, and another.........HELP ME!! Blake, I went with aluminum because it's easy to work with and there is an aluminum place right down the road. A guy at work recommended 5052 because it was easy to bend (less stress on the bend area?). The cable is the keyed seatlock mechanism. 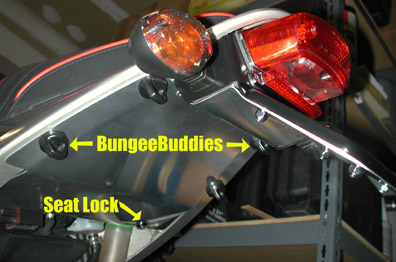 Dana out. |