| Author | Message | |||
Mikej |
Might as well start a pseudo-KV here, which may be redirected to the main KV section. What "special tools" have you found reference to in the H-D service manuals that you either found a public tool source for or have found a different tool to do the same job with? Currently I'm replacing a saddlebag latch and need a rivet set tool of some sort. The instructions that came with the replacement latch kit calls for a rivet tool, part number HD-39787. Does anybody have a pic of this rivet set tool or know of a suitable alternative? Thanks. I'm also playing with the CB radio and there's a whole slew of special testing tools to diagnose it. I may just remove it, hardwire the rear speakers to the front speakers, and rig up a lock pouch or mini glove box on top of the tank where the CB assembly sits.
| |||
Jackbequick |
It is in the V-Twin Mfg. tool catalog: http://www.vtwinmfg.com/Catalog1/VTwinCatalogIndex1.htm 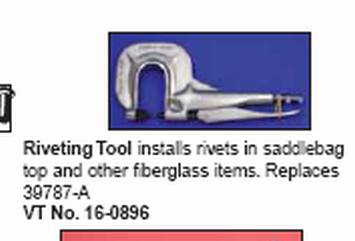 Units per Pack: 1 List Price: $405.27 In Stock Now! I guess that price explains this thread, doesn't it? Jack | |||
Mikej |
Thanks for the pic and link. I was thinking of just taking the saddlebag lid into a local dealer and seeing what they'd charge, looks like two good squeezes would do it, not sure how hard they'd squeeze my wallet to do it though. $400 for a fancy set of vice grips seems a bit steep. I think I can find a tool at the bicycle shop and maybe use a BB for a forming anvil. Or maybe I'll dig around here and see if I can find a big set of channel locks. Good link. I'm going to spend some time rummaging around on it, thanks. | |||
Pammy |
It almost looks like a chain breaking/pressing tool doesn't it? | |||
Mikej |
Yep, but the one above has a deeper throat: http://www.parktool.com/products/detail.asp?cat=5& item=CT%2D2  | |||
Rich |
I've used one of the HD tools before, a tech friend had one. I think a person could make a tool out of a cheap c-clamp or a welding-style vise grip, from a garage sale. That's my plan, if mine start rattling again. | |||
Oldskoolef |
We have that tool where I work. It has different types of interchangeable anvils. We don't have the right ones to set the rivets or I would have used it for my saddlebags when I painted them. We use it to set snaps. I ended up using regular pop rivets. | |||
Mikej |
Hey, a snap setter, good idea, I'll have to check at some fabric stores too. Were you able to find a pop rivet with a small enough head on it? (Hmmm, where did I put my pop rivet gun last time I used it a few years ago, another hunt I'm afraid.) | |||
Pammy |
http://www.moto-chains.com/site/898528/page/567225 This is the kind of chain breaker riveting tool I was talking about. YOu might see if you can rent the tool from someone. Hell, we have loaned a couple of our specialty tools to upstanding customers. | |||
Pammy |
http://www.aircraftspruce.com/menus/to/rivettools. html Look at this site. | |||
Mikej |
Ah, Aircraft Spruce & Specialty, got one of their older catalogs at home. Forgot all about them. Visited their store once while I was still in SoCal and thinking of home-building an airplane. Thanks. I'm going to be a riveting fool when this is done, the riveting personality I'll have to work on later.  | |||
Mark61 |
Find your self an OLD old time mechanic or farm shop. They used to reline brake shoes and have stand mounted rivet punches. I see these kind of tools for sell all the time at flea markets and auctions. mark61 | |||
Mikej |
About 6 years ago while out west helping clear out some of my dad's stuff there was an ancient rivet press that was given to a new indirect relative who happens to live a half-day drive up north from here in WI, you just reminded me of this. The thing stood about 5'-6' tall and weighed a bit too heavy for one guy to handle easily. Huh, now I've got a use for it, small world. | |||
Jackbequick |
Another option might be to use a air chisel and a hand buck (two sets of hands would be needed). Get a cheap round pointed chisel and grind it to the a shape that will match a rivet that is already deformed or installed. Then make the "buck" out of a short piece of round bar stock. Grind one end to a shape that will match the head or other end of the rivet. Then drill a hole in a heavy steel block and put the buck in it. Vary the air pressure to control the stroke on the air chisel and peen the rivet into place. This is similar to a process used in building and repairing aircraft. Used in areas where the front and back of rivets cannot be reached with a jaw type or one piece riveter. Jack | |||
Jackbequick |
Here is what worked for me for driving the seals in on my 39mm damper rod type fork tubes on my '97 FXD: 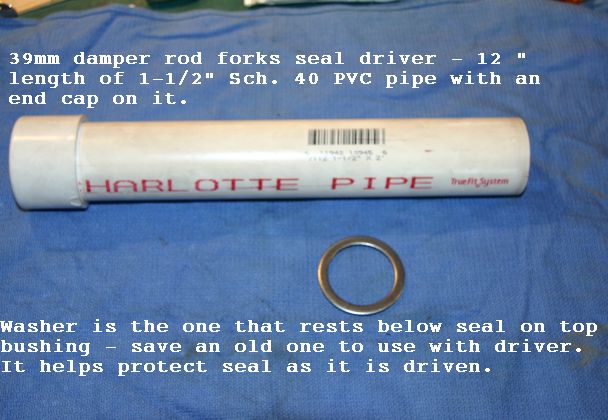 12" of 1-1/2" Schedule 40 PVC and an end cap. Sharp corners gently rounded with emery cloth to smooth them. The metal washer is the one that goes under the seal and rests on the upper bushing. Those usually come in the kit with new seals and bushings so you can save one to use for installing the seals. Laying the washer on top of the seal spreads the load as you drive the seal. Seal goes in with the spring side up I did mine holding the collapsed, drained, tube and lower vertically, resting on a rag on the bench for padding, dropped the PVC over the upper tube and down against the (lubricated with fork oil) seal and washer, and it only took a few gentle blows from one of those big black plastic non-rebounding hammers to seat the seal. You know the seal is seated if you can put the snap ring retainer in. The dust seals will press in by hand, the PVC can be used if you want. The upper bushings (copper plated metal, Teflon lined, and not seen here) are supposed to be either light press in or drop in fit. On mine, one was pressed in with a piece of wood dowel. The other would not go it and I suspect the bore in the (brand new) lower was slightly undersized. I wound up adjusting the end gap on the upper bushing until it will tap into the bore. I did that with a piece of heavyweight 300 grit emery cloth folder in half. I slipped it into the gap, and it took about 200 or so strokes up and down the sheet to remove enough metal to get it to fit. I got the new lowers (genuine H-D OEM replacement parts) new in the box from a third party. If I had got them from a dealer I would have exchanged them because of the miss-sized bushing bore. Instead I fixed it. Jack | |||
Jackbequick |
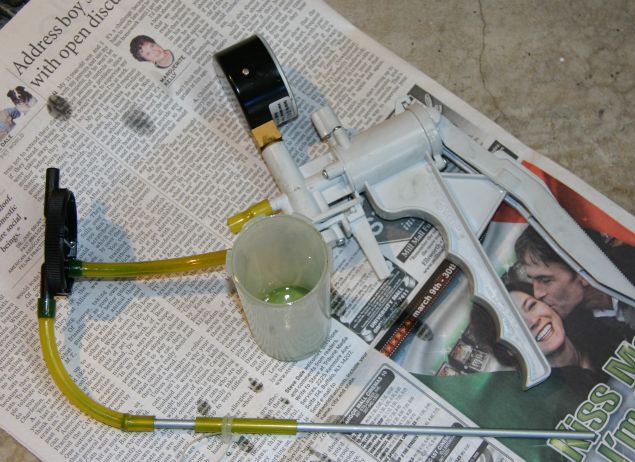 My home made fork oil level gage and a MityVac vacuum tool. In installing a Race-Tech Gold Valve Emulators and springs kit in my '97 Dyna FXD, the procedure sheet called for measuring the height of the installed fluid to set the level instead of measuring the volume of the fluid. I got a 24" or so 3/16" steel brake line from the auto parts store and cut it in half. I filed the cut off end square and smooth and deburred the inside of it. The yellow tube is silicone chain saw fuel line tubing (1/4" I.D.). I slipped a piece on and set it so that from the bottom of the fuel line to the end of the metal tube is the height needed (160mm). I fixed it in place with a small cable tie. Put another cable tie on the upper piece of tubing too to prevent suction leaks. Level is set with emulators in, springs out, and tube collapsed or lower full up. I did this with the tubes and lowers fully assembled and mounted in the triple trees, the lower was held full upward with a bungee cord. I added fluid (13 ounces of BelRay 15W fork oil). Then I held the gage with the bottom of the fuel line even with the top of the fork tube and fired up the MityVac. It pulled about 2 ounces out and I quit when I heard the slurpee noise. Always check to see if you put the drain screws in before you put fork oil in. Unless you want to waterproof your shoes with fork oil. Jack | |||
Jackbequick |
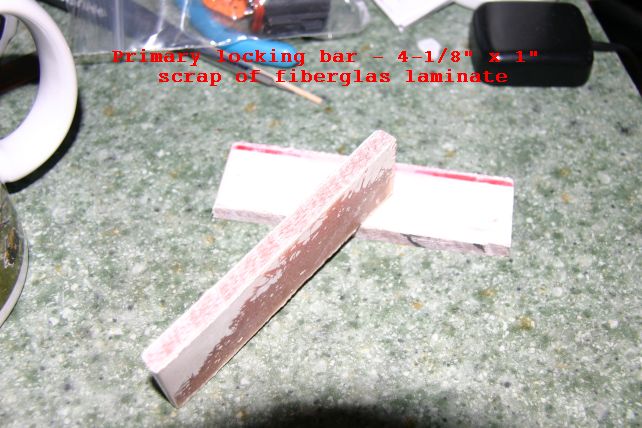 This is for the Sportster/Buell XL engines. This are primary locking bars made from fibreglas scrap from a boatyard. They are about1/4" thick, 1" wide and 4-1/8" long. Use a coarse file to round the ends a little where they fit into the crankshaft and clutch basket sprockets. Jack | |||
Ratbuell |
I just use plain ol' 2x4 or 1x4 for a primary locking tool. Just make sure to get the slivers out before buttoning everything back up! |