G oog le BadWeB | Login/out | Topics | Search | Custodians | Register | Edit Profile

Buell Forum » Big, Bad & Dirty (Buell XB12X Ulysses Adventure Board) » Archive through May 06, 2010 » HID Install « Previous Next »

  Thread Last Poster Posts Pages Last Post
Archive through April 20, 2010Xb12xmike30 04-20-10  11:35 am
         

Author Message
Top of pagePrevious messageNext messageBottom of page Link to this message

Slowride
Posted on Tuesday, April 20, 2010 - 11:37 am:   Edit Post Delete Post View Post/Check IP Print Post    Move Post (Custodian/Admin Only) Ban Poster IP (Custodian/Admin only)

xb12xmike...

all I see is red X's
Top of pagePrevious messageNext messageBottom of page Link to this message

70_west
Posted on Tuesday, April 20, 2010 - 11:50 am:   Edit Post Delete Post View Post/Check IP Print Post    Move Post (Custodian/Admin Only) Ban Poster IP (Custodian/Admin only)

I did the 35 watt route, exactly the same as Slow... 'cept placed the horn on the opposite side. Amazing difference over the old lights and an easy install for anybody considering.

Jack
Top of pagePrevious messageNext messageBottom of page Link to this message

Xb12xmike
Posted on Tuesday, April 20, 2010 - 12:11 pm:   Edit Post Delete Post View Post/Check IP Print Post    Move Post (Custodian/Admin Only) Ban Poster IP (Custodian/Admin only)

I did get annoyed alittle and wasted time figuring out the various instructions I had. (2-3 from badweb, and the basic kit instructions) I had to hard wire the headlight harness, (I messed up the connector trying to push the pins out) That was supposed to be a 15 min. mod. (LOL) I had to ADD 6in. to each wire so I had enough slack to make the connection. (everything soldered/shrinkwrapped of course) Would have been easier just to cut it out. I also pulled the ground and power wires from the kit going through the new dustcaps so I only have the 2 ballast connectors coming out of the headlight dust covers. (why they did that??) They connect Ballast to the relays. But that didn't happen till I figured out how I was gonna wire it all. Trial and error is bad for electrical work. LOL. Live and learn.

Someday I will reopen my lid an tidy up the wiring like yours Slowride. I have a ground wire for the ballast, one from the existing headlight wiring and another from the relays. LOL. The rest looks good.
Top of pagePrevious messageNext messageBottom of page Link to this message

Mnrider
Posted on Tuesday, April 20, 2010 - 02:01 pm:   Edit Post Delete Post View Post/Check IP Print Post    Move Post (Custodian/Admin Only) Ban Poster IP (Custodian/Admin only)

The only real problem I had is after I had it tore apart I could not remember which was the high been and which was the low beam.
Top of pagePrevious messageNext messageBottom of page Link to this message

Xb12xmike
Posted on Tuesday, April 20, 2010 - 02:38 pm:   Edit Post Delete Post View Post/Check IP Print Post    Move Post (Custodian/Admin Only) Ban Poster IP (Custodian/Admin only)

hehe...yea... my final test, I had it all connected and and all wires soldered and sealed up with everything just hanging out all over, Then I shut it down and I tried to make it more neat and ended up switching the ballast cabes by accident. Eh...still worth the pita.


(Message edited by xb12xmike on April 20, 2010)
Top of pagePrevious messageNext messageBottom of page Link to this message

Rwcfrank
Posted on Friday, April 23, 2010 - 06:25 pm:   Edit Post Delete Post View Post/Check IP Print Post    Move Post (Custodian/Admin Only) Ban Poster IP (Custodian/Admin only)

I just received my kit, from what I have read I can either cut off the old H7 plug in for the old bulbs or plug the spades that come with the DDm kit into the plug. Is that right?
Top of pagePrevious messageNext messageBottom of page Link to this message

Xb12xmike
Posted on Friday, April 23, 2010 - 08:20 pm:   Edit Post Delete Post View Post/Check IP Print Post    Move Post (Custodian/Admin Only) Ban Poster IP (Custodian/Admin only)

I didn't know about that!! (if it's true) But I cut the old H7 plug for the bulbs AND the 2 spades (male) off the kit and soldered and shrink wrapped new female spades to make the connections to the new relay.
Top of pagePrevious messageNext messageBottom of page Link to this message

Xb12xmike
Posted on Saturday, April 24, 2010 - 10:26 am:   Edit Post Delete Post View Post/Check IP Print Post    Move Post (Custodian/Admin Only) Ban Poster IP (Custodian/Admin only)

I got my relay's from Americansportbike.com
http://www.americansportbike.com/shoponline/ccp0-p rodshow/16074.html

I've used relays before for headlights in my car, it nade the lights ALOT brighter. The juice come direct from the battery to the lights (thru the relay) instead of thru the original harness and switch.
Top of pagePrevious messageNext messageBottom of page Link to this message

Rwcfrank
Posted on Saturday, April 24, 2010 - 06:16 pm:   Edit Post Delete Post View Post/Check IP Print Post    Move Post (Custodian/Admin Only) Ban Poster IP (Custodian/Admin only)

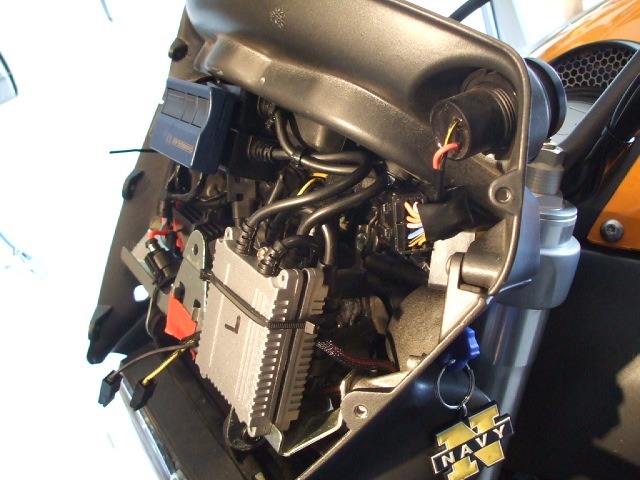
Got the low beam all wired up and it works awesome. Have to wait till Monday to go for a ride and get it aimed. Sure makes the old high beam look dim. Install was a lot easier than I thought it would be. Along with the auxillary light relay and voltmeter its gettin very tight under the sheild but I think the high beam is next...
Top of pagePrevious messageNext messageBottom of page Link to this message

Alchemy
Posted on Saturday, May 01, 2010 - 09:04 am:   Edit Post Delete Post View Post/Check IP Print Post    Move Post (Custodian/Admin Only) Ban Poster IP (Custodian/Admin only)

I installed 35 watt high and low. I ended up bundling the flat square DDM ballasts together and wrapped in a piece of inner tube. My concern is heat. I am not sure how hot these may get. I don't want them to melt the inner tube - yuck. I think this should work but if anyone has noted that they get very hot I would like to know that.

Also, they both work but the high beam buzzes a little while warming up.

Now I have to decide how to keep the low bean on all the time. I think I will bridge the line at the grip switch.
Top of pagePrevious messageNext messageBottom of page Link to this message

Froggy
Posted on Saturday, May 01, 2010 - 10:31 am:   Edit Post Delete Post View Post/Check IP Print Post    Move Post (Custodian/Admin Only) Ban Poster IP (Custodian/Admin only)

They get warm, but not hot. I don't think melting is an issue, but I wonder if they will get a little hotter than normal due them being enclosed like that vs being able to radiate easily to open air.
Top of pagePrevious messageNext messageBottom of page Link to this message

Alchemy
Posted on Saturday, May 01, 2010 - 11:29 am:   Edit Post Delete Post View Post/Check IP Print Post    Move Post (Custodian/Admin Only) Ban Poster IP (Custodian/Admin only)

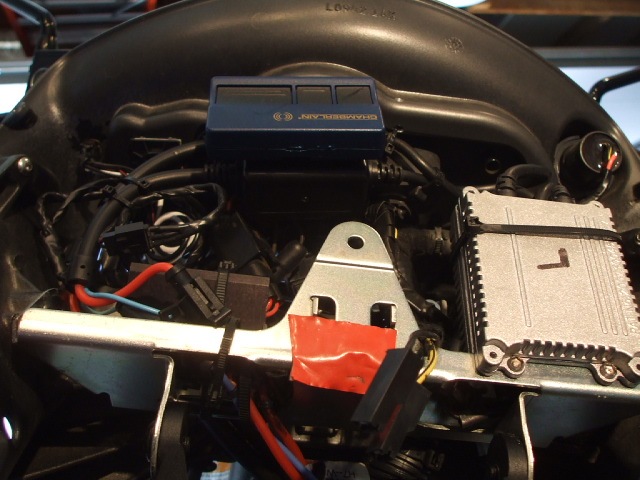
I separated them slightly with an air gap and held with wire ties. Then wrapped in a sheet of rubber (from the inner tube) and wire tied them again. There is some ventilation but less than ideal. I feel they are protected from vibratory damage with the rubber.

I am hoping that they will run for a LONG time without attention. I allowed for a return to the regular bulb in an emergency so I can take a couple of them with me on trips where lights might be critical.

I took a lot of pictures I just have to review how to reduce them and post them up AND find the time to do it.

Now to working on keeping that low beam on all the time.
Top of pagePrevious messageNext messageBottom of page Link to this message

Ronmold
Posted on Saturday, May 01, 2010 - 03:27 pm:   Edit Post Delete Post View Post/Check IP Print Post    Move Post (Custodian/Admin Only) Ban Poster IP (Custodian/Admin only)

Blue wire that goes to the left handlebar control cluster. Dig it out of the harness, yes you have to cut some of the sheathing, use that for the low. That wire comes from the lighting fuse.
ballast mounting:


(Message edited by ronmold on May 01, 2010)
Top of pagePrevious messageNext messageBottom of page Link to this message

Froggy
Posted on Saturday, May 01, 2010 - 04:37 pm:   Edit Post Delete Post View Post/Check IP Print Post    Move Post (Custodian/Admin Only) Ban Poster IP (Custodian/Admin only)

Or you can just pin swap at the headlight harness like everyone else :P
Top of pagePrevious messageNext messageBottom of page Link to this message

Ronmold
Posted on Saturday, May 01, 2010 - 09:42 pm:   Edit Post Delete Post View Post/Check IP Print Post    Move Post (Custodian/Admin Only) Ban Poster IP (Custodian/Admin only)

Oh sure, do it the easy way! The benefit of the pin swap is that you do have 2 fused circuits in case the HID electronics were to fry, you'd still have H beam.
Top of pagePrevious messageNext messageBottom of page Link to this message

Alchemy
Posted on Sunday, May 02, 2010 - 09:44 am:   Edit Post Delete Post View Post/Check IP Print Post    Move Post (Custodian/Admin Only) Ban Poster IP (Custodian/Admin only)

Of course when you move the low beam via the pin swap now you have to remember that the call out for the fuses must be changed. If the ballast fails then you "might" blow fuse 8 (10 amp) on the accessory line and not the indicated fuse 5 (15 amp) for headlamps (now hi beam only).

My experience with ballasts is that they more often fail open (killing the lamp but not blowing the fuse) rather than as a short that would pop the fuse. But I have no direct experience with these ballasts so that experience is likely useless.

None of these mods is without the potential for added confusion. I think I am going to go with the left hand switch gear bridge between the blue and yellow wires since I am familiar with soldering. If I had the proper tool for pulling the pin then I "might" go that way but I don't.

I will mark the bridge with red so it can be easily identified and snipped to return to normal if needed.
Top of pagePrevious messageNext messageBottom of page Link to this message

Ronmold
Posted on Sunday, May 02, 2010 - 10:49 am:   Edit Post Delete Post View Post/Check IP Print Post    Move Post (Custodian/Admin Only) Ban Poster IP (Custodian/Admin only)

Instead of pulling the pin just cut off that connector. I still think the 1 ground pin in that connector is inadequate to handle the current of both lights on and has been a known meltdown problem. Although many have used it successfully some have not. The HID's already have a disconnect and you just don't need a connector going to a connector.
Top of pagePrevious messageNext messageBottom of page Link to this message

Slowride
Posted on Sunday, May 02, 2010 - 12:36 pm:   Edit Post Delete Post View Post/Check IP Print Post    Move Post (Custodian/Admin Only) Ban Poster IP (Custodian/Admin only)

The pin swap also caused my 09xt to turn on one of the HIDs when you turn the key all the way up to 11..... Awesome!
Top of pagePrevious messageNext messageBottom of page Link to this message

Hangetsu
Posted on Sunday, May 02, 2010 - 03:10 pm:   Edit Post Delete Post View Post/Check IP Print Post    Move Post (Custodian/Admin Only) Ban Poster IP (Custodian/Admin only)

When ever I get around to installing mine, I plan on sandwiching a thin sheet of neoprene between the two ballasts to give them a little vibe protection. Anyone know if the ballasts get warm enough to cause any melting or smoking problems with neoprene?
Top of pagePrevious messageNext messageBottom of page Link to this message

Ronmold
Posted on Sunday, May 02, 2010 - 03:40 pm:   Edit Post Delete Post View Post/Check IP Print Post    Move Post (Custodian/Admin Only) Ban Poster IP (Custodian/Admin only)

2 faced foam tape works good also between the units, a smaller piece still allows airflow.
« Previous Next »

Add Your Message Here
Post:
Bold text Italics Underline Create a hyperlink Insert a clipart image

Username: Posting Information:
This is a private posting area. Only registered users and custodians may post messages here.
Password:
Options: Post as "Anonymous" (Valid reason required. Abusers will be exposed. If unsure, ask.)
Enable HTML code in message
Automatically activate URLs in message
Action:

Topics | Last Day | Tree View | Search | User List | Help/Instructions | Rules | Program Credits Administration