| Author | Message | ||
Okc99 |
I don't have the repair manual so I can't see how this is done. How specifically can you access the intake manifold to spray propane or carb cleaner on it to test for a leak? I found this picture on the web. Supposedly it's a thunderstorm, but may be a Harley. 1) I read one post that said remove the air scoop and you could see the intake. Well I did that and it's not true. I used a flashlight and a small mirror and still can see up there far enough to find this manifold. 2) I read another that said to remove the air filter. Well I removed all 4 bolts but I could not remove the big black panel that the air cleaner rests on. That big trombone-looking rubber thing in the center seems to be holding it down and I don't want to yank on it too hard cause it looks like it would be hard to get back in place. Are you supposed to just yank it off hard cause there are no more bolts to remove?! So how in the heck do you get to this sucker? What do you have to remove and which side is it facing (throttle side or clutch side) etc.  | ||
Thunderbox |
That is definately looking at the right side of the motorcycle you can tell because the push rod tubes are on that side and there is part of 2 of them in the picture. I am almost sure that is a Buell engine because the push rod tubes on the Harleys are chrome. Just above this you will see a small panel with 3 torex screws holing it on. Remove those screqws and you will be able to apply the propane to it. Make sure you are on a still air place so the wind doesn't blow the propane away. | ||
Okc99 |
Thunder, maybe I mis explained. Our v-twin is so well covered that I can't even see what we can see in the picture above. My question is what do we remove in order to see the intake? Is it the airbox? That's the only thing I can think of, but I can't get my airbox off because of what I explained above. | ||
Spacecapsule1 |
there's a clamp around the base of the velocity stack. you'll need to move the clamp then pull off the stack. 1st you need to carefully pull up the airbox base. pull it up just enough to unplug any electrical connections and pull the pcv hoses out.... also work it free of the velocity stack. | ||
Xbimmer |
You should seriously consider biting the bullet and getting the Service Manual. There are thousands of words and many good pictures and illustrations worth many many thousands of words. Taking things apart is easy compared with what info is required to put them back together, correctly. Just my $.02. | ||
Okc99 |
I give up. After an hour, I can't see anything more to disconnect. The only thing left is to tug like hell, and I know that's not gonna be good. There are no clamps are visible on top or underneath. I'm f'd. | ||
Okc99 |
They should produce a pdf, digital version of the manual. | ||
Johnnylunchbox |
The service manual doesn't really explain how to take the base plate off. It says "remove base plate" DAMHIK | ||
Spacecapsule1 |
okc99, what have u done so far? | ||
Okc99 |
I've done #1 and #2 in the first post above. | ||
Xbimmer |
Focus on the top lip of the V-stack that seals against the base plate. With one hand pulling up on the base plate push down with your finger on the lip to get it started, work it down and under the base plate opening for the V-stack. Work around the entire opening until free. At this point DON'T pull up too hard on the base plate, just enough to free the lip. Once free, then you need to deal with the breather hoses and Intake Air Temp Sensor. Lube up the hoses somehow and push them down through the base plate until free. I find it easier (if careful) to simply reach under then to pull the IAS down from its grommet. Putting it back together is not as simple, and take note of the height of the hoses' protrusion above the base plate, it's important. | ||
Tootal |
Leave the airbox alone. If you're testing for an intake leak, remove the left side scoop and the right side cover. Both are just under the frame/fuel tank. The picture above is from the right side. Leaving the air box on will keep propane/WD-40/Brake cleaner etc. from being sucked into the intake giving you a false reading. | ||
Ourdee |
Okc99, I think you are making it harder than it has to be. Look at the pic from the manual. 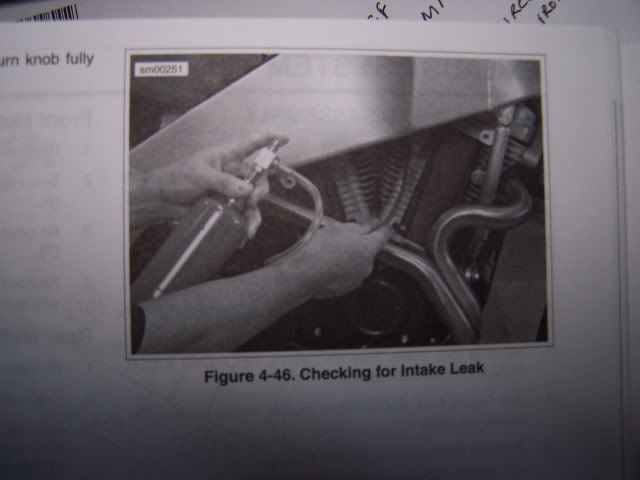 |