| Author | Message | ||
Upthemaiden |
In all the searching I did about swapping swingarms, I read plenty about either replacing the block, or filing down the original block to make the aluminum arm fit without limiting it's travel. I never really found a good description of what needed filed. Easy to tell by holding the two up next to each other, but if you don't have the new block to compare, it's harder to know exactly what needs done. Took this picture of the two just for future reference for anyone else doing the swap. The one on top is the original steel swingarm mounting block, the one on bottom is the new mounting block for an aluminum swingarm. 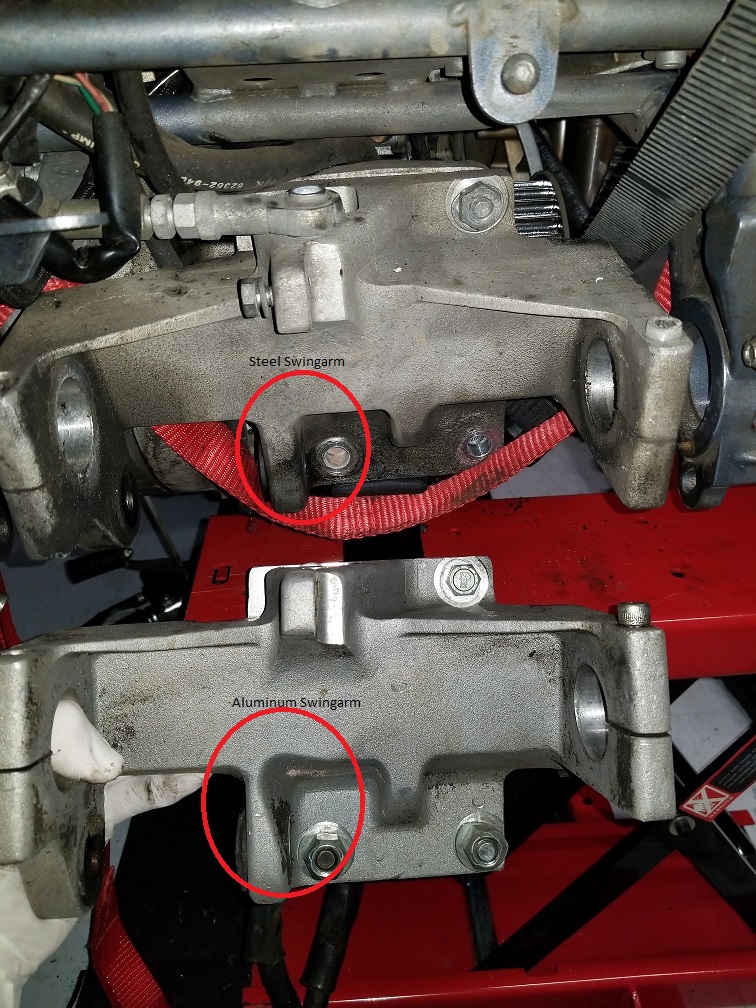 I had grand hopes of just unbolting the one block and bolting the new one in, swingarm still attached. Unfortunately there's no way to get a wrench on the top left bolt without dropping the engine, and you can't drop an S1 engine without removing the header, and under Murphy's law, you can't remove the header for a job like this, with studs that look like mine, without snapping at least one of them off. I've got enough work I wanna do to my bike before spring gets here, and drilling/tapping snapped exhaust studs didn't make the list, so it looks like I'll just be taking a grinder/file to the current mounting block to get this swingarm on. Anyway, hope the pictures help somebody. | ||
Oopezoo |
I swapped mine without dropping the motor. I remember that it took damn near forever to get all the bolts out and back in, but I managed to do it. | ||
Upthemaiden |
Do you remember what you used to get to that bolt that's tucked in behind the tie bar? It'd be easy to get to if it wasn't for the battery tray. The head of the bolt on the engine side I can get a ratchet on, it's the nut on the rear wheel side that's blocked in on 3 sides, and the frame is in the way of the 4th side. | ||
Oopezoo |
I'll take a look. I remember it being a PITA, but I don't recall using anything special. | ||
S1owner |
Two box end wrenches and 10 minutes of patients for that tiebar!!! The whole swap with cleaning is a two hour swap! | ||
Oopezoo |
Yeah.....I looked, I used a regular open ended wrench and a ratcheting box end wrench. It was a slow 1-2 clicks at a time, but didn't have any real problems with it | ||
1313 |
Man, back in the day we only had pictures in magazines... Check out the article 'Old dog...NEW TRICK | ||
Mike_lee |
This mod is definitely on my list. Thanks for the info Maiden. | ||
Upthemaiden |
"This mod is definitely on my list. Thanks for the info Maiden." Yup! I would've just waited till I had the time to pull my headers and deal with the studs, but my isolators are shot anyway, so it's worth doing while I'm in there. I'll try getting a wrench in there again, and decide whether it's more practical to try and get it out, or just take the die grinder and file to the old block. I'll take a look at that article too, thanks for the link! | ||
Upthemaiden |
You guys were right, once I found the right combination(I believe a 11/16" open box wrench and an 5/8 ratchet), dropped the engine down as far as I could without removing the header, and the bolt came right out. The scott-free tool I made folded itself in half when I was trying to get the isolators out(I'm guessing due to the end pieces having too big of a diameter compared to the threaded rod which gave it room to move arond, but I just made it with stuff I had laying around), but still held long enough for me to remove them. I picked up a new/thicker threaded rod and some washers and didn't have any problems this time while I was putting them back in. | ||
Oopezoo |
I'll still never understand that tool setup for removing the isolators. I mean, I understand the concept of it, but it just seems really unnecessary. I hung the rear of my bike from the rafters, unbolted the isos, then just put my foot on the top of the rear tire and yanked up on the tail section. It pulled right apart with no drama at all. Reassembly took a little more work, but once everything was properly lined up, it just slid right back together. I was expecting it to be a huge PITA. Turns out it was once of the easier projects I did. | ||
Upthemaiden |
That was my plan when I started this venture! unfortunately I realized it wasn't doable with the header still attached, and I wasn't risking touching those exhaust studs until I know I have the time to fix a snapped one. They were looking pretty nasty and I'm already gonna be cutting it short getting back on the road by spring. The tool ended up being really easy to use, so it wasn't a big deal. | ||
S1owner |
I was able to put a little teflon spray on the isos and push the frame back down over the motor with little issue. I actually have a harder time putting Isos in my X1 frame than I did on the S1 or M2 | ||
Oopezoo |
Ahh....yeah, my exhaust was sitting on my work bench when I did it, and that would certainly make a difference. Carry on  |