| Author | Message | ||
Upthemaiden |
The axle and look great currently. When I clean up my bike I'd really like to take all of the bolts to the wire wheel and shine them up, but I know that would just make them rust more unless I shipped them off to have the recoated. I've been wondering if anyone makes some kind of hardware coating kits you can buy to do at home... I wouldn't have a problem sending out hardware if it was all simple, but when it comes to a whole bike's worth of nuts and bolts that are all different sizes, I think shipping those off and trying to piece everything back together when you got it back sounds like a nightmare. | ||
Cyclone8u |
I'd love to know of a way to treat the hardware doable by the home mechanic - particularly ones working out of a shed  I've been trying to swap out what I can for stainless and hitting the cleaned up parts with WD-40 to keep them from immediately rusting again. Tonight I installed the new header gaskets and have been cleaning up the various exhaust mounting hardware. Flanges, before and after: 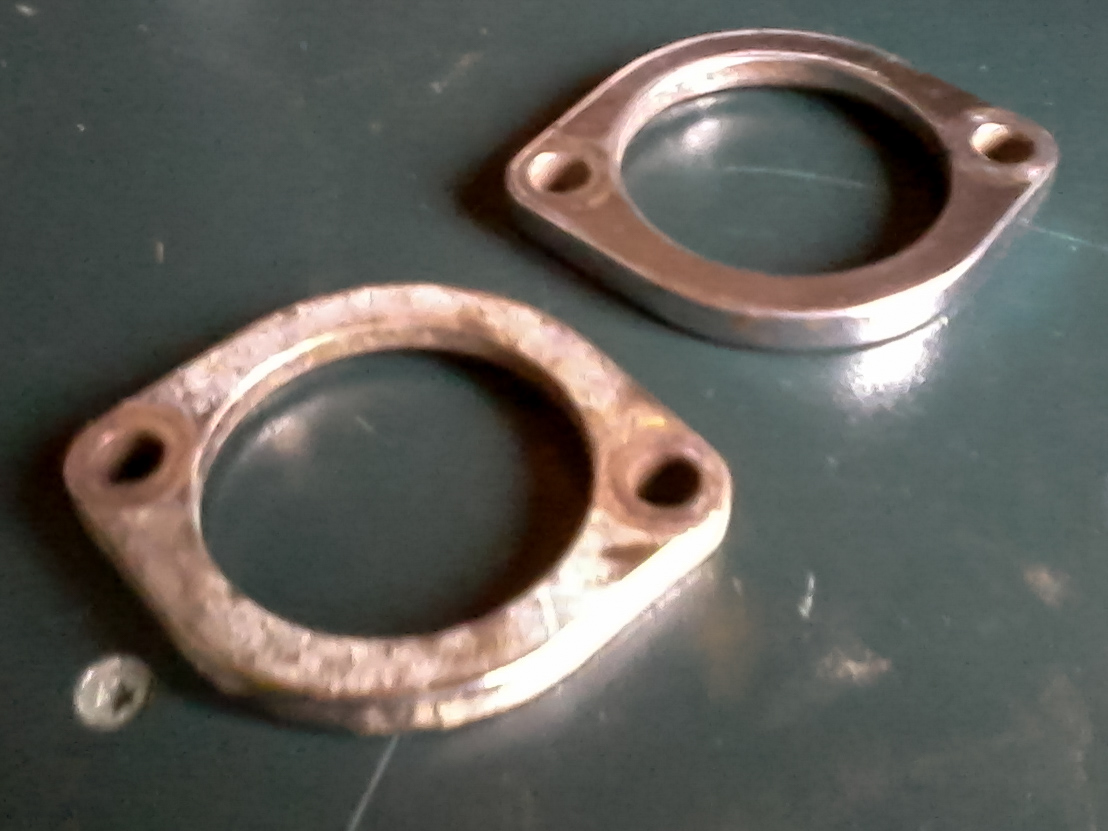 While the muffler was out of the way I addressed the rusting shock can: 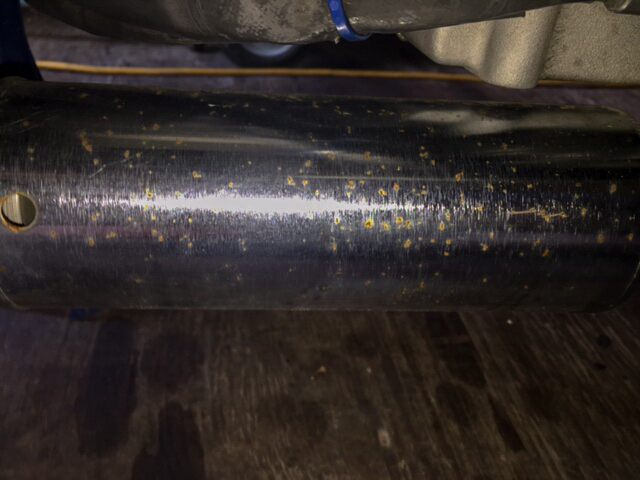 After some work with some 320 grit... 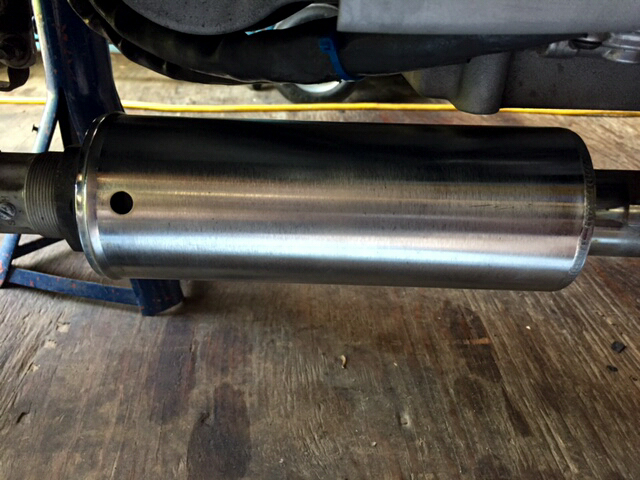 | ||
S1owner |
This is what was used on the raw aluminum airplanes in ww2. Its what I use on all my raw hardware and metal. Cheap does the job and easy  | ||
Hootowl |
How long does it last? Reapply after wash, or does it sort of soak in? | ||
S1owner |
Does not come off in water etc it drys like a coating of clear coat just clean and reapply as needed | ||
Upthemaiden |
http://www.jegs.com/i/UNKNOWN/352/10049Z/10002/-1? CAWELAID=1710660661&catargetid=1784159531&cadevice =c&&cagpspn=pla&gclid=CMHe5Zq16LoCFSNp7AodCXQAIA Appears there are kits, although I wouldn't be surprised with a little online research if you couldn't recreate the kit on your own for half the price. I'll definitely look into it when the time comes. | ||
Cyclone8u |
S1owner - school me a little more on this penatrol, I looked it up and it's supposed to be a paint additive. It sounds like you're using it straight up. I take it that it's clear. | ||
S1owner |
Now adays known as a paint additive but its original use was wiping on clear metal to protect it. In WW2 they found the paint on the planes were adding to much drag and weight slowing the planes down and lowering how much munitions could be on board so they stripped the planes to bare aluminum. But quickly realised the weather I/E salt caused very quick wear on the panels. So penetrol was the awnswer. You can wipe ut brush it or soray it. Drys gloss clear. Can be remover with acetone or similar but is pretty string stuff. I have had it on all my bare aluminum well over a year and it looks just like it did when applied. But if a recoat is needed simply clean as needed with acetone, degrease and apply a new coat. I was looking for a raw metal coating but not powder or paint as it allows the metal to corrode under it and this is the stuff I found but I had to dig and ask alot of questions! Any more info pm me as I dont want to clog up his build page  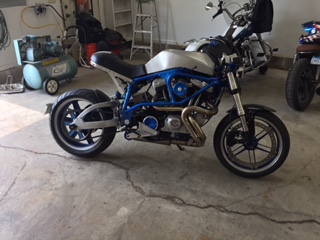 | ||
Hootowl |
Thanks Ken. On my list. | ||
Cyclone8u |
Back at it. At this point it's been a lot of time with small brushes, a crap load of rags and a metric shit ton of elbow grease cleaning all the various nooks and crannies that have 18 years worth of accumulated filth. I got the header gaskets in, gave the headers a thorough scrubbing with some 320 grit and cleaned up my beloved Borla (the best sounding pipe ever made for a Buell IMHO). I also discovered the throttle & return cables just starting to fray, so I ordered replacements of those. I replaced the fuel line and float bowl vent line as well since both had become hardened over the years. Borla before cleaning: 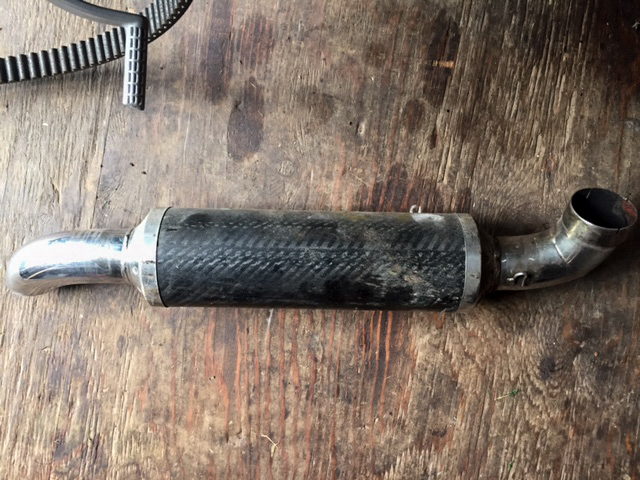 And after: 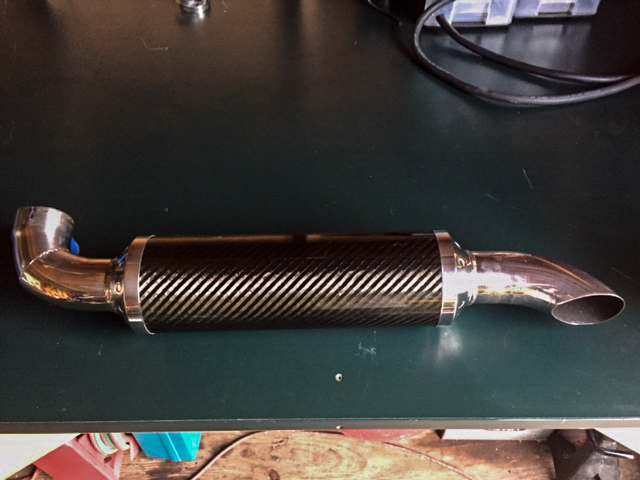 New cables lubed & installed, carb installed and exhaust hung. I polished up the rocker covers with some 0000 steel wool: 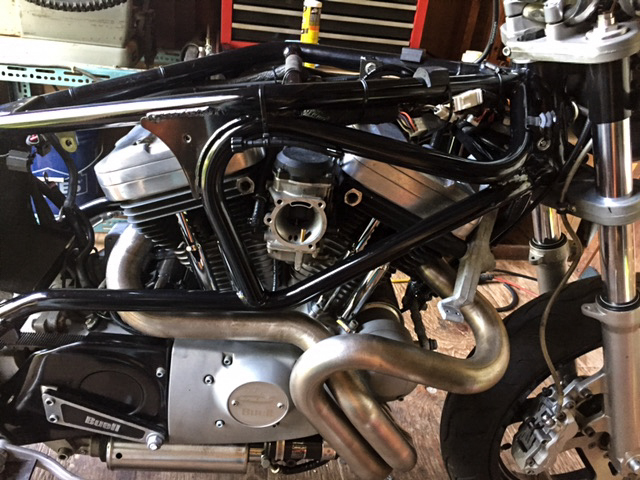 New plugs and wires: 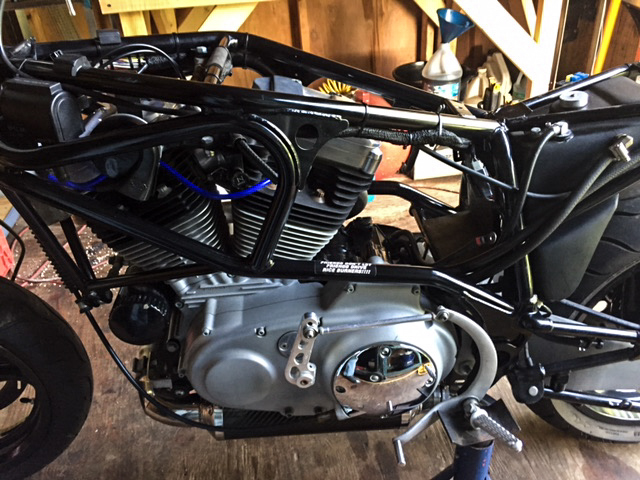 For those interested, the Taylor blue 8mm racing wires are an almost exact match to the blue streak paint of this era of Buell. This is starting to make me happy! It's looking less and less like a neglected farm implement I dug out of some derelict barn. 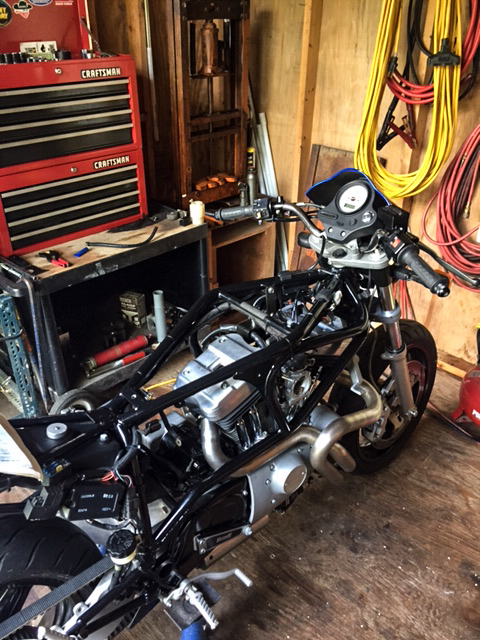 | ||
Cyclone8u |
I painted the fork cross bracket bolts & brake line holder black. Much better look I think. 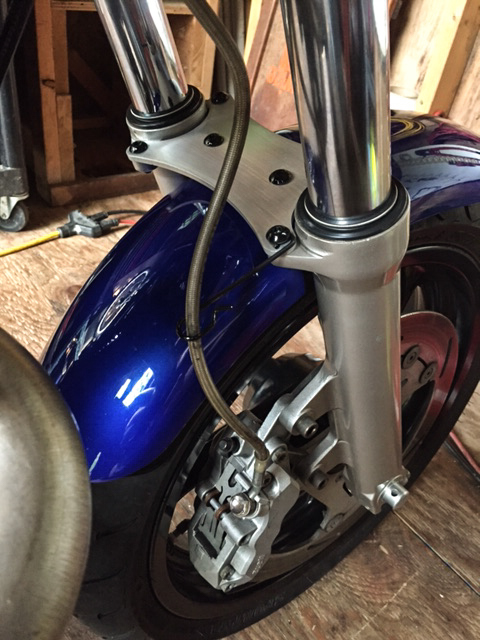 | ||
Ajturbo |
Looking great..!!!! | ||
Brother_in_buells |
Looks very nice! May i ask which billet alloy shift arm that is on your M2 ? | ||
Cyclone8u |
Hey Brother in buells, its from American Sport Bike. The plan is to replace the whole setup with the MC Moto-worx shifter when it becomes available for the M2 and my budget allows. | ||
S1owner |
Going to look great!!!! Plus one on the Mc MotoWorx shifter! It shifts So smooth!!!!!  | ||
Cyclone8u |
S1, I actually stole the idea from your build thread  On another note, mother of God! Every Buell owner needs this... http://www.a2stainless.co.uk/Buell-M2-Cyclone-Engi ne-Body-Frame-Forks-Kit_A65RM.aspx | ||
Cyclone8u |
I had some time off today, so I continued the cleaning/polishing routine. I got my banjo bolt so I put the intake together and routed my breather lines. The banjo bolt and fitting is actually a standard H-D part my local dealer hooked me up with. Not quite as nice a look as the hex screw head type discussed earlier, but it is the same standard 3/4" hex that the stock breather still mounted in the air box uses, so one less tool needed to disassemble. I had to loop the breather hose in the air box around the snorkel before exiting to keep it from kinking, whatever, no one will see it buttoned up. I am happy that the rear breather doesn't need to shoot out the side and get routed back under the frame, this is the clean look I was hoping for.  Of course, having it this far along, I just couldn't help myself. Yeah, that's right, I slapped the tank on, dumped some fresh 93 octane in and fired it up. You would too. It fired up immediately and besides the clacking of deflated lifters that eventually went away, sounded oh so sweet! Blipping the throttle from idle no longer results in coughs, farts and back fires, so the new James blue intake seals are doing their job. I shot some video, I'll try to figure out YouTube this weekend and post the link. So off with the tank and back to work... I'm still in need of a solution for my tail section, anyone try this one from AirTech? 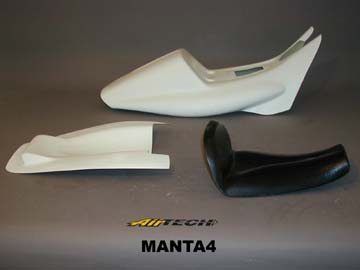 | ||
Brother_in_buells |
Some Ducati Monster tails look very good on the tubeframe buells to! Maybe that's a cheaper/better option!? | ||
S1owner |
Not a fan of the manta tail from airtech makes the rear look large and out of place. The duck tails take some frame mods to work so thatsxa no go.. Have you thought about shaping and formung your own? You clearly have the skills! | ||
Cyclone8u |
the manta tail from airtech makes the rear look large and out of place Kinda what I was thinking, that's why I wanted to see if anyone had gone that route. With the large tank on the M2 and the minimal bodywork on the front, my goal is to slim up the rear to give it a more bull dog look. The AirTech setup looks exceedingly large for a single seat solution, and for the money i can buy a brand new stock tail and keep the cushy seat if I'm not saving anything in the size department. While my fab skills may be up to the task, my right brain creative ability is severely lacking. That said, I may just start cutting up some cardboard to mock something up and see where it takes me. This could get interesting... | ||
S1owner |
Google burll m2 with airstrch tail there are a ton of images. Looks good when it is full fairing and painted in a way it accents correctly but otherwise thumbs down. Wrap the back with plastic wrap spray foam it shape your tail and use fiberglass or shape one out of metal | ||
Cyclone8u |
Alright, kinda figured out youtube, for some reason it's rotating the video 90 degrees from how it's shot. Anyway, here's the vid of the first firing, the lifters are loud but once she warmed up and they pumped up it was pure music. Second one is all warmed up with zero throttle hesitation. | ||
Cyclone8u |
Ok, I'll admit it, I like the breadbox. The first time I ever laid eyes on a Buell it was its inherent weirdness that got me going, and the breadbox just brings it to that next level - the asymmetric ugliness combined with the engineering brilliance of it. That said, I hate the crinkle coat finish on all the black pieces. My last one I refinished in high gloss black to match the frame, unfortunately I destroyed it in a very hard low side (along with almost everything else on the right side of the bike, hence the stainless header). Knowing how much work it was to get it looking the way I wanted, I've been putting it off for a long time. So now it begins... Before:  Sanded down with 100 grit:  Then with 180:  First coat of primer: 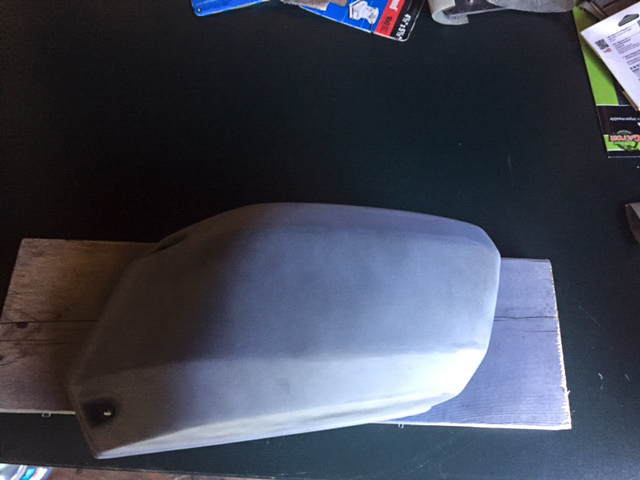 It will need 1-2 more coats of primer, then I'll hit it with some 320 grit, more primer, 600 grit, primer, 800 grit then start the top coat, which will be several coats with sanding in between ending with 1600 grit wet sanding... it's a long arduous process, but if it comes out like the last one it will be well worth it. I'm guessing it will take a week or two to finish. | ||
Hootowl |
Regarding your breathers... The port where the breather passage exits the head is downhill of the rocker box. Any oil that enters the vent has to run down hill to escape. By running your vent tube up hill from the breather, you are preventing the oil from draining. This will result in an oil plug, which negates the efficacy of the breather. The breather lines need to run down hill from the breather bolt to a catch can. Also, if the breather line is too long, the resonant frequency of the air in the line will be greater than the pulses from the crankcase, effectively appearing as a plug to the air in the crankcase. Think ported subwoofer. The port in the sub enclosure appears to not be there above the tuning frequency of the port. Air in the port resonates at whatever frequency (usually tuned for 25-35 hz) giving you a 3dB increase at that frequency, and then below the tuning frequency, air just rushes out of the port, and dB output of the sub falls off dramatically. The pistons in the crankcase are effectively a speaker cone pushing air in and out of the "port" that is the breather line. You always want your engine to "play" lower than the port frequency so that air rushes in and out of the port. The longer the line, the higher the frequency (at a fixed diameter). You may feel air pulses at idle with a long line, but those pulses will rapidly drop off as you rev the engine. Bring the lines down from each banjo bolt, and tee them together, with the hose coming off the bottom going into a catch can. You can mount it under the engine next to the shock on a bracket attached to the front bolt of the swingarm drive support bracket. (I think that's what it's called...the thing that says "Buell" that covers the output sprocket of the transmission.) Use the largest diameter hoses you can. | ||
Cyclone8u |
Hootowl, while I agree in general principle, the calculation for air flow in this case is way more complicated and would require a decently equipped laboratory to map. Air flow in a given length/diameter pipe, at a given temperature, at a given velocity, with a known viscosity is relatively easy to calculate provided the air flow is laminar. The fact that every single one of these variables with the exception of pipe diameter/length is variable in the case of our breathers and we are dealing with turbulent air, not laminar, would take an enormous amount of calculations by someone above my pay grade to figure out. In those cases we need to step away from the chalk board and do some good old fashioned field engineering. What I've found in 20,000 miles of running my breather lines to the back is that airflow is sufficient to evacuate any accumulation of water condensation and oil, along with crank case air and blow by without causing any pressure increases in the crank case sufficient enough to compromise gaskets or seals. My base gaskets are still stock and the only reason I changed the rocker box gaskets is because I had to open up the top end when changing my oil pump drive gear. I guess I'll continue to run this experiment and post any findings or conclusions here. For now, I'd say this setup works. That said, I love feedback like this. This board is always a wealth of sometimes obscur knowlege. While I dabbled in audio back in the early nineties, I never got into the whole speaker enclosure design thing. My background then was more on calculating piping sizes based on flow rates and pressure requirements. | ||
Hootowl |
If you're not getting spooge dripping from the line, it's not making it out of the heads. But I agree, the real world math is tough. The part about making it all run downhill doesn't require any math though. | ||
Lynrd |
Or just put XB rocker boxes on it...much easier and cleaner | ||
Cyclone8u |
Lynrd, agreed - as discussed earlier in the thread, that is the ultimate plan. However, this is a refresh being done on a shoe string budget so the XB rocker covers are out. For now... (Message edited by Cyclone8u on September 04, 2017) | ||
Cyclone8u |
So after several prime-sand-prime cycles with a touch of filler for the real bad spots, I finally have it finished to a point that I can start a top coat. 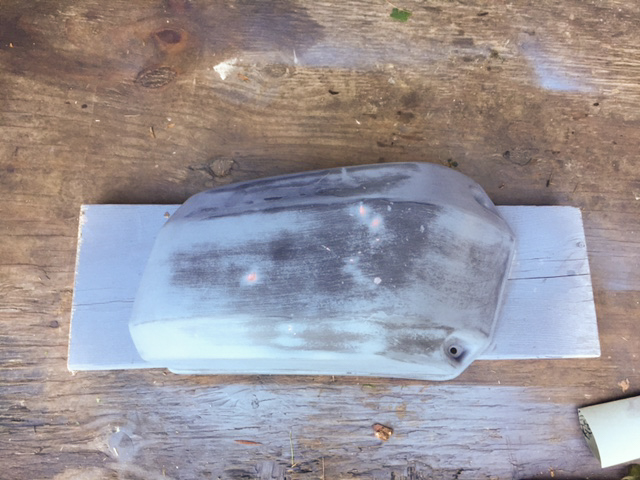 And after the first shot of black. 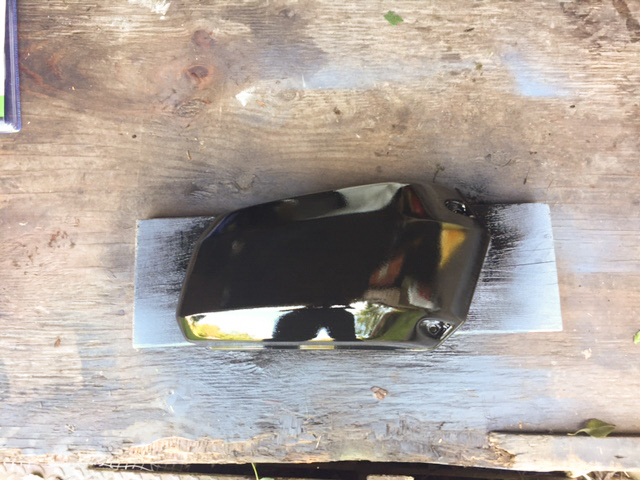 It will take several coats with sanding in between, but the final product should be a mirror like black. I'm convinced that if they came from the factory like this, more people would have just kept them on... | ||
S1owner |
Most dont know but you can now get any auto paint put into aerosol cans at most paint shops so you can get one step and everything |