G oog le BadWeB | Login/out | Topics | Search | Custodians | Register | Edit Profile


Buell Forum » Old School Buell » Archive through January 21, 2016 » Stripped bolts « Previous Next »

Author Message
Top of pagePrevious messageNext messageBottom of page Link to this message

Valguard
Posted on Friday, November 20, 2015 - 07:15 pm:   Edit Post Delete Post View Post/Check IP Print Post    Move Post (Custodian/Admin Only) Ban Poster IP (Custodian/Admin only)

So... This happened:


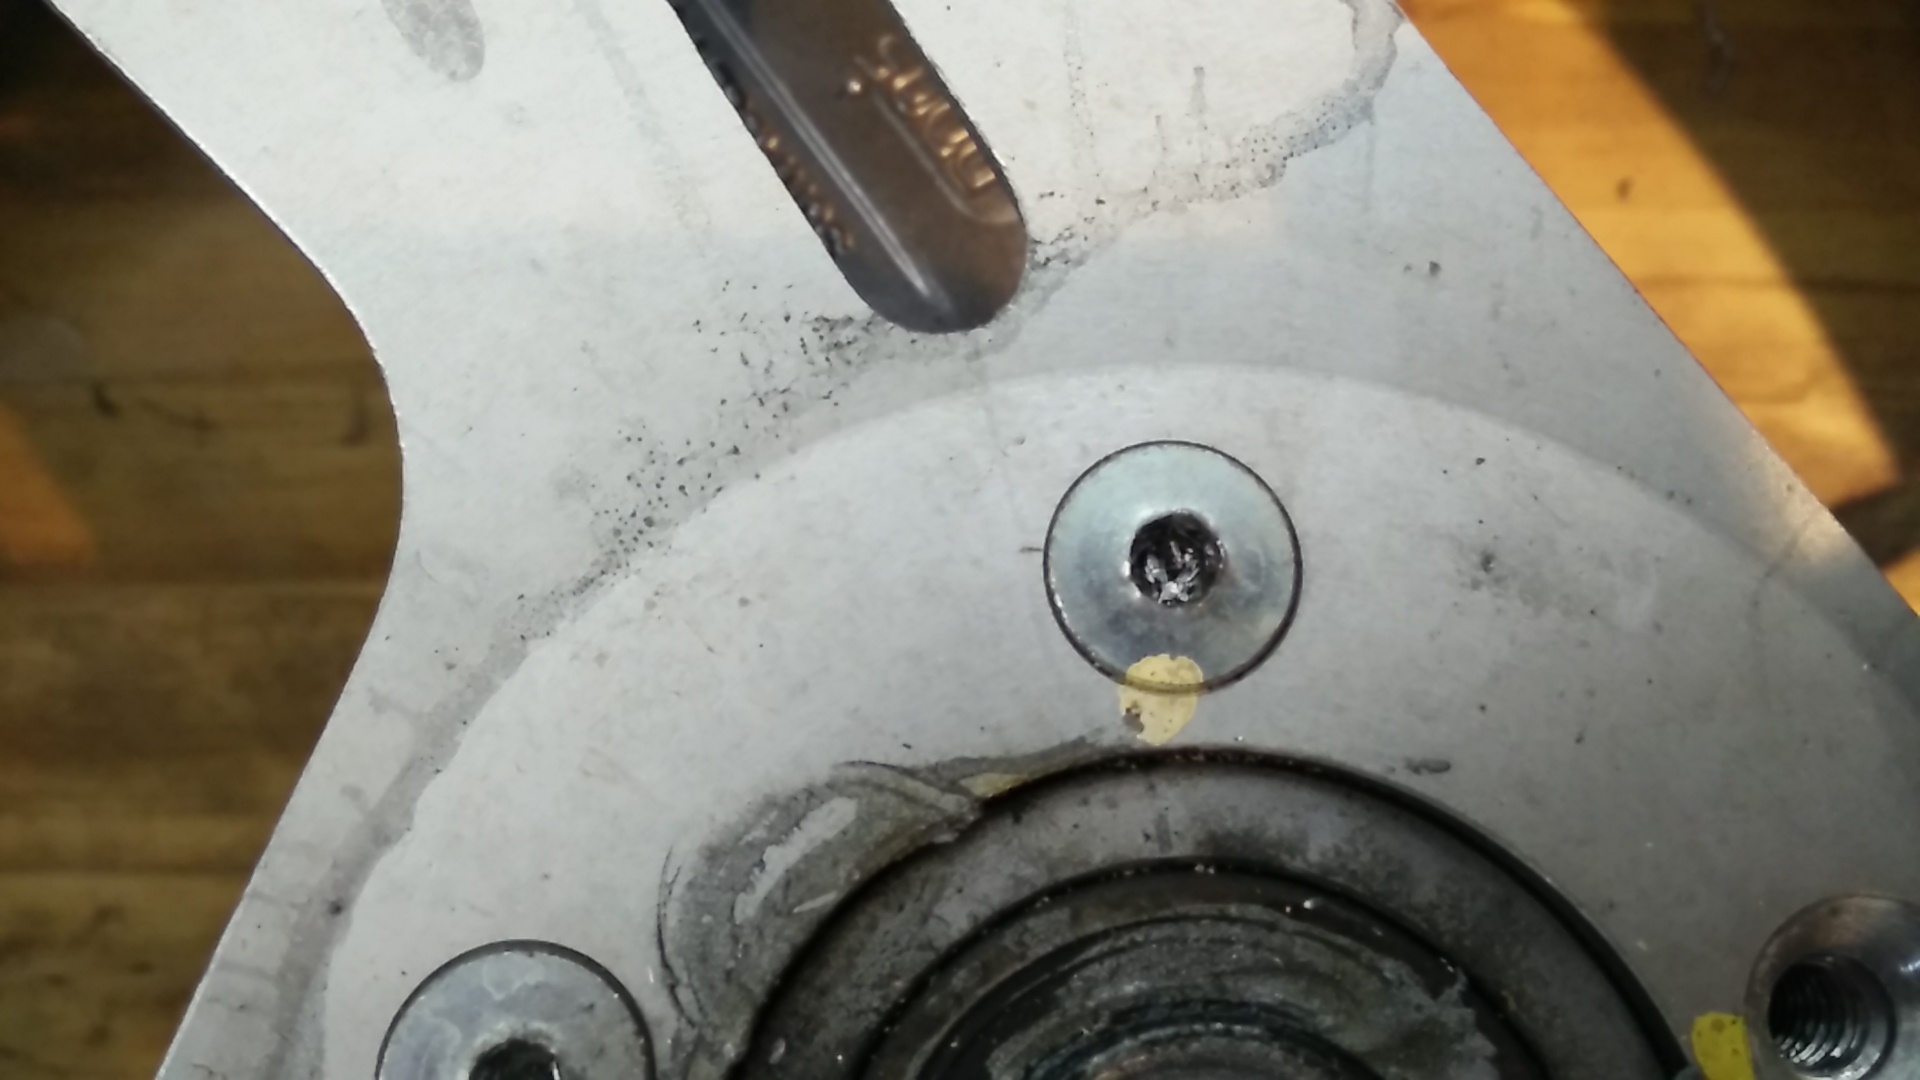
Anyone with a good suggestion on how to get this out? I've got a propane torch, tried heating it. I also gave it some good whacks with a small punch and a hammer. Seems like the best thing would be to weld a bolt to it upside down, or a nut? But I don't have access to a welder. Other ideas?

Does this happen because of the weakness of the bolt or a poor quality bit? I used a craftsman bit, but not an impact one, using just a hand driver.

Thanks!
Top of pagePrevious messageNext messageBottom of page Link to this message

Jolly
Posted on Friday, November 20, 2015 - 08:13 pm:   Edit Post Delete Post View Post/Check IP Print Post    Move Post (Custodian/Admin Only) Ban Poster IP (Custodian/Admin only)

I use a penetrating oil the day before.... Then the day of... Hit it again with the penetrating oil and I use a hand held impact tool by craftsman... And patience..it takes a bit to "break" these free....don't re-use any of them!

http://m.craftsman.com/craftsman-impact-driver/p-0 0947641000P
Top of pagePrevious messageNext messageBottom of page Link to this message

Valguard
Posted on Friday, November 20, 2015 - 08:28 pm:   Edit Post Delete Post View Post/Check IP Print Post    Move Post (Custodian/Admin Only) Ban Poster IP (Custodian/Admin only)

Oh for sure. I've got new ones ready along with my new front rotor. Thanks for the penetrating oil tip. I'll give em a soak tonight.

Does anyone think an easy out would be good here?
Top of pagePrevious messageNext messageBottom of page Link to this message

Reepicheep
Posted on Friday, November 20, 2015 - 08:35 pm:   Edit Post Delete Post View Post/Check IP Print Post    Move Post (Custodian/Admin Only) Ban Poster IP (Custodian/Admin only)

You could try a "screw remover", which is kind of like an easy out, but has a head that bites into the surface as opposed to a shaft that goes in a hole. Worst case, it just starts drilling out the screw for you.

Typically that will do it, drill far enough down the head that the head separates from the shaft and pops off. Then the rotor will come off, then the tension will be off that screw and it will either thread out with fingertips, or with vise grips on the now exposed shaft.

That is probably a loktite red screw though, so use heat to release the threadlocker.
Top of pagePrevious messageNext messageBottom of page Link to this message

Jolly
Posted on Friday, November 20, 2015 - 11:12 pm:   Edit Post Delete Post View Post/Check IP Print Post    Move Post (Custodian/Admin Only) Ban Poster IP (Custodian/Admin only)

+1^. I've used that trick as well When things got ugly! Most of my tube frame era Buells have front rotors that I've replaced with "braking wave rotors" so been through this a few times
Top of pagePrevious messageNext messageBottom of page Link to this message

2003xb9r
Posted on Saturday, November 21, 2015 - 03:40 am:   Edit Post Delete Post View Post/Check IP Print Post    Move Post (Custodian/Admin Only) Ban Poster IP (Custodian/Admin only)

You can try a sharp centre or dot punch & make a decent indent on the screw head near the outside edge right about where the yellow dot is in the photo. Then angle the punch in the direction of loosening & keep striking it firmly. Chances are it will break free & undo reasonably easily. I have used this method many times on severely chewed up screws.
Top of pagePrevious messageNext messageBottom of page Link to this message

Brother_in_buells
Posted on Saturday, November 21, 2015 - 07:49 am:   Edit Post Delete Post View Post/Check IP Print Post    Move Post (Custodian/Admin Only) Ban Poster IP (Custodian/Admin only)

Like 2003xb9r suggested It's a very good trick!
or you could try it with a torx bit.
Top of pagePrevious messageNext messageBottom of page Link to this message

Jolly
Posted on Saturday, November 21, 2015 - 07:52 am:   Edit Post Delete Post View Post/Check IP Print Post    Move Post (Custodian/Admin Only) Ban Poster IP (Custodian/Admin only)

I forgot to add.... (I had a LOT going on)..After you let it sit over night with something like PB blaster penetrating oil, the next morning, hit it again with the oil, then I heat cycle the bolt a few times with one of those blue propane torches.... Heat/cool/heat/cool three or four times.. Then start with the tool of choice...

(Message edited by Jolly on November 21, 2015)
Top of pagePrevious messageNext messageBottom of page Link to this message

Mmcustoms
Posted on Saturday, November 21, 2015 - 11:59 am:   Edit Post Delete Post View Post/Check IP Print Post    Move Post (Custodian/Admin Only) Ban Poster IP (Custodian/Admin only)

I've welded a extractor to them before I got them out
Top of pagePrevious messageNext messageBottom of page Link to this message

S1owner
Posted on Saturday, November 21, 2015 - 09:18 pm:   Edit Post Delete Post View Post/Check IP Print Post    Move Post (Custodian/Admin Only) Ban Poster IP (Custodian/Admin only)

Fyi this happens because of the dis similair metals the steel screw and the aluminum wheel react with each other over time. A high grade stainless would help but it will strip easy also.
Top of pagePrevious messageNext messageBottom of page Link to this message

Valguard
Posted on Saturday, November 21, 2015 - 10:19 pm:   Edit Post Delete Post View Post/Check IP Print Post    Move Post (Custodian/Admin Only) Ban Poster IP (Custodian/Admin only)

Boom.


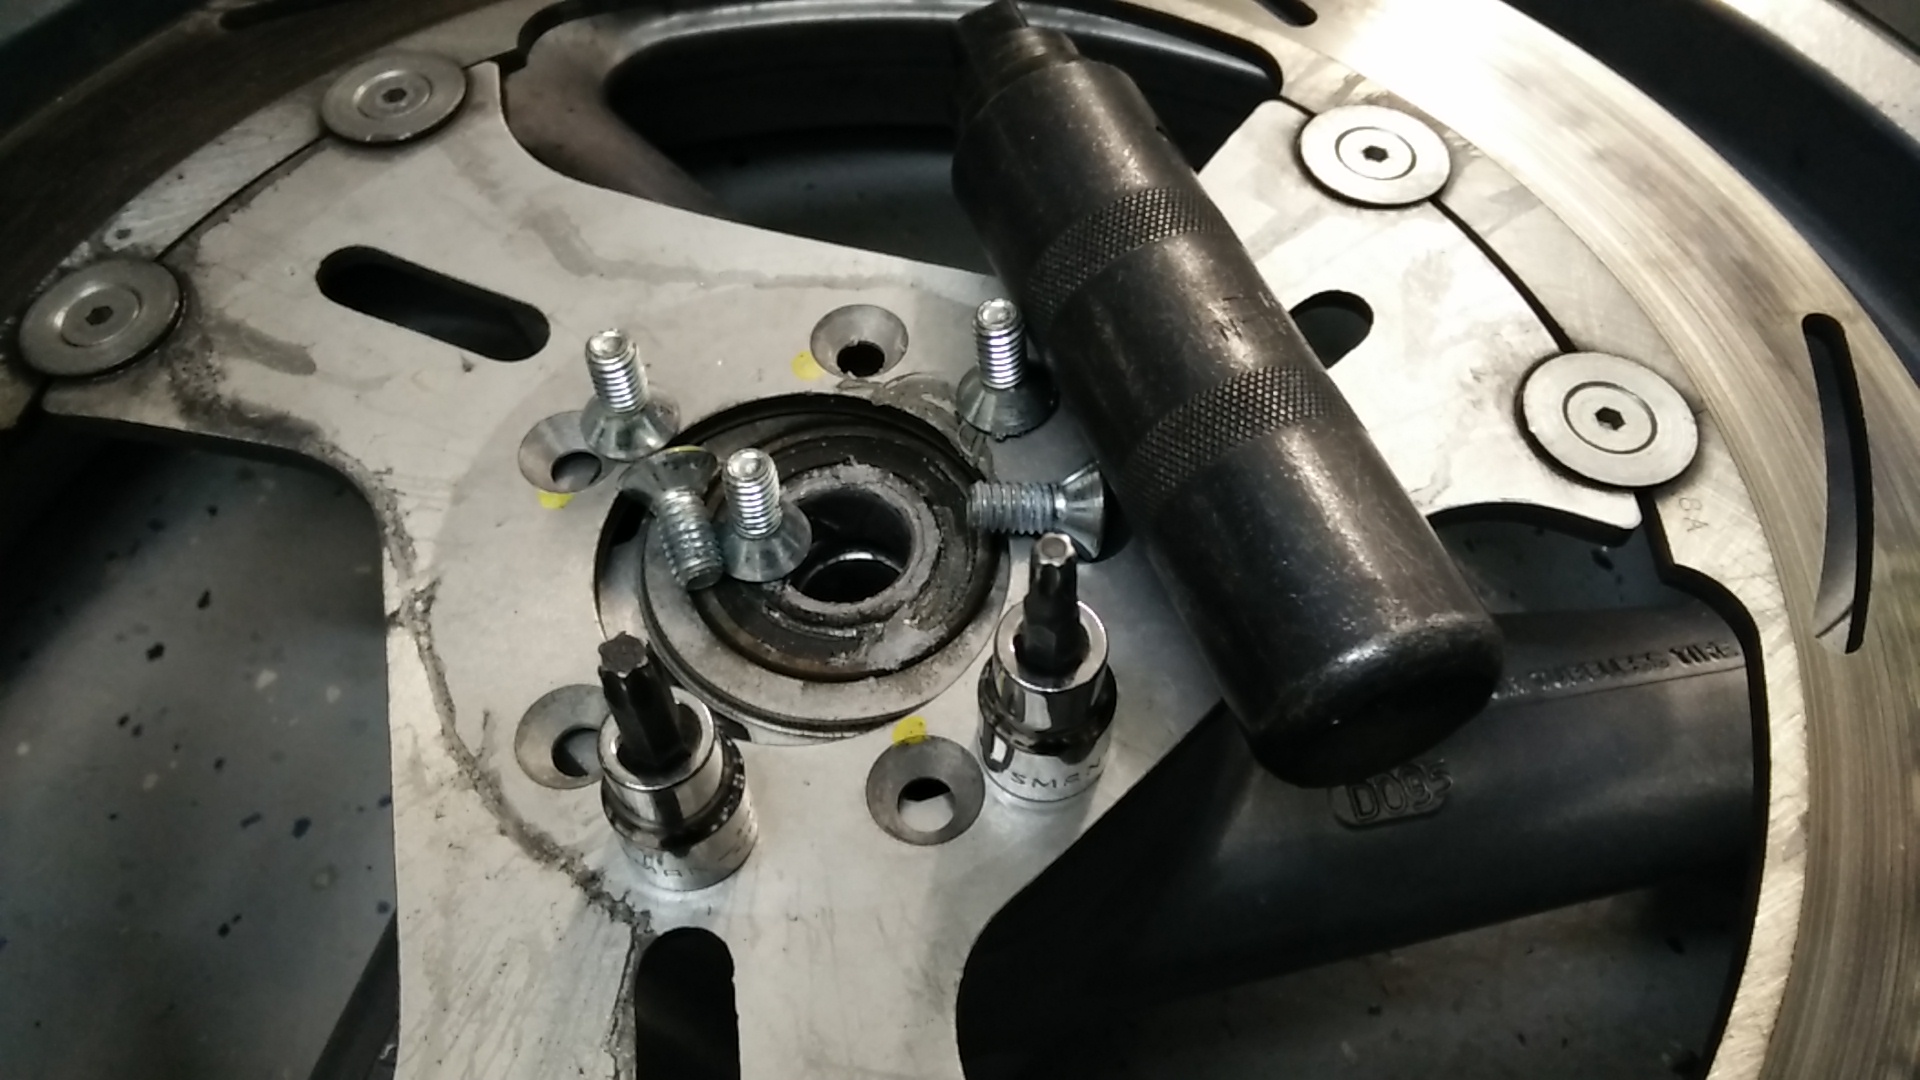
So, ended up getting the manual impact drive and used my 2.5lb hammer with it. I'd heat the screw up for about 3-4 minutes each with the propane torch I have. Then I'd hammer in a torx bit that was a little too big. Once it was secure in there, I'd get the impact drive and hammer away.

Pretty sure one if not both of the torx bits are ruined. Thank God for life-time warranty.

So, the new bolts I got are pre-threadlocked with the same yellow locker. Can I heat this up and remove it and use loctite Blue instead? Recommendations?

Thanks so much for the help people!!!

(Message edited by Valguard on November 21, 2015)
Top of pagePrevious messageNext messageBottom of page Link to this message

Steveford
Posted on Sunday, November 22, 2015 - 04:50 am:   Edit Post Delete Post View Post/Check IP Print Post    Move Post (Custodian/Admin Only) Ban Poster IP (Custodian/Admin only)

Run them through a die first to scrape off that thread locker and then use a little bit of Blue Loctite.
Top of pagePrevious messageNext messageBottom of page Link to this message

Jolly
Posted on Sunday, November 22, 2015 - 07:17 am:   Edit Post Delete Post View Post/Check IP Print Post    Move Post (Custodian/Admin Only) Ban Poster IP (Custodian/Admin only)

That hammer impact driver has saved me countless times!!!

Top of pagePrevious messageNext messageBottom of page Link to this message

Johnod
Posted on Sunday, November 22, 2015 - 10:18 am:   Edit Post Delete Post View Post/Check IP Print Post    Move Post (Custodian/Admin Only) Ban Poster IP (Custodian/Admin only)

Where did you find new bolts?

Thanks
Top of pagePrevious messageNext messageBottom of page Link to this message

Valguard
Posted on Sunday, November 22, 2015 - 02:55 pm:   Edit Post Delete Post View Post/Check IP Print Post    Move Post (Custodian/Admin Only) Ban Poster IP (Custodian/Admin only)

The new screws I got from HD. Part number 3655A. They were $1 each which seems pretty fair for what you get.

They are pan head, longer and torx. The length won't matter as the holes in the rim are much longer than the original screws. The pan head is what I need for the new wave rotor. I'd prefer the torx bit too especially after the above experience. Seems like they will be much less prone to strip. I'm sure they are grade 8 and high quality. They also come with that yellow thread locker pre apllied.

Thanks for the tip. I'll run a tap through the rim and the screw through a die to remove the yellow locker. Might even hit them with the torch and wipe in case the die doesn't do the job. Then I'll just use loctite blue.

Thanks everyone.
Top of pagePrevious messageNext messageBottom of page Link to this message

Johnod
Posted on Sunday, November 22, 2015 - 09:55 pm:   Edit Post Delete Post View Post/Check IP Print Post    Move Post (Custodian/Admin Only) Ban Poster IP (Custodian/Admin only)

Thanks, I guess they won't help me, need the countersunk style.

Anyone know of any reason off the shelf grade 8 bolts and lock tight wouldn't work?
Top of pagePrevious messageNext messageBottom of page Link to this message

Gobadgers
Posted on Monday, November 23, 2015 - 04:30 am:   Edit Post Delete Post View Post/Check IP Print Post    Move Post (Custodian/Admin Only) Ban Poster IP (Custodian/Admin only)

Quick question: can you do the heat cycles like you describe to PM rims?
Top of pagePrevious messageNext messageBottom of page Link to this message

Reepicheep
Posted on Monday, November 23, 2015 - 07:58 am:   Edit Post Delete Post View Post/Check IP Print Post    Move Post (Custodian/Admin Only) Ban Poster IP (Custodian/Admin only)

Sure! But if it was me, I'd use a heat gun instead of a torch to do it.

(The black $9 harbor freight heat guns are cheap and work for a little while, but I've fried two of them in a row now, so find another brand or model).
Top of pagePrevious messageNext messageBottom of page Link to this message

34nineteen
Posted on Monday, November 23, 2015 - 09:10 pm:   Edit Post Delete Post View Post/Check IP Print Post    Move Post (Custodian/Admin Only) Ban Poster IP (Custodian/Admin only)

Ok, I'm confused. You say the bolts in the pic are HD 3655A - pan head? Or you bought pan head bolts, but the pic is of the original flat head bolts?
Top of pagePrevious messageNext messageBottom of page Link to this message

Valguard
Posted on Tuesday, November 24, 2015 - 12:04 am:   Edit Post Delete Post View Post/Check IP Print Post    Move Post (Custodian/Admin Only) Ban Poster IP (Custodian/Admin only)

The screws in the picture are the stock ones that came with the bike (an S1W). The 3655A screws are not pictured. Let me know if you would like a picture of them posted.
Top of pagePrevious messageNext messageBottom of page Link to this message

Screamer
Posted on Thursday, November 26, 2015 - 09:32 pm:   Edit Post Delete Post View Post/Check IP Print Post    Move Post (Custodian/Admin Only) Ban Poster IP (Custodian/Admin only)

The disc mounting screws for the PM wheels (AA0508.5CZ) are still available.
The screws for Marchesini/Castalloy wheels are obsolete but are a 5/16-18 X 3/4".
Top of pagePrevious messageNext messageBottom of page Link to this message

Tony302
Posted on Tuesday, December 01, 2015 - 08:52 am:   Edit Post Delete Post View Post/Check IP Print Post    Move Post (Custodian/Admin Only) Ban Poster IP (Custodian/Admin only)

Screame...that part number for disc mounting screws form the pm wheels, is that for the updated 9 pin disc?
Top of pagePrevious messageNext messageBottom of page Link to this message

1313
Posted on Tuesday, December 01, 2015 - 08:32 pm:   Edit Post Delete Post View Post/Check IP Print Post    Move Post (Custodian/Admin Only) Ban Poster IP (Custodian/Admin only)

for the updated 9 pin disc

CA0001.Q

Or alternatively, online research shows to be 6570Y

But back to the AA0508.5CZ Buell part number...

AA = American Bolt (just one A would signify a metric bolt)
05 = diameter in 16ths, 5/16" in this case
08 = thread length in 8ths, 8/8" or 1" in this case
for fasteners, the '.5CZ' identifies the head style and plating details

So the Buell part number for the Marchesini/Castalloy screws would be AA0506.5CZ

IMO, I prefer the Buell part number convention over H-D's...
1313
Top of pagePrevious messageNext messageBottom of page Link to this message

Tony302
Posted on Tuesday, December 01, 2015 - 08:47 pm:   Edit Post Delete Post View Post/Check IP Print Post    Move Post (Custodian/Admin Only) Ban Poster IP (Custodian/Admin only)

Nice never would i figure that. Thanks for the knowledge their 1313. that updated 9 pin disc mount bolts are those for the pm wheels?
« Previous Next »

Add Your Message Here
Post:
Bold text Italics Underline Create a hyperlink Insert a clipart image

Username: Posting Information:
This is a private posting area. Only registered users and custodians may post messages here.
Password:
Options: Post as "Anonymous" (Valid reason required. Abusers will be exposed. If unsure, ask.)
Enable HTML code in message
Automatically activate URLs in message
Action:

Topics | Last Day | Tree View | Search | User List | Help/Instructions | Rules | Program Credits Administration