| Author |
Message |
    
S1owner
| | Posted on Monday, July 13, 2015 - 07:18 pm: | 


|
Pm me with questions I will give you my number and I will help as much as I can |
89rs1200
| | Posted on Tuesday, July 14, 2015 - 12:53 pm: |
|
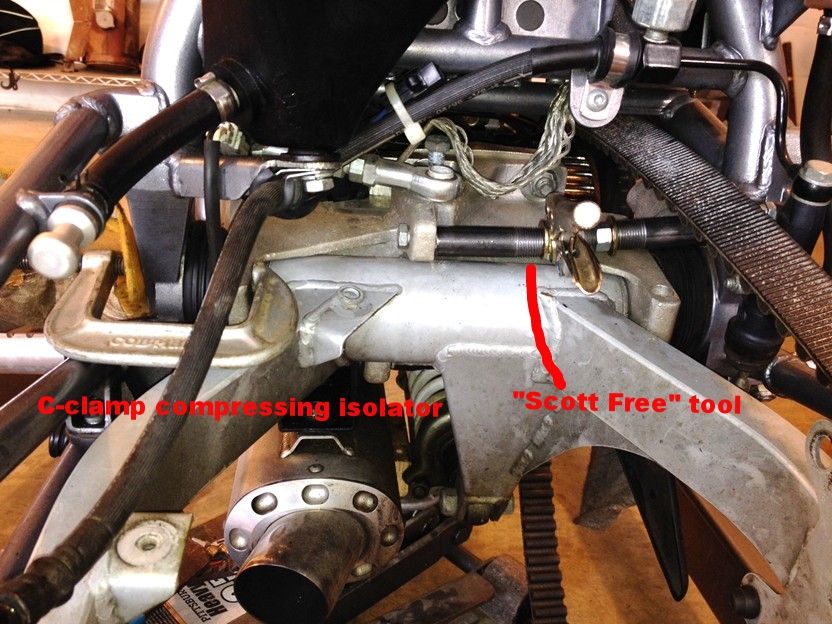
As I stated before, this is a simpler solution and uses the same too position as Buell. Using the same location Buell tool is used, just above the isolator.
A large bolt cut to length so it would just fit between the frame and swingarm mount. Put two nuts on it as one nut was not long enough.
Much smaller tool than the old wrench and socket.
Spread only enough to allow the isolator to come out!! |
Jahwarrior007
| | Posted on Thursday, August 13, 2015 - 02:51 pm: |
|
Ok, my other thread here, first, want to thank everyone on the help. I ended up making the "Scott Free" tool, except I used a 1/2 bolt instead, worked like I had been doing this for years. Did want to say thanks to S-1 owner for his help too, maybe I'll try that method next time. So, along with the X-1, the S-1 will be on the road this weekend. |
Charlies_s1
| | Posted on Friday, August 14, 2015 - 12:04 am: |
|
I purchased a type of furniture clamp from Harbor freight that you can reverse, It has a lever you can reverse to allow you to push the frame apart just enough to slide them in. Worked great and really easy to use.  |
Jolly
| | Posted on Friday, August 14, 2015 - 07:53 am: |
|
photo??!!! |
Charlies_s1
| | Posted on Friday, August 14, 2015 - 11:07 pm: |
|
I am almost certain this was purchased at Harbor Freight, You can reverse the ratchet on it to push outwards. I just used it between the frame to get it push it apart enough to get them started, once they were started the rest was easy. I also have a way to put the frame back on the motor all by yourself, Also with something from Harbor Freight. lol lol

 |
Bluzm2
| | Posted on Sunday, August 16, 2015 - 09:18 am: |
|
You won't find Bessey clamps at Harbor Freight, that came from a hardware or woodworking store.
The nice thing about that one is it is "inline" without a handle sticking out the side and has a much lower profile.
It's a Bessey DuopKlamp, mush better quality than HF, they are available in a couple different sizes averate about $25 or so. |
Tombo
| | Posted on Sunday, August 16, 2015 - 10:21 am: |
|
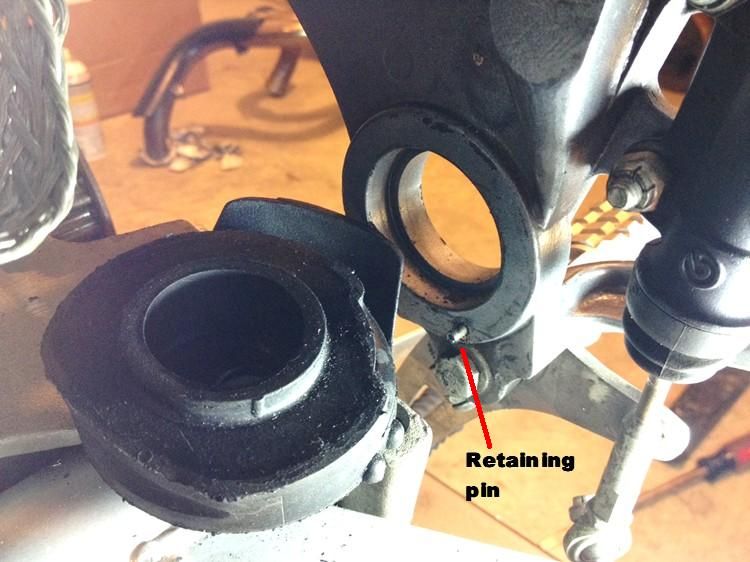
First frames without side plates were the 96 S1s, then 97 M2 and 97 S3s. ALL frames changed in 99, but only the X1 had a side plate and a removable rear sub-frame. As far as isolator tools, there is a lot of force and you have to be careful about slippage. I have had the factory tool collapse, the aftermarket tool slip, and finally made a "Scott free" tool that worked after a couple of iterations. One thing to understand about both the factory and aftermarket tools, they were designed for the old isolators. The new isolators are both harder to compress and take up more surface area (leaving less for the tool).
Rather than redesign the frames, I think they could have designed the isolators as two pieces(one piece with the lip and pin hole, the other acting more as a spacer that slides in after you insert the lipped part). You would only need this for one side. To remove, you would simply remove the bolt, slide the spacer our, then have room to push the isolator in and drop it out. Sounds simple, but there may be safety considerations that I am missing. |
Hughlysses
| | Posted on Sunday, August 16, 2015 - 10:54 am: |
|
Yea, the Harbor Freight version of that clamp is good for about 5 lbs clamping or pushing pressure before the plastic lever pivot snaps off. DAMHIK. |
General_ulysses
| | Posted on Monday, August 17, 2015 - 10:33 pm: |
|
That cheesy HF clamp would snap like a dried twig for the frame spreading job I had to do getting my isolators out. It took tremendous force to spread the frame enough to get them out. Plus, not sure how easily it would fit into the space required?? Looks too big and cumbersome for the job I did (see link above for pics). |
Charlies_s1
| | Posted on Tuesday, August 18, 2015 - 12:43 am: |
|
Yea Sean, I guess some may be harder than others. But this clamp had no problem with it, in fact I thought it was too easy compared to way it was said to be. |
Hughlysses
| | Posted on Tuesday, August 18, 2015 - 05:27 am: |
|
Supposedly you're not spreading the frame; you're compressing the isolator on the opposite side to provide clearance to remove the first isolator. Once the first isolator is out, that provides clearance to move the engine to allow the first isolator to slip out easily. So whatever tool you use for the job should be between the engine and one side of the frame, not between the two sides of the frame. |
General_ulysses
| | Posted on Tuesday, August 18, 2015 - 02:27 pm: |
|
You are spreading the frame. There's no truly practical way to isolate the spreading on just one side. If you look at the images I provided in the previous link, the homebrew spreader presses against the engine/swingarm mounting block...and that in turn presses against the other side of the frame. I did put a C-clamp on the other isolator to compress it in order to help make more room on the other side. But the spreading forces are still applied to both sides of the frame. If I had to do it all over again I might try to slip a hacksaw blade or perhaps a small chisel up to where the spring pin is and either cut it or shear it off. The isolator would drop right out then with very minimal spreading. You would have to replace it afterwards, but that shouldn't be a big deal. Once everything's out that area is pretty accessible. |
Hughlysses
| | Posted on Tuesday, August 18, 2015 - 03:11 pm: |
|
I guess unless somebody actually measures the frame under these conditions we won't know for sure, but I've seen more than one post that says what you're actually doing is compressing the left side isolator. The tool pushes against the mounting block and the right side of the frame, so you're "pushing" the mounting block to the left and the frame to the right. The swingarm block is pressing against the left side isolator which sits against the left side of the frame. All they're saying is that rubber isolator will "squash" a lot before that chrome moly tube frame bends, as the frame is reinforced pretty stoutly in that area. You only have to compress the left side isolator a little to give room for the right side isolator to drop out.
When I replaced the isolators on my S3, I dropped the whole swingarm block out (which is probably way more work), so all I'm going by is what I've read here previously. |
89rs1200
| | Posted on Tuesday, August 18, 2015 - 03:38 pm: |
|
Hey!! Stop right there!!! Took some time for me to realize that people are not using a manual and are actually trying to spread the frame!!!
Spreading the frame is dangerous and definitely NOT in any Buell manual nor posted anywhere else on BadWeb as a correct procedure!!!
The frame can spread permanently, even if you do not see it, and may cause a failure at the rear engine mount. To stress this point, the last Tech. bulletin describes adding a washer between the engine mount and isolator so there is some constant pressure compressing the rubber.
When I get home tonight I will post the latest Tech bulletin and photos of the tool I have used successfully several times. |
89rs1200
| | Posted on Tuesday, August 18, 2015 - 03:45 pm: |
|
Concerning the statement; "If I had to do it all over again I might try to slip a hacksaw blade or perhaps a small chisel up to where the spring pin is and either cut it or shear it off. "
Seriously? the pin is shorter than the metal ring of the rubber isolators, which also needs to clear the frame. Cutting off this vital pin solves nothing. How the heck would it be replaced later without removing the motor from the frame?
Please do not take offense because I am truly concerned that all of you ride safe. Have been riding and maintaining Buells since 1997 and want that for the rest of you. |
General_ulysses
| | Posted on Tuesday, August 18, 2015 - 08:22 pm: |
|
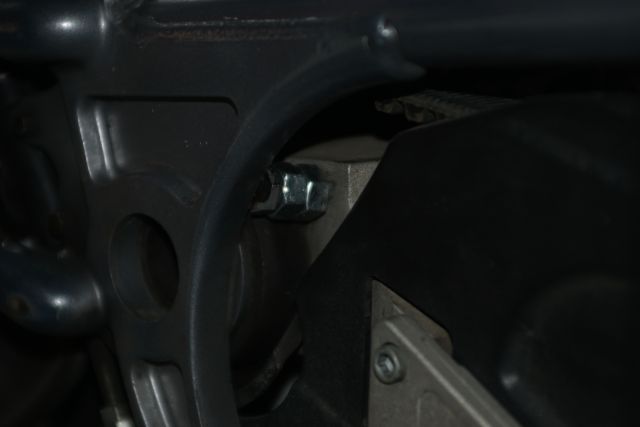
89rs1200 - Yeah, seriously. I *might* try to saw it off to get the isolator out. But that doesn't mean I would simply put the isolator back in upon reassembly without reinstalling another shorter pin. I agree it needs a holding pin of some sort, but I don't agree it necessarily requires engine removal to remove the sheared off stub. Here's a pic of the access I had without the engine being removed:
I'm pretty sure I could extract the stub with this level of access. And again, replacing with a lower profile pin sufficient for holding the isolator, but low enough to greatly ease assembly and future disassembly. |
General_ulysses
| | Posted on Tuesday, August 18, 2015 - 08:48 pm: |
|
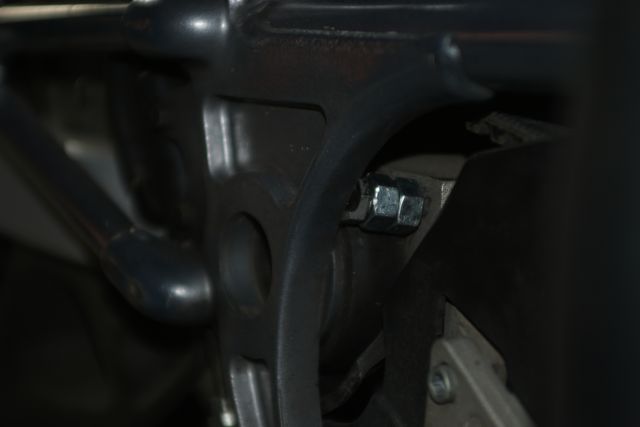
Not trying to argue with you Hughlysses, but I know for sure the spreader tool used as I have shown it here...
...results in the frame being expanded in both directions. Newton's third law dictates "For every action there is an equal and opposite reaction." Follow the stress/compression path and you'll see the other side of the frame must ultimately bear the reactionary brunt of the other side's expansion.
As far as the other isolator being compressed and that gives you all the room necessary - certainly not true at all in my case. If the retaining pin was missing or severely filed down to a very low profile, this might work. Otherwise, it ain't happening...at least not on an S1 built like mine. I know, I tried it, again as shown in the pic. The rubber for the old isolators was very rigid and non-compliant. It barely compressed, even with maximum clamping pressure applied with the C-clamp. And I don't believe it was because they were old and dry rotted either. The brand new replacements also provided very little compliance, they are made of stiff rubber that did not compress easily at all. The vast majority of what allowed the isolators to come out was frame deflection by using the spreader tool and then by lowering the rear part of the engine slightly, as described in my earlier referenced post. |
Hughlysses
| | Posted on Tuesday, August 18, 2015 - 09:12 pm: |
|
I understand what you're saying, but you can also see that the Scott free tool is effectively pushing against the left isolator, trying to compress it. I'll take your word for it that the frame springs apart before the rubber in the isolator compresses. If the C-clamp wouldn't compress the isolator it doesn't seem the tool would either.
At any rate, I can definitely say I like the rear isolator design on the XB better!  |
Tombo
| | Posted on Tuesday, August 18, 2015 - 09:58 pm: |
|
89rs, the procedure in the manual is not what the dealerships ended up using for the big isolator recall, in fact, the factory made a frame spreading tool specifically for this job.
Hughlysses, when I was with ATC we did actually measure the compression of the opposite isolator during the removal process. I forget the measurement (though I believe Jay did publish it in the Weather Report). What I can tell you is that the compression accounted for about half the space needed to drop the isolator, the other half was in the frame. Unfortunately, I did here of a few stories about frames being spread too far and not fully springing back. Charlie, I am wondering if your frame has a little spread in it if it was so easy for the clamp to do the job.
After measuring the spread we developed the ATC method of isolator removal, which involves removing the swing arm block. Shortly after Jay published the method Erik expressed interest in it, but the service manuals had already been published and the frame spreader had made its way to dealers.
Main thing to keep in mind with the spreader no matter which you use is not to spread more than absolutely necessary. If you use the service manual procedure, watch that you do not damage the front isolator. I still believe the ATC method is the best for the bike, but it is admittedly more work. |
89rs1200
| | Posted on Tuesday, August 18, 2015 - 10:20 pm: |
|
I agree with Hughlysses & Tombo. Dropping the frame from the isolators creates the least stress. This was the procedure I used often, but it is more work and time consuming.
Second best is to use a spreader similar to the factory tool. I made the following and it works great. Easy to pack for a trip.

Service Bulletin B-016B for isolator replacement can be used as a guide for replacing the belt. Gives procedure and torque specifications.
Find it at http://www.ukbeg.com/downloads.php |
Charlies_s1
| | Posted on Tuesday, August 18, 2015 - 11:34 pm: |
|
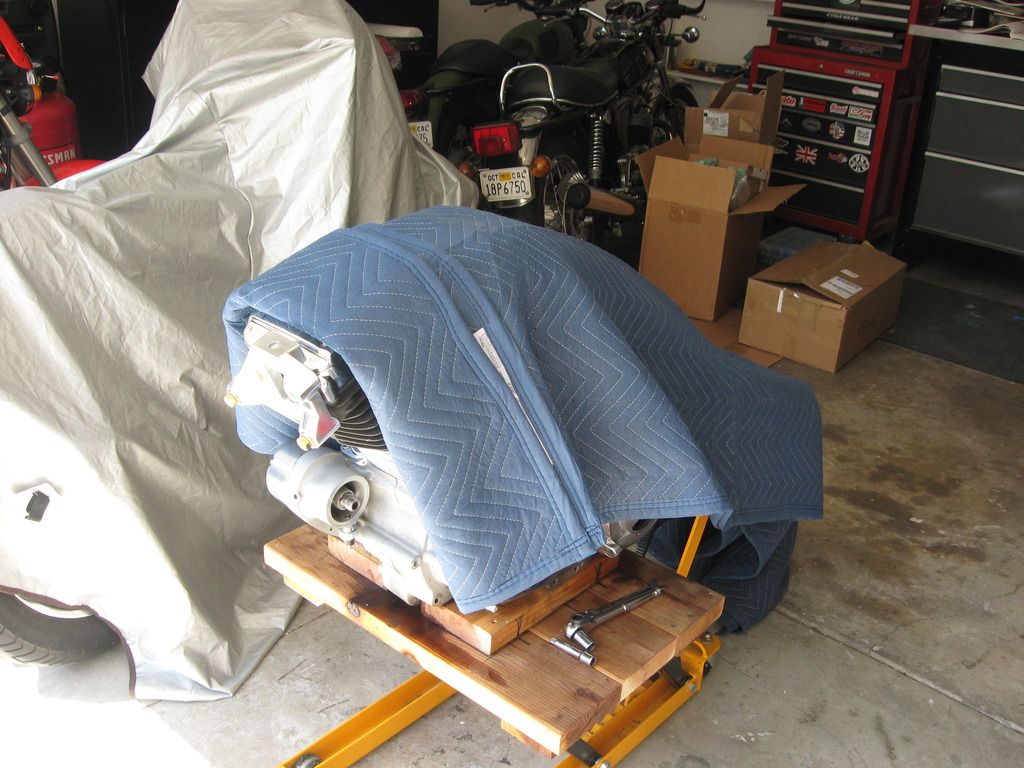
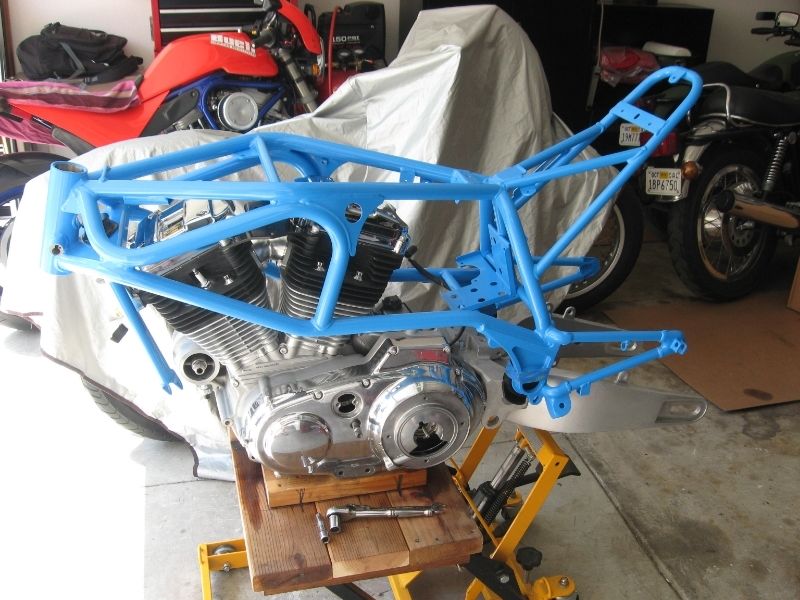
Well I screwed up here as far as what the thread is about, I had the bike completely apart and lowered the frame with the iso's in place in the frame onto the motor and swing arm already together. so the amount I had to spread it was just enough to get it started and just pushed the frame down onto the swing arm. I was thinking they were taking it apart to the point I had mine to do it. That would seem like a safer way to do it. Sorry for the confusion.
 |
Charlies_s1
| | Posted on Tuesday, August 18, 2015 - 11:54 pm: |
|
 |
Tombo
| | Posted on Wednesday, August 19, 2015 - 06:49 am: |
|
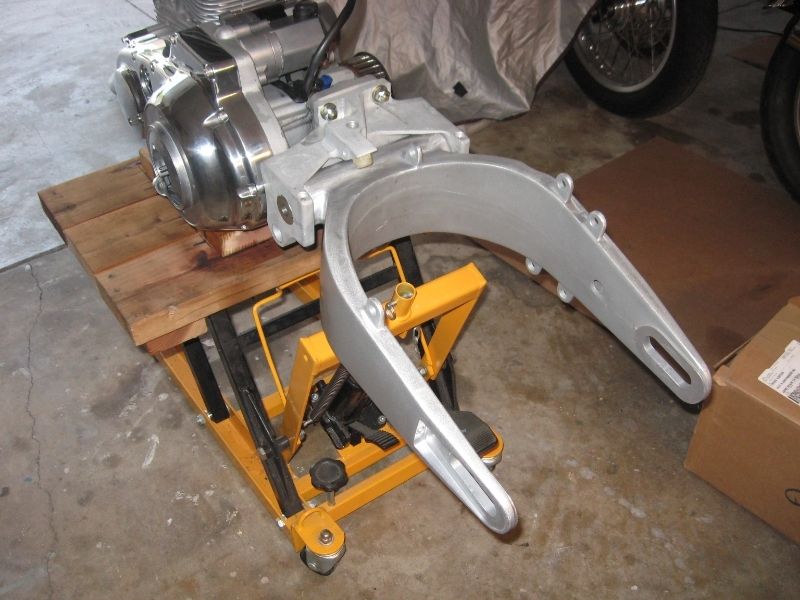
Charlie, that is how the service manual describes the procedure, a good method for minimizing frame spread as long as you do not over stress the front isolator at the same time. Looks like a pair of S1s in the garage. |
Buellistic
| | Posted on Wednesday, August 19, 2015 - 08:38 am: |
|
OLD SCHOOL:
Do not spread the frame, COMPRESS THE LEFT ISOLATOR !!! |
Steveford
| | Posted on Wednesday, August 19, 2015 - 09:38 am: |
|
89rs1200,
You said that there was a mention of some sort of washer in an updated tech bulletin?
I must be missing it.
Sorry to the OP that the tool busted, I can't recall who made the factory tools. |
General_ulysses
| | Posted on Wednesday, August 19, 2015 - 12:12 pm: |
|
Charlies S1 - you did it the best way by removing it like you did. A lot more work if that's all you're doing, but the best method considering what might happen to the frame by stretchin' on it. Otherwise, your superclean bike project looks awesome. Got any completed pics yet? |
1313
| | Posted on Wednesday, August 19, 2015 - 12:40 pm: |
|
I can't recall who made the factory tools.
The later version of the factory tool was made by Kent-Moore. The initial version was made to Buell's design, likely by one of their 'go-to' machine shops.
It was realized that the initial version didn't have the lifetime expected by a 'tool', so Kent-Moore (being the official source for specialty Harley-Davidson tools) was approached to produce a real tool - you know, something with the expected lifetime of a 'tool'. What Kent-Moore came back with was pretty much a duplicate of the initial Buell design.
And Kent-Moore's version has proven itself to just be a copy of Buell's initial design...
1313 |
Charlies_s1
| | Posted on Wednesday, August 19, 2015 - 12:42 pm: |
|
I think you may be able to double click on the photo and it may take you to my photo bucket page?? |
Buellistic
| | Posted on Wednesday, August 19, 2015 - 02:00 pm: |
|
There was a TECH SHEET on a WASHER KIT ...
It was because technicians not only breaking the factory tool, but spreading the frame to where they bent it ...
The WASHERS were to take up the space because of the bent frame ...
One needs to COMPRESS the LEFT ISOLATOR as mush as possible then use the SCOTT FREE METHOD or the FACTORY TOOL to get the RIGHT ISOLATOR out ...
Remember: A BENT FRAME CAUSES ALIGNMENT PROBLEMS !!! |
General_ulysses
| | Posted on Wednesday, August 19, 2015 - 02:10 pm: |
|
If I overstretched my frame, I would slide a long section of threaded rod through the two isolator holes with a coupla big washers and padding to protect the frame paint and then draw it down (i.e. compressed by tightening the nuts) until the bend was removed. |
|


