| Author | Message | ||
Scott_in_nh |
Some of you might recall that my 99 S3 broke an anti-rotation pin which hung and bent an exhaust valve and obviously trashed the cam and lifter. The S3 is my only bike and it is used for commuting, sport touring one and two up and the occasional trip down the 1/4 mile. I want it to start, idle and run smoothly, but would like some extra power. I get great gas mileage now and don't mind losing a little, but don't want to kill it. I want to keep the stock redline and don't want a soggy bottom end, but will give up a little to get a stronger mid and top end charge. I want to keep stock gearing. I will be using the stock header with a low restriction muffler. I already have a 1250 kit from NRHS installed. Option 1 Put in the new exhaust valve I already have, N6 cams and new lifers. Option 2 NRHS stage 2 light heads and N6 cams. Option 3 NRHS stage 2 heads and N6 cams. Option 4 NRHS stage 2 heads and Redshift 567 or other >.500 lift cam. Thoughts? Experience? | ||
Scott_in_nh |
FYI obviously I am buying cams and lifters no matter what but the cost of the headwork is a major consideration. After this I am hoping to not be in the heads or the right side of a motor for a long time, so I don't want to regret the decisions I am making now. | ||
Buellistic |
Option 5 The "BIGGEST CUBIC INCH ENGINE" you can get !!! (Message edited by buellistic on December 22, 2014) | ||
Scott_in_nh |
If I started with a non-original motor and had more money to spend, then big cubes are awesome I'm sure. The 1250 kit is as big as I am going on this motor. | ||
Phelan |
I "may" be a little partial, but I would go with a stage II with 7mm valves and OEM style beehive springs, and NRHS CAT3 cams (.540 lift). They are a very good all around cam set that will give you more power than a </= .500 lift cam but without a significant loss of low end torque. The 7mm valves and beehive springs keep the valve train light and quick to rev. We do have beehives for 5/16" valves too, if you prefer the stronger valve. Not to mention productivity and efficiency have gone up quite a bit since we moved and have gotten settled into the new shop  . . | ||
Scott_in_nh |
That's good to know Ross. If I go that way - Once I have the money, how long do you think you would have my heads? | ||
Phelan |
You'd have to call Dan and ask him for a good estimate; I just know we are faster now as we've gotten things situated and found our groove with the new equipment and tool placing and whatnot. (Message edited by phelan on December 22, 2014) | ||
Scott_in_nh |
Fair enough, I'm still open to hear owners experience of what works for them regardless of manufacturer... That said, not looking to hold you to anything, just trying to plan. 2-4 6-8 8-10 (weeks)? | ||
Phelan |
If I were to guess, probably 5-6 since Christmas is a round the corner. (Message edited by phelan on December 22, 2014) | ||
Jayvee |
Did you look at all the dyno charts posted on the NHRS site? Kind of reflects the cams chosen for that build. There's some dyno charts over in the Knowledge Vault too. | ||
Scott_in_nh |
I have looked at the charts on NRHS, but not the ones here. They are very useful, but don't address fuel mileage or whether it fits my requirements and is an engine I can live with. Any of us older guys can remember friends who put too much cam and too much carb on their muscle car and ruined it - I don't want to be that guy with my bike! | ||
Buelliedan |
Scott, I would suggest our stage 2 light headwork and a matching set of our NRHS cat 3 cams. Should give you right around 100 hp +/- 5 and it should be as reliable as stock and have a nice powerband between 2,800-6,800 rpms for good all around driveability. This is our most popular package as it does everything well without breaking the bank. I don't want to post prices here as I am not a paid sponsor so feel free to call me if you have questions at 970-532-3344 (Message edited by buelliedan on December 23, 2014) | ||
Scott_in_nh |
thanks Dan, I will call when I'm closer to the purchase. I didn't want to waste your time until then and I was hoping to hear from guys running these or other manufacturers parts to see what they liked or wish they had done. | ||
Ft_bstrd |
I'm about to jump into my build as well. NHRS 1250 Kit NHRS Stage 1 Head work N4 Cams HSR42 Stock Headers Supertrapp Muffler Dan, you have an estimate on HP/TQ? I want a little more across the Rev range but don't want to worry about durability over stock. | ||
Johnod |
Interesting thread. | ||
Scott_in_nh |
So it is close to decision time. I've decided not to do any head work - I have other toys that need attention too and not enough money to do everything I want to any of them. A good problem to have I suppose! So I think I am back to either N6 cams with stock springs or the CAT 3 cam with aftermarket springs. The heads are otherwise stock, but I did blend in the steps from the valve seats. | ||
Scott_in_nh |
Decision made - went with the N6 and S&S lifters  | ||
Scott_in_nh |
The cams and lifters got here yesterday The engine isn't ready for them though - I still have to drill and tap the case for the new style anti rotation pins. I am using one of the anti rotation pin covers as a drill guide. I bought a guide for the bit and another for the tap and an engineer friend of mine is going to drill the required holes in the cover for the guides. He is also making a 3/16 centering pin. I'll take pictures when I am doing it. If anybody wants to buy or borrow this tool to do their own engine - let me know. After seeing what this failure can do I think this update should be as high or higher on your list as the oil drive gear or the larger primary adjustment shoe! | ||
Jolly |
Scott, photos and full work up please! | ||
Phelan |
It is a very worthwhile upgrade. And fairly inexpensive as well. | ||
Phelan |
BTW Scott, I just noticed you mentioned you had a bent exhaust valve. Check to make sure the guide isn't cracked. I recently picked up a set of Thunderstorm heads with a bent exhaust valve and the guide was cracked in two spots on the port side. | ||
Scott_in_nh |
Thanks Ross, I will give it a thorough examination. Hoping to do the anti-rotation pin mod this weekend. | ||
Scott_in_nh |
So a little project creep along with shoulder surgery has prevented me from working on the bike, but my drill guide is done. Instead of using the anti-rotation pin cover as a guide, we made one out of aluminum. This way we didn't have to cut down the hardened drill guides. one side has a drill guide for a #7 drill used to open up the hole for the 1/4 20 tap. The other side has a 1/4" guide so that the tap goes in straight. We also made a tapered centering pin. The idea is that you center the #7 guide with the pin and bolt the guide down. Drill the hole to the correct depth, unbolt the guide and flip it over. Use the centering pin again, tighten the bolt, tap the first side and drill the other side. Flip it over one more time to tap and it is done. We discovered that the 1/4" guide didn't fit the tap so we had to hone it out a bit, if we built another we would look at a different guide. The tapered pin was made before we discovered this so it is just a touch loose, but the goal is to keep the tap straight so it shouldn't be a problem. 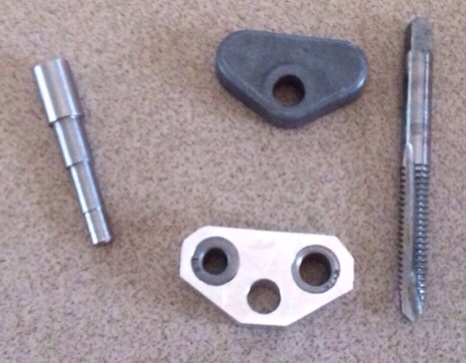 | ||
Scott_in_nh |
So crap loads of snow followed by a little shoulder surgery (not caused or helped by shoveling and blowing snow) has slowed the progress on the rotation pin upgrade, but it is done. 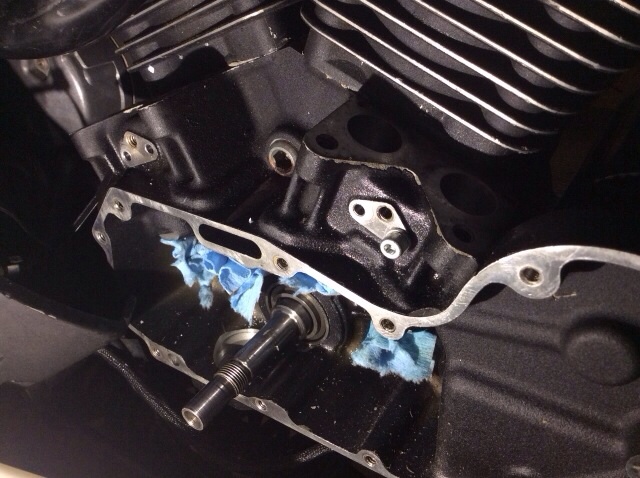 | ||
Scott_in_nh |
I extended the depth of the 3/16" hole into the other side of the bore by adding about 0.060" to the length of the new pins. The existing hole acts as a drill guide and I used a drill stop. Next I bolted on the 1/4 - 20 drill/tap guide and centered it with the location pin (a friend mad both for me). 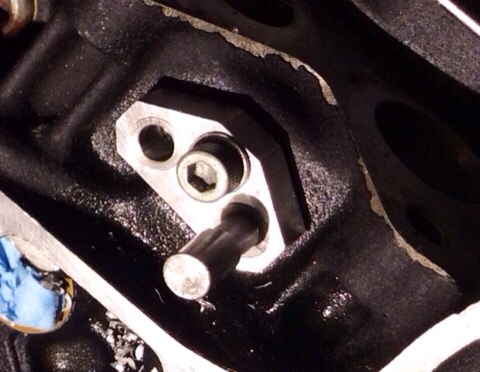 | ||
Scott_in_nh |
Next I used a #7 drill with a drill stop to prepare for tapping. 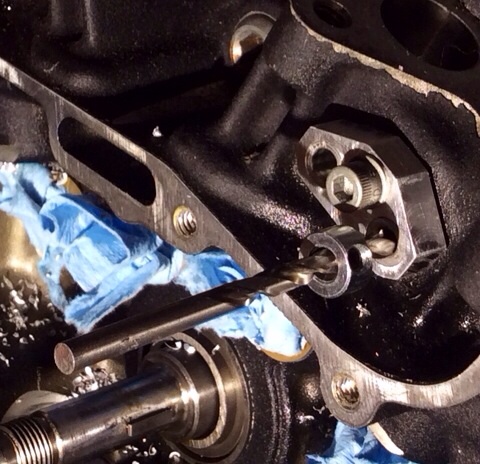 | ||
Scott_in_nh |
Then I tapped it with a 1/4 - 20 tap. After careful de-burring and cleaning the job is done. I used paper towel to block anyplace I did not want the chips to go and then I vacuumed it clean.  | ||
Scott_in_nh |
Forgot to mention that one side of the dill/tap guide is bushed for the bit and the other side is bushed for the tap. You flip it over to do both on each location. |