| Author | Message | ||
Buellrobot |
Trying to figure out minimum I need to do to remove the front pulley, in order to replace a broken neutral indicator switch. Do I need to drain the primary in order to take off the front pulley? I know there's a seal behind the pulley, but it's unclear if I'm in any danger of dumping the primary if I just remove the pulley. Am I correct in assuming the drive nut is 1 7/8" inches? | ||
Cupcake_mike |
I don't remember what the drive nut is off the top of my head, its larger than anything I had so I made a tool, but you do not need to worry about losing primary oil...that seal doesn't really see it. In fact, some guys replace that seal with a plug that has a grease zerk so they can ensure there is lobe going to the roller bearings back there. | ||
Kalali |
No need to drain any fluids. Nut is 1 7/8", left hand thread - clockwise to loosen, and be gentle with the shaft while pulling the pulley. The shaft is riding on bearings. You'll need the manual for the exact procedure to torque it properly. | ||
S1owner |
Well it is not that simple. A standard 1 7/8 may work but if it is on correctly it will most likely not work. There is a specially designed socket that fits flush and tight you will also need a locking tool to lock the gear in place. You also do not use an impact it can damage internals. Mine was a bear worked on it for two weeks with a normal socket etc. borrowed the correct socket and lock bar broke one 18" breaker bar and a 4 ft pipe for leverage and it finnaly came once I had the correct tools it took me 20 min to complete!    | ||
S1owner |
Conact Buellistic he has a system for replacing that part without removing the pully | ||
Jolly |
Ive been trying to track down the correct part numbers for that socket and pulley locking tool. I have both 27 tooth and a 29 tooth across my 5 Buells. do I need two different locking tools? thanks for any info on part numbers | ||
S1owner |
Sockets are on ebay under sportster pully nut the lock tool i have never found I borrowed it. You do not need diffrent tools they are the same for all sizes | ||
S1owner |
  | ||
Odd |
you do not have to remove the pully to replace the neutral switch, if you can't get in touch with Buellistic get back to me I know I have that tool somewhere. | ||
Jolly |
Thanks, Apparently Ive been calling it the wrong tool...or have only randomly looked when it wasnt available.... thanks for the listing, | ||
Two_seasons |
After removal, initial torque on the pulley nut is 50 ft/lbs, then continue to rotate counter-clockwise (tighten) until you can line up the two holes for the retainer plate. DO NOT rotate after the initial 50 more than 45 degrees past that point. FSM is your friend! You can get all the parts you need from HD. Do replace the pulley nut, retainer plate and two screws that hold that down. Cost is several dollars. By the way, I did use an impact gun on the pulley nut. Easy peasy and no issues so far. | ||
Buellrobot |
Has anyone had experience with anything like this? It looks a lot more economical than buying a tool... 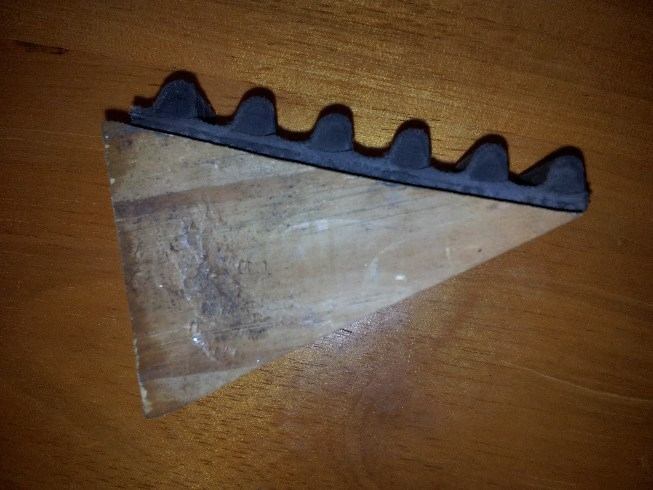 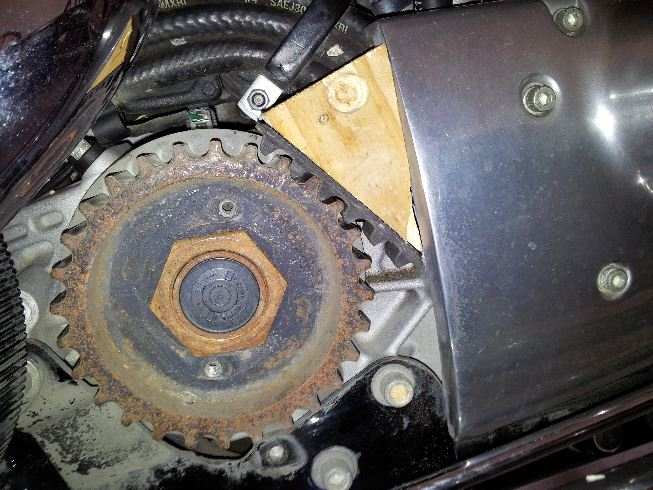 | ||
Jolly |
I've read, quite often, and for good reason, that you don't want to use an air tool to remove this nut (transfers energy back through the transmission that it was not designed to withstand), however, if you have the sprocket locking tool all of the energy would be captured by the locking tool instead of being transferred through the transmission..correct (transmission in neutral, locking tool installed)? or even with this sprocket locking tool is an air tool for removal still a "BAD" idea? Yes I have a service manual for every bike, and yes, I am asking this question without fully reading the manual first, so more of a "hey smart guys, whaddyathink(?)" while this is an active thread.... fortunately with all of my Buells I still have not had to do remove this sprocket, I have however, had to tighten two of them on bikes that were bought and previous owner didn't notice that the sprocket was slightly loose on the shaft, once tightened to spec, no issues! Fortunately! so just prepping for future jobs that will one day undoubtedly be required mx. | ||
Two_seasons |
No locking tool used to remove. I only used a torque wrench with the primary locking tool from American Sport Bike after I installed the new nut finger tight, along with the retainer plate and two screws. Follow the FSM and you are golden  | ||
S1owner |
I have heard of ones that come off nice and also ones that have to be cut off. Mine was a bear once i had the special socket and locking tool it was butter. | ||
Bluzm2 |
Ken, Yours was really bad, I've done a bunch and never had that much problem. Although I did have to use a 3/4" breaker bar on one.. | ||
S1owner |
Brad thats the way I roll!!!!! | ||
Kalali |
It would be harder if it looked rusted like the one pictured above. In this case I would apply some penetrating oil followed by some patience before dragging out the breaker bar. PB Blaster works quite well. | ||
Oldog |
Hey Buellrobot How a bout some details on your tool for removing the monster nut. Props Bro that is genius! | ||
S1owner |
The wood block is cool and economical! I would suggest using it at the rear of the pulley against the pivot block as the cam cover and the oil fittings could be damaged. If anyone needs a piece of belt I do have a broken belt | ||
Buellrobot |
I got a few tools (giant 1-7/8" socket + adapter 1/2" for breaker bar), plus an old belt from the local harley dealership, but am traveling for the next 2 weeks so will report back once I've had a chance to give this a shot. S1owner: Good point. I'm wondering if this might work: make a wedge of 2x4, with old pulley belt nailed to 2 sides, and then set it on top of the bottom 1/2 of the belt, where it feeds into the rear pulley ��then put something flat and solid (a cinder block or something) under the bottom of the belt, so the bottom facing side of the wedge remained horizontal. Would that put undue stress on the belt (and/or other bearings)? Crude drawing: 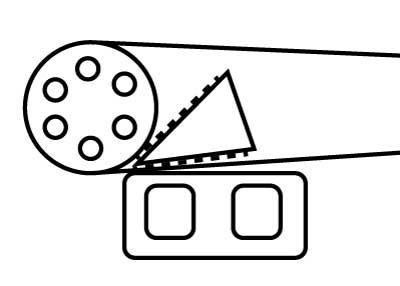 | ||
Oldog |
Bott How did you secure the belt section to the wedge? | ||
Alfau |
are you sure it's the switch and not the shifter pawl adjustment? TRANSMISSION INSTALLATION AND SHIFTER PAWL ADJUSTMENT 6.13 6. See Figure 6-61. Align shifter shaft. a. Place transmission in third gear. b. Place a No. 32 drill bit (0.116 in. dia.) through hole in detent plate (3), and between pawl (2) and drive pin at end of shifter drum shaft. c. Push down top of crank (4) to remove all clearance between pawl and drill bit; this will correctly align pawl to shift drum pins (do not push down with too great a force, as this might cause the shifter drum to rotate). d. With bit in place, tighten shifter shaft assembly bottom locknut (1) first to 90-110 in-lbs (10-12 Nm). Then, tighten shifter shaft assembly top locknut (1) to the same torque. | ||
Buellrobot |
Alfau, it might not be the switch, but my symptoms sounded very similar to at least one other board member, who reported a working neutral light when they replaced the switch. His light was intermittently working in cold weather and eventually stopped working. That said, when I saw the new switch, and how the mechanism works (pretty simple!), I definitely asked the same question you just did. I wouldn't mind running without the neutral light working, except that the bike dies when I try to warm it up on the kickstand. Oldog, I'm imagining that the belt pulling the wedge into the pulley would make it stay put (similar to how a baggy pant leg or hand could potentially get sucked in). If I'm understanding it correctly, the front drive nut is reverse threaded, so when you're removing it you'd be putting clockwise tension on the belt. The whole sketch/idea may be stupid though... I was pretty tired when I came up with it. | ||
S1owner |
I would not wedge it in the belt I would put it between the pulley and the swingarm pivot mount Thats where the tool would go plenty of strength there. |