| Author | Message | ||
S2forever |
Last weekend, I was forced to pull over on highway as my S2 suddenly made severe noise somewhere I could not figure out from and would not move even tough motor seemed fine. Eventually it ended up with S2 hauled to my home ~ 30 miles away. At home I found trans sprocket spline totally stripped. 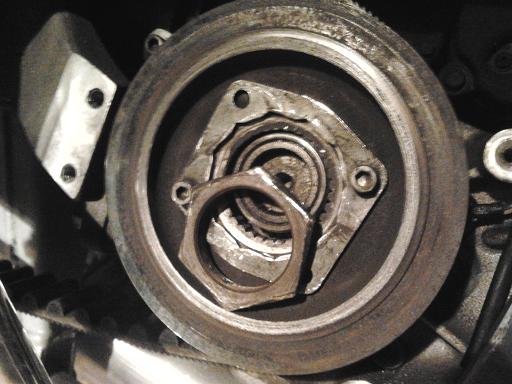 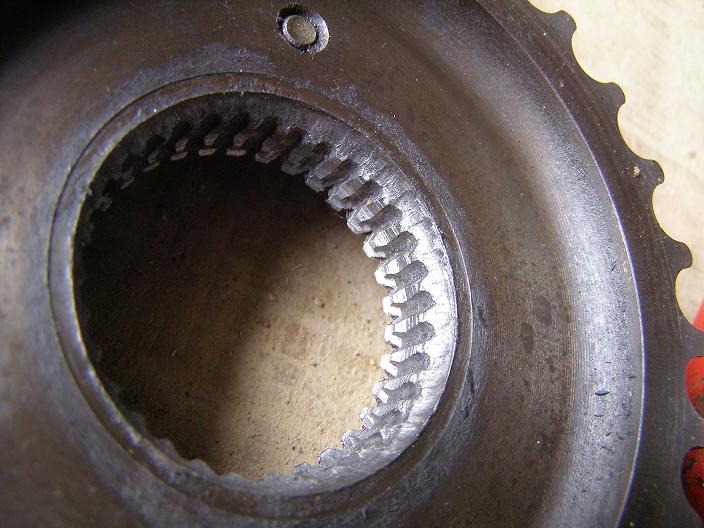 ok, partially it was my mistake as it is well known to be problematic. Upgraded stock HD sprocket is too expensive at ~ $300 here (and maybe another ~$100 for nut, lock plate, spacer and bolts), I am going for lighter and way cheaper BDL 29 T kit. It is readily available at Ebay. 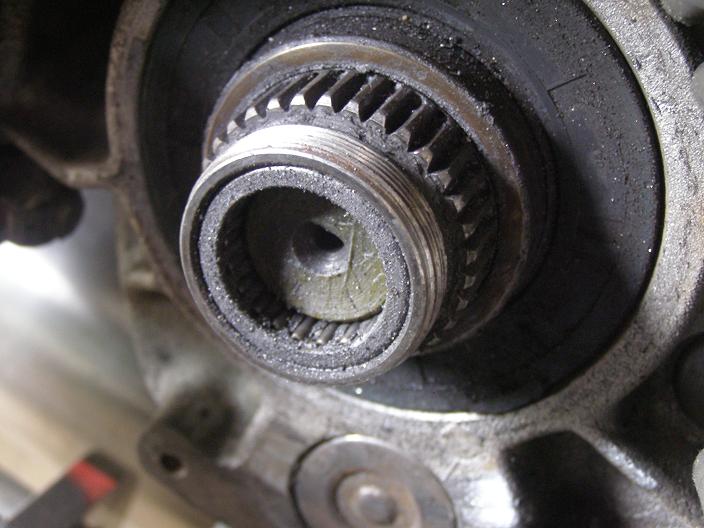 Alright will it be ready to ride when new sprocket is installed? Well, not quite. Close look at the main drive gear caught my attention. Needle bearing is exposed!!! I don't have much experience with major motor components but it looked very odd to me. Needle bearing is supposed to go between trans shaft and main drive gear but somehow it does not look that way. And any bearing should be sealed off! I looked into service manual and found that needle bearing is not fully driven in and closed end cap seal (pn #12030) is missing! How this can happen? My guess is that it rolled out that way from the factory. The bearing looked to be like that for long time. I am not yet sure what to do with it. Drive in the bearing further with 3-jaw bearing puller may be worth considering. Not sure if it will work without damaging main drive gear nut thread. Or I ride this season with the gear end sealed off with box tape to keep sand and dust out and oil in. My S2 is very early model (#3051) manufactured on Mar/93. Check yours if your S2 is early model. Too bad. | ||
Reepicheep |
There are two of those needle bearing cages in there, so there is still a LOT of support for that transmission output shaft that rides in the middle. If it were me, I'd clean the heck out of it, look for needle bearing damage (looks OK in the picture, but hard to tell with the gunk) and see if it will gently tap back in with a wooden dowel cut down to press on the race but not the 5th gear drive assembly. Tap easy, or let it be, don't force it. And cleaning will force a lot of that junk into the tranny, so you will need to flush that well also. If not, the biggest actual problem you have is probably the plug that is supposed to be in there. There is no room for it now. Even if the bearing didn't tap back in, I'd personally be tempted to get it durably plugged somehow (maybe silicone epoxy rescue tape used to fashion a "cap"), and keep riding it for a while, and just keep an eye on it to monitor those needle bearings. The good news is that if you do have to rebuild it, doing so on a tuber is work but nothing insane. You have a cartridge transmission, so you don't have to split the cases. | ||
S2forever |
I am half through your story. I rode it with belt tight for first 6 k miles when rear wheel bearing race spun. Did it drive needle bearing out to eventually pop end cap seal off? Mysterious. (Message edited by s2forever on April 30, 2014) | ||
Smoke |
happened to my s1 a long time back. cleaned bearing, packed it with grease and tapped it back in. bought a new cap from the HD shop and tapped it in. that was in 1999 and still good to go. i wouldn't leave it as is. mine when spotted was further exposed than yours. loctite the nut and lock screws. have fun, tim | ||
Reepicheep |
When my M2 failed, by the time I noticed, that needle bearing cage had rusted to half gone, and the needle bearings were more or less free floating. Mine didn't creep out and my cap was still on, but it seems more common to see them creep just like yours did. | ||
Hootowl |
Here's the sprocket seal you need. http://americansportbike.com/newdir/Item/17322 | ||
S2forever |
BDL TPS-29 sprocket kit delivered. Teeth count 29. Alright. But it did not take long to realize that what an envision I had on the title of this thread! 1) Spacer does not fit. Even light hammering would not work. I found its inside-diameter is ~0.002" smaller than stock part's. Main driver gear is intact and stock spacer fits smooth and perfect. What a holy garbage. 2) Found sprocket flange, which is larger in diameter than stock part, touches swingarm mount block at some point as it rotates. It may work as it is but it surely will grind swingarm block a little. I am concerned that it may damage main drive gear, shaft and bearings. I do not know. (BDL specify this part for Sportster but not for Buell) 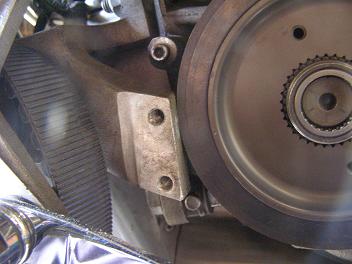 So I looked away from this headache for HD sprocket which is known to work on my bike. I called HD Korea (the only dealer in the country). What the h*ll, they sell it (sprocket alone) for ~$350. New style spacer is ~$55. Well, I find myself googling and ebaying again... | ||
S2forever |
Last weekend, while still waiting for correct spacer to come in, I worked on pushing back in the roller bearing. I used damaged sprocket, new nut, 2-jaw puller, 23 mm socket and large bolt. Voila it worked perfectly without any damage to main bearing, main drive gear thread and nut. I was worried about damage on thread and nut but they seemed more than strong enough to withstand pushing force. 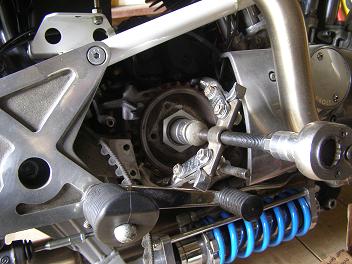 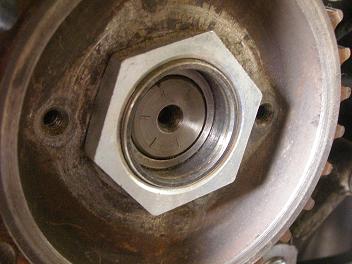 Oops, roller bearing is ~ 0.340" in from flush (spec is 0.285" ~ 0.315") but it seems ok. A drop of trans oil put in and end cap seal pushed in. 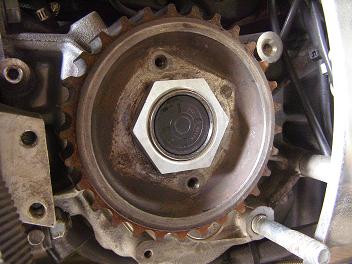 It is very workable job, whole thing taking less than 20 minutes. 3-jaw puller would be better to work with. And you will get to know why sprocket flange is missing when you try it out. | ||
4speeder |
That's an excellent step by step description and pics. Thanks for taking the time to post this info. | ||
Reepicheep |
Nice! As I recall, there is a measurable gap between those two roller bearings (1/8 or 1/4 inch maybe?), so it seems hard to imagine how seating it a little too deeply could hurt anything. | ||
Hootowl |
Does the seal just press in there, or would it be wise to add some sort of adhesive? Loctite? Epoxy? | ||
S2forever |
Reep, I hope so too. Hootowl, good point. Endcap seal is tight but not as tight as I expected. I will keep an eye on that. I should have cleaned up metal debris on the bearing more carefully but I forgot. No force ever to drive gear bearing, needs no special or home made tool, no damage to thread and nut, just parts you aleady have and easy. Most difficult thing is finding a large bolt that fits socket drive hole. (Message edited by s2forever on May 13, 2014) | ||
S2forever |
(Installing sprocket may be straightforward but I will just post what I did to make this thread complete.) Finally JIMS spacer (33344-94) has come in. It is direct replacement to HD part and looks very high quality. It is fatter and shorter than old stock part (33334-85). Of course it is a snug fit to main gear as it should be. In the picture below left is JIMS and right is old stock one. 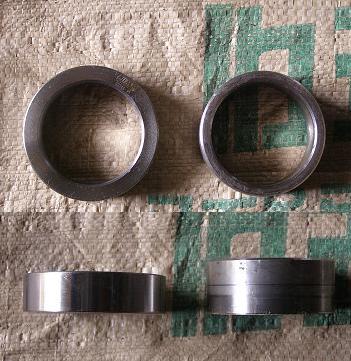 Here is how it looks when new spacer and new seal are installed. 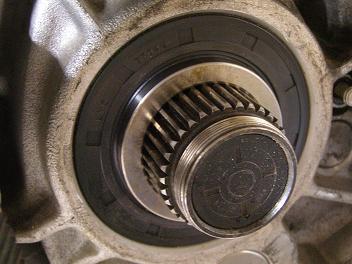 My plan was to grind off some metal where sprocket touches mount block but there was no enough space for my angle grinder. Here is sprocket with nut and lock plate in place.  With swingarm drive support (not pictured) installed and sprocket cover off as I wanted to monitor sprocket assembly for a while I went for test ride. Initially sprocket grinding on swingarm mount block was like light brake applied periodically but its resistance was overcome quickly. After ~50 miles test ride, everything looks fine. FYI, my sprocket (old design) failed at 13 k miles (with belt tight for the first 6 k). BTW does anybody know how long BDL aluminum sprocket lasts? Any long term update on that? | ||
S2forever |
Follow up; BDL is good for last 4 k miles. |