| Author | Message | ||
Zenbiker |
To answer Brad's riddle, the S2 Timing Cup is on the left. | ||
Ratbuell |
Yes, there can be that much variation in fuel cells. | ||
Bluzm2 |
Thanks Neil, I forgot to post the answer! A carb motor doesn't run very good with the one on the right. Or so I've heard.......  | ||
Jolly |
parts are slowly arriving, but not everything is going to be here in time to work on over the weekend. the engine stand showed up today and the collapsible push rod tube covers with billet bases showed up from zippers. since I am pulling the rocker boxes anyway to pull the push rods, to pull the cam cover to replace the oil pump drive gear I want to go back together with the best parts and I have used the zippers collapsible push rod tube covers with billet bases (stock solid push rods) on my S3 with great results, so...rabbit hole...as long as I am there might as well do...... | ||
Terser |
Sounds like everything is coming together! i almost have the carb off my s2 but no rush as i wait for a rebuild kit. quite a tight squeeze to disconnect all the stuff from it. | ||
Jolly |
Parts from American Sport Bike all showed up a few days ago and the motor is showing up today. Ill spend the evening nights and weekend if needed getting all of the new parts in place so that this thing is ready to go for the engine swap. which will leave me with tuning a thunderstorm motor, a 2inch exhaust into a supertrapp with 12 - 14 discs? followed by a front fork swap and then rebuild the ones that come off the bike. I need to replace all of the brake fluid as well. front "looks" ok, but the rear is black! then a Baldwin saddles seat, and then sort body color....the only unknown at this point is the status of the rear shock...I've got no idea, but everything else was really rough so I'm hedging my bet that this is shot as well.... I could use a little luck at this point though! | ||
Jolly |
finally got off work at a decent time so I was able to get a little work done on the motor....built a stand for it and then got out the scrub brushes and s100 and the hose...now of course it raining while I am working on it..but that just figures! I got the rocker boxes pulled....and they are in terrible shape!! they are the chrome versions and they look terrible. I have the XB style covers so that solves part of it, but the rocker box themselves are in bad shape...going to have to figure that out...maybe pull the brushed finished ones from the 95 S2 motor and use them on this 98 motor, at least I wont have to spend any money.... got the push rods out and then pulled the cam cover and got the oil pump drive gear replaced.....one nice surprise along the way...one of the cam cover bolts at about the 1:00 position around the oil filter was stripped out...I promptly broke my last EZ-out in side the bolt trying to remove it...Not sure why they call those things EZ-outs..I have broken one every single time I have needed to use it. fortunately I was able to grind the head off, then pull the cover and remove the threaded shaft that was left behind. tomorrow I will pull the stock push rod tubes and replace with the billet based and collapsible push rod tubes (using stock push rods) from Zippers. I put a set on my S3 and have not had an issue with leaking push rod tubes or bases at all so while I have the motor sitting on a stand its on the do it now list. then XB rocker box conversion and then primary chain adjuster foot and then its ready to go in the bike! I may go ahead and send the cam cover off to NRHS and have it cut down... its late so that's a decision for tomorrow. | ||
Jolly |
shift shaft is thrashed...the splines are just roughed up enough I cant fit any of the shifters on to the shaft...actually broke one of the cast ones trying to spread it open enough to see If it would slip on.... tracked down a new shift shaft today, so one more thing to fix on this motor...but I was going to be in there anyway replacing the primary chain adjustor.....so again...here we go down the rabbit hole. and since its not a true S2 motor, and the cam cover is off....might as well send it out and have it cut down..... found a set of plain rocker boxes on ebay so now I don't have to "steal" the ones from the S2 motor.... spent some time today cleaning up the heads and touching up the black paint then installed the zippers collapsible push rod tube assemblies. getting closer to having this motor ready to swap! | ||
Jolly |
I have these collapsibile push rod tube assemblies from zippers performance installed on two motors now, I really prefer how they mate up and install compared to the stock sportster style. they are like the ones on big-twins. 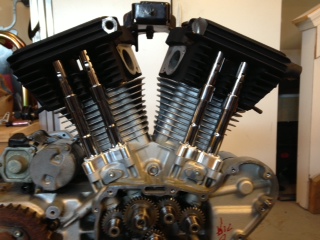 | ||
Jolly |
top motor mount off to the powder-coater... today is a stay at home day so Im going to get some time on the bike. its snowing and sleeting..a beautiful winter mix... I have to replace the oil pump gasket....didn't think about it while I was replacing the oil pump drive gear...might as well..they go bad and its a leak point so replace gasket and start working towards replacing the shift shaft assembly, splines are so beat up that I cant get a shift shaft on...I think the previous owner beat one on with a hammer and didn't have it aligned so now its more work for me. and another surprise..while looking at removing the side plate for the upgraded side plate project, I found one of the bolts rounded off.....probably red Loctite and over-torqued then rounded off for good measure. cam cover was shipped yesterday to NRHS for the cut down and painted black. its a little rough so the best fix is to paint it the same texture black as the heads (HD texture black) should have the rocker box covers from Al and the cam cover back from NRHS by Friday.... | ||
Jolly |
oil pump gasket removed and rounded off (internal hex gored)bolt removed... heated it up with a torch, then let it cool down, repeat...then drove in the hex bit with a hammer (about the only use for a hammer on a motorcycle..rubber mallets of course are another story...)to seat it well and used this tool from sears (have used this thing many times and it normally does the trick... by the way, excellent for removing rotor bolts!) its a manual impact driver that you strike with a hammer and each blow as it drives in it also turns about a 1/16th or 1/8th of a twist. then a quick trip to fastenall to buy 6 new bolts to replace the old ones with since they were all a little rough. also bought a 3ft length of 1/4 20 threaded rod to cut down into 6 inch sections (then cleaned the threads with a die) to use as locating rods to reinstall the cam cover. by threading these into the bolt holes you can slip the gasket over these and then slip the cam cover on, catch a few bolts then remove the guide rods...easy work! started pulling down the pieces of the S2 that will need to come off to swap motor, exhaust, battery etc.... I'm also so confident that I'm going to be able to sort out having redesigned side plates to use newer style kickstands that I bought a kick stand for an x1 off of ebay http://www.sears.com/craftsman-impact-driver/p-00947641000P 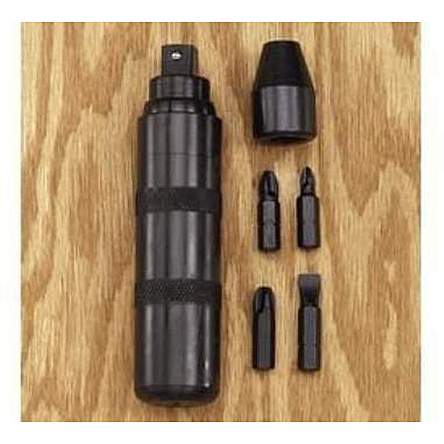 | ||
Jolly |
cam cover cut down, since it was a little marred up I decided to paint it to match the heads. If this were a true S2 motor I might have left the cam cover alone but since its really an S3T with thunderstorm heads, I went ahead and did the cut down and paint to match. now its either clean up the pulley or use a nice dress out part like the one on my X1 which is a solid billet disk or the one that American Sport Bike sells which has a colored or CF center disk. or I may work with the machinist and design one since the solid CNC one that I have on my X! seems to be no longer available.....after the S2 side plate project is done.... 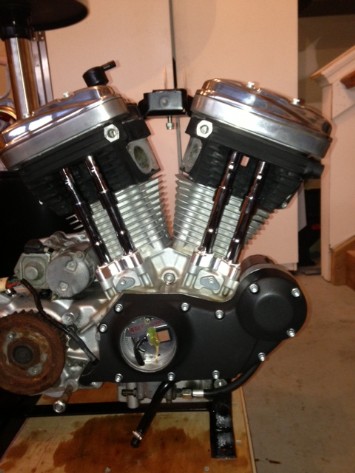 | ||
Jolly |
experts weight in please! I had to replace the shift shaft, the end of the one on this motor was mushroomed out just enough that I could not get a shift lever back on nor could I clean it up enough to save it so I just went ahead and replaced it. As for the set up per the book.. 1) place transmission in 3rd gear 2)place a #32 drill bit through hole in detente plate and between pawl and drive pin at end of shift drum. this is what I was looking at: 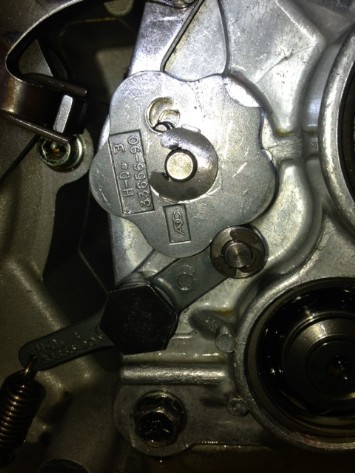 3) push down on top of crank to remove all clearance between pawl and drill bit this will correctly align pawl to shift drum pins (do not push down with too much force as this might cause the shifter drum to rotate) so I pushed down just hard enough to take out all slop with the top of the spring resting on the top of the flat plate (arm?) on the shift shaft and base plate without rotating shift drum - this spring and flat "arms" provide the return to center after shifting? after nuts tightened per book spec there is a very little bit of rotation in the shift shaft as it moves between the upper and lower arms of the springs and the arm on the shift shaft and base plate. IS THIS CORRECT? 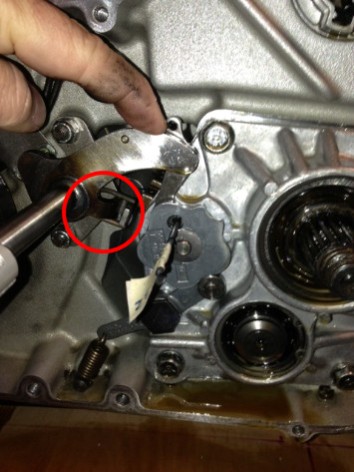 thanks to the experts! | ||
Jolly |
It just seemed that with the play that was left in rotation between the spring tabs and the shift shaft tab arm and tab arm on the base plate that it may not have been so critical to drive 15 miles to the only place that had an actual #32 drill bit in stock so that I could do this job... | ||
Steveford |
Kinda sorta. You want an old beater primary cover that you can cut windows into. You put the cut cover on which will line everything up and THEN you do the drill bit routine. It's just a bizarre set up compared to what the rest of the planet arrived at but that's what they did. | ||
Jolly |
so you need the old cover installed so that the shift shaft is held in place at the outside to limit angle deflection when pressing down on the arm?.. yeah that's a trick not found in the manual... hmmm don't have one of those to even consider trashing.... yeah...I agree that is bizarre! | ||
Steveford |
Yep. Put on the swiss cheesed cover, tighten it up and then set the free play. I don't know if you can achieve satisfactory results without the cover trick as I never tried it any other way. I'm afraid I don't have a cover as I just used the ones at the shop. | ||
Jolly |
Ahhhhhhh testing my patience on day one of the new year..... Installing the brand new motor mount from American Sport Bike and the left motor mount hole in the head stripped out..... Ouch!!! Going to order a "time-sert" thread repair kit for 7/16-14 bolt... Hole is 1.25 deep so a 1.0 insert since its a blind hole (dead ends in the head-not a pass through) I'll order tomorrow, maybe have it Saturday?? See my cry for help in the old school pages if you want the details, I wanted a clean topic thread for this issue so others could use the notes it generated on the specific topic... | ||
Jolly |
Issue solved with a "Time-Sert". motor mount installed and torqued to 60 ft lbs..no issues! see this thread for photos and advice of others. http://www.badweatherbikers.com/buell/messages/476 23/728956.html?1388877069 | ||
Jolly |
Ive been all through this motor now, repaired some extremely limiting issues, upgraded some other parts and the motor is now finally ready to be installed in the S2. the following has been done to the motor: heads re-painted/touched up exhaust studs replaced top motor mount powdercoated oil pump drive gear replaced Zippers collapsible push rod tube assemblies cam cover cut down and painted XB style rocker box conversion all new bolts for the cam cover shift shaft replaced front motor mount bolt hole repaired with a time-sert Billet front motor mount (American Sport Bike) installed updated primary chain tensioned installed | ||
Jolly |
had a nice surprise today on a lucky find! my good friend Buelljunkie..(I gotta tell you, Ive met some great people while trying to resurrect the side plates for the S2) ...sent me a note about a front fairing NOS black sapphire pearl for an S2...wondered if I was looking for one....ABSOLUTELY!! bought it today, kind of hard to justify it as a birthday present since I just spent the money on the first one-off set of side plates for the S2 so this is....my wife's birthday present...hmmm.... anyway, thanks Dave!! anyone have a black sapphire pearl fender and fuel tank cover for sale! PM me if you do! | ||
Jefc73 |
Sick, Sick,Sick! lol | ||
Jolly |
yeah, you know what's really sad in this whole process is the bike I should have bought... I test rode a very nice S2T with two sets of bags, ready to go, only needed a little electrical issue sorted out for the turn signals...price was good, only "issue" it had pin striping on the body work, every panel which meant that it would have needed to be repainted.....I am so far past a repaint that I look back at that bike and think, SHOULD HAVE BOUGHT IT! three days after I looked at it someone else bought it and stripped it down to parts.... I knew I should have bought that bike!, of course the "plus" side is the extra experience and tricks I am learning rebuilding this one.... OUCH | ||
Phelan |
The truth is, you bought the one you did because you really wanted an excuse to build it the way you wanted it  | ||
Jolly |
well it was finally warm enough and Steveford and I could finally get out schedules sorted out so he came down this morning and we worked on the motor swap..THANKS Steve! big help, wouldn't even accept gas money or money for a nice lunch on the way home! I had to build a structure to suspend the bike from which I spent some time yesterday doing to get everything ready. 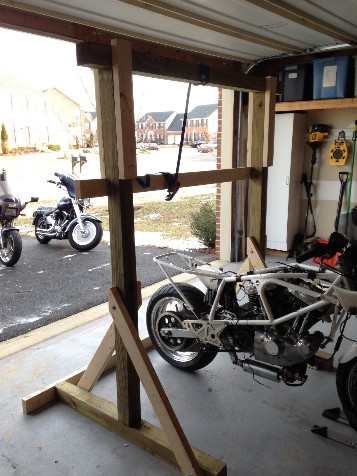 | ||
Jolly |
we got the motor out and it only fought us a little bit, randomly, as we standing there mentally trying to work it out a buddy of mine stopped by...must have done something right in my past life because this guy hasn't been by in over a month and randomly on cue when we need an extra hand.... so motor was pulled... 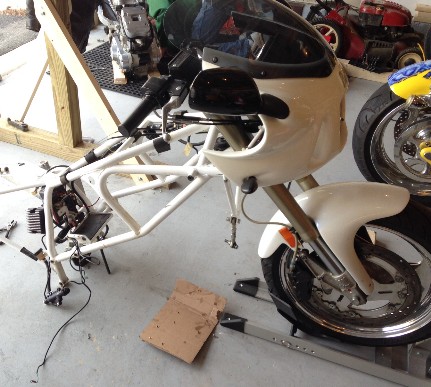 | ||
Jolly |
"new" motor installed, 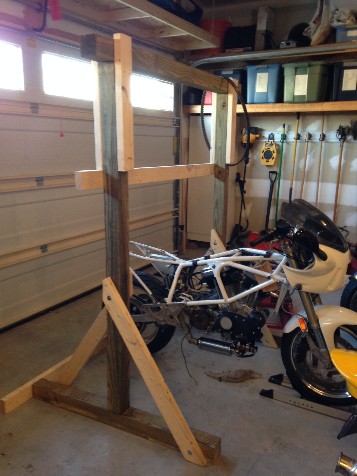 only real issue is the front horizontal tie bar that connects near the oil filter had a bent bolt in mounting it to the old motor. I m sure that motor had been pulled and reinstalled and done so poorly. so now with everything tightened up the front tie bar doesn't line up with the mount point on the motor. Is this simply a matter of "shifting" the motor to get it to line up? we also installed a new front isolator (rear ones when I get my new side plates) and it did not come with a sleeve to tighten up the tolerance of the bolt through the isolator...is this an issue? I have read that others had the same question and no real issue...??? we mounted the new style isolator above the frame plate instead of under it. the directions showed two ways of installing the isolator depending on whether you have a notched frame or not, if there is a notched frame on the steering tube you mount the isolator above the plate, if no notch in the steering tube it goes below the plate, both Steve and I had read that others had the same questions and mounted it above the cross plate instead of under even though I do not have a notched frame. any input from others that have done the same thing? | ||
Steveford |
You're welcome, my good deed for the day. The things you do come back at you - in my case, a guitar I had up for sale sold this afternoon which is great as now I can make my mortgage payment. Buying that Les Paul really put me behind the 8 Ball but now it all worked out. You're going to have to shove the motor to the right to get the tie bar to line up correctly so eat your Wheaties. You can try putting the front isolator underneath and see if you can get the bolt to line up right but it wouldn't on my S2 with the S3 motor. For the D washer on your old torn isolator what I meant was I'd never seen one quite so gigantic as the one on your bike. Let me know if you own the same S3 that I sold many years ago. I just thought of something - when you get a front tie bar bolt that isn't shaped like a banana you might want to loosen up all of the mounts (and front isolator) before you give the motor a mighty heave to the right. That might help matter some. (Message edited by SteveFord on February 02, 2014) | ||
Jolly |
Here is the front horizontal stabilizer mount bolt Steve is referring to..... 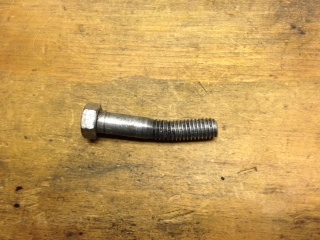 | ||
Jolly |
this is how far off the motor is in proper alignment... 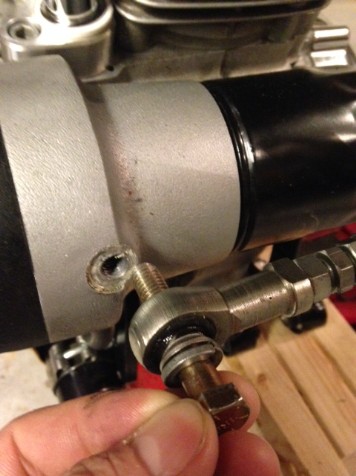 after cleaning the threads and mating surface I had the wife come out to help as this was obviously going to take two people... I placed a lift under the left side of the motor so that when it was jacked up it would pull a bit to the correct side, then loosened the top isolator bolt and jacked it up, it pulled a little closer.. the bike is sitting close enough to a wall that I could really get me back into it...quite literally! I leaned against the wall, put my feet up on the side of the motor and pushed just a bit while the wife stood there and threaded the bolt in. I didnt have to push very hard and might have been able to do it by myself, in a pinch...but I had help so why do things the hard way... perfect! 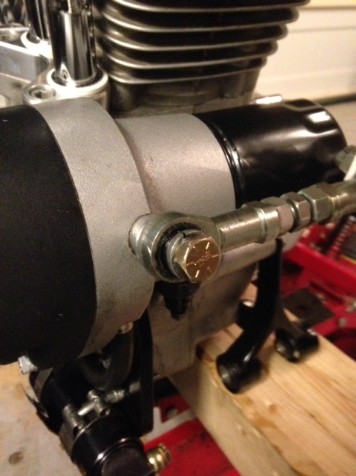 any one have any photos of different routing of oil lines since I cut down the cam cover? now it's down to running wires and oil lines..fuel lines and carb...clutch...side plates....new kick stand...new body work....new.... |