| Author | Message | ||
Jolly |
This poor motor I bought to replace the shot motor in my S2 has a few of its own issues, too be expected from a used motor for sure so no ill thoughts towards the person I bought it from, its just one of those things.. getting ready to do a motor swap and as I was installing the new motor mount from American Sport Bike the left side head bolt stripped at about 40 ft lbs, didn't make it anywhere near the 60ft lb requirement. a few questions might be about install technique...followed the directions exactly, red locktite on the bolt threads, oil on both sides of the washer to remove friction and get a true stretch torque value... walked both in slowly increasing torque to get them both in without pulling one side...right side went in perfectly....left side stripped out.. WHATS THE BEST REPAIR? the head is not broken or damaged its just the bolt hole threads completely stripped out. can this be repaired without pulling the head and what insert is the best? thanks...I'm sure I am not the first guy to have this happen with these motors... Im glad I found it now, threads must have been previously damaged and would surely have lead to a broken bolt sheared off or worse... | ||
S1owner |
Does this hole extend into the head? Or is it a dead end hole? I only ask because maybe a heli coil will work | ||
Lynrd |
I have used timeserts on cylinder base studs in an Evolution engine that pulled two of the studs from the cases. The insert was stronger than the aluminum that it replaced. 24,000 more miles on the bike (1993 FXR "Cheryl") after that repair when I sold it with no further issues, and it's still on the road today. I did ALL of the base stud holes with the logic that if two had failed, six more were about to. I have not used these in this application so I will defer to anyone that has, but if it were mine, I would go that way. The torque values are similar enough to give me confidence. With the engine out, you might be able to get it with a hand drill, but you're risking boring the larger hole catywumpus to the original. Again, I haven't had to do this, but when/if I do, I would have that head off and do the boring on a drill press to make sure I get it square. (Message edited by Lynrd on January 01, 2014) | ||
Jolly |
yeah its time to step away from this one for a day and think about it...Im leaning towards a time-sert, watched the video, seems easy enough, a few videos show a hand drill and a few show it clearly being done on a drill press set up...problem with a drill press, if its not perfectly square, it's definitely going to cut at what ever angle you have the drill press set up for if you don't have a jig for this very specific job... it appears that you only drill out the threads then re-tapping for the time-sert so wouldn't the drill bit walk its' self in if your careful??? well were having fun now.... ouch! | ||
Jolly |
oh, to answer the previous question..its a blind hole..bottoms out in the head...measured depth is about 1.25 inches.. | ||
Lynrd |
Jolly- Yes, you are drilling just slightly larger than the olde hole, then tapping threads into that hole, then insetting the timesert and locking it in place. If you are careful a hand drill would do the job. I did use a hand drill on those cases, using the studs still in place to guide my hand. Good call to sit back for a day or so and come up with a plan. Good luck! | ||
Dannybuell |
you are just drilling out the threads, go slow low rpm's and you will do OK. | ||
Jolly |
yeah...I think I am going to order the time-sert 7/16 - 14 thread repair, have measured the hole it's 1.25 inches deep, so a 1 inch thread repair per the website. motor is sitting on a stand and I have clear unobstructed access to the hole. I'm going to use a hand drill and go slow without disassembling the head from the motor since I have clear access. the threads are almost all removed already so it should be fairly easy with limited risk of drilling at an off angle, its almost a smooth bore now as it is. I'm going to get their thread tap guide to use to help line the tap up. everyone is closed today so its nothing I can order today. any additional in-put appreciated, surely someone else has had to do this with the number of motor mount breaks there have been. I'll keep folks posted on the process. | ||
Jolly |
almost all of the threads pulled right out... 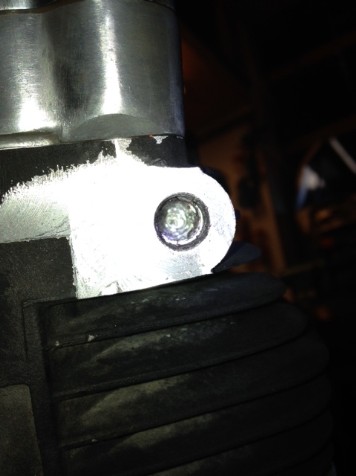 | ||
Buelljunkie |
Jolly-I think you have the skill and patience to do it yourself with success. I agree with the others about stepping away for a bit...probably a wise idea. Just a thought...before drilling you could always insert a fresh bolt and spin it around a few times to clean out the hole a bit more. Maybe use one with sharper, finer threads.. Personally I would be a more concerned about keeping the tap in the correct position while cutting new threads than I would be about keeping the drill in position. At least with the drill your wrist isn't rotating back and forth like it will when you're tapping, know what I mean? I prefer the L-handle drills over the T-handle...I think it's easier to keep the bit in line. I usually wrap my thumb & forefinger around the "heel" of the drill with my index finger extending down the side in line with the bit. I operate the trigger with my middle and/or ring finger. You can't do this with a T-handle. It seems to work very well on the cordless DeWalt I have, there's actually a groove around the back of the drill seemingly for this purpose and it's very comfortable. Anymore most cordless drills seem to be the T-handle design though...I had to buy a hammer drill to get the L-handle, but you can still select no-hammer mode. | ||
Jolly |
here is an example using no jig and a hand drill... http://www.youtube.com/watch?v=39nTN2uuDhY what material are the thunderstorm heads? | ||
Lynrd |
Cast aluminum. Don't know the alloy. | ||
S1owner |
And do not do as he did in the vid and run the tap straight in should go 1 full turn back out 1/4 turn so on and so forth this way it cleans the threads and cuts them properly. The Heli coil is the same thing it will work I have used them in some high stress applications and it works great in the aluminum it will probably be stronger then before | ||
Kc_zombie |
Jolly, Sorry I didn't finish our conversation yesterday on the matter, family duties called. You can always use the old engine mount as your jig, similar to using an exhaust stud jig. You will have to pre-drill the old mount to the correct size. Be sure to measure the depth on the bit to make sure you do not pass through the original depth on the head. The time-sert or Heli-coil is the best way to go in my opinion. The improved strength factor alone is enough to convince me. Installation may be easier as well. I know this is hind site, but part of used engine buying 101 is checking the integrity of all mounting surfaces, threaded parts, mounting holes, etc. It doesn't take a mechanic to strip a bike for salvage, so lots of stuff can go wrong during a quick and dirty unskilled tear down.  | ||
Jefc73 |
You make good valid points Vince. Great idea with the old engine mount. | ||
Kc_zombie |
Hey Jeff! Happy new year my friend! | ||
Jolly |
I ordered the time-sert kit today for a 7/16-14 bolt and a 1 inch insert. the kit comes with 5 carbon steel inserts which should be fine according to the very knowledgeable rep that assisted me...but I went ahead and ordered the stainless-steel inserts as an additional precaution, the kit still comes with the 5 carbon steel so I have extras now. the kit comes with the 5 inserts (plus the 2 stainless in addition that I ordered), the bit, the insert tool, the tap and the tool for cutting the counter recess. I added in the cutting oil and the very high temp high strength loc-tite (good to 660 degrees) for the insert. I plan on using my old stock motor mount as a guide and may actually take it to a local shop and have it over sized and a nice guide pressed into it. then it becomes a tool that anyone else can borrow if they need it. I really have nothing negative to say about the guy I bought the motor from, I paid a good price for it, and he shipped it quickly, most of what I am doing to the motor I would have done to any motor, and some things are just simply beyond what's easy to identify as an issue. I wish it had been in a little better shape, but its a used engine and we all know that these have weak points that need to be addressed. its forcing me to get in deeper, solve more issues than I would have gotten into with out the need to, so I am learning even more as I go here, which is always a good thing! and of course sharing my lessons learned and knowledge gained along the way.... maybe through my misfortune we all learn a great fix to a stripped out front engine mount hole. and I have a new tool for the garage, which I am willing to share if anyone needs to borrow it, Ill have 130.00 total in the tool, but the inserts are only about 3.00 a piece..... In some deranged, only a Buell guy would understand, way I'm actually looking forward to fixing this myself... approach: have a plan have the right tools do research on process have a back up plan back up plan = call local excellent mechanic and have open check book if it goes poorly! best case, I fix it stronger and better than it was delivered, and share process worst case, buy a new head.... tool should be here hopefully Saturday if the weather doesn't delay the mail.. On the plus side I will truly OWN this motorcycle when its finished..  | ||
S1owner |
Jolly you forgot one very important step Contact badweb for knowledge and assistance! It ussually ranks at 1 or 2 on my list | ||
Steveford |
You're not really catching a break with this project, are you? I've never had a problem with HeliCoils but the trick is to follow the instructions. You're really just installing a metal spring in there and need to get it about two full turns into the hole and then smack the tang off with a punch and then fish out the tang with a pair of electrician's pliers or a blob of grease on a pipe cleaner. I guess I won't come down this Saturday as you'll need that mount on to swap out the motors. I should mention that you want to run a tap through these holes to clean out the old dried Red Loctite and flush it out real good with contact cleaner before you install the new bolts. (Message edited by SteveFord on January 03, 2014) | ||
Natexlh1000 |
Has anyone heard of someone drilling/tapping the hole up to a larger size and then just using larger bolts? Would you suppose that would weaken the head casting too much? | ||
Dannybuell |
I have been told that the the marriage of steel to aluminum with a heli-coil type device creates a stronger connection with the steel of the bolt mating with the steel heli-coil. This is more than a repair, it is an upgrade. | ||
Lynrd |
You beat me to it, but that's exactly right. Those timeserts are not going anywhere once installed right and steel is not going to loose threads easily. You COULD drill larger and go oversize I think, but If you actually went through the trouble to source Grade 9 bolts to do it right, you'd still have the same aluminum thread vulnerability. If Jolly hadn't caught this when he did, this could have been another "I broke the front head" story. I expect that once repaired and with the improved (triangulated) front mount, this bike will see no more problems. | ||
Buellistic |
A "HELICOIL" REPAIR KIT is the answer ... Your local AUTO PARTS STORE will carry them ... GOOGLE Helicoil for more "INFO" !!! The MOTOR MOUNT is a HIGH STRESSED PART, if not assembled correctly it will self destruct as will the ISOLATOR ... The FACTORY SERVICE MANUAL does not give you enough information on this ... FRONT ISOLATOR/MOTOR MOUNT Class 101, just PM me if you want a copy ... | ||
Daveswan |
Time-serts are far superior to helicoil. I've used both and won't use a helicoil again except on a lawn mower. | ||
Bluzm2 |
Jolly, If you bring it to a machine shop have them check to make sure both faying surfaces are flat and in the same plane. This will prevent the motor mount from "rocking" top to bottom. This is one of the major failure modes. (Message edited by bluzm2 on January 04, 2014) | ||
Buellistic |
"THANKS", Daveswan for the "INFO" up-date !!! TIME-SERTS are far SUPERIOR !!! | ||
Mhlunsford |
I have done similar things with heli coils for the cyclinder studs, worked pretty well. When I was young I would over tighten things. I recently had the motor mount problem too. The solution for me was the reverse drill, then 7/16 tap to clean up the threads. I used the motor mount and new isolator from American Sport Bike and all went well. | ||
Jolly |
DONE! I used the "Time-Sert" product to repair the thread. I ordered the kit on Thursday, and it showed up in the mail today. drilled out the hole using the supplied drill bit and a cordless drill with an adjustable clutch and low speed. it basically walked itself in since it wasn't removing very much material it followed the original hole straight in. then switching to the counter bore bit so that it cut a nice recess for the insert to completely sit flush. 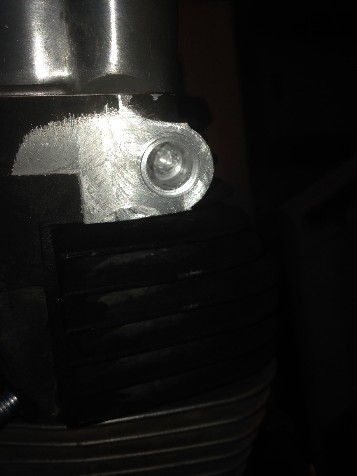 then using the supplied tap and tap guide to get the tap started square to the face I tapped the threads. this photo does not show the tap guide, I used it to get about a 1/4 inch in then stopped using it once I had good threads cut to guide the tap. 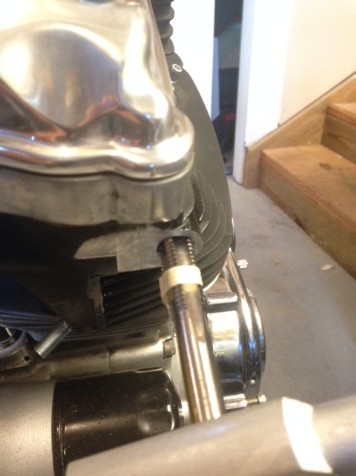 next step is to install the insert with the supplied installation tool using the HIGH temp HIGH strength lock-tite, not really required I suppose since the insert really locks itself in place, but worth the extra insurance.. 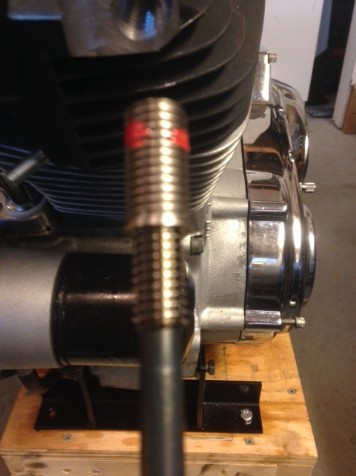 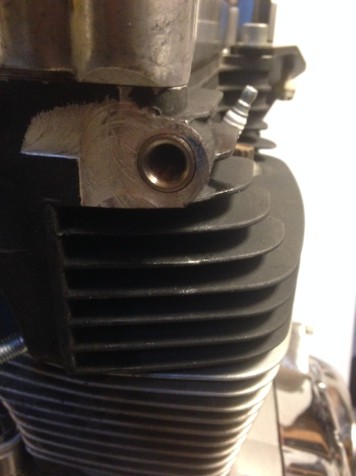 final step, test everything out by installing the motor mount and carefully following instructions to torque to 60ftlbs.. no issues with threads..everything lined up and torqued without issue. 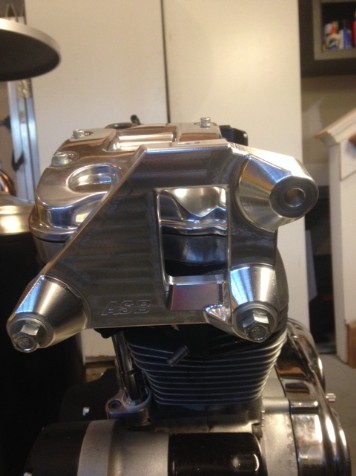 | ||
Jolly |
This really is a great product and I can really recommend it to anyone that has a similar issue, it just seems to be structurally superior to a heli-coil for the application, torque and stress this point requires. It didn't fight me at all and was very straight forward and easy to use. Time-Sert 7/16-14 (size and pitch)repair kit for a 1.25 inch deep blind hole kit consisted of the following: -drill bit -counter bore bit -tap -installation tool -5 carbon inserts 3/4 inch (not used) purchased in a addition -1.0 inch stainless steel insert (recommended .25 inch shorter than max depth of hole for a blind hole repair so that the insert tool can pass fully through the insert to set it in place) -cutting oil -tap guide -high temp high heat locktite | ||
Buelljunkie |
Nice job, Jolly. Glad everything worked out. The American Sport Bike mount sure looks nice.. |