| Author | Message | ||
Zrx1100 |
Looking to borrow the special harley tool to install the updated crank seal. I need to rip into the primary, so while there, figure will do some preventative maintenance. Let me know if anyone has this tool. thank you in advance. | ||
Reepicheep |
The tool makes it easy, but you can fabricate your own tool pretty easily as well. I did it with a dowel rod... Cut it smooth and flush with a miter box / hack saw. Then measure the depth you want to seat the seal, and cut or file half the face of the dowel rod down that far. You then carefully position the dowel rod with the "higher" part of the face on the case, and the "lower" part of the face on the seal, and tap gently and carefully to seat it. It goes as far as it is supposed too, then stops. The seating depth can't be too deep, or the bearings will chew through the seal, that is what you are trying to avoid. So it doesn't need to be a perfect seat depth, there is a decent range of "harmless error". I used the infamous green tinker toy piece. I was working on it when my second oldest (who is now in 7th grade but was young then) walked out and first asked "what are you doing" then shortly after said "Hey! You cut up my tinker toy!". I was *sooo* busted. | ||
Buellistic |
The big pain in the arse is getting the seal out and there is no special tool for that ... "i" put my new seal in without this expensive installation special tool !!! | ||
Reepicheep |
There is a perfect tool for removing that seal.... two drywall screws and two pairs of pliars. Either find the metal part of the seal, or if there is no perpindicular part carefully tap the metal part of the seal to fold it "in", us a center punch to set a divot so you can drill a small hole, and put a drywall screw in. Repeat on two sides if you want to make it easy. Then just yank the screws, it will pop right out. 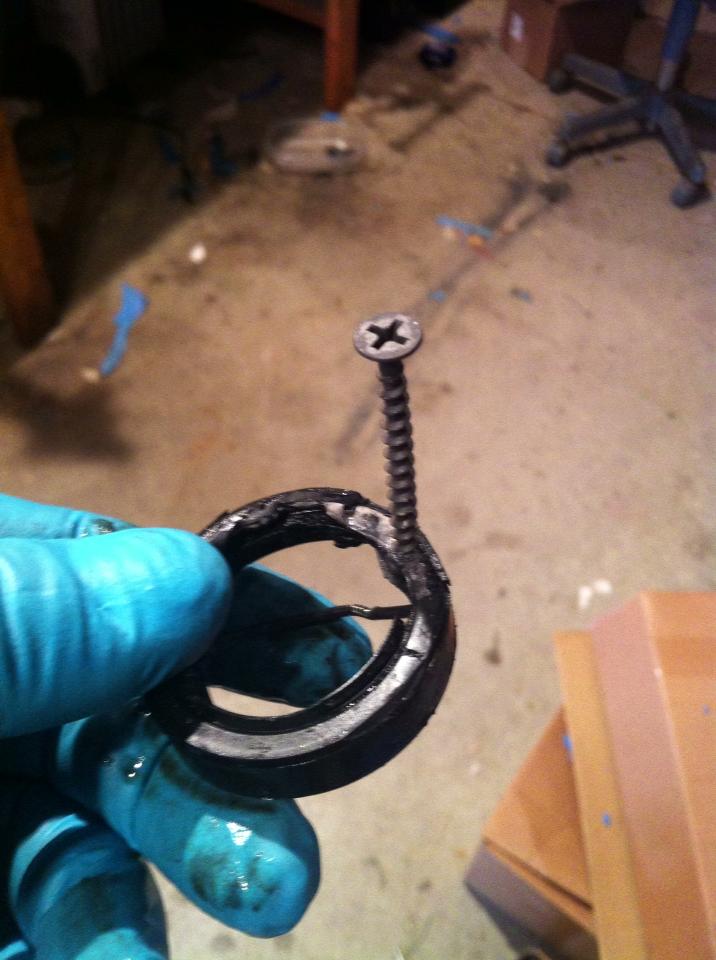 Sorry I forgot who here on Badweb posted that tip originally... it worked great for some very stuck seals on front forks from a 78 KZ-400... which is about as stuck as stuck gets stuck. (Message edited by reepicheep on October 29, 2013) | ||
Oldog |
I would not drill around the crank bearings as you don't want any crap in them. I used a pick and pushed it between the case and the seal to bend the metal insert then took needle nose pliers and picked it out in pieces, I scratched the case a bit but no issues,,,,, if you can get to the area behind the seal or remove any shavings using screws or hooks is fine, | ||
Alfau |
That screw idea is effortless, fast, and fool proof. Easy to clean up and the way to go. See the new seal to detirmine where to drill. Don't drill into the bearing unless your an idiot. | ||
Hootowl |
Even if you are an idiot, I would not recommend drilling into the bearing.  | ||
Natexlh1000 |
If you're an idiot, drilling into the bearing is the best way to go. I know every time I screwed up something, I was an idiot. Don't make mistakes when you're smart. | ||
Buellistic |
ID1OT's should not do this at home !!! | ||
Reepicheep |
Fair point about making sure the crank bearing is untouched by the drill and clean when you are done. For the record, I didn't do the screw thing the two times I replaced my crank seal on the M2.... it worked with the "bend then needle nose" thing, but it chewed up the outer part of the engine case. That aluminum is as soft as butter. Not a functional problem as that part of the case doesn't do anything, but it really bugged me knowing I chewed it up. It made it look like the job was done by a hack. (Which, it was, I just don't like it when it looks that way.  ) ) | ||
Oldog |
The bearings are hardened, I am referring to shavings, that all drill bits produce when drilling, the shavings will damage the crank bearings if they get into them. unless precautions are taken drilling grinding or cutting with a saw are not recommended in the assembled lower end. YMMV ... idiots don't work on their bikes, they have all moved to washington dc and run the place ... | ||
Harleyelf |
A thick coating of wheel bearing grease on the drill bit will capture most of the shavings. But it is still a bad idea to create shavings that close to such an important bearing. A small cold chisel, carefully placed on the seal and not the crankcase and then smacked with a plastic mallet, can give you enough exposed edge to grip with strong needle-nose pliers. | ||
Buellistic |
BWBers is the only place you can learn all the OLD SCHOOL TRICKS of a "REAL MECHANIC"(not technicians) ... | ||
Reepicheep |
It didn't for me when I tried it. I was able to bend it over fine, but I ripped the steel outer portion of the seal apart several times before finally ripping it out almost piece by piece (doing significant damage to the seal bore in the process). Maybe my m2 was just in a mood. You should have seen what I had to do to get the 5th gear drive assembly out of that sucker. | ||
Zrx1100 |
thank you all for feedback, still would like to use the right tool. will probably wait until next time to change the seal, since it seems like I get into the primary every 3k miles | ||
Littlebuggles |
I've got a home made tool out of ABS plastic, glued together for the correct depth. I posted pics of it when I did my seal last year, I'll see if I can find them. Also, there is a seal puller at Harbor Freight that I believe would do the trick better than the slide hammer and hook set up I eventually used to pull my seal.I looked at them in the store and thought this looked like a good option, it needs to have a small tip to fit in there, the dual tip tool looked a little big to me. http://www.harborfreight.com/seal-puller-69025.htm l | ||
Littlebuggles |
Here's page two of the three page thread from the Old School archives, possibly a good read for many suggestions and especially ideas of what not to do. Pictures of the tool I made are further down on the following link. it's light so I could drop it in the mail for minimal cost in shipping, unless you've absolutely got to have the metal tool. There were 50 or so produced last year, sold at cost by another badwebber. There's a thread for a seal installer tool group buy in the Old School archives, suggest reading and checking profiles for someone in your locale to hit up for a loaner or even a hand in the project. -Mike | ||
Littlebuggles |
... sorry, here's that link: http://www.badweatherbikers.com/buell/messages/476 23/695328.html?1349218166 | ||
Zrx1100 |
thank you, Mike | ||
Zrx1100 |
Thanks for all the advice. Particularly to American Sportbike (off-line). Found the clutch throw-out bearing badly worn and clutch fiber plates at near limit. The spring plate was still intact. Put in Barnett 9-plate as per instructions. Also replaced my Muller Power Clutch with the original unit. Very impressed with the results. None of the Barnett 9-plate side-effects such as chirping sound and grabby clutch. Very good friction zone and strong engagement. The clutch action is silky smooth with the new bearing too. Also, running Formula +. Excellent shifting, finding neutral without issues. Will miss the Muller though, the old ramp makes the clutch considerably stiffer. Will wait until next time to replace the seal. Maybe will prepare the tool in the meantime. | ||
General_ulysses |
Instead of drilling into the seal use a sharp awl or even a small sharp nail to carefully poke a hole in the seal. If necessary, make progressively larger holes with bigger pointy devices as you go along. Then twist the drywall screws in and remove as described. There should be very little to no metal debris or filings generated this way. But tilting the seal/bearing down (so that gravity will work with you in keeping crud out of the bearing) during the poke and pull session is also a good idea. Using a powerful small-size magnet to sweep the area after the seal comes out is also a good idea. Maybe some flush oil and a clean shop vac too if you want to get anal about it. |