| Author | Message | ||
Tll130 |
Hello all Saturday I am going to attempt to disassemble my front headlight and install "custom" HID headlights on my 2000 x1 if anyone has any advice on the removal of the headlight feel free to chime in and if it works I will gladly post pictures up and if anyone is interested in doing it I will post a walk through I haven't yet determined on where I'm going to be placing the ballasts if you have any ideas for that throw them in I'm currently stuck with under the seat. | ||
Mbsween |
TII130, The headlight disassembly is nothing complicated. Couple of screws and you're off. I have an HID kit that I haven't gotten around to, I was wondering if the ballast was small enough to fit in the headlight bucket, or maybe behind the flyscreen with the rest of the electrical connectors. There is also room under the tank, but that might be too close to the engine (and the heat from it) Good luck, which headlight kit did you go with? | ||
Tll130 |
I'm using a car hid kit the maker of it is Litech have had it in my car for awhile gonna swap it to the bike(cut n splice to fit) and then throw my green bulbs in it. As for the ballasts they are to big I need 2 1 for high 1 for low that's how the car ones are at least maybe it's different with the bikes but I would rather do more work for a reliable product then less for a unreliable | ||
Kalali |
As said before it should take no longer than 10-15 minutes to remove and disassemble the headlight. I suggest you test fit the bulb inside the bucket before you start the cut&splice. Most hi/lo HID bulbs have the hi/lo switch at the end of the bulb and may pose clearance issues inside the X1 bucket. | ||
Tll130 |
Will do my hi/lo is 2 separate bulbs the bulbs are probably a half inch longer then the stock bulbs if I can only get 1 in that's fine they r bright enough to the point I don't need high beams anyways. Thank you for the advice. | ||
Oldog |
All I have done the HID install and have been running it for years. Matt the ballast is to big to fit in the bucket, it fits nice behind the fly screen. I made a steel bracket and used rubber grommets to provide some cushion for the ballast. the wires to the lamp (power to light lamp) should not be spliced or altered. the HiLo wires no issues, As Kalali points out the H4 single hid may not fit, I took a ball peen hammer to the end of my headlight shell to rectify that problem. The wiring in my case goes up to the head area from the battery area & under seat area, on the right side ( as seated ) as the main harnes is on the left, Use an inline fuse at the battery..... I suggest fitting the lamp in the shell first then dissemble fit ballast, then wire. watch the hi/lo relay the real cheap ones will supprise you most likely after dark as the lights go out. I have a cutout switch under the tail, a really nice way might be if you got the switch gear for heated grips and used that for the headlight cutout, there have been issues where the switch to re-start the lights has been a life saver I can post up pix if any one is interested, the HID is great in the OE lampholder, be sure to double check the aim and pattern of the headlight when done... good luck... | ||
Oldog |
Travis BTW do not attempt to disassemble the glass part as it cant be put back together AFAIK 1 screw at the bottom or side loosens a clamp and allows removal of the glass front and reflector ( as a unit ). | ||
Tll130 |
Sounds good olddog thank you for all the info. Btw pics are more then welcome if you can post them they may help me at some point | ||
Oldog |
OK Travis / Matt / All I cutout a sheet steel plate to hold the ballast note the 2 nuts beyond the end the plate is rubber mounted to the headlight shell. 2 screws hold the Ballast to the plate but with the mini "digital" ballasts the ignition coils are on the headlight whip so the box is tywrapped under the bracket the lead wires wrap around the bucket, vs trying to stuff them into the shell. ( they won't fit ) make sure that the leads don't snag on any thing as they are soft and flimsy. NOTE I have some additional instruments so I have a bit more wire in this area than normal. 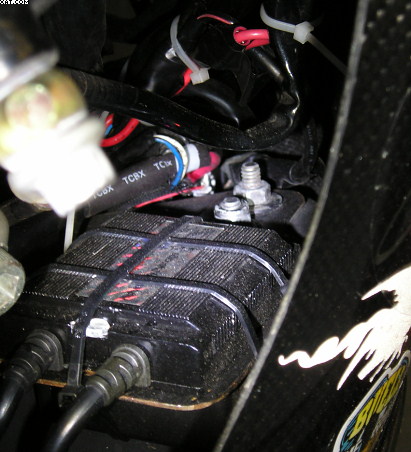 Travis to answer your original question, the catch is at the 6 oclock position 1 screw a lip formed in the shell catches the chrome ring at 12 oclock 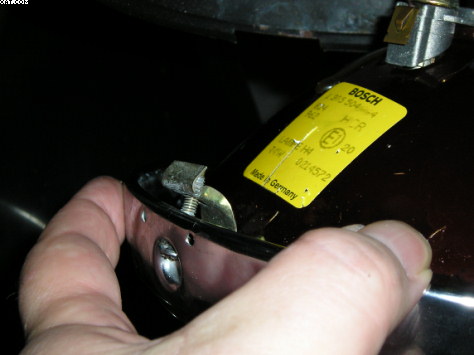 | ||
Oldog |
here is the coil that Kalali refers to as not fitting, it sticks back far enough to prevent putting the reflector back into the shell, H4 driver, Travis may not have this as he has 2 lamps the moving rig is typically called "bi-xenon" ( BS ) as the light bulb just moves in its shutter housing changing the position of the arc in the reflector. The driver ( moves the bulb up and back ) 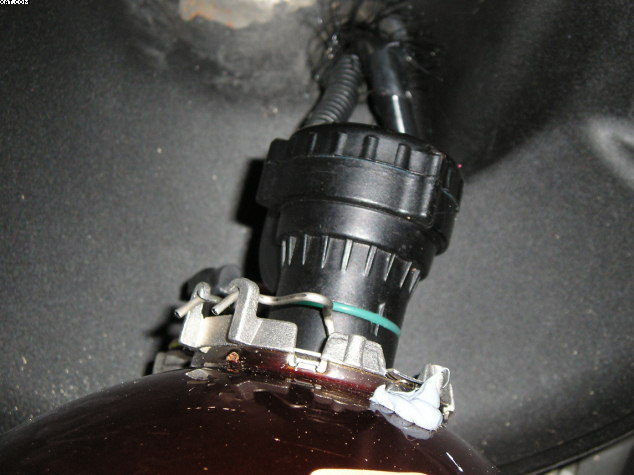 I elected to dimple the rear of the steel shell for the reflector with a back stop and a ball peen hammer, note the bolt heads in the top this is where the bracket is attached. inside I used rubber grouments as rubber bushings and self locking nuts ( and red locktite ) to hold the nuts in place to allow slight movement to cushion the ballast mounting plate originally all the bits were "rattle-canned" black  Travis you can see where the formed lip at 12:00 is in the shell. | ||
Tll130 |
All looks good thank you for the pics they r gonna be great to reference back to. Decided to order the h4 ballast and bulb. So waiting on that to get in so I can under go this adventure lol | ||
Oldog |
The electrical wiring is routed down the right side as seated on the bike, the headlight harness had to be pealed back in my case to connect the the relay and ballast control / power. A seperate line runs directly to the battery to power the ballast, at ignition the ballast draws a heavy current in order to strike the lamp ( the initial flash you see with hid some times ) your kit should have an in line fuse holder if not fit one as close to the battery as possible as a fire can result with out fuse protection. 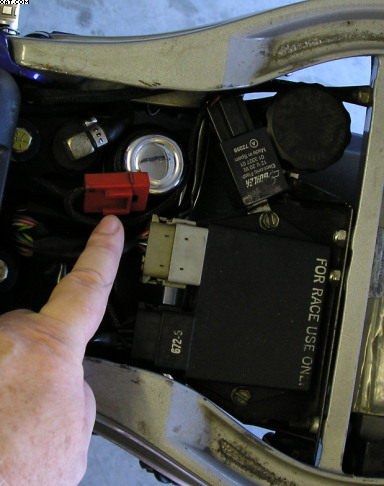 there is less than 16" of wire to the battery at this point and the holder is protected under the seat.  This relay powers the ballast and operates the Hi / lo coil consider keeping a spare on the bike, I had one fail at night, I have a "restart" switch so I could re-lite the head light, other wise I would have had to call a tow truck Note the heat shrink on the socket leads to protect them and keep the mess to a minimum. the bikes Hi/LO run wiring from the OE socket is fed to the relay here, another advantage to a cutout / restart switch is that the ballast can be switched off for testing or low battery starts.  | ||
Tll130 |
Gotcha thank you for everything olddog this will give me a good reference and anyone in the future aswell |