| Author | Message | ||
Littlebuggles |
Smoke, I have a cheap harbor freight heat gun with a round nozzle, and a torch with mapp gas (is that right, yellow can?), are either of those options? Reep, I've only gained a little ground moving that thing outward, I think I can tap from the side to tip the lip back in at all the stress points where it pulled out, but I don't want to apply any inward force. I like Eric's suggestion the best, probably it's just wanting to use power tools since I've made so little progress thus far, I'm looking forward to getting after it again tomorrow... very mellow night at work has go me bored and looking forward to the bike project. | ||
Smoke |
no flame, use the heat gun or even an infrared lamp to heat the case. it really makes a big difference on removals. tim | ||
Thylacine |
Seal puller? You can use one to like pull out the er...em... Seal (Message edited by thylacine on September 24, 2012) (Message edited by thylacine on September 24, 2012) | ||
Oldog |
I have some small carbide cutting wheels that I can use to get through the outer lip, and some even smaller cutting tips If some one has not mentioned those are the MAIN bearings they are the main load carriers for the crank shaft using a cutting tool will fill them with gritts. not a good idea, I pried mine out with a pick, do it just as Reep suggests, deform the outer body of the seal and pull it out, with pliers take your time and make sure that you get all of the trash. } | ||
Littlebuggles |
Chance, the book takes for granted the seal either lasting forever, or just being done with the case split. I didn't see any instruction in there on removing it at all actually, and assumed you'd use something like a bear race removal type tool to drive it out from the other side... So I'm not trying to sound snarky but have you seen one that would fit this specific application? (Message edited by littlebuggles on September 24, 2012) | ||
Blackm2 |
Bugs, do you have some kind of small weight to slide over the shaft of that brake tool, using it as a slide hammer so to speak? Seemingly that should pop right out, or something like Fasted has. | ||
Jramsey |
"using it as a slide hammer so to speak?" Here's what I use, 1/8" x 1/2" flat strap bent 90 welded to a nut that fits on a slide hammer.   | ||
Littlebuggles |
Exchanged the big small pry bar for a REALLY small pry bar on my way home tonight. Also picked up this little drift/punch thing that should serve nicely to do... something, I guess... more work on this and pictures to come tomorrow. I forgot I had training to attend tonight so I've not gotten after it again like I thought I would. Cool mod there for your slide hammer J, wish I'd had something like that in my garage when I started this! Dave, I think that would work except the hook has already proven it's just as happy to pierce the lip as anything else, so I no longer trust it for this project. Jason, I've pretty much taken over your thread entirely. Have you started your removal process? You've probably got it done already, and are sitting back laughing at all of this aren't you? | ||
Reepicheep |
Jramsey... briliant! You can tune the tip to tuck between the shaft and the seal body. Thanks! | ||
Thylacine |
Yes, ask any reputable tool guy for a seal puller. It will Work. It is a simple took that many don't know exists. Many times while working at dealerships I would see people struggle,walk over and simply pop out said seal.get one | ||
Blackm2 |
Chance I have an automotive one from Harbor Freight, http://www.harborfreight.com/seal-puller-35556.htm l That is going to fit in there to do the job? | ||
Robr |
To all concerned, For what it is worth; 3000 miles ago, give or take, my 1999 X1 began the puking thru the tranny breather symptoms. Rather than proceed with replacing the crank seal, I concluded (with much info provided by this website), that the root of the problem was insufficient engine breathing. Not having the funds to upgrade to XB valve covers, I drilled and tapped the X1 valve covers and installed automotive PVC valves. The tranny breather has not puked since, and I have not found it necessary to replace the crank seal. Don't know if this will will work in every case, but it worked in mine. Rob | ||
Blackm2 |
It's only temporary Rob. Mine started doing it probably 6000 miles ago. It was so sporadic that I was not sure it was the problem, it only happened when I ran it extra hard or 80+ on the freeway for extended periods. Does it almost on every ride now. You too will know our pain! | ||
Littlebuggles |
All right, tried again today after tapping the edges back down and applying some heat to the case around the outside perimeter of the seal. Got no where, so having neither a slide hammer, nor a welder I turned to Harbor Freight... I found this: http://www.harborfreight.com/15-piece-slide-hammer -and-puller-set-5469.html I hope it has sufficient weight to pull this seal out. The "L" bent end that threads on reminded me of Jramsey's tool so I thought I'd give it a try. I also exchanged the super-ultra-mini pry bar for a mid sized model with better ends. I also thought if the other options don't work I'd try this: http://www.harborfreight.com/seal-puller-91352.htm l Knowing how hard I've tugged on this thing already, and seeing the rather pointed tip on the other tool I felt these were safer options. | ||
Smoke |
you should be installing a seal soon. those are what you need if the steel isn't too soft on the tools. tim | ||
Littlebuggles |
Slide hammer with the "L" tip on it did the trick. Had to hook under the lip where it was intact, then under the lip of the screws for decent purchase since the Harbor Freight tip was more of a rounded "L". Jason, I will have a seal install tool on Friday. I met with brother-in-law/machinist Wednesday morning to discuss the project, since the good lathe was tied up he felt Friday was a realistic estimate on when he could turn one out. He's gonna see about making a couple extra while he's at it, I have no idea on cost right now, he is hoping to just grab a couple pieces of scrap material and see what he can do. So now that the seal is out, it appears I was perhaps a little too... um... "enthusiastic" in drilling the old seal to set in those screws; so I may have some delay to my project. It appears I kind of over penetrated... a bit... hmmmmmmmm... I'll put up couple pics tomorrow maybe... I had a brief moment of joy, then I saw all the metal shavings under the seal and hurried out of my garage. Anyway, you are welcome to use my new tools Jason (slide hammer, seal driver) while I sort out just what to do with my bike now. Or I can come by and help, I'm getting really good at the "what not to do" type scenarios. So I'd make a good shop helper since I can say with confidence "Don't do that!" as it appears I already have... several times.  | ||
Rick_a |
I've one of these. Works like a charm, cheap, no need to drill through anything.  | ||
Lakes |
I'm surprised no one has posted, a tool to put the new seal on true as i think that is the important part. i had to go into the primary & also desided to change the, Regina chain for a Dimond chain. so thought best to replace the seal with latter double lip. my original single lip seal was not leaking and has 75,000k. am making a tool to put the new seal on with, got old seal out. | ||
Littlebuggles |
Alright, here are the tools I used, the one that finally did it I am thinking of filing the bottom of that tip flat, if Jason needs to use it I will do that (and you can see how much I tore up the old seal): 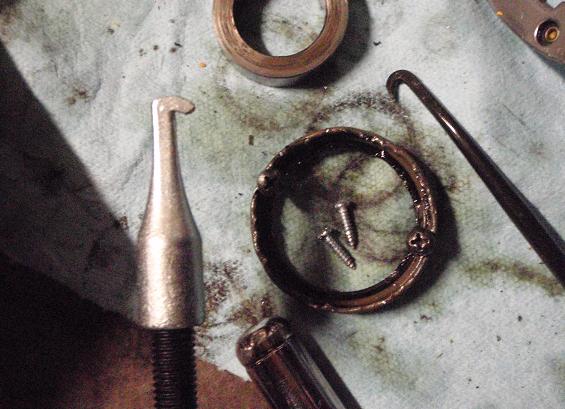 A partial assortment of other tools tried:  The final result:  I think the damage is to the case, not the bearings or race but need to very carefully clean, and carefully inspect. Lakes, there is a picture of the original tool on the other thread (the tool Steve made his from), I can copy and post it here. I will post pics of the tool I was improvising, and the one made at the machine shop tomorrow. I didn't think my seal was leaking, then I slid the spacer off for a better look at the seal and it showed a steady outward flow of oil from then 'til now. | ||
Littlebuggles |
I can only guess that the tolerances on my bike are especially tight, making the seal a super tight fit. So I think the $14.98 side handle seal puller that Harbor freight sells might have done it had I tried that first. With the lip being deformed as it was I needed the extra force the slide hammer provided me. | ||
Blackm2 |
Ouch, better vacuum and use magnets to get those filings out bugs. I'd like to be in line for any tools made or borrowed please | ||
Robr |
I hope and pray that I'm OK, ouch! those are scary pictures!  | ||
Jwag12r |
Littlebuggles it's great info you are sharing on what to and not to do, much appreciated. I have been busy but would love to borrow the tools, to get the job done. Thats awesome your brother in law can make the install tool. Thanks again | ||
Littlebuggles |
Jason, PM sent, make sure to check your spam, they go there sometimes. Brother-in-law was not able to make the driver for me after all, I picked up the seal I left with him from his dad's shop around 1pm. I will finish the tool I was improvising from ABS, I think it will work out okay, hopefully press in when I get home from work Sunday morning, gotta try and take a nap now. I'll take and post more pictures. Regarding my over exuberance drilling - It looks like there's a ring cast into the motor that the bearing and race seats against, looks like that is what I drilled into, and it went in at an angle so I think it's good. Used some q-tips and a dental pick to clean out all the shavings. Tried a small rare earth magnet to pick up the metal bits but they must have all been aluminum since they wouldn't move for the magnet. I still have a small local shop that said they could make the early (unavailable)tool for $50, so if anyone wants me to have him turn out some I'll have him do it for you. | ||
Blackm2 |
I got a quote from a guy down in San Antonio to have the tool made. To have one made would be 40 bucks, to have 5 made would be 150 bucks total or 30 dollars a piece. If there is more made I am sure the cost would go down. Any interest? | ||
Jwag12r |
For $30 I would buy one for sure! Let us know how soon it could get done. | ||
Blackm2 |
So far we've got 3 buy-ins total, let's get some more, hopefully he'll bring it down more. | ||
Littlebuggles |
I'm a little unsure about seal orientation, but the factory seal driver would have kept me from that. I assume the side of the seal with the groove cut in it is the outside, where the tool would seat... Here's the solution I came up with using 1 1/2" ABS. Before pulling the old seal I dry fit a short cut of the pipe into an end cap, checked my depth, then glued it up, cleaned off the excess glue then once it had set up I double checked depth and sanded it lightly to make a flush fit with no sharp edges to cut into the new seal.  Today I used a 3/8" drill to start drilling center inside the cup, then once I had a center divot started I got out a large step drill and opened it out. Size fit right over the shaft and only needed a little clearancing for the threads, so I could tap it with a mallet against a deep socket. Checking dry fit prior to driving the seal: 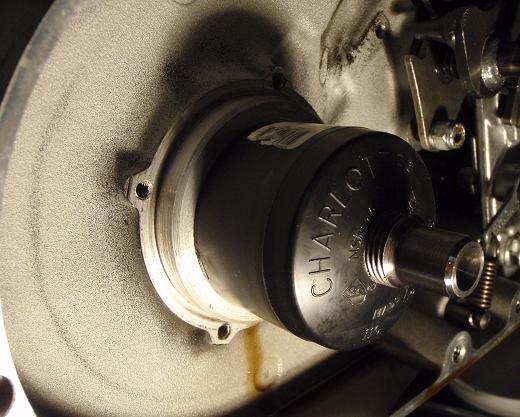 Install method, tap-tap, then spin the tool and do it again just to make sure everything is flush:  So the cap lets you apply some force, but not drive the seal too deep. I've not worked with ABS, we always used PVC for outdoor sprinkler systems, but the diameter I needed wasn't available at the local Home Depot so I got the ABS instead. I like that when you glue it, it doesn't try to push apart like PVC will do, so I glued and set the depth and it stayed right there until cured. | ||
Littlebuggles |
Total cost, including a $2.99 bottle of ABS glue was $7 and change. I prefer to have the right tool for the job, usually help keep me from bunging things up too bad, so if I'd had the tool, even at $30-35 I'd have more peace of mind, rather than browsing the archives to see if I can find a pic of the seal installed right to check my work. But I really want my bike back together as both this one and my XB are down at the moment, I'm going nuts not riding and burning a lot of extra gas driving my truck. | ||
Littlebuggles |
Okay, reading Henrik's post I'm sure it's in right, just need to slide the spacer back in to fill the gap. Pushed gently on and flush prior to attempting my tool, I used a q-tip to run a light coat of oil all the way around the inside of the case to help the seal slide in: 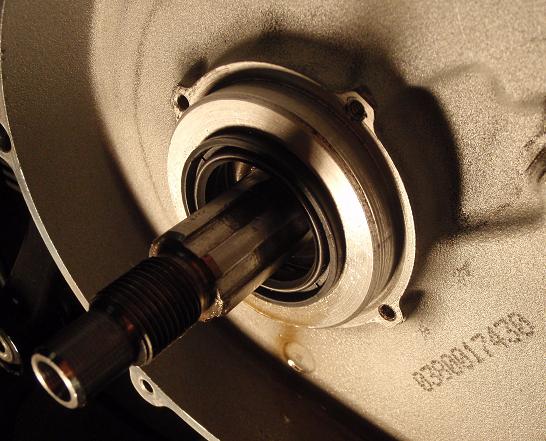 And the finished product, pressed only as deep as the old seal, only needs the spacer pushed back on the shaft:  Gotta get ready for work now, tomorrow I can clean everything and button it all back up, switch the bikes around and get the XB's injectors pulled, woohoooo!! Edit, I tried to slide the spacer on real quick prior to leaving and it would not go. Probably should have put it back in with the seal. So even with the questions and tool fab, and maybe having to pull the new seal and reseat (or replace) it with the spacer in it I'm astonished at how easy it was to put the seal in compared to the absolute nightmare pain in the butt pulling the stupid thing was, sheesh. Hmmmm... (Message edited by littlebuggles on October 02, 2012) |