| Author | Message | ||
Jwag12r |
So my seal went bad(oil puked out trans vent hose) and I need the tool to seat the new seal(New upgraded style seal) Dealer wants almost $100 for it(ouch). So I was hoping to borrow or rent somebody's tool. I live in Utah but would pay for shipping it to me and then return it as soon as I'm done with it. Let me know if anybody can help me, Thanks. Oh and My Bike is a 1999 X1 | ||
Blackm2 |
Then when Jasons done I would like to rent it please! | ||
Reepicheep |
You can fabricate something that works. Take a hard wood dowel rod, and cut a 2" or so post. Now use a saw to carefully notch out half the face of the dowel rod. So the end of the rod looks like this: XX xXXX XXXX XXXX XXXX You want the difference in height to be the depth you want to seat the seal. Then carefully use the dowel rod to tap the seal into place. Make sure the "step" catches on the engine case, so it keeps you from seating it too deeply. Work your way around carefully seating the seal gradually. You will have to play around with the measurements (or google them up). You don't want the seal against the bearings. So long as you don't do that, the depth isn't critical. Deep enough to be below flush with the case, but shallow enough the seal does not rub the bearings. | ||
Brinnutz |
I have one but I'm overseas currently. It's been lent out before and I don't have a problem doing so. If you still need it in a month when I get back, get a hold of me. | ||
Littlebuggles |
Jason, I'm hoping to put a new seal in my bike this afternoon, I'll let you know what I come up with, this is a new project for me, I think I have some dowel in my garage or can come up with something... Y2K Cyclone (Message edited by littlebuggles on September 20, 2012) | ||
Littlebuggles |
Hey I'm making a tool out of a short piece of ABS pipe and an end cap. current seal looks to only be set in maybe as deep as 1/32". If this sounds familiar to you guys I'll cut the ABS and glue it up, Jason, I hope to have this done tonight and you are welcome to the special "tool" after that. I'm in Murray, right off I-15. Dealership had one seal on hand, maybe because Jason bought the other one? As soon as I pulled the spacer out my bike started leaking like crazy, old seal is like hard plastic, not rubber. Just destroy the old seal to get it out? Not sure how to get it out, can't find a specific section in the service manual for just this service... Dental pick is not strong enough and plies just tear pieces of the seal off. | ||
Blackm2 |
Don't we have a bunch of machinists/engineers on this board that could make up a batch of these tools? I'm sure there are a few that would buy them, myself included. Measurements are at the bottom of this thread: http://www.badweatherbikers.com/buell/messages/384 2/174248.html | ||
Reepicheep |
Heck, I just scored a lathe. If I wasn't in the middle of a KZ400 restore with a sick KX-60 in the garage, I'd make one out of a good hardwood (which would work just fine) just to teach myself how to do it. It would be a fun project. | ||
Littlebuggles |
David, thanks for posting that link. My badweb google search didn't help me find that last night. Gonna see if my brother in law can turn one out for me while he's in town for a minute. Maybe I can get his dad's shop to turn a few out if there's adequate interest. I told him I'd give him $20 for it. Better than waiting weeks for HD to get one in it seems. HD 45206 $17 in 2006. Thanks too Steve Mackay for posting the measurements on a pdf! Now if only there was an easy way to get the spent oil seal out!!! Using a T handled spring puller (for drum brakes), it hooks nicely into the inner lip and is plenty strong, but the seal is pressed in there TIGHT. (Message edited by littlebuggles on September 22, 2012) | ||
Blackm2 |
Sure thing Bugs. I read in another link that you drill into it with a small bit, I believe into the groove where the installer slides into. Screw a self tapping sheet metal screw into it and pull. I would imagine you could get some leverage by placing a piece of wood against the engine for protection and leveraging the pliers against that, if you can imagine what I'm thinking. That's how i was going to try it. I haven't cracked mine open yet. | ||
Littlebuggles |
Jason, sorry to jack your thread brother. I tried some small screws last night and they just yanked out. I am going to take some pictures this morning and post them here if Jwag12r doesn't mind continuing this here. Talked to Buellistic on the phone last night. He encouraged me that it will come out, it's just the getting it done that's the real work. I went in and talked to a parts guy at the dealer this morning, they said the HD pn# above for the $17 tool is not available anymore. Brother-in-law said maybe tomorrow on the tool. Might see if his dad's shop will make one now, or can refer me to someone who's not busy and crank out a couple of them. | ||
Fasted |
mini pry bar with the heel resting sideways on the shaft, and the toe hooked under the lip of the seal | ||
Buellistic |
Another out of the box thinker !!! Fasted, you get an AT-AH-BOY for that one ... | ||
Jwag12r |
Reepicheep I understand how multiple projects go thanks for the thought Littlebuggles I talked with Chris at South Valley HD and he said they could order the tool but for $90 something bucks. If your brother in law can make one I would help with cost if I could borrow it. Let me know, and thanks guys for all the help | ||
Sleez |
you can get it here, posted on another thread; i think we are talking about the same tool. Kent Moore HD-45206 seal installer? i just found out this part is not restricted, meaning any purchaser of Kent Moore tools can get it. the hitch? not available until 11/29!!! i found Hands On Tools, ph 866-943-7524, Cathy, $89.05 plus shipping. hope that helps!! | ||
Littlebuggles |
Either my brother in law will make one (Merlin's Machine shop) or a few on Sat, or another machine shop (Hansen Machine) I went to said they would do one on Monday for me if I still needed it done. Price quote from Hansen was $50 for one. I imagine he'd bring the cost down if we had more people wanting to buy some. I'm thinking of having it made from aluminum and instead of having the back flat, making it taper to a cone with a flat top, then you could just stack a couple washers on it and use the nut on the crank to push it in, rather than having an extra part with the spacer in there. The 45206 is the tool I'm going to have made, the Salt Lake HD shop said they could not get it. Jason, you are welcome to use it once I'm done, or if I can't get the original seal out, you should use it first maybe... especially if you are ready to put the new seal in your bike already. I bought a mini pry bar, but apparently it wasn't mini enough. I'm exchanging it in the morning for a super-ultra-mini pry bar. I've taken a few pictures and will post them up tomorrow. I think I got the seal to move a little, but mostly I bunged up the inner lip, kind of a lot. Did you buy Chris's X1, that thing looked pretty knackered. Maybe it's a different Chris, the guy I knew from there left HD some years ago for some sort of small business/private venture sort of thing. | ||
Littlebuggles |
Leaky main seal with spacer removed, it has been drilled on either side at this point. All of the seals lip has been pulled, I was hoping I could apply some force against it but it is all over the garage floor.  I've reduced and edited all the other images I have ready to post now, but am too tired to load them, or my computer is too tired to do it for me. I'll post more pics in a bit. | ||
Littlebuggles |
Spring puller for automobile drum brake springs, small screws that pulled loose when I tried to pry against them with a screw driver, and the oil seal/main shaft outer spacer  Here's the spring tool fitted to the inside lip of the seal. You can also see the hole I drilled on the left side of the seal circled in red 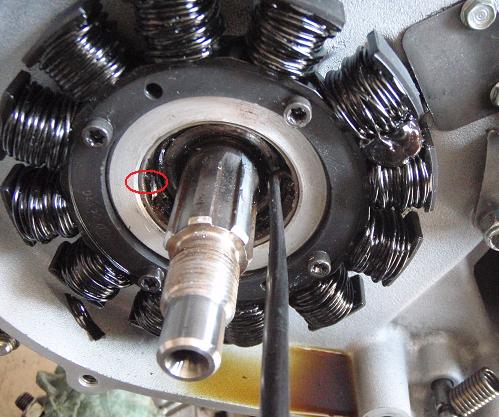 | ||
Littlebuggles |
Close up of the lip after working my way around it and various pull points failing. Larger dia sheet metal screws installed, snug fit.  Mini pry bar (Bostitch double end nail puller)  Ends don't fit, are wrong shape and size to get anywhere with this particular tool. Also you can see I moved the stator windings out of the way so as not to damage them once the manic prying activities ensue 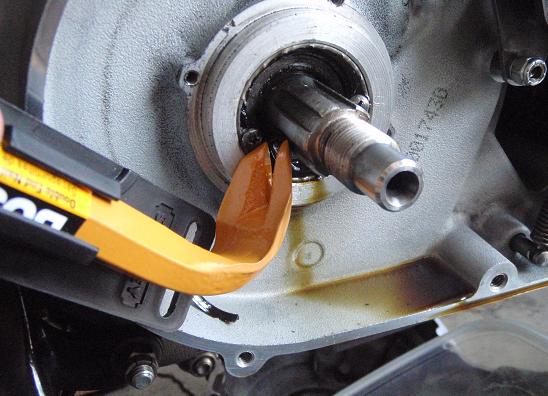 | ||
Littlebuggles |
Ugh. So Saturday was my brother-in-laws birthday, I forgot about that when I was tryin g to get him to look at this tool cutting project on Friday. Having worked my regular shift Friday night, and having another to work Saturday night I slept and didn't bother him with trying to meet up at the shop. I do anticipate seeing him today and will show him the pdf of the tool, or email it to him if we don't get together. Hopefully he can turn out a couple of these real quick before he has to go back to his regular job. Stinkin' stuck p.o.s. seal. | ||
Eshardball |
What about using a dremel with a small ball end mill to groove the inside of the seal and then tap it inward so it splits where you grooved it. you can grab the curled end with a needlenose and just roll it out. Just my .02 | ||
Eshardball |
For what its worth, I tapped my crank seal in very slowly with a large deep socket and a very small dimmpling hammer.I put a couple thin tabs of plastic behind it and tapped it in until the tabs could be slid out with a slight amount of drag. I'm sure the tool would reduce the amount of finesse required for the task but it worked just the same | ||
Fasted |
 | ||
Reepicheep |
You can carefully use a punch to bend the outside of the seal inward also. You might lightly damage the very outside of the case bore for the seal, but the last outer fraction of a milimeter isn't important in terms of sealing integrity. Once you get it to start bending inwards, that gives you something else to grab onto that you can clamp on and pull. If you can get the whole thing to "kink" as well, that might make it come out easier also. | ||
Blackm2 |
Keep the pics and suggestions coming! Any kind of hammering, tapping, banging on the old or the new seal makes me nervous. I do not want to have to do this job twice. As it is I am going to have to do my rear base gasket as that started leaking a couple rides ago. Fasted that tool looks perfect to pop that seal out. I have an automotive seal puller put I know it isn't going to fit in there, that thing looks like miniaturized version of it. | ||
Smoke |
heat the case with heat gun or hairdryer. might have been locktited in place. slide hammer also good to grab the screws with to pull straight. did i mention HEAT!!! good luck. tim | ||
Littlebuggles |
I like the dremel idea a lot at this point, I have some small carbide cutting wheels that I can use to get through the outer lip, and some even smaller cutting tips I got for opening out the carb vent bowl on the forcewinder intake I had that I may be able to carefully thin the walls of the seal with and then just fold them in or break it up to get it out. I'll see if I can exchange this pry bar for a smaller one too, I don't have a lot of faith in those screws being able to hang on. Heat makes me nervous, I really don't want to catch my bike on fire, and there's petroleum product dribbling out there. I've talked to my brother-in-law, he's been e-mailed a copy of Steve's tool pdf file and said he could probably do it Tues. I told him another shop quoted $50 to do it, he assured me he'd get it done. I have to work again tonight so cannot start on it again until Monday late morning or afternoon anyway. I hope to get it finished and put back together mid-week. | ||
Smoke |
heat is your friend. take your gas tank off. the oil is not going to light off. we are talking 150-200Degrees. heat the case, not the seal. tim | ||
Reepicheep |
That aluminum case is as soft as butter. I'm not sure I'd put a cutter to that steel. Tap it and fold the outer lip in, and get other tools on it. | ||
Eshardball |
If you groove the inside of the seal with a dremel, it will fold in much easier than relying on force alone. The point is to set up a fault where the seal will split with reduced effort. |