| Author |
Message |
    
Oldog
| | Posted on Tuesday, May 29, 2012 - 06:28 pm: | 


|
Poser
use a gasket on each side of the carb mount and one under the head of the bolt
( any where a joint is made to the head or breather assy. )
HD part # 26231-78 "WASHER OIL PUMP ASSY"
The washer has a metal center covered with and fiber works well about 1.50$ ea from hd and come in bags of 10 pcs..
I have to use 6 for my banjo's and carb mount, 3 each side I also use red locktite for the breather bolts YMMV ..
almost perfect rare seepage from hose to banjo ( non issue for your setup ) |
Imaposer2
| | Posted on Friday, June 01, 2012 - 11:36 pm: |
|
So, my FW kit came in. Question. Do K&N filters come pre-oiled and ready to go, or do they still need oil? The filter is red, but it doesn't really look or feel oily or tacky, whereas the little crankcase filter gauze is white and is packaged with a little container of oil.
I have oil for my foam dirt bike filters, but I've actually never used a K&N before. Is the K&N filter oil different, or is it super tacky like the foam filter oil? I guess a stop by the local m/c dealer is in order. |
Imaposer2
| | Posted on Friday, June 01, 2012 - 11:53 pm: |
|
Well crap...
Guess I shoulda Googled first, huh?
K&N FAQs:
10. Do K&N air filters come pre-oiled or must they be oiled before using?
Almost all K&N air filters come pre-oiled and ready to use. The filter oil we use is red. A new oiled filter will appear red-pink in color. Some crankcase vent air filters come unoiled, however, they come with a small packet of K&N filter oil so they can be oiled before use. There are also a limited number of filters with specialty uses which are not pre-oiled. These items will be clearly marked as unoiled. Using an unoiled K&N filter will greatly reduce the filter's efficiency and void our product warranty on filters that come pre-oiled from the factory. If you receive a filter that is packaged in its cellophane wrapper and is unoiled, contact K&N's Customer Support department at (800) 858-3333.
Still not too keen on K&N's filtering ability though. Heard to many bad things about them over the years, and gotta admit that when I hold mine up to a light and peer through it I see lots of unimpeded light.  Seems to me that it would let lots of rather large particles through. May re-oil it anyway just to maybe add a little dirt catching power. Seems to me that it would let lots of rather large particles through. May re-oil it anyway just to maybe add a little dirt catching power. |
Buellistic
| | Posted on Saturday, June 02, 2012 - 08:22 am: |
|
What you have heard was not explained properly:
It is not a OFF THE ROAD filter because it is not a high enough micron filter !!!
"SO" if you go OFF ROAD(dirt roads) you would be required to use a "PAPER TYPE" FILTER !!! |
Fahren
| | Posted on Saturday, June 02, 2012 - 09:51 am: |
|
And, to put this into another perspective, the Moto Guzzi Le Mans 850 had wide open intakes for its dual Dell Orto carb's. The only "filtering" was a mesh over the openings to keep large rocks out!
Crazy Italians! |
Imaposer2
| | Posted on Saturday, June 02, 2012 - 10:17 am: |
|
Hmmm...
Never knew that. Every one I've seen had the intake runners coming from behind the side covers so I just assumed there was a standard filtered airbox under there.
I have seen quite a few "Cafe'd" Tonti's that had open stacks though.
Not for me! 
While a K&N may be sufficient for a street ridden motorcycle, there's no way I would feel comfortable with just open stacks on anything that gets ridden regularly. |
Fahren
| | Posted on Saturday, June 02, 2012 - 10:29 am: |
|
I wish I had taken a photo of the setup on an old Le Mans I saw last month. The intakes are trumpet-shaped (flared cones), and the intake screen, which has gaps approx. 1/4" - 1/2" (way bigger than insect screening) is dome-shaped.
I would have to insert some foam or something like that inside, living in a sandy beach area. I would be scared of that degree of openness!
This was also on an original 850 Le Mans, before the Mark I or II stuff. I don't know if/when they changed it.
from Wikipedia: ...Dell'Orto 36mm pumper carbs with filterless mesh grey plastic velocity stacks
Quiet exhausts, with super-loud open intakes: crazy Italians!
(Message edited by fahren on June 02, 2012)
(Message edited by fahren on June 02, 2012) |
Buellistic
| | Posted on Saturday, June 02, 2012 - 07:55 pm: |
|
Had one of those ITALIAN bikes once and it had a tapered intake piece on which "i" put a PAPER filter on it for DIRT TRACKING because there were no K&N's, "BUT" of DAYTONA it was open stack !!! |
Imaposer2
| | Posted on Sunday, June 10, 2012 - 12:02 am: |
|
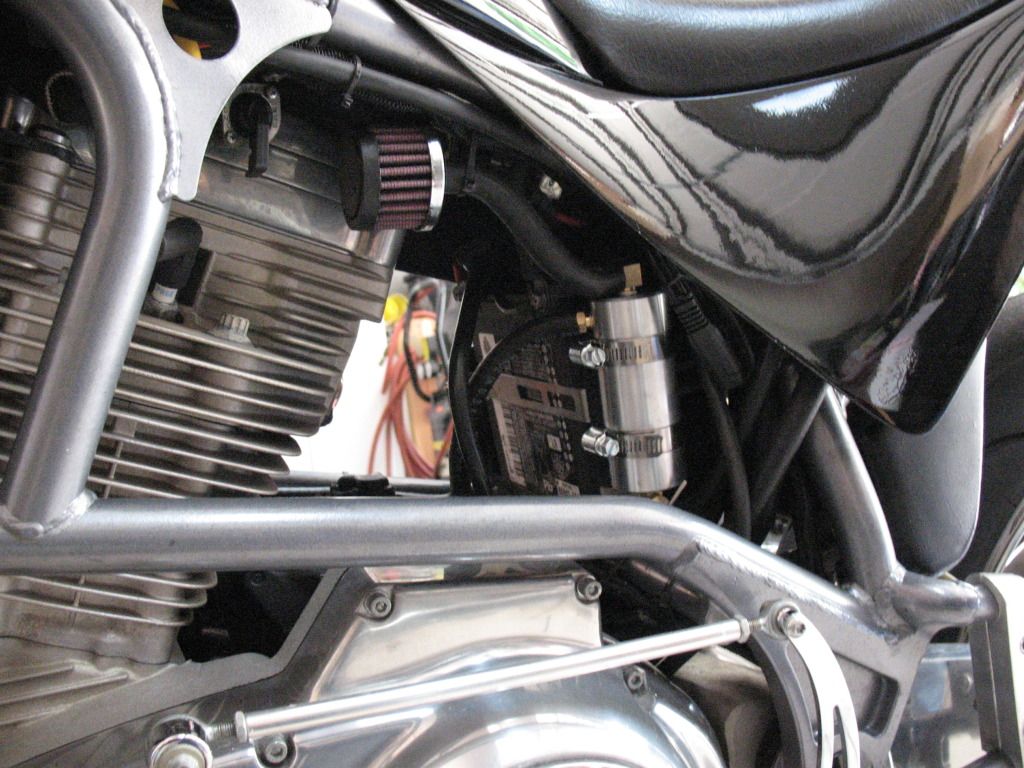
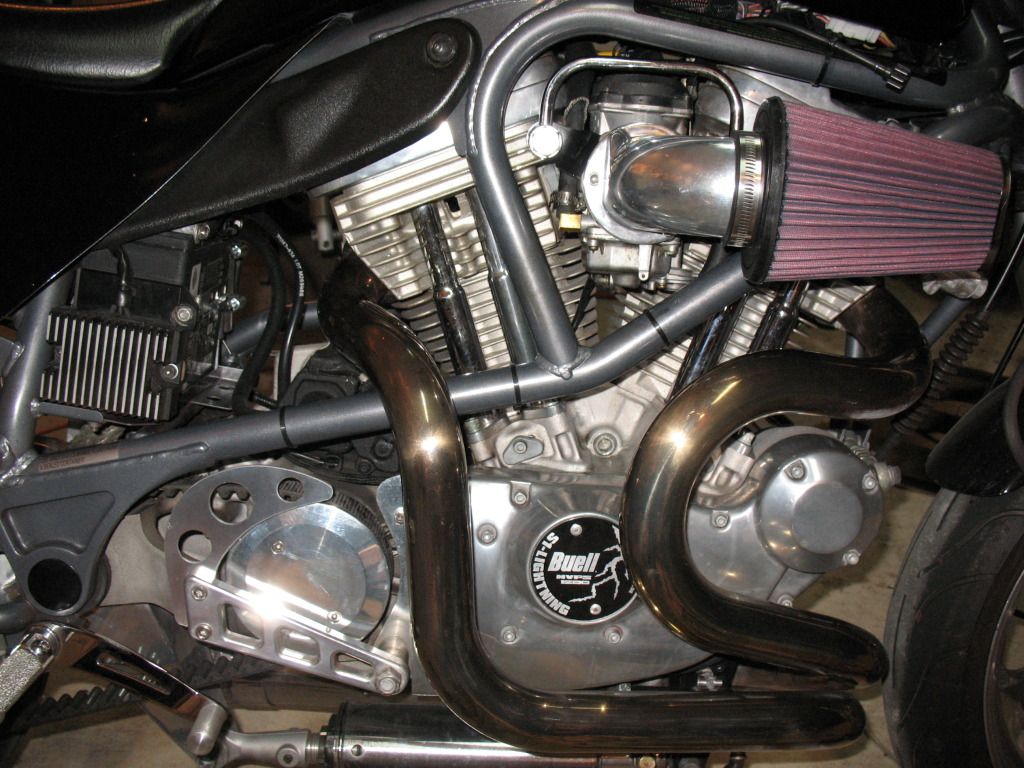
Ok, so I finally got my Forcewinder and catch tank installed...
I got this little catch tank on Ebay for a little over 20 bucks shipped. Didn't know it at the time but it had 1/4" hose barbs instead of the usual 3/8". It did have a drain valve on the bottom, but due to where I wanted to mount it I wanted to add a drain hose to simplify dumping the contents on occasion. So, a trip to Lowes got me the parts I needed to modify the hose barbs and pick up a compression fitting needle valve for the drain. Just got it all mounted up last night, and just got through installing the Forcewinder tonight.
Oh well, here's the catch tank installed:
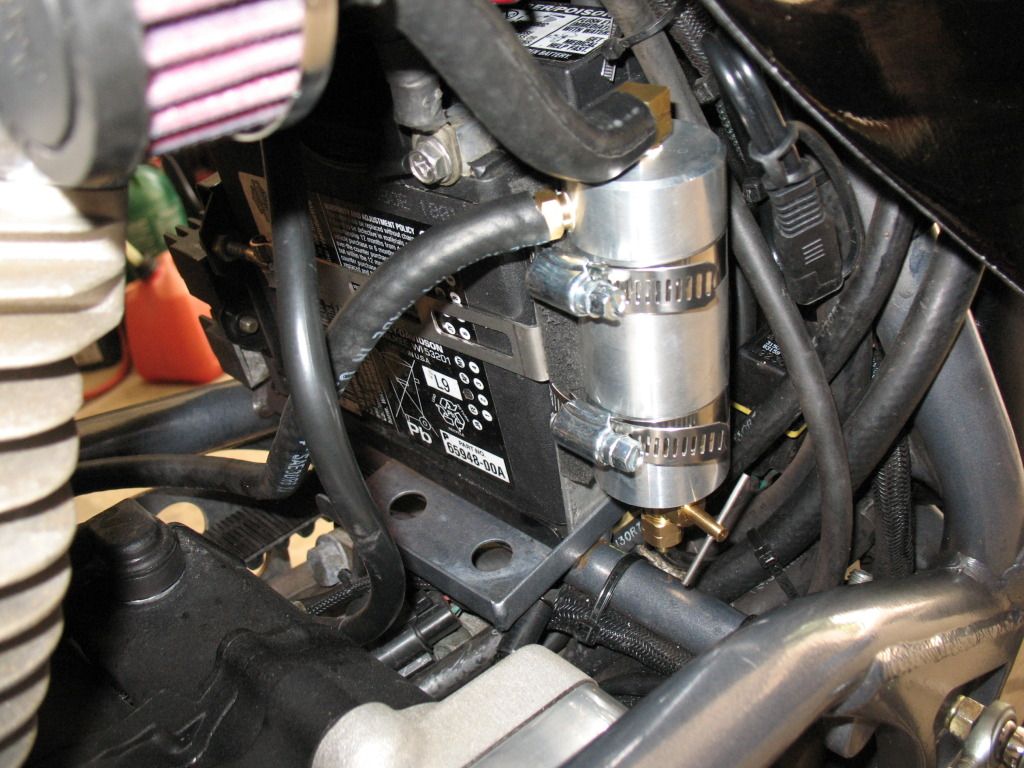
The needle valve and drain hose:
Took a ride with the catch tank today and was happy to not have any oily mist residue to worry about. Haven't had a chance to ride with the Forcewinder yet but I'm not really expecting anything to change other than the added knee room that I've already noticed just sitting on the bike. And of course, the looks, which as I sit here looking at it in my garage, I much prefer over the filter that was on the bike when I bought it. 
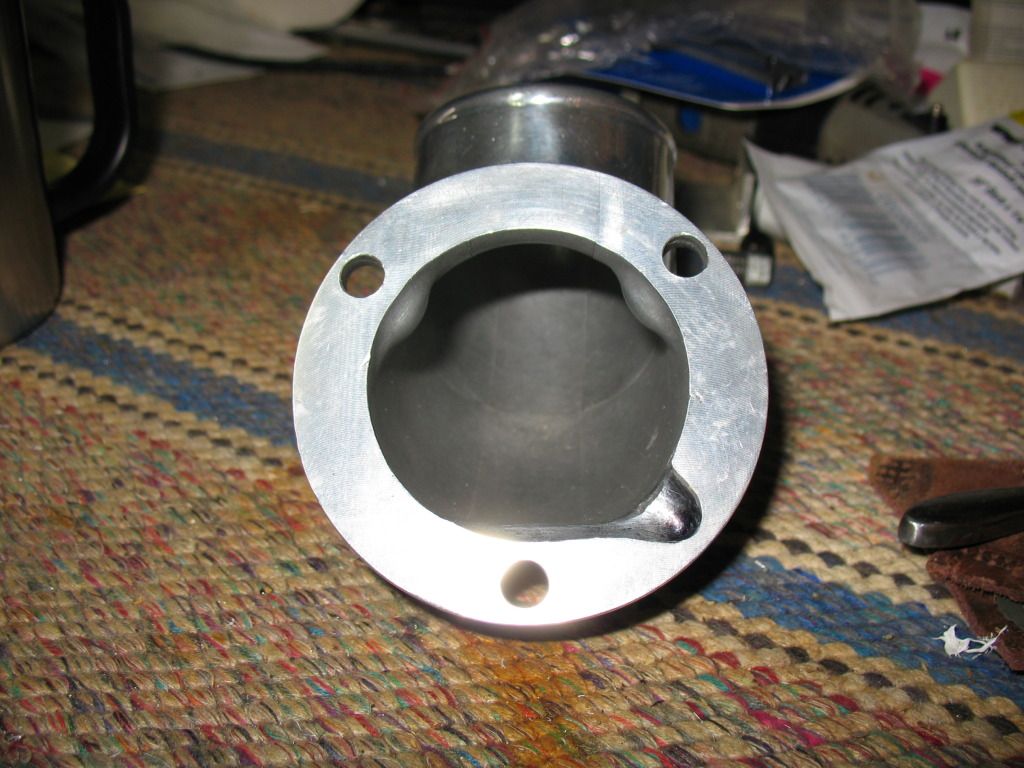
I found the thread with the pictures of the old style Forcewinder with the cast in float bowl vent area, sized the pics to life-size, printed them out and used them as a template to try and modify mine as best I could. Hopefully this will work:
And the Forcewinder and vent hose routing:
 |
Kilroy
| | Posted on Sunday, June 10, 2012 - 05:21 am: |
|
You really should have the catch can as the lowest point in the system. You have a large trap right now in the hose that will have a good chance of filling up before you can push the spooge into the catch can. |
Littlebuggles
| | Posted on Sunday, June 10, 2012 - 06:30 am: |
|
Looks good. I preferred the Forcewinder for the knee room as well.
I like the needle valve and drain line you adapted to the catch container, that sort of mod will help me with my current container location. Do you have sufficient space between the frame rails to run the breather below the carb instead of over it? |
Imaposer2
| | Posted on Sunday, June 10, 2012 - 11:42 am: |
|
Kilroy,
I get what you're saying, and I did think of that. I would have preferred to have the vent hose have a drop all the way to the catch can, with the catch can being the lowest point so everything drains. I just couldn't figure out a method of making that happen in a way that I liked. I considered other mounting locations but there was something I didn't like about them all. As it is now the catch can is lower than the rocker boxes and the hose is 1/4" ID so while the hose will retain some liquid, I don't think it'll present any issues. The hose will always have something in it, but once it reaches a certain level the excess will drain into the catch tank. I guess I'll run it like this for a while and see if it presents any problems.
Other than it not being an "ideal" set-up, does anyone know of a specific issue with the way it is now? 
Littlebuggles,
Where do you have your catch can mounted? I'm open to suggestions on a better way of doing things, but I'm not sure I understand your question about my set-up. The chrome tubing piece connecting the front and rear heads can only be mounted the way it is, AFAIK. The hose comes off of it below the forward banjo bolt then runs behind the lower frame rail back to just over the drive sprocket, then over in front of the battery to the catch can on the left side.
I could loop the hose up and over, but since I couldn't make it all downhill, I at least wanted to keep everything below the banjo bolts.
.
(Message edited by Imaposer2 on June 10, 2012) |
Knwyman
| | Posted on Sunday, June 10, 2012 - 12:07 pm: |
|
I have the same catch can set up but mounted it on the upper front frame spar on the left near where the tie rod mounts. I ran the hose from the heads around under the tank near the horn & down to the tank. I then ran the vent line to the filter pretty much around the same route as the other hose around & zip tied it to te frame/wiring harness on the right side of the front head. It works well for around town but on extended highway trips the filter ends up soaking & blowing oil. I think I'm going to try a plastic bag around the filter on my next long trip to help contain the mess a bit... |
Uwmad
| | Posted on Sunday, June 10, 2012 - 01:17 pm: |
|
One problem with the hose being lower than the can...is when it fills up. It's not going to make it to the can until it fills the entire tube first...you are no longer at atmospheric pressure if the tube is filled? Is that going to cause problems?
I mounted mine on the bar right under/next to the ForceWinder filter. The filter basically hides it. |
Imaposer2
| | Posted on Sunday, June 10, 2012 - 01:23 pm: |
|
Knwyman,
I have heard that putting some coarse stainless or brass "pot scrubber" material inside the catch can helps the liquids condense and stay in the can rather than passing through. Not sure if it really helps or not and since my catch can can't be opened up to remove it I didn't add anything to it, although I did think about threading a bit through the fitting holes.
My bike had the vent routed directly into the air filter before and it did mist a bit. It really wasn't too bad though, so I'm hoping the catch can sill stop it altogether. I put a little over 100 miles on it yesterday after installing the can and nothing so far, but of course 100 miles isn't much so time will tell... |
Imaposer2
| | Posted on Sunday, June 10, 2012 - 01:34 pm: |
|
Uwmad,
As long as the system is open to the atmosphere it will be at atmospheric pressure regardless of any fluid that may be sitting in the hose. The way mine is now, the can end of the hose is ~ 4" lower than the banjo bolts and the can is vented through the small vent filter. Effectively, the only thing the tube will do is increase the total volume of the system. And while the volume contained in the couple of feet of 1/4" ID hose can't be drained, I don't see that it hurts anything just laying there in the hose. |
Kilroy
| | Posted on Sunday, June 10, 2012 - 04:44 pm: |
|
Knwyman
Don't put a plastic bag around the "breather" |
Knwyman
| | Posted on Sunday, June 10, 2012 - 05:05 pm: |
|
Kilroy -I know it sounds like a terrible idea but I'm not talking about super tight or shrink wrapped. Just loosely over the filter at the end of the 2 foot hose off of the catch can to help contain the mess on long trips. |
Littlebuggles
| | Posted on Sunday, June 10, 2012 - 08:44 pm: |
|
I have mine mounted with a couple hose clamps behind the down frame spar here (circled in yellow):
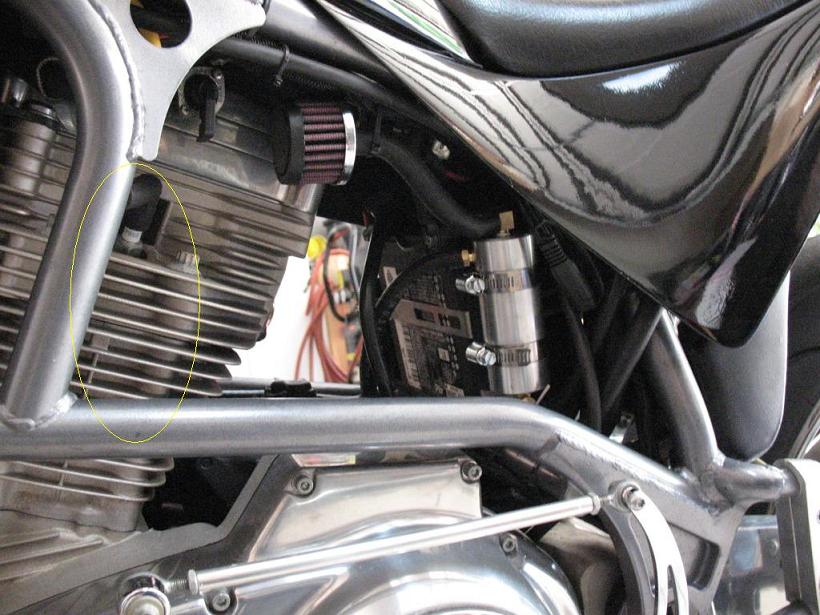
The stock valve that came with the catch can (same as yours, from Pegasus Auto Racing) hits the frame and makes it difficult to open up. fortunately with the XB covers I have less stuff collecting so I don't have to drain it very often.
IMP2, I got a cheap plastic pot scrubber and fed a bunch of the material in through the top hole to help filter misted air. since I can't observe it in action I don't really know how it works. Don't think it impedes function though so either way it's fine. |
Imaposer2
| | Posted on Sunday, June 10, 2012 - 10:21 pm: |
|
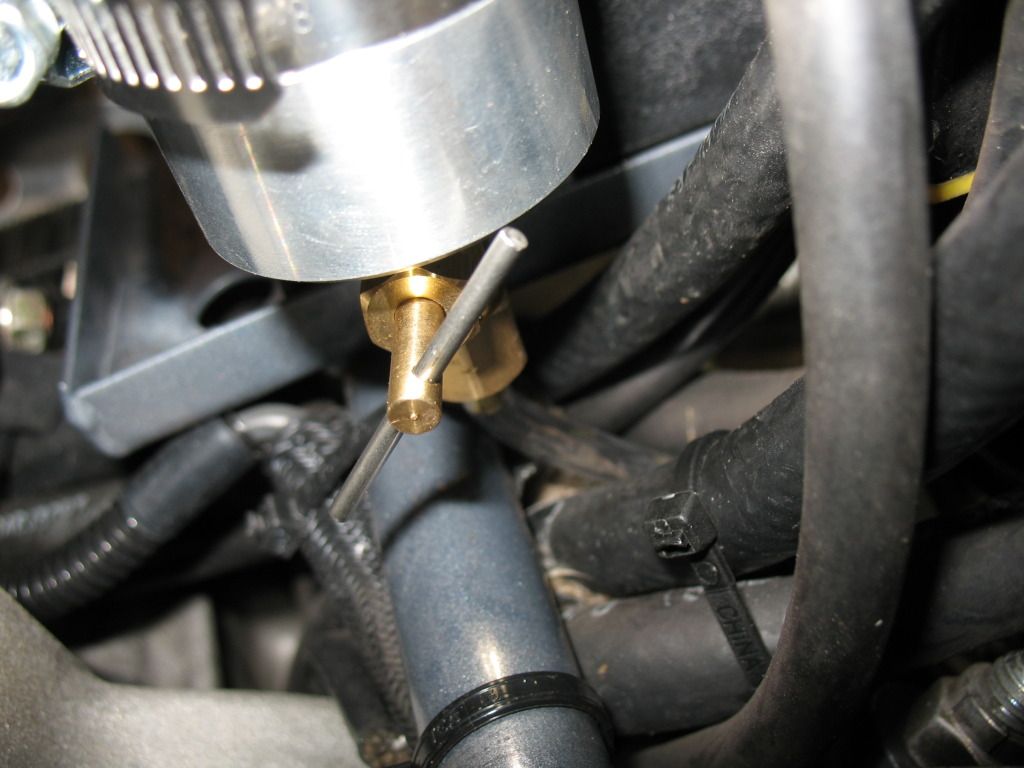
Yep, looks like Pegasus Auto Racing has the same catch can. I got mine from Weaver Performance via ebay for $16 plus $7.90 shipping.
The needle valve that I used (1/4" OD X 1/8" MIP) has the valve handle mounted 90* to the can, so it can be oriented so as to not interfere with surrounding things. It also has the added bonus of allowing a little hose to be attached which simplifies draining. |
Uwmad
| | Posted on Wednesday, June 13, 2012 - 10:32 pm: |
|
when you do the float vent mod on the Forcewinder...do you do anything to the gasket? Seems like the gasket will still restrict the flow? |
Littlebuggles
| | Posted on Wednesday, June 13, 2012 - 11:07 pm: |
|
The gasket has a round hole, same size as the bolt holes, it should flow more air than the little machined slot that came in the force winder initially. |
Bluzm2
| | Posted on Saturday, June 16, 2012 - 10:58 am: |
|
Not much airflow is needed. The hole is the atmospheric vent for the float bowl. Not much air going in and out. |
Imaposer2
| | Posted on Saturday, June 16, 2012 - 11:14 am: |
|
That's what I thought too. It's really just there to prevent a pressure differential that could affect fuel being drawn up into the venturi. I still don't understand how the shape of the vent area of the Forcewinder elbow matters so long as the vent is there. But after reading about it in a couple of places I figured, "what the heck", and went ahead and modified it as shown.
 |
|