| Author | Message | ||
Triman023 |
Just got this, the seller claims it will fit an S2. Will it? Looks way better than my original. 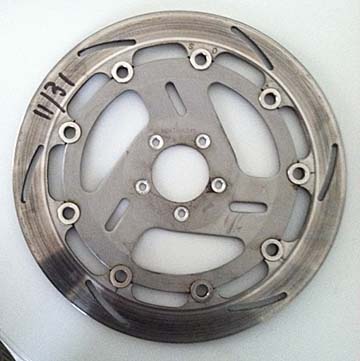 | ||
Buellish |
That looks like the 2000 and later stainless rotor.Should measure close to 13 5/16".So yes. | ||
Triman023 |
It does indeed measure 13 5/16 Looks like no more rattle, woo hoo! Any tips on removing the old one? Welding torch, impact wrench etc? | ||
Buellish |
If it has allens,make sure you have a good wrench.If your using an old worn allen, grind it down.I find that whatever type fastner (allen or torx) using a ratchet and socket allows you to put pressure against the fastner.Keep the wrench straight.Don't let it go at an angle.If it has the original carbon rotor,a little heat will brake down the locktite the factory used. | ||
Triman023 |
Thanks! Useful info. | ||
Sportyeric |
Heat. Use a centre-punch to rap the bottom of the hole. An electric impact-wrench. | ||
Sportyeric |
It might need a different shape of bolt-head. Don't mix-and-match. | ||
Leftcoastal |
I've found that my Makita 18v impact driver (the type that uses a 1/4" bit - not the impact 'drill') with the proper drive bit does wonders in getting stuck fasteners out. Use heat first like everyone above says. Use a lot of pressure on the tool and it usually spins it right out. Carpentry tools to the rescue. | ||
Al_lighton |
I've twisted a few bits in half on the old flat head allen screws..I think it's only a 3/16" allen, and those bolts can be darn stuck in there. Easiest way if you have a welder is to weld a 5/8" nut to the top of each flat head screw. Gives you something you can twist by, and the weld heat does a good job on the loctite in the hole. There's a reason that the new bolts are pan head, not flat head. Multi-hole bolt patterns with flat heads are a tolerance nightmare. The first screw installed self centers. All the rest will have line contact only at bottoming unless they're SPOT on, causing the bolt head to bind. See http://www.americansportbike.com/shoponline/ccp0-p rodshow/17024.html for the proper ones for that rotor. They have the right grip length, head height and thread locker. Stupid price, though. Al | ||
Ratbuell |
Stupid price, though. Gotta give Al credit on that - he's the guy who owns the place! However...a few extra bucks for bolts, ESPECIALLY on the brakes, is worth it in my book. $25 on bolts is waay preferable to needing a winch to get the bike out of the woods after missing a turn because the brakes didn't work right  | ||
Triman023 |
Agree, I will order the new bolts. I only have a hammer driven impact tool, this should work right? | ||
Hootowl |
I've had luck with hammer type impact tool. Worked on half of them. The others I had to drill the heads off of. It was actually faster to drill them. Once the head popped off, the threaded part came out easily enough. | ||
Bigslug |
I just changed the rotor on my S2 last weekend. A bit of heat from a propane torch and an allen socket with a long handled ratchet and they came out without a fight. Definitely use heat, it softens the Loctite. Mike | ||
Kenm123t |
Hey Al have you tried this one. If you have a tig welder use your lowest setting start a arc in the bottom of the allen socket. The bolt wont melt but youll put the heat right where its needed and break up the loctite and corrosion they come right out after that. I did that after doing the welding another bolt or nut on with my tig machine. Fewer sparks to burn powder coat etc Allens came out with no extra effort | ||
Dynosaur |
These also fit... http://www.americansportbike.com/shoponline/ccp0-p rodshow/17067.html ...and are preferred due to the torque of the disc being resisted by the short plain shank rather than a threaded section (as well as the friction of the interface between disc and wheel). Cheaper too... | ||
Al_lighton |
Be careful with that... Yes, the un-threaded shank length on the XB rear rotor bolts IS longer. But if the bolt stops threading in because the un-threaded section starts into the female threads in the wheel, as opposed to the bottom of the head touching down on the rotor surface, that bolt will have no preload in it at full installation torque and is a fatigue failure waiting to happen. Before using those bolts, you'd better be damned sure that the bottom of the head to the wheel surface is less than the thickness of the rotor at the bolt hole. Al | ||
Dynosaur |
No worries Al, it works as I am sure you have now checked yourself. Popular fitment in Netherlands, Germany and with those loveable rogues on UKBEG. Mine have 20000 miles on and will only be coming out to change the disc to an EBC Prolite... Coolest thing about these is that you buy 5 and get one free... | ||
Al_lighton |
After looking at the bolts and the rotor today, I'm pretty sure that it'd work 90% or more of the time. However, the amount that the grip length of the bolt protrudes out of the back of the rotor could, with the just wrong thread entry condition on the wheel, cause the torque to rise rapidly ahead of the bolt head seating. I do think it'd work most of the time, but without KNOWING the tolerances of each part (i.e., brake hub thickness, C-bore depth, bolt shank length, wheel thread start depth), I'd still check it before attaching it. It's marginal on the ones I looked at. You're correct, it is a superior joint to have the full unthreaded shank cross the shear plane of the mated parts. If there is enough recess of the thread start, it's the best of all. At worst, you'd just need to recess the thread start on the wheel with the XB bolts to use them. They ARE cheaper, and other than shank length, are otherwise identical. On brake parts, ALWAYS be sure... | ||
Dynosaur |
Yeah bro, not going to argue with you there, however if you screw these into an aluminum part and the shoulder protrudes, it will just push through the first couple of threads. Never had an issue myself and never heard of an issue and the indy Buell techs over the pond have been doing this for years. Nothing new... I am sure Buellistic has a white paper on it somewhere and he is a guy I respect. But I am happy to re-iterate your point, don't mess with brakes if you don't know what you are doing... | ||
Triman023 |
One more question: I am going to be using different bolts to put this rotor on. Is the torque setting the same as my shop manual says? Or do I need to look up the setting for the 2000 model? | ||
Buellish |
I have run the 2000 rotor with the correct bolts on my S2's and used the 95/96 torque spec,without problem.Been doing it for years. Of course on this board you will find different opinions for everything. | ||
Triman023 |
Great Thanks Always good to find out every detail when brakes are involved. |