| Author | Message | ||
Mikethediabetic |
so i bought this bike at the beginning of summer for $3000. it had all its service done by the previous owner at H-D and it had 5,500 miles on it. All stock except for the "race only" ECU and some slip on that i dont what company it is. I have since done some modding to the bike. First step was to bail the mickey mouse mirrors. Obviously bar ends were the choice. second was to get rid of the un-godly huge air box. I refused to pay $300 for an intake so i made my own. A big steel bushing, some stainless exhaust tubing and an air filter later and i ended up with what you see there. The whole thing cost me $22. Then i swapped out the stock handle bars for some renthal moto bars. They have a smaller rise to them. I also installed a smoked integrated sequential taillight. The subtle things that not everyone will notice are the trimmed wind screen, (cut about an inch off it to make it smaller and hug the headlight and gauges more). I also raised the tail about 4 inches which gives it a very nice stance. So, what to you guys think? i will post more pics if you guys want. please let me know. all input is appreciated. Sorry if the pic is too small. 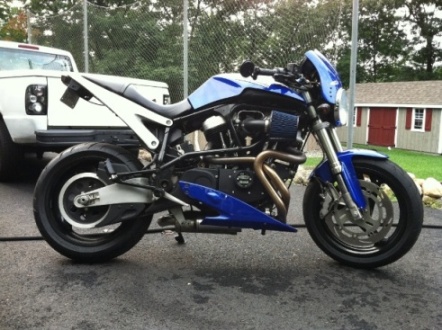 | ||
Nwrider |
Nice looking bike sir. Did good on the price as well! | ||
Matrim |
Looks very nice. Actually the windscreen was the first thing I noticed - gives it an xb sort of look. How did you do the seat lift, I i really like it? I want to do that on mine but cant justify the cost of this kit: http://www.trojan-horse.co.uk/prods/364.html | ||
Barrick09 |
hey mike, was wondering if you could post some pics of the air fitler mod that you did to get that forcewinder look. Looks just like it for $22!! would really appriciate it! Thank! | ||
01x1buell |
nice bike man. i have an 01 x1 i love it,, i think i have seen you on njbo. | ||
Mikethediabetic |
Im glad you guys like it! as far as raising the tail section its super easy and takes about 15 min to do. If you look at the subframe mounting bolts, there is a top one and a bottom one. all you do is take out the bottom bolts on each side. Then grab the tail by the tail light and lift it to the position you desire making the sub frame pivot on the top mounting bolts. The factory mounting tabs for the lower mounting bolts are pretty big so when you get the tail to the position you like just drill new holes in the mounting tabs and put your factory bolts back in. THEN PRESTO! you got a nice raised tail. | ||
Barrick09 |
after looking at my subframe i figured thats what you did. With the corbin 2-up seat i bet raising the tail looks even better! does your seat still fit normally? i don't think mine will bend like that lol | ||
Ltbuell |
..hey Mike....like the changes you did and on a shoe string budget.I,too,have an X-1('00) thats been modded...still a work in progress(alot of us already know this,right?).LT | ||
Lunchbox |
Looks great! I just picked up a 99 X1, Love the airbox mod! Post more | ||
Xl1200r |
That "slip on that i dont what company it is" looks like the Buell Race header and muffler. Does your} header outlet point to the back of the bike? Or down at the ground? If to the back, it's the race system. | ||
Mikethediabetic |
ok so to answer some of your guys posts. Barrick09: My seat definitely bent quite a bit but since the seat covers are a plastic-like material i just hit the cover with a heat gun for a little and smoothed out the crease. thats all you have to do. Lunchbox: I will try and find time to take more pics of the ebaywinder intake for all you guys. it was very simple. Xl1200r: If you are reffering to where the header and the slip-on slide over and mount to eachother then yes it points straight out the back of the bike. Is this a good exhaust? or crappy? | ||
Matrim |
Very cool with the seat. Is it more or less comfortable for you? Do you think there is much compromise in structural integrity from drilling a second hole for the subframe? | ||
Lunchbox |
That "slip on that i dont what company it is" looks like the Buell Race header and muffler. Does your} header outlet point to the back of the bike? Or down at the ground? If to the back, it's the race system. Isnt that the stock header? Looks just like mine. | ||
Xl1200r |
That's the Buell Race header, then. It's probably the best system you can get and when the packing isn't all blown out isn't obnoxiously loud. Check out American Sport Bike for a repack kit if your seems kind of noisy. Also, when you take the muffler off to change your primary oil, give it a shake - if you hear anything rattling or sliding around you need a repack. >>>Isnt that the stock header? Looks just like mine. The routing is the same but I think the outlet is 1/4" larger. The biggest difference is that primary tubes are longer. On the race system, they wrap all the way around the front of the bike, come together and point the collector straight back. The stock header has them join sooner and the collector is pointing more downward at a 45 degree angle, perpendicular to the bike. The elbow to get the exhaust going to rear is built into the muffler. | ||
Lunchbox |
Makes sense. Mine is the stock one then. | ||
Barrick09 |
hey mike, any luck on some photos of your ebaywinder intake lol, a part list would work fine and i could figure it out, just not sure where to/what to look for as far as the 90 elbow and how it mounts? Anthony. | ||
Barrick09 |
hey mike, any luck on some photos of your ebaywinder intake lol, a part list would work fine and i could figure it out, just not sure where to/what to look for as far as the 90 elbow and how it mounts? Anthony. | ||
Mikethediabetic |
ok guys i just wanted to see if there is any interest in the intake. i will give you a parts list right now and then post pics when i get a chance. Here is what you will need: 1. Cold air intake filter from ebay. $16 http://cgi.ebay.com/ebaymotors/_W0QQcmdZViewItemQQ _trksidZp3984Q2em1439Q2el2649QQitemZ300561586256QQ sspagenameZSTRKQ3aMEWNXQ3aIT 2. Bushing from Fastenal.com. $3 http://www.fastenal.com/web/products/detail.ex?sku =33520&ucst=t 3. Rubber grommet to mount IAT sensor from pepboys. Its about 1" in diameter. $3? 4. 2 1/4" 90* mandrel bent elbow. $5-$10. For this i just went to an exhaust shop buy me and asked if they had any scraps lying around. They had a box of scraps that were all mandrel bent and stainless steel. I found one that was my size with what i thought was right curve and he charged me $5. You can buy these online with the exact dimmensions you need but it is going to cost about $20-$30 for the elbow. I have a little 115V welder at home and it worked more then fine for me. Here is the steps in assembling it. 1. Take apart your factory airbox and locate the black plastic rings that mount to the intake with 3 silver allen head bolts. Take the rings off and use them as a template for the bushing that you bought. 2. Mark out and drill the mounting holes in the bushing. 3. Mount the bushing to the intake of the bike. you may need to re-install one of the plastic rings to be used as a spacer for the new intake. 4. Once your bushing is mounted tight to the bike call a buddy or someone that can hold the elbow for you. 5. Take the elbow that you should have trimmed a bit to fit nice at this point and have someone hold it up against the bushing on the bike. Just like it would be if it was welded. Get the right angle that you want it at and everything. 6. PROTECT THE BIKE! At this point protect the bike with anything you got, towels, cardboard, anything. Because now you have to tack weld the elbow to the bushing. 7. Put a couple tack welds on. enough to hold the elbow and bushing together so you can un-bolt it. 8. Finish welding the Elbow to the bushing. 9. Drill a hole on the back side of the intake tube for the IAT sensor. I used a step drill which made it go very easy. 10. Now cut the length of the elbow to your desired length sticking out the front of the bike. 11. Paint the intake if desired. 12. install the IAT sensor with the grommet from pepboys. 13. Bolt it all together and enjoy. | ||
Barrick09 |
Thanks so much for the info, after i started reading i realized i might have a problem that make this process easier lol. I have a 42mm mikuni carb, when i get home ill take it apart and see what parts of the process might be different. |