| Author | Message | |||
Ztferrari |
I have decided it is time to tear my s2 down to the frame and do a "restore" on it. Need to put new rear iso's and belt on it anyways. The plan is to remove motor and everything and repaint the frame, clean it up etc. As much as I hate to do it, the bodywork is in pretty bad condition (few cracks, scuffs, and tear around the tank cover bolt holes). I am thinking of repairing these and repainting them. It kills me to do this and have to repaint, but I think it is necessary to get it looking the best. I have new rear isos im going to put in so why not? the bike has 30k miles on it and has been around the world (one of the previous owners had it in germany) and it shows. Am I crazy? I did this with my previous S2 and it turned out OK, but I didnt touch the bodywork. I guess I don't really need advice, maybe just some encouragement. Here it is as it sits right now. Anythings I should be aware of? It has been about 5 years since I tore an S2 down to the frame. 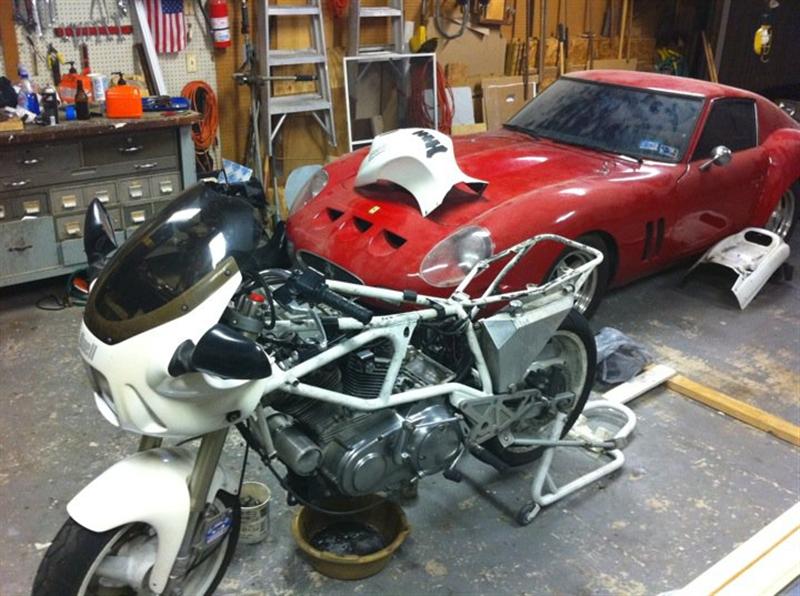  Thanks guys and I love y'all! | |||
Ebutch |
Nice Bikes Scott.My S2T is Just Broke-in 129,000 miles.Untouched Strong Engine.Hope you keep it White!Last time in Texas was 1967,Fort Sam.  I,m on my 3d paint-job. I,m on my 3d paint-job. | |||
Easy_rider |
Get a box of baggies and a marker in the shop right away!!! When you go to buy parts, I'm guessing you'll have the old number in hand. They'll give you a bag with new numbers. Get them to write the cross-reference for you as they go or you'll spend time trying to sort it all out. I bought mine in batches and still spent way too much time trying to sort out some of the gaskets. I'm about to hit the two year anniversary of purchasing my rebuild. A solid week of time and energy would get it done. I said I was going to release this after completing and cleaning it up a bit. Since it's unsanitized, take it with a grain of salt.
| |||
Ztferrari |
Thanks easy rider. I shouldnt have but I did a =sum of the price column! I will be getting my parts through AL @ American Sport Bike. Closest buell parts dealer near me is 45 minutes away and I don't want to give them my money. Ill keep everyone posted with pics | |||
Easy_rider |
Yeah, it hurts to see what it takes, but should come in handy when you're looking at whether or not you want to tear into a subassembly. My closest dealer has been generally supportive, so I felt I owed them a piece. American Sport Bike is a sponsor, so some went there as well. Ratbuell busted his butt to get me a part once, so they got a (very) small part as well. | |||
Road_thing |
ZTF: Do you have a lift? If you do, you might consider putting together a "skyhook" frame like I did:  It sure made pulling the engine easier. rt | |||
Ratbuell |
+1 on the lift, it definitely makes life easier. You can do the same thing with a stepladder and a couple ratchet straps in a pinch. For my money, strip the frame and have it powdercoated. Trick I learned at my old job - have them mask off the VIN stamping and do the color coat, so it doesn't fill in the stamp. Then unmask it, and clearcoat the whole thing. Not "stock"...but at least you can still read your VIN should the need arise. And for god's sake, I hope that's a kit car. If you put bodywork loose on a real-deal Ferrari, I'll come out and smack ya in person  | |||
Phelan |
There's a Datsun Z hiding under that GTO, Joe. I've talked to Scott about it before. Still, I wouldn't be setting anything on the hood except maybe a cute girl  . . | |||
Buellistic |
BUELLers: Here is some tear down advise for you'll to think about ??? ie: the cam cover - the FACTORY SERVICE MANUAL give you torque spec's for torque'ing and a torque pattern ... Would you not think that you should do a loosen pattern in reverse at 1/4 turn per allen screw until all are loose ??? The primary cover should be done the same way, "BUT" the FACTORY SERVICE MANUAL does not have a pattern("i" have it and will send on request) ... The same applies to rocker arm covers, trap door, engine cases, rotors, and anything that has more than two hold down screws/bolts ... If you do not believe what "i" am saying here, just go ask a MECHANIC that takes these new car engines apart ... | |||
Easy_rider |
Ditto on the VIN. Didn't get the officer's signature the first visit because the VIN couldn't be read. I'm going to try getting some graphite in the remaining pattern so the number can be made out. It didn't help that the engine was out as well, though the number is completely legible there. There's a great reminder in Buellistic's post, the factory service manual DOES NOT tell you which screw goes in which hole of the cam cover. I've got the pattern that worked for me, but suggest you pay attention during removal! | |||
Buellistic |
BUELLers: Take a piece of card board and lay the new cam cover gasket on it ... Draw around the edges and holes ... When you remove each allen screw, punch a hole when goes ... This way you will not get caught with which one goes where ... This works anywhere there is a gasket ... On the engine case'es you have to draw a picture as there is no gasket or brackets/what ever ... | |||
Ztferrari |
I do believe there are pictures in the FSM about where the bolts go, lengthwise at least. Thanks for the support. Its really not a tough job, its just the commitment of not riding for awhile that sucks. And no lift, I know it would make it easier but I don't feel like having to transport/store it if/when I move. Ill post pictures and stuff, I'm still in the middle of the road commitment wise on the teardown! And yes, its a datsun under that beautiful body. The car is next to get a complete overhaul, so I don't worry about the 300$ paint job on it too much. It's also got a t4 turbo and 330 horsepower (when its running) Scott | |||
Easy_rider |
I do believe there are pictures in the FSM about where the bolts go, lengthwise at least. Just enough to mislead you into thinking the info is as good as what's provided for the primary side. IIRC what's there isn't correct. It'll cost you an hour to figure out where they go during assembly... | |||
Ztferrari |
I've done it so many times now I think I have the bolt location/sizes memorized... Here's where I'm at right now Removed all the backend stuff, the real dirty crap. 15 years of road grime. the wiring harness is in bad shape, I will have to do some doctoring to some open wires. Also, the neutral wire, the one coming right behind the sprocket right? I just cut the sucker, looks like someone else did too since there was a splice there.  | |||
Road_thing |
You're getting to the fun part now. I pulled the starter and transmission out of mine before I dropped the motor, just to make it as light as possible. I'm always surprised by how heavy the damn things are. Do you have some way to support the frame when you drop the motor? rt | |||
Easy_rider |
There is a new wiring harness on ebay for $80. I waffled a few weeks before pulling the trigger, but at the end of the day it seemed like cheap insurance in the overall scheme of things. Nice stand.... | |||
Ztferrari |
Update: Got EVERYTHING removed. except the swingarm and motor. 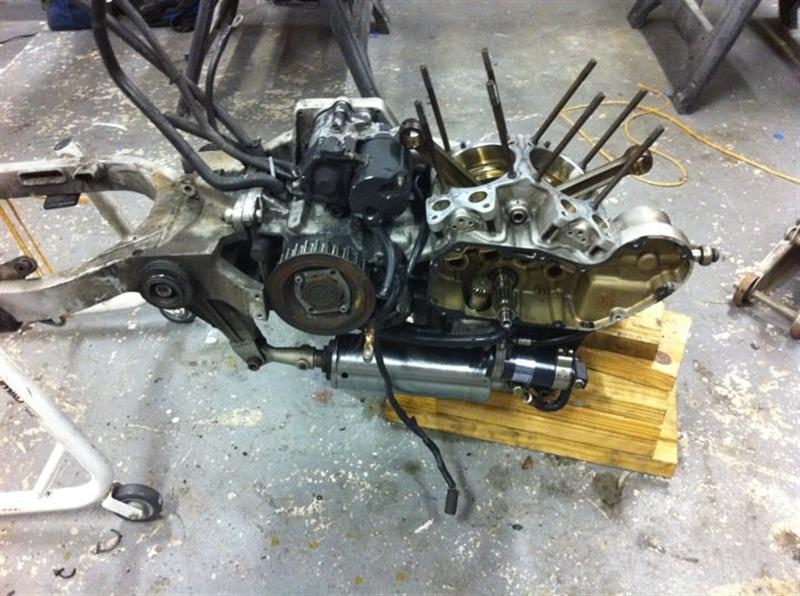 The primary side looks real good. Frame is in rough shape. It will be cleaned and painted (or powdercoat, but im thinking about paint since I can do it myself) 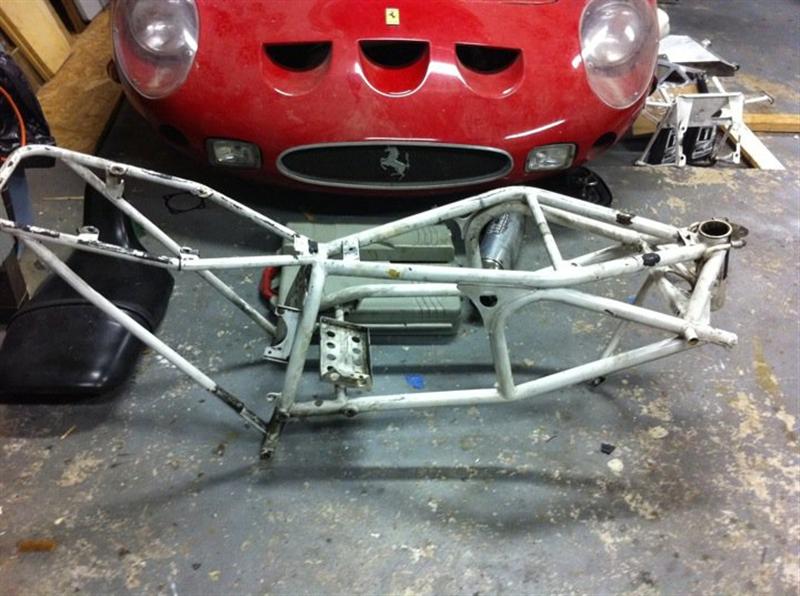 Now bad news... the wrist pin retaining clip came off the the pin gouged my rear cylinder real bad.  gouge is 0.090 deep. What kind of headache (and $$$) am I looking at? Anyone had experience with this? Should I split the cases to fish out the clip? This wouldnt be fun if it were easy, right? heh. Thanks guys, hope yall are enjoying riding since i'm not! | |||
Ztferrari |
heres the primary side, just for personal amusement  | |||
Easy_rider |
You can dish out the clip with one of those magnetic pickup "wands". Two or three times, as a matter of fact. (I eventually learned to put a rag over the hole.) I did have an occasion where it took extra effort. As I recall I lifted the front of the block so the clip worked it's way to the back. More clearance back there. | |||
F_skinner |
Me too, the hard way.. The magnetic wand should work. | |||
F_skinner |
I had mine powdercoated and was please with the results. I am trying to think if the frame carries any current (or ground) in which case paint would not allow that. Maybe someone can confirm or deny that? | |||
Easy_rider |
Frank's question comes at a timely moment for me. It looks like the heavy cable from the negative side of the battery attaches to the frame at the top bolt of the regulator. Is that correct and does it attach between the nut and the frame? Is the frame bare metal there? It doesn't look like a good connection if there's not something like a star washer to chew through the paint but I don't see that in the parts list. I should have taken better pics. It probably looked obvious at the time. | |||
F_skinner |
Yes, it attaches between the not and the frame and there is a regular washer that goes there but you can use a star washer. If your frame is powdercoated it should be fine.. If it is painted then you need to scrape the paint off a little. | |||
Ztferrari |
Easy, I just checked my frame and where the ground wire washer contacts the frame is bare metal.. | |||
F_skinner |
Mine is not... Interesting... | |||
Ztferrari |
this is what mine looks like:  | |||
F_skinner |
I would use a star washer to make sure contact is achieved.. | |||
Easy_rider |
That's where the ground strap ties to the frame? The way the cable is tie-wrapped to my regulator wire bundle it looks like it would attach to the back side of the plate that the regulator attaches to. What's the fuzzy thing do? I don't remember anything being in that area. | |||
Ztferrari |
Fuzzy thing is for an alarm the PO had put on the bike.. | |||
Ztferrari |
and easy, I just checked with some pictures and the washer spot next to the fuzzy thing is the correct spot for the ground strap. then the other end goes to the swingarm - I forget where but I'll figure it out when I put it all back together Scott |