| Author | Message | ||
Nukeblue |
so i'm workin on a cyclone (friend of mine) that overflowed the primary vent tube, covered the wheel & crashed the bike. after all the cosmetic repairs are now done i'm changing the engine seal. ( i assume the engine oil filled it) i got it all apart & i can see the seal. it kinda looks like it's in there backwards which i'm not used to. but anyway... the service manual of course shows a special tool to install it. what i was wondering is if anyone has just popped the thing out & drove the new one in? and had any luck? | ||
Pkforbes87 |
I let the circular spring slip off of mine while installing it by hand, so pulled it back out with a tool I don't know the name of (very sharp and has either a hook or 90* bend on the tip - usually comes in a set with a few different angles on the tips) Anyways I pulled it out, slipped that spring back around the crank seal and re-installed. Nearing 3000 miles and have had no problems so far. | ||
Psycrow |
Dental picks?? Psy | ||
Pkforbes87 |
Yeah picks.  | ||
Nukeblue |
so the seal isn't in there that tight? | ||
Pkforbes87 |
Oh sorry I should have clarified.. I don't know how tight it's in there when trying to remove it after use - a local shop removed mine when I dropped the cases off for cleaning, and inspecting the crank/flywheel/rods/etc It shouldn't matter how tight it's in there, if it's going to get replaced anyway then just F*%$ it up with a PICK (got it!) and put the new one on. | ||
Buellistic |
BUELLers: The correct oil level for transmission is just up to the BOTTOM" of the CLUTCH DIAPHRAGM SPRING ... It is checked or filled with the clutch inspection cover off, bike on level ground, and perfectly up-right ... IF YOU OVER FILL OR THE MOTOR SHAFT SEAL GOES BAD, THE EXCESS OIL PUKES OUT THE BREATHER WHEN YOU RIDE IT HARD AND DO "WHEELies" !!!} | ||
Nukeblue |
ok well i'll just find somethin bout the same size & drive it in. it would be nice if the seal was the other way around though. | ||
Reepicheep |
I drove it in the first time by feel. 4000 miles later, the bearing had cut the seal and I had to do it over. The second time, I took a wooden dowel (the infamous green tinker toy) and machined a lip into it. That way, half the tip would push the seal down, the other half of the tip would catch on the case. This allowed me to better control seating depth. That fix held up fine. Just make sure you don't let the bearing rub that seal... better to error seating it not deep enough, then seating it too deeply. | ||
Easy_rider |
As I recall, the seal is a little tight. I think I used a screwdriver to pry it out and worked my way around the edge a little at a time. I'll be doing another this weekend. I'll come back and post what I use this time. | ||
Fasted |
instead of doing it on the cheap, spend the $25 or whatever to buy the CORRECT UPDATED driver to easily and properly install the UPGRADED CRANKSEAL. do yourself a favor. the part and driver costs less than a 1/2 hour labor charge at the dealer. using the proper tool removes quite a bit of screwup potential, and will not require a redo. http://www.badweatherbikers.com/buell/messages/384 2/370024.html | ||
F_skinner |
Do it on the cheap. As long as you careful you should be ok. Your not going to find the driver for 25 dollars it is more like 75. | ||
Nukeblue |
easy, i'll be doin mine this weekend too so i guess we'll compare notes come monday. looks like the depth is about flush with the case housing with the stator. | ||
Fullauto |
The dimensions for the driver are in the KV. I had a friend machine one up and instead of buying the factory tool to fit it, I used a PVC reticulation fitting and, with a collection of spacers, used the crank nut to seat it. The lip on the seating tool pushes the seal into the correct depth. Also, you mention the seal being "the wrong way round". The upgraded seals are double lipped unlike the originals so, as I recall, they can be fitted either way. I did mine over 30,000 miles ago with no more problems. 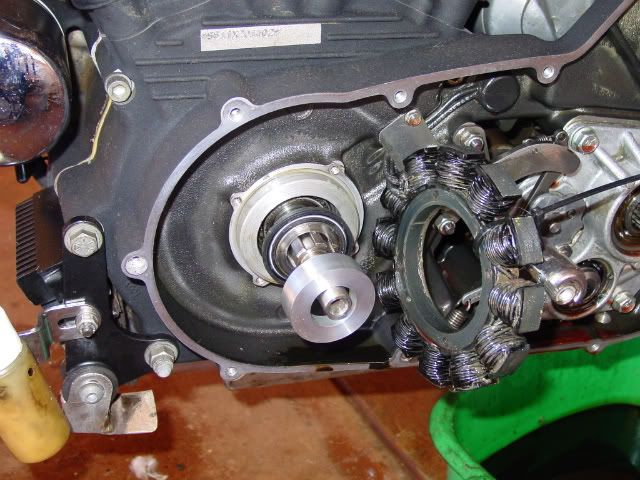 | ||
Fullauto |
Oh, and you don't need to pull the stator off. I think I used a big socket for a spacer. | ||
Reepicheep |
I just ruined one of those trying to get it in a KDX-200 case. Sigh. Found another bad bearing in there anyway, so no big deal, I have to go to ye ol bearing shop tomorrow anyway.... | ||
Easy_rider |
Seeing the stator reminds me, do they have a 4-year old chinese kid wind these? I'm used to seeing the windings being a little tighter, though probably add considerably greater expense. Nuke, I almost went out and did mine just to have a recent example. Decided to "stay the course" instead. The case looks much better than it did. Master cylinder is rebuilt. Front caliper is going to need some soaking time, though. | ||
Nukeblue |
ok i pried the old seal out last night, no sweat. but like you said the new one is double lipped & i'm trying to figure out which way to install it. i'm thinking of installing it the "normal way" which will have the protruding lip outwards toward the stator. if it can go either way thats the way i think would be easiest | ||
Bluzm2 |
If you use the factory tool, you can only install it one way. I'll take some pic's later today and post. I have the tool and a spare seal.. Brad | ||
Fasted |
thanks, brad....good to know that someone else out there likes to do it the easy way. don't proper tools make things a lot easier?????  | ||
Bluzm2 |
They sure do!! | ||
F_skinner |
Why is it I have no problem spend hundreds of dollars on tools but hate to buy ties and suits? I tried tracking down this tool through Jims tools and I think it went for about 80 dollars. It is worth it. | ||
Bluzm2 |
OK, for those that have not seen a seal tool, here it is. The tool is on the left a new double lip seal on the right. 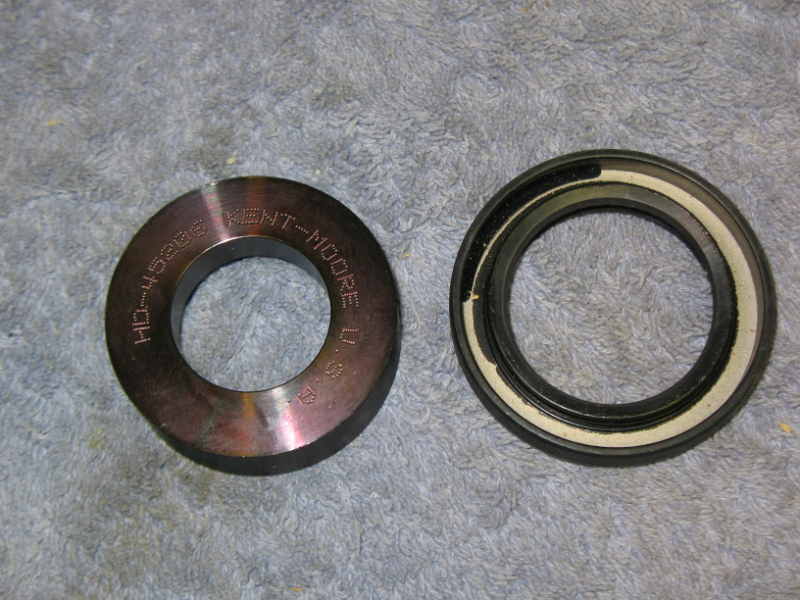 Again, the tool on the left tilted to show the lip a bit more clearly.  This is the "stack". Seal on the bottom with the seal tool inserted into the seal. On top is a PVC conduit spacer. Just use the crank nut to push it into place. The crank spacer must be in place in the seal when you do the install. The edges are pretty sharp and can damage the seal if inserted later. It also prevents from over insertion of the seal. It takes about a minute to install a new seal when you start. 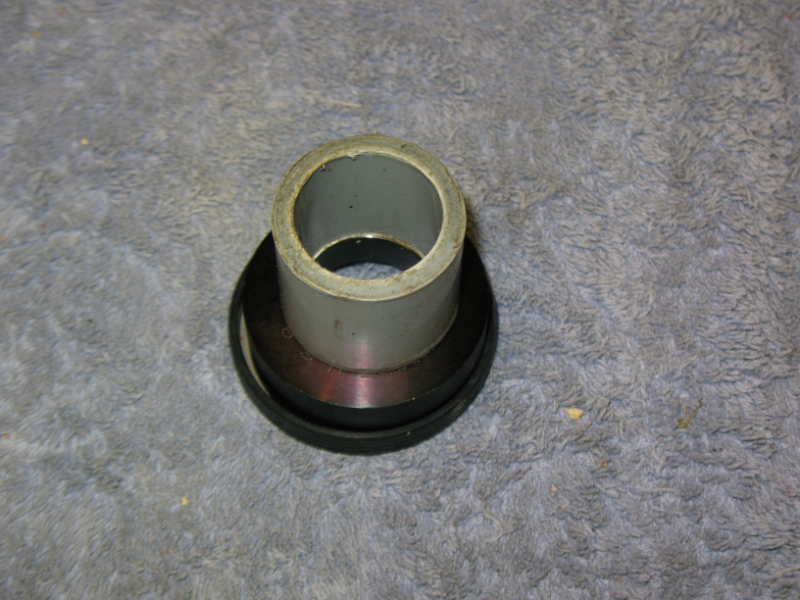 Yup, the right tool makes the jobe a WHOLE LOT simpler. It was less than $25 if memory serves. I've used this one at least 10 times... Brad | ||
Ebutch |
Crank seal 35151-74 oil seal,40240-89spacer sprocket fits inside oil-seal right?OK Brad.Kent-Moore tool is my choice too!Will purchase.  (Message edited by ebutch on June 14, 2009) | ||
Bluzm2 |
If I understand you correctly, yess. The spacer is the slug that slides over the crank. The seal goes around the spacer. The length of the spacer prevents the insertion tool from inserting the seal too deep into the race. Make sense? I don't have a spacer for a picture. I will in a week or so when I tear down my M2 motor to install a new crank. Brad | ||
Ebutch |
Brad:I think that should replaced at time of seal replacement.Old spacer worn from seal #20 and some pitting.Hard to find in fac parts book.page 36 #21 not where I think it would be page 8.  (Message edited by ebutch on June 14, 2009) | ||
Bluzm2 |
I know what you mean. However if you are replacing an old style single lip seal with the double lip version, when you flip the spacer, the seal rides on a fresh surface. No leaks! Not so if youare replacing a double lip seal. | ||
Nukeblue |
well the install went great. rode it to three or four bars, got home & the oil level hasn't lost a drop & the primary hans't gained a drop. i think we're good! i just used a driver from here at work. if you install it without the spacer it's easy to see how close to the bearing you're getting so you don't set it too deep. then i lubed up the spacer & GENTLY installed that. i know what you mean about the "fresh surface" for the double lips to ride on. judging by where the old track mark is, both lips are on fresh surface, sweet! | ||
Tom_s |
Am I understanding correctly that that the crank seal is pried out around it's outer edge? | ||
Fasted |
no, that would screw up the surface of the metal......pry out from inside. if you haven't read the posting in the link given above, do yourself a favor and do so. fsm is a plus as well |