| Author | Message | ||
Pkforbes87 |
Black Betty is finally going back together! Right now the tranny, clutch, the rest of the primary, and the top end up to the heads is all installed. Sorry for the lack of pictures but I've been working crazy hours and getting Betty on the road is a higher priority than recording every step of the process. I had a little trouble figuring out what was wrong with the tranny the first time I installed it. Turns out I missed this small triangle shaped bracket that prevents the shift drum from sliding left and right. I still don't see this part listed in the manual or parts book, but it's pretty important  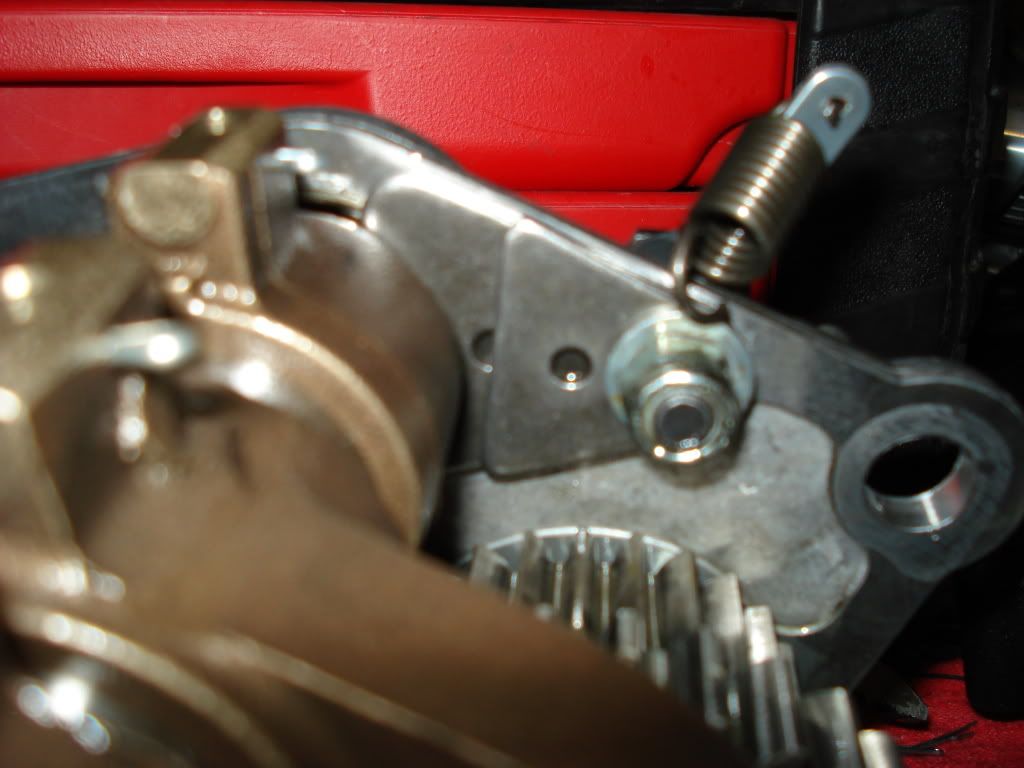 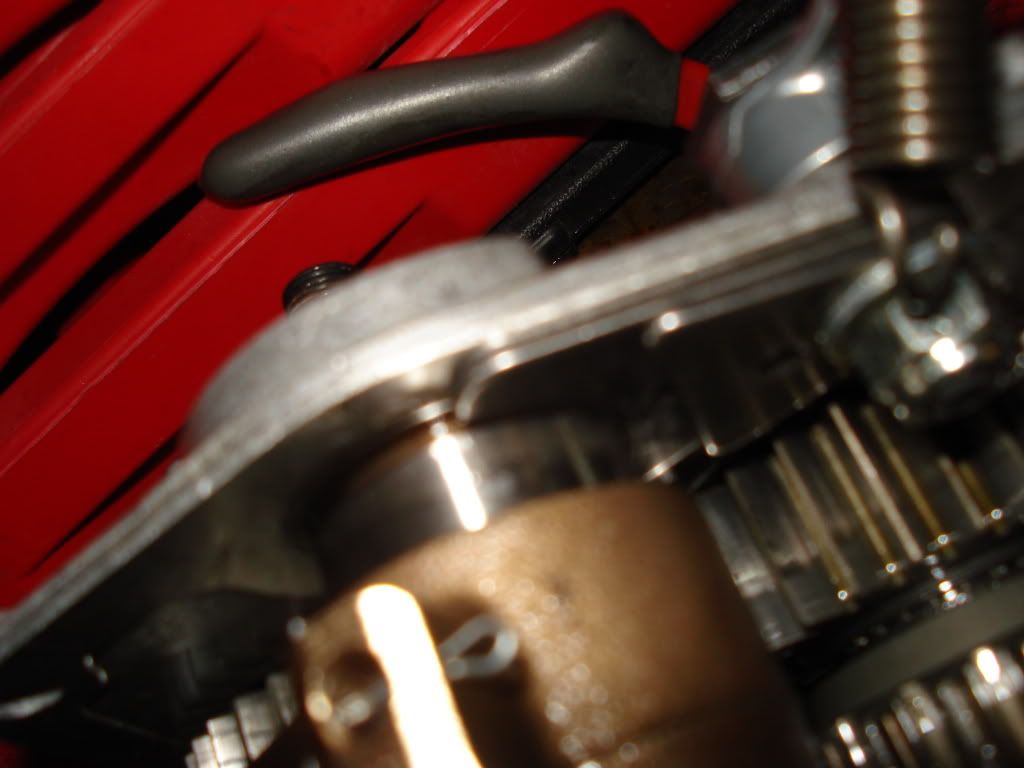  Here's a couple more pics of some safety wired parts.    And installing the pistons. Since I've never done this before, I was a little worried about messing up such a vital part. It really wasn't that difficult, just took some time to go slowly and make sure the rings slide in smoothly. After these pics were taken, I got everything installed, and after installing the heads realized that I forgot to install the second circlip in each piston. So EVERYTHING got torn back down and the circlips installed. The front was alright, but I accidentally pulled the rear cylinder all the way off the top of the piston so had to start over.  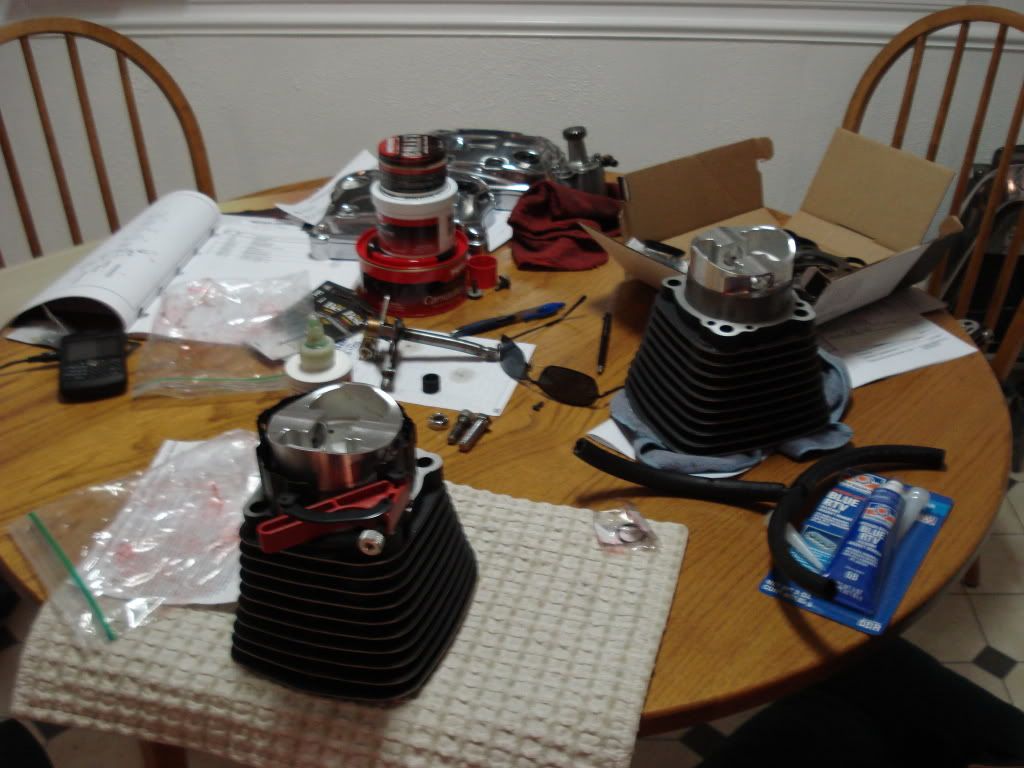 That shift pawl on the table is what came out of Betty. don't know what the PO did to bend the shaft like that, but I robbed the one from my 2000 X1 to make this work. After seeing that Betty's lifters were shot I also robbed the lifters from the 2000. Took them to the shop that assembled my cases and they said the 2000 lifters with 25,000 miles look brand new so I'm not too worried about using them. | ||
Hugie03flhr |
Thank God, you remembered that clip. You would have gone 50 mile saying "this bike runs great!" Then the smoke starts  Then the sinking feeling you F-up.LOL Looks great, keep chugging Then the sinking feeling you F-up.LOL Looks great, keep chugging | ||
Pkforbes87 |
The wrist pins that came out of the old pistons had to be driven out with a socket and a rubber hammer, but the new ones slid in pretty easily with some assembly lube. Anyone know why fitment would be different? The manual said that removing the pins should be as easy as removing a circlip and pushing it out, but that definitely was not the case. | ||
Oldog |
PK as I under stand the fsm the pins are tapered ( slightly smaller on one end ) that end is marked with a ring stamped in the end face. I used a bolt and socket to pull the pins on my bike I would never strike the con rods pistons etc with any thing so as to avoid damage to the big end bearings | ||
Brinnutz |
Phil, wanna send me your piston ring compressors to borrow?? LOL | ||
Pkforbes87 |
thanks Jim, I'll know better next time. I was as gentle as possible this time removing the old pins, and looked/felt for anything out of tolerance on the connecting rods. Wilson - I got the compressor at Oreilly's. Shipping would cost more than the tool did  | ||
Pkforbes87 |
Wilson, there are two types (at least) of piston ring compressors. The type I used is "volkswagon" style and designed for engines where the connecting rods are permanently mounted to the crank. The other type is designed for engine designs in which the connecting rod can be attached to the crank after the wrist pins are already installed and the piston is in the cylinder. From what I've read they're usually used in applications where the piston will be installed from the top of the cylinder versus from the bottom.  When I bought the volkswagon style, I was thinking that I would be installing the wrist pins and then lower the cylinders over the pistons. After realizing that method would be a major PITA if not impossible, it donned on me to just get the rings in the bottom of the cylinder beforehand. Major blonde moment yeah - but don't blame me, I'm new to this wrench turning stuff  | ||
Pkforbes87 |
I hate installing intake manifolds.  Will start taking pics when I get a chance. She will hopefully be running this weekend if all goes as planned, and if I can borrow a working laptop from a friend to reset TPS. | ||
Brinnutz |
Phil, I've got an old Palm, can't you use one of those? | ||
Pkforbes87 |
Wilson - not sure. I assume anything windows based would work. My roommate's got a laptop that I'm sure I could use. He's just anal about weird shit so I'm asking a few other people before I resort to using his and listen to the inevitable whining that will follow. Mine's out of commission until I find myself a 32 bit WIN OS. My Dell self destructed it's OS along with the recovery partition of the HD. | ||
Pkforbes87 |
got quite a bit done today, and just put Betty through her first heat cycle. By the time I get off work tomorrow morning I'll be going on 36 hours without sleep but hearing her roar to life tonight makes it all worthwhile. I thought I might get a second heat cycle in before work but her battery is dead. I'll put the charger on it overnight and get started again tomorrow! | ||
Pkforbes87 |
on a side note.. is it normal for a newly rebuilt engine to put out a horrid burning odor? I'm guessing it's just all of the assembly lube burning off because the cylinder walls still had a bit on them from assembly, but man does this thing stink! | ||
Brinnutz |
wewt....git 'r done. | ||
Wile_ecoyote |
Nice job Pk! Yes, it will stink like hell for at least the first 100 miles. Lubes and coatings getting burnt up/in. Looking good man. | ||
Pkforbes87 |
Thanks matt, I think the ceramic header coating is contributing to the smell of death too.. I noticed it smoking a bit at the end of my 3 and 4 minute heat cycles. I got a stainless oil line made for the oil pump to filter housing portion and it was weeping a little from under one of the crimps. Got a new one made this morning with a 45* an fitting on the filter housing which puts less strain on the crimp. The new line doesn't leak so there's one less problem. Now I have to figure out why the tps was at 7.1% and afv at 115%. The bike came with forcewinder/vance & hines, now its got forcewinder/ d & d and doesn't want to idle any below 6% tps. If anyone has an ecmspy map file they could send me from a KNOWN factory race ecm I'd be interested to compare and see if my maps have been altered before. This weekend I'll have time to do the 20 minute ride heat cycle, so should get some time spent in closed loop and get an idea of where I'm at.. | ||
Oldog |
PK please explain "heat cycling" | ||
Cyclonemick |
I believe he is refering to letting the bike warm up to normal operating temps and then letting them cool down to cold conditions. I have heard people use this method a series of times to help seat rings and or any other componets which results in the bike being broke in and ready for normal riding or extreme riding conditons with out hurting motor. Don't know if it is beneficial or not??? | ||
Kyrocket |
Heat cycling is a big can o' worms. The literature I got from N**S's website says to DEFINITELY do it. One minute, cool down, two minutes, cool down then up the times. I can't remember the exact procedure right off but you get the picture. Others say jump on and flog the beast, the rings will seat. I don't know what I'll do to break mine in, I'll be so paranoid looking and listening for stuff. | ||
Pkforbes87 |
yep the 1250 kit came with instructions that say to start the motor for the first time - let it run 1 minute, then let it cool completely. repeat for 2, 3, and 4 minutes respectively. The next step is to start it, warm it to normal operating temperature and go for a 20 minute ride, then let it cool completely. Then just follow normal break-in guidelines staying under 3200 rpm for 500 miles. That's what I'm doing with mine - I haven't the time or money to experiment with methods that the company that made my top end does not recommend. | ||
Pkforbes87 |
here's a last minute shot.. all of the polished is covered in oily fingerprings right now, and the front wheel still needs to be swapped for my powdercoated one, but at least she runs I tried to add lots of small touches that only a tuber buff will even notice. 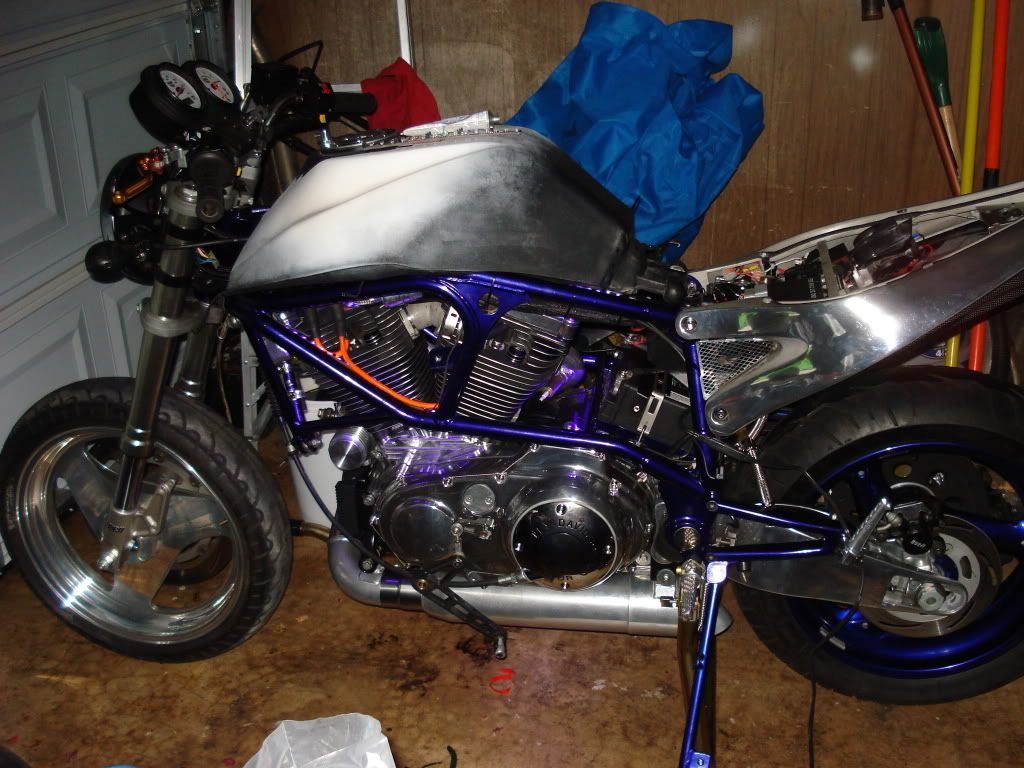  This week should be the last of my 12 hr shifts for a while, so I can get the final touches completed and take thorough pictures. And best of all actually ride her! God willing, Betty will be at homecoming with break-in complete! | ||
Wile_ecoyote |
The neons are not my thing, BUT, I must say its scrumptious. I had looked and added up about 12 different mods youve done so if anyone else wants to play , "guess what Pk's done" proceed. LMAO, looks great dude really does. Good on you. Now, lose the passenger pegs! | ||
Kyrocket |
So tell me PK, did you assemble the whole motor then put it in the bike or assemble some of it, put it in and finish it while in the bike? I can't decide if I want to assemble in exact order as disassembly or assemble more while it's out and have help getting it back in. I dropped it out myself and that bottom end is HEA-VYYY. | ||
Phelan |
hand levers Headbolt covers Plug wires Hurricane oil filter Footpegs Banks shifter Tail screens Derby cover Carbon undertail Frame plugs The ones I can't tell for sure XB signals? XB rockerboxes? Billet front mount? | ||
Pkforbes87 |
Kyrocket - I put the bottom end in the motor first because I don't have a stand or anything to hold the engine in place while I work on it - so I used the frame for that instead Tranny, primary, starter, top end all got installed with the engine in the frame. BTW I got the engine into the frame by basically "hanging" it under the frame with tow straps, and lifting it until I could bolt it onto the swingarm mount block. Phelan - the Banke shifter is just on there so I can go in and out of gear while working on the bike. I got a 01+ shifter polished that will be used on the finished product. No XB signals, the front signals have been shortened by pulling out the plastic midsection of the stalk, and I got lenses from a Blast so they're tinted a little darker than before. And you're right, the front mount is billet. I had heard before that installing XB rockers into a tube frame was difficult because of clearance issues with the motor mount, but those rocker covers were the easiest thing in the world to install. Maybe the billet mount is just machined differently with specific clearance for XB covers. (Message edited by pkforbes87 on May 14, 2009) | ||
Kyrocket |
You forgot the screwdriver on the headlight and the tube of glue on the tank for when things vibrate loose. | ||
Phelan |
rep to you for noticing the glue, but I'm now looking at this picture full screen on a 42" HDTV and still don't see the screwdriver. Am I blind? BTW, did you polish the side of the engine case? (Message edited by phelan on May 14, 2009) | ||
Lowroad |
i think he's looking at the aftermarket lever and thinking it's a screwdriver. | ||
Pkforbes87 |
The tube on the tank is actually dielectric grease I've been using on all the electrical connections to keep moisture out. Safety wire and zip ties are what keep thing from vibrating loose And yep the whole engine is polished. The cases are missing a couple spots on the bottom that are only visible from underneath the engine. | ||
Kyrocket |
Oh yeah, I see that now. It looks like a orange and black handled screwdriver laying across the headlight bucket. My bad, my bad. | ||
Pkforbes87 |
More progress! The odo went from 6677 to 6700 today! That's the last of my heat cycles. Next I'll swap the PM front wheel with the nuke blue cast wheel (complete with brand new strada), then change the oil and work on getting close to that 500 mile mark. Just to be safe I bumped the race map up 10% richer this morning before my ride, and when I got back the AFV was at 90.2% so I guess I erred on the safe side. I was a little worried about having an intake leak as I've got a bad track record with installing the gaskets properly, but there was no sign whatsoever of the RPMs trying to hang. It was kinda neat.. riding down the highway I could tell almost the instant I got into closed loop mode from my right leg warming up. For a minute there I thought the ceramic coating was just insulating REALLY well  Oh yeah forgot to mention.. I thought D&D sounded mean before. HAHA - with higher compression the sound coming out of that pipe is just scary. (Message edited by pkforbes87 on May 16, 2009) |