| Author | Message | ||
Oldog |
Heres the top bar with the frame end loose, they are stiff on turning on the bolts but they can be made to swivel the bars check out ok   The rear iso is to be removed from the frame end [ NO WAY! ] this is easier and the mount block / ground should be checked from time to time ( that�s chassis ground ) in front of the tie bar end. I removed the isolators for the rear end, on both sides the swing arm mount bolt was a fraction on an inch above the mount this provides a machined surface for the isolator to be clamped to.  | ||
Oldog |
I opted to replace the bolts because they were corroded and tracked up indicating that the bearings were slipping on them. the left bolt was horrific to remove last time.  I had the swing arm off one year early but I was in that far so I checked and added some grease, the seals must be replaced as removal damages them, I check the outer races for grooving they stain before a discernable notch is pressed into the race.  The race is good till next inspection, there are no notches that you can feel, remember that this bearing does not turn a complete revolution but sees the suspension loads for the rear.  The isolators that I removed were like the last ones (originals) not torn or damaged in any discernable way and would likely be good for another couple of years, in order to rule out, bad rear isolators causing front isolator failure I changed them. [ after a discussion with Jramsey its possible that the softer isolators can contribute to front iso overload / fail ] I would limit the service life of these parts to about 4 years.  here are the new rear isos being prepped for install, I was extra careful to get the roll pin located , scuffs on the old ones indicated that the pin was off just a bit, these were located and marked, at assembly they were checked with a mirror to insure that the pin was exactly where it needed to be. As stated in the FSM anti seize was applied to the heads I also apply Blue loctite and torque to the specified 65 foot pounds. I pulled the front engine mount heres the failed Barry mount. | ||
Oldog |
 The safety washer ( the D washer ) is starting to cut into the mount, The previous mount was much the same. It had totally failed at the point that I had removed it, it had been used for over a year, the number on this part is 28043, it is noticeably softer than the DRAG SPECIALTIES mount that I am testing.  I am pulling the rubber back with my thumb its quite soft.  the Drag Specialties part is harder typically harder elastics have a higher load rating for isolators like these. My Comments : This was an exhausting day it was cold and over cast which makes working in my little space more difficult. I started a little later in the day than I wanted to and had to hustle. The reassembly was a bit trying as I used a ladder to secure the tail section and position it the engine was balanced on jacks it can be a trying experience as you fit the side plate and right iso. The front mount was changed in about an hour [practice makes perfect] I need to revise the posted procedure, some one who is better at this could do it in about 45 min or less  At 51 getting up and down is a bit of a pain, as is working by lantern light I hope that the problem can be isolated and corrected. Dealing with this sucked! 6 month life spans for engine mounts indicates that there is a problem based on my inspection of my bike it was the OE isolator. the attention of Buell motorcycle is in order. My 80$ worth � I will be posting mileage and condition comments as time goes on. (Message edited by oldog on March 18, 2009) | ||
Oldog |
Revised Front iso change 1. Place the cycle on jack stands at the rear ( passenger foot rests ) 2. place a bottle jack and a block if desired under the engine sump 3. remove the seat and tank 4. tools for iso removal �� end wrench, � socket & ratchet, 9/16� end wrench, u-joint socket, short wobble extension, regular socket, deep socket, longer (8�) wobble extension 5. loctite. From the right side, fit the �� end wrench to the top nut of the hanger bolt and d washer assembly reach in front of the weld joint of the 2 tubes. Fit the �� socket and ratchet from between the forks. The front wheel can be held to help secure the machine as the force to loosen the bolt is significant. loosen and remove the bolt D-washer etc there are 2 washers one is between the motor mount and the hanger. slip the 9/16 end wrench between the rocker box and the frame on the right side from behind the weld at the two tubes. fit the open end on the nut hold it with the left hand. place the short u-joint socket on a short wobble extension and place those on the head of the right hand mount, remove bolt. move to the left hand side of the machine, move the wires and throttle cables to reveal the left bolt head, if needed you can unhook and remove the electrical connectors / cables and thread them back out of the hole, make note of the ORDER that you do this as it will be critical to re install. fit the end wrench to the bolt head ( top) assemble the deep socket and the long wobble extension turn the nut off of the bolt remove the wrench and then the bolt the D washer and the isolator remove from the right hand side of the machine, Assembly is in the reverse order of removal. Use the jack to hold and position the motor for inserting the hanger bolt. You will probably have to raise the motor slightly to get the bolt in. 3/8� bolt (9/16�) head torques to 35 ft# �� hanger bolt torques to 110 # I blue loctited all fasteners. | ||
Gowindward |
Jim, the brown truck arrived at my place last night with isolators with both a stock isolator and the Drag Specialties part. I installed the DS part on my S2. It is a much harder durometer, like you said. It was so stiff that when letting the weight of the engine down onto the isolator there was still a gap between the isolator and the D washer. From my experience with the stock isolators they move and the D washer settles down on top of the rubber. Did you see the same thing on yours? I didn't like the looks of it that way and pulled the D washer back off and placed a 2 " dia. washer under the D washer that I had ground a flat on one side to match the D washer profile. That filled the gap, which I felt would be better for the isolator long term. | ||
Oldog |
My D washer sank to the top of the rubber shortly after I installed it, with the new iso. I take it you have scrapped the strut. What condition are your rear isos in? are they soft the new ones are rock hard by comparasin | ||
Blackm2 |
Is the Drag Specialties part a "Barry" isolator too? | ||
Oldog |
No there were no identifying marks on it of any kind, some have been reported as LORD ##### wich is LORD manufacturing co. | ||
Gowindward |
Jim, I still have the strut on the S3T. I have another one made for the S2, but with the DS part being higher durometer I wanted to give it a go in the stock configuration. The rear isolators look okay, but I've not seen what failed ones look like, so not sure. The bike has less than 5500 miles on it, but then again it's 13 year old rubber. | ||
Oldog |
Loren, James and I had Isos that looked ok I "think" that they get soft and sag as they get old, [ like a lot of things that we have =) ] I am beginning to suspect that the rear mounts can play a part in premature front iso failure. | ||
Gowindward |
Jim, the rear iso's are hard as a 17 year old's...... I do feel more vibration in the foot pegs than I think should be there. I may go ahead and order parts and replace them for piece of mind. | ||
Buellistic |
The softer the ISOLATOR(s) RUBBER the less VIBRATION and the shorter the isolator life ... | ||
Jramsey |
Loren, I changed out my rear isos on the S3 Friday night and when riding both Sat@ Sun and immediately noticed the difference in handling plus the vibration is now more consistent. My S3s isos didn't look bad but the frame had dropped down far enough to make contact with the rear headpipe.Now there is a strong 3/16" between the two. Went out yesterday on the X1 which has the original isos (front and rear) and noticed when I shook the bars at speed the bike shimmied like a bowl of Jello.... just like the S3 did before the iso change. | ||
Buell_lee |
I just want to take this opportunity to thank all you guys for all this information especially Oldog it has been a great help to me I cant remember who it was but someone earlier on said that it was bad Karma reading a thread about Buell Isos, whoever it was new what they were talking about. I knew that one of my bikes needed a new one after my Tasmanian trip. When I picked up the Isolator from the dealer it was a 79-D so I took the guy outside to show him the difference on the one I had on my other bike and yes you guessed it that one was gone too. | ||
Gowindward |
I'm back to waiting on the Brown truck. I ordered rear iso's for both the S2 & S3T. The S2 vibrates really bad in the foot pegs below 3500 rpm. Does not feel right. The S3T feels great at all rpm's, feels tight in handling, and has a strong 3/16" spacing between the header and frame, but I figure I will get the parts and have them on the shelf. They were about $18 for the pair, so not much for a set of spares. | ||
Gowindward |
Here's the DS isolator installed and supporting the weight of the engine. I didn't like the gap under the D washer  So I installed a washer under the D washer as a shim. 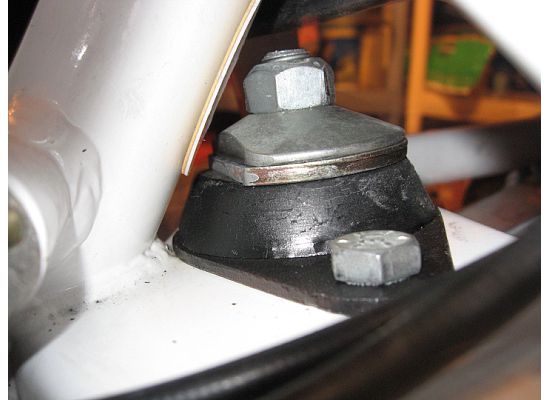 | ||
Brinnutz |
I got my stocker out the other day. I'll have to post pics of it when I get a chance. Nice litte tear down the bottom, rear side. | ||
Oldog |
Buell_Lee you are more than welcome, My hope is that we can come up with the root cause of the failure issue and perhaps make an improvment in longevity, Loren there is a small gap at the flatted side on mine, the rear (motor) side is touching, I will be interested in seeing what happens there with the spacer you added, I think that 4 years of service is about the max safe life, for the rear maybe? the front issues still seem to point to too soft of a rubber compound. Brin did the part rip at the outside or around the insert tube? | ||
Gowindward |
Jim, I agree on the front being to soft a rubber. Hopefully the DS part ends our issues. I think the problem on my rears on the S2 is certainly age and not miles. I'm thinking the rubber is aged and very hard. | ||
Oldog |
Loren the parts being HARD may be good if the bond is not broken I almost said being hard is good =O The X1 shakes like hades! the varnish is just starting to flake off of the isos ( all three ) did I mention that it SHAKES! A brief spate of hooliganisim caused no ripping. | ||
Jramsey |
Jim, just a FYI I picked up another 16207 -79D this weekend and moulded in the rubber it says. LORD J 21920 Made in China 23-08 Looked at the one I put in the S3 last summer and it says the same. | ||
Fullauto |
I'm sure you guys have jinxed me. I just went out for a ride and at about 30 miles per hour in a back street I felt the old familiar vibration. Pulled over and, sure enough, the left front engine mounting bolt had snapped and the boss on the right hand side had cracked through, again! This is the second time in about 8,000 km (5,000 miles). My X1 wears a NRHS billet mount, which, when I fitted it after the first breakage seemed to be the first time this had happened with a billet mount. The last fix had lasted about 30,000 km after the original Buell engine mount broke. It appears on all occasions that the left front mounting bolt breaks first, followed by the other damage because the other side can't take the weight of the engine itself. I fitted it all up last time as per Buellistic's instructions and this time it lasted the shortest time of all. I wonder if a higher grade of mounting bolts might end the problem. Any ideas? | ||
Oldog |
most likely will, Al sells the bolt kit, I would say that following the Factory install directions is a must. what condition is the rubber mount in? a thought what condition is the clamping face for the head mount in ( the 2 spots at the ends of the cast in bosses on the cylinder heads ) | ||
Fullauto |
A slight chip on the left inner thread but not something significant I would think. I replaced the front iso last time I fixed it and it seems fine. Both times before the front iso was torn. The left hand bolt seems to be the starting point for this trouble so maybe a higher grade bolt in this application only maybe? This is really starting to annoy me. I don't mind doing the work on the bike, which is quite therapeutic, but by the time I get the parts together, strip everything off, get the head welded and get it all back together it's the best part of a month gone. This time I'll pull the top ends and replace the base gaskets as well as I have a bit of a weep there on the rear cylinder. I've also ordered the pushrod bases from Al. May as well do this stuff while it's down. Likewise the manifold seals. | ||
Oldog |
Al and I talked about it and the short version He's of the opinion that a vibe frequency matches the arm freq and this tends to cause fractures, If I had the shocks and forks better sorted I would change out the mount and bolts. I wonder if fateuge(sp) sets in over time and pow, the failure is common and is predictable. | ||
Blackm2 |
Loren, something is up with your setup for sure. The fact that the D-washer doesn't settle down on top of the isolator when the weight is set on top of it is strange. Where is it hanging up that it does that? That would cause an extra amount of shearing on the bottom half of that isolator. | ||
Limitedx1 |
excuse me for my ignorance but....can the front top rubber iso be changed without taking the wishbone mount out of the head? i just replaces all three of those bolts last year but never checked my iso. and my bike shakes bad and now since i replaced the rear iso's i have a funny dash shake not when the engine idles down from revving. what is the absolute number 1 iso to buy if i get a new one! | ||
Gowindward |
David, that is a Drag Specialties isolator and the rubber is much harder than the OEM part. The rubber just didn't flex as much when the weight of the motor was applied to it. I put the washer in under the D washer, so that the load was being applied to the top surface of the isolator and not to the internal steel sleeve in the isolator, so I don't think it causes any extra amount of shear load to the bottom half of the isolator.  | ||
Blackm2 |
Ron, that is the big question right now for everyone, which one is the best one. They all seem to have their upsides and downsides. You'll have to read through this whole thread, as there are part numbers. Basically there are three isolators. One you have to drill. One with harder rubber, and the current Buell application. | ||
Psycrow |
Ok if I want to stick with an OEM ISO which part number do I use between these two. I've seen both listed on some parts sites. L0501.2 or L0501.TA Psy |